

Overview
Affireo - Affiliates for WooCommerce turns your WooCommerce store into an affiliate program. Affiliates apply through a signup form on your site. Once you approve them, they share a personal referral link and earn a commission on the orders they bring in.
Everything is managed from the Affiliates menu in your WordPress admin. There you review applications, check visits and referrals, run payouts to affiliates by PayPal, bank transfer and other methods, view reports and export data as CSV. Affiliates use a front end dashboard that you place on any page with the [ppl_afw_portal] shortcode.
This is the Pro edition and it works on its own. You do not need the free version installed. If the free version is active, Pro deactivates it when you activate Pro and keeps all your existing affiliates, commissions, payouts and settings.
Requirements
- WordPress 6.2 or later (tested up to 7.1)
- PHP 7.4 or later
- WooCommerce 8.0 or later, installed and active
Installation
Affireo needs WooCommerce, so install and activate WooCommerce first. You download the Pro plugin as a zip file from your ProPluginsLab account. You do not need the free edition: if it is active, Pro deactivates it for you and keeps your data.
Make sure WooCommerce is installed and active.
Log in to your ProPluginsLab account and go to My Account > Downloads. Download the Affireo zip file.
In your WordPress admin, go to Plugins > Add New > Upload Plugin.
Choose the zip file and click Install Now.
Click Activate Plugin. If the free version of Affireo is active, Pro deactivates it automatically.
Go to Affiliates > Settings to configure your program.
Quick start
- Set your default commission
Go to Affiliates > Settings and open the Commissions tab. Enter a rate under Default commission and choose Percent of the order or Fixed amount per order. Click Save settings.
- Choose how affiliates join
On the Affiliates tab, decide whether Activate new applications instantly should be ticked. Leave it unticked if you want to review each applicant first. Add your Program terms, which appear above the terms checkbox on the registration form.
- Create the affiliate portal page
Create a WordPress page (for example "Affiliate program") and add the
[ppl_afw_portal]shortcode. Publish it, then enter that page's ID in Dashboard page ID on the Portal tab and save. - Pick your payout methods
On the Payouts tab, set the Minimum payout and tick the payout methods affiliates can choose from in their dashboard. Click Save settings.
- Approve your first affiliates
When applications arrive, the Affiliates > Overview screen shows a notice with a Review now button. You can also open Affiliates > All Affiliates and click the Pending view to see who is waiting.
- Let affiliates share their link
Approved affiliates share a referral link built from their slug, for example
?ref=yourslugadded to a store URL, or a/go/yourslug/link. Visits show up under Affiliates > Visits, and orders show up under Affiliates > Referrals.
#Overview
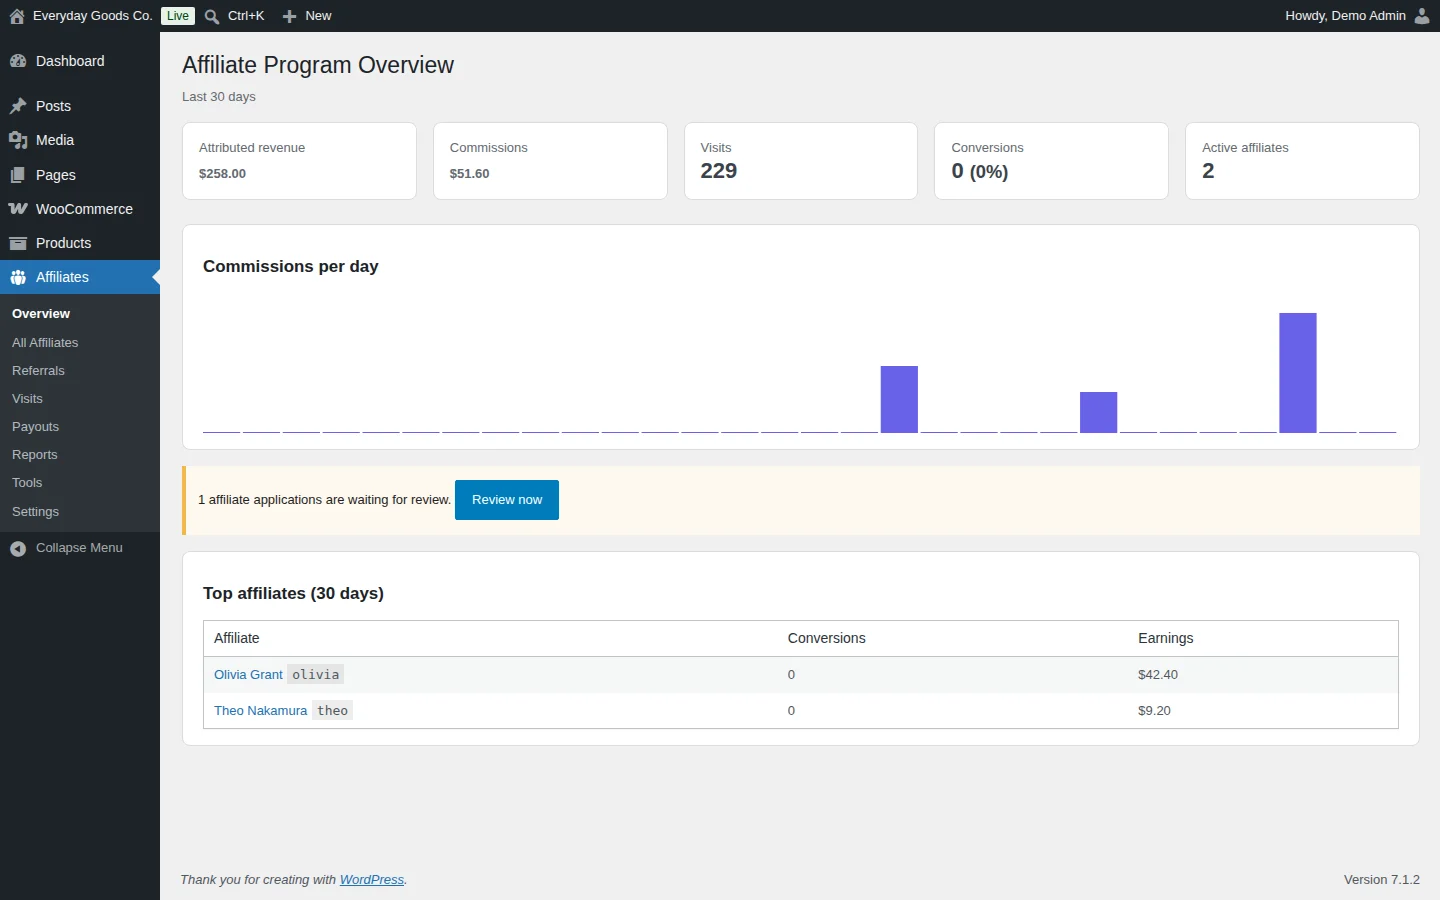
Affiliates > Overview is the first screen of the plugin. It sums up the last 30 days of your program so you can check things at a glance.
- Summary cards: Attributed revenue, Commissions, Visits, Conversions (with the conversion rate) and Active affiliates.
- Commissions per day: a bar chart of commissions over the period.
- Pending applications: when affiliate applications are waiting, a notice tells you how many. Click Review now to go straight to them.
- Top affiliates (30 days): a table with each top affiliate's Conversions and Earnings.
#All Affiliates
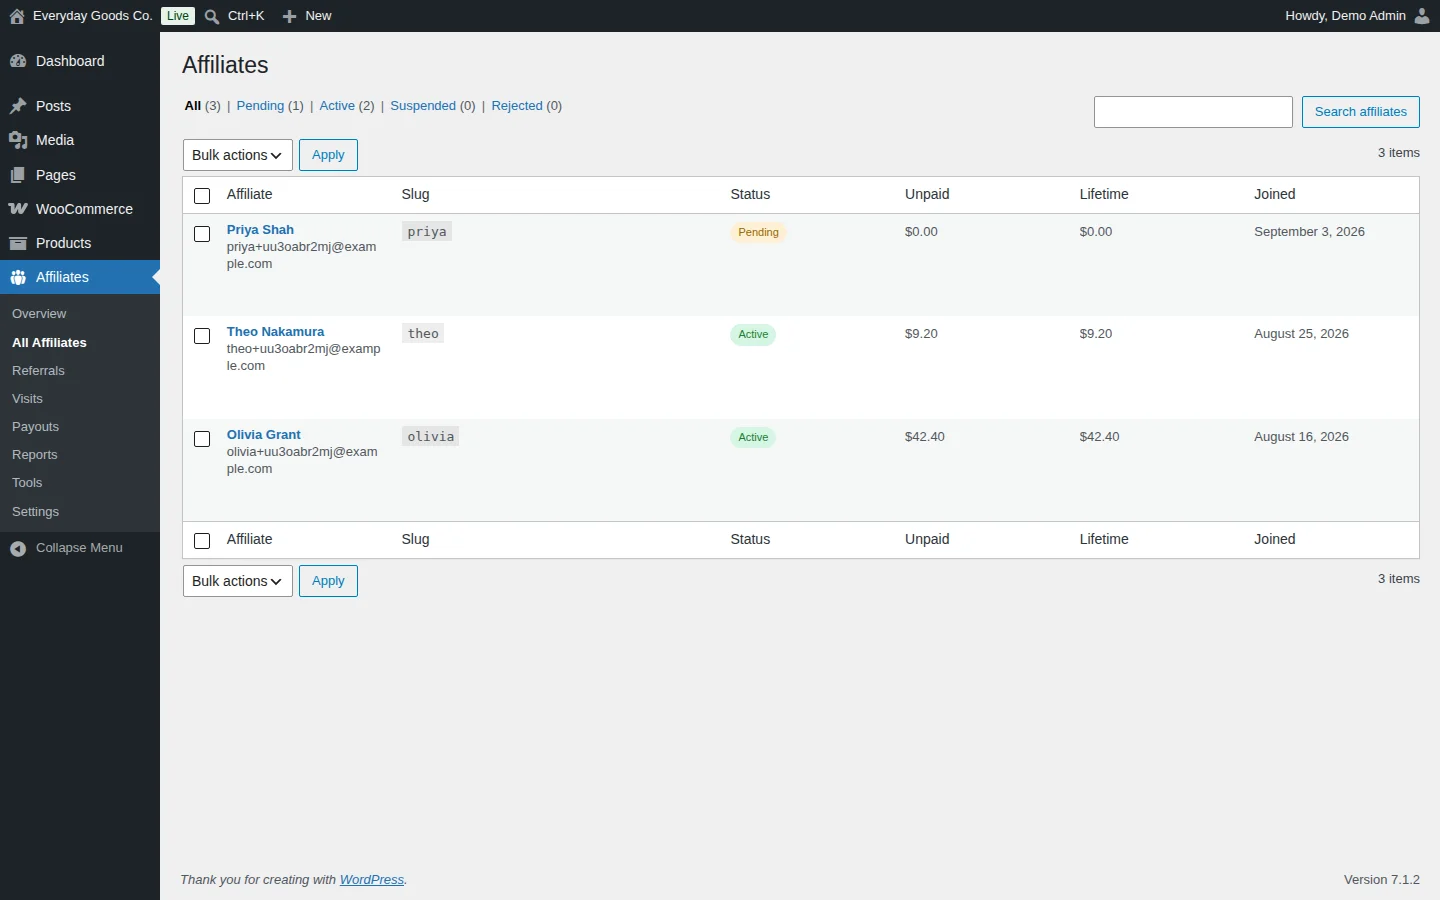
Affiliates > All Affiliates lists everyone who has applied to or joined your program.
Use the views at the top to filter by status: All, Pending, Active, Suspended and Rejected. The number next to each view shows how many affiliates have that status. Use the search box and Search affiliates to find someone by name.
The table shows:
- Affiliate: name and email address.
- Slug: the affiliate's referral slug, used in their links.
- Status: for example Pending or Active.
- Unpaid: commission earned but not yet paid out.
- Lifetime: total commission earned.
- Joined: the date the affiliate signed up.
To act on several affiliates at once, tick them, choose an option from Bulk actions and click Apply.
#Referrals
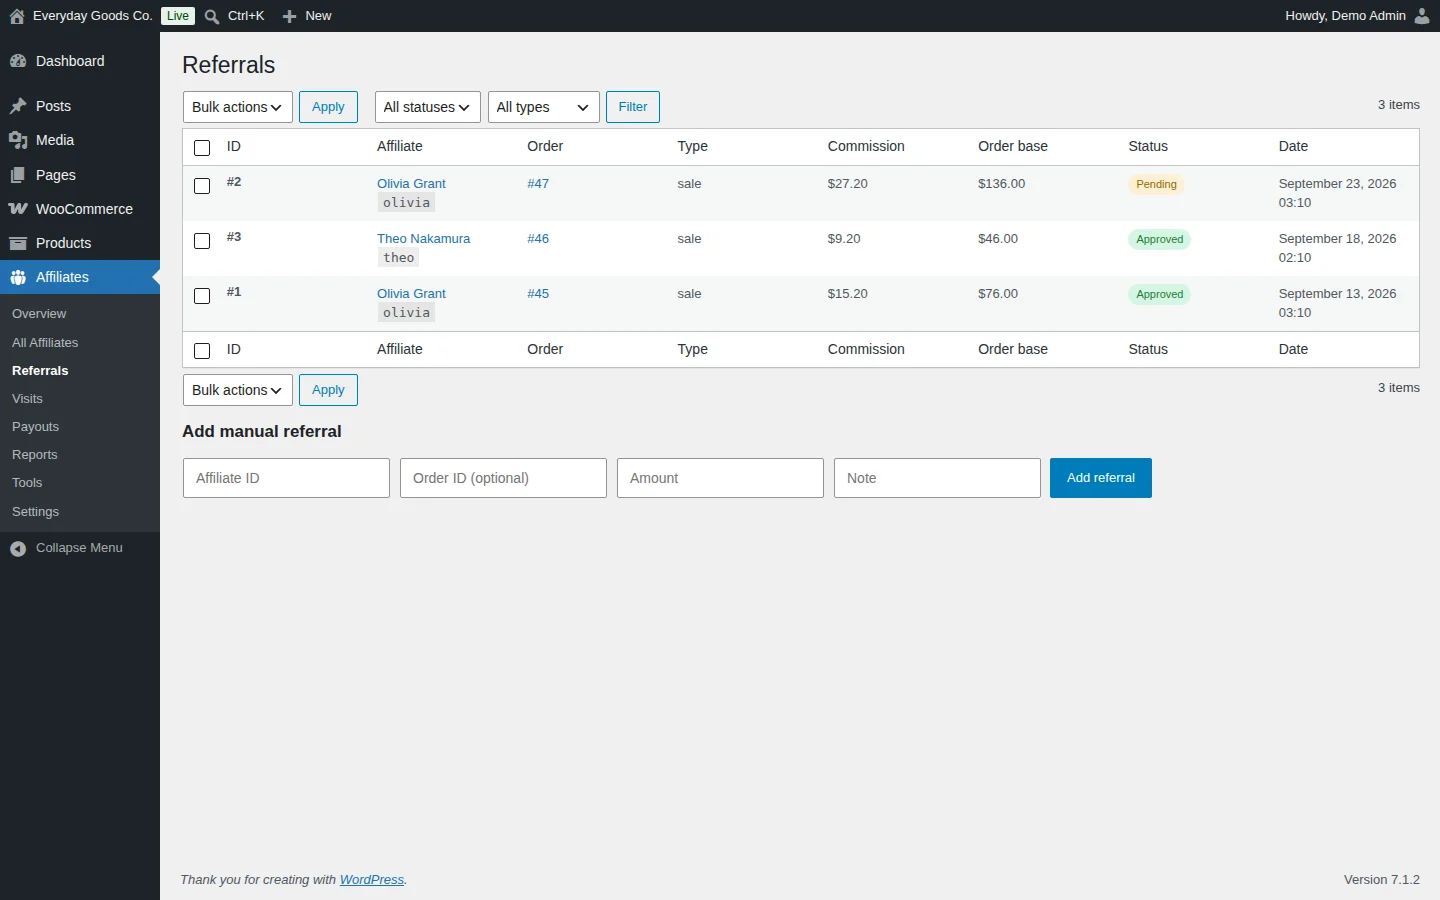
Affiliates > Referrals lists every commission recorded for an affiliate.
Each row shows the referral ID, the Affiliate, the WooCommerce Order, the Type (for example sale), the Commission, the Order base the commission was calculated on, the Status and the Date. Statuses include Pending and Approved.
Use the All statuses and All types dropdowns and click Filter to narrow the list. Tick rows and use Bulk actions with Apply to update several referrals at once.
Add a manual referral
Use the Add manual referral form below the table to credit an affiliate yourself:
- Enter the Affiliate ID.
- Optionally enter an Order ID.
- Enter the commission Amount and an optional Note.
- Click Add referral.
#Visits
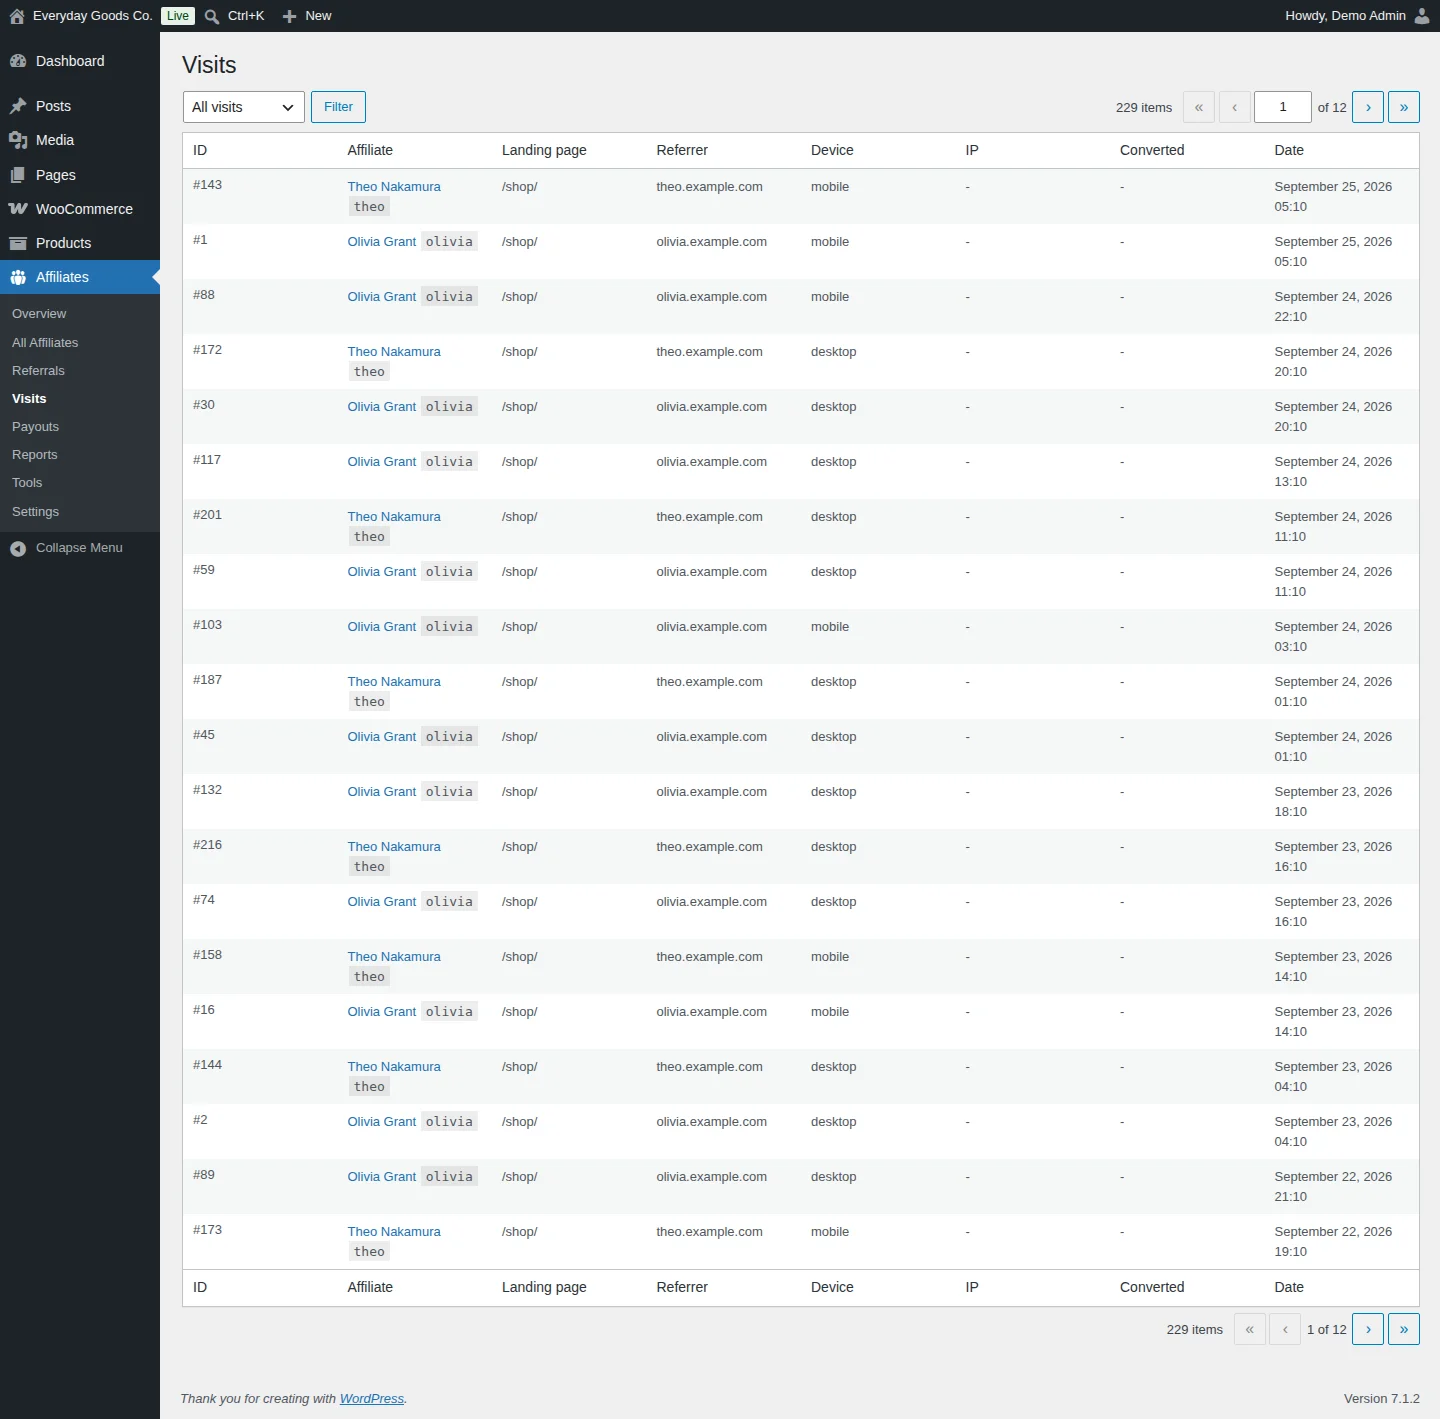
Affiliates > Visits logs every click on an affiliate link.
For each visit you see the Affiliate, the Landing page, the Referrer (the site the visitor came from), the Device (for example mobile or desktop), the IP, whether the visit Converted into an order, and the Date.
Use the All visits dropdown and Filter to narrow the list. Use the page controls at the top and bottom to move through long lists.
#Payouts
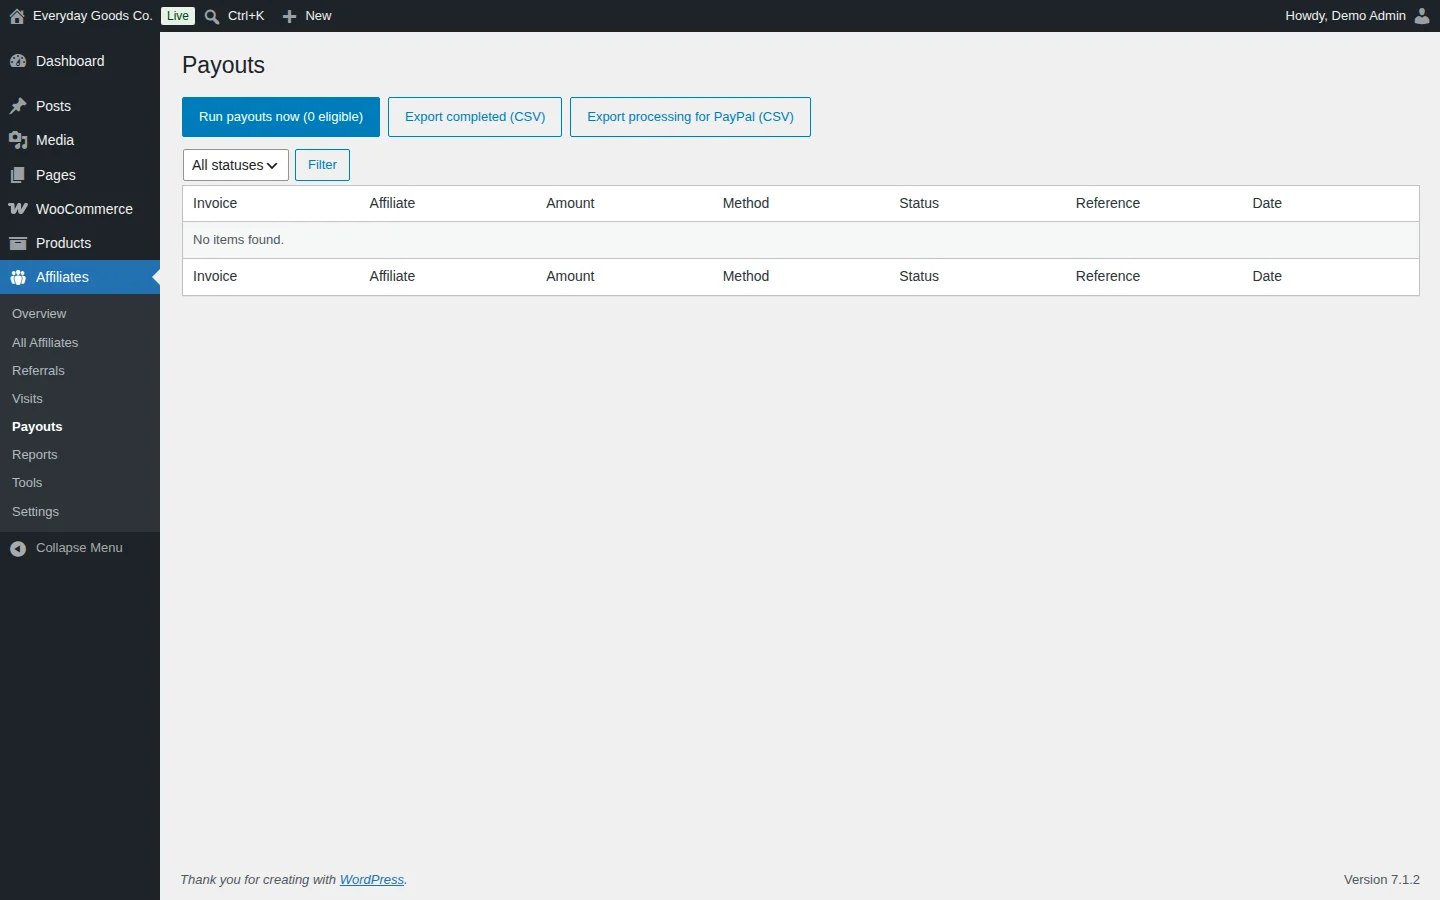
Affiliates > Payouts is where you pay affiliates and keep a record of each payment.
- Run payouts now: creates payouts for affiliates who are due one. The number in brackets shows how many are eligible. Affiliates become eligible once their approved balance reaches the Minimum payout set on the Payouts settings tab.
- Export completed (CSV): downloads completed payouts.
- Export processing for PayPal (CSV): downloads the payouts that are being processed, as a CSV for PayPal.
The table lists each payout with its Invoice, Affiliate, Amount, Method, Status, Reference and Date. Use the All statuses dropdown and Filter to narrow it.
Payout invoices are numbered in sequence. Affiliates enter their own PayPal email or bank details in their dashboard, and these details are stored encrypted.
#Reports
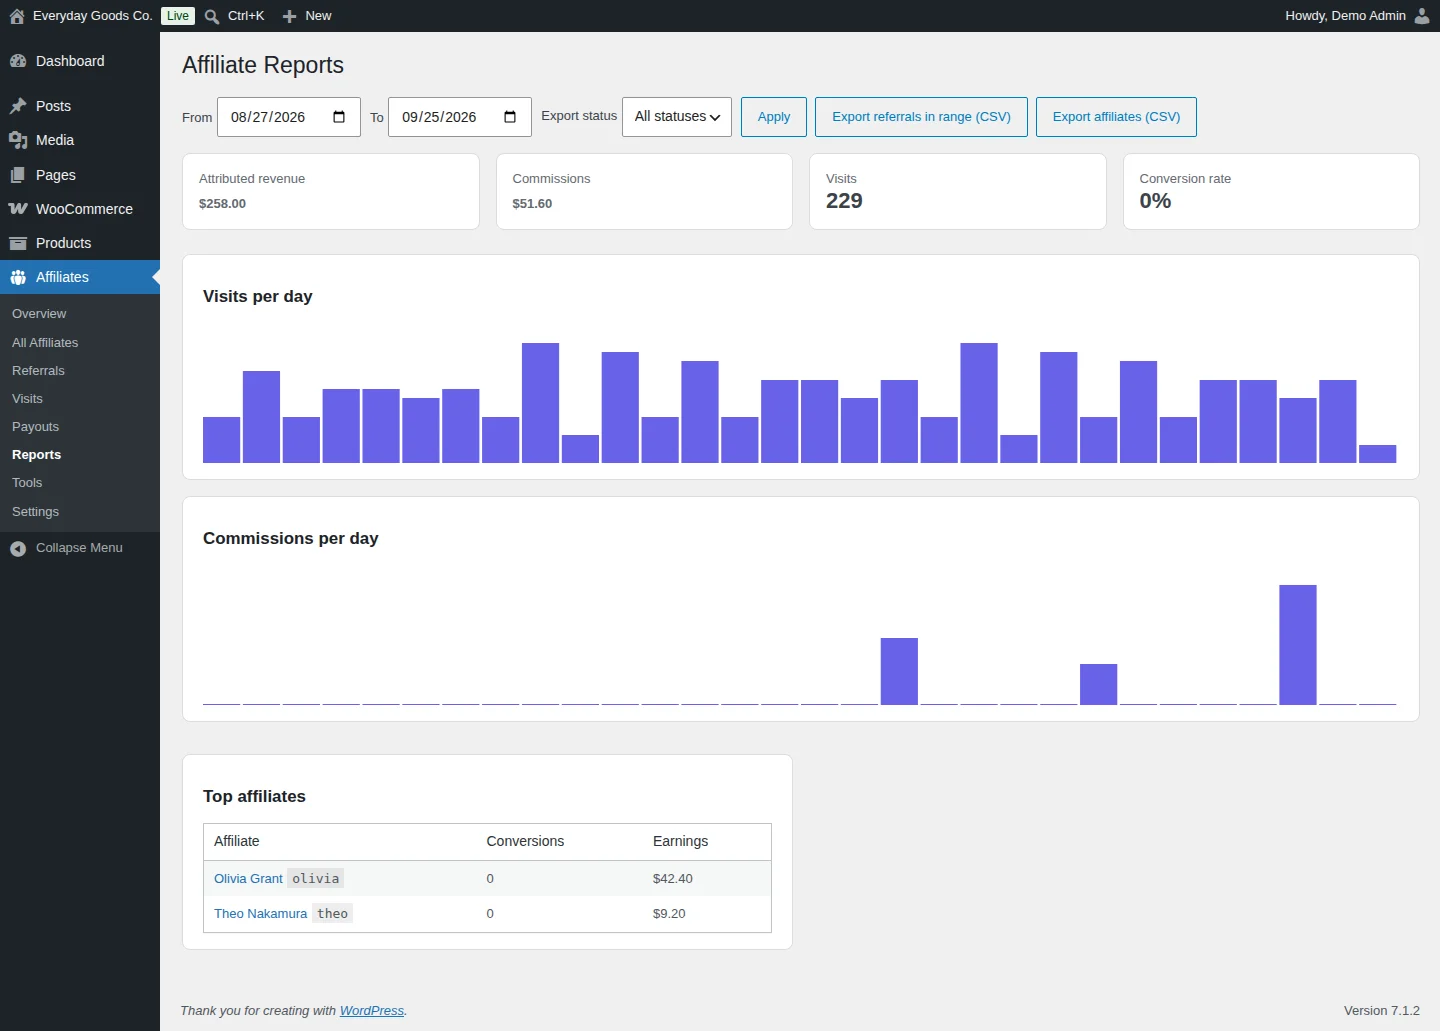
Affiliates > Reports shows how your program performs over any date range.
- Pick a start date in From and an end date in To.
- Click Apply to update the report.
The report shows Attributed revenue, Commissions, Visits and Conversion rate, two bar charts (Visits per day and Commissions per day) and a Top affiliates table with conversions and earnings.
To export data:
- Choose a status in Export status (All statuses, Pending, Approved, Paid, Rejected or Refunded) and click Export referrals in range (CSV) to download the referrals for the selected dates and status.
- Click Export affiliates (CSV) to download your affiliate list.
#Tools
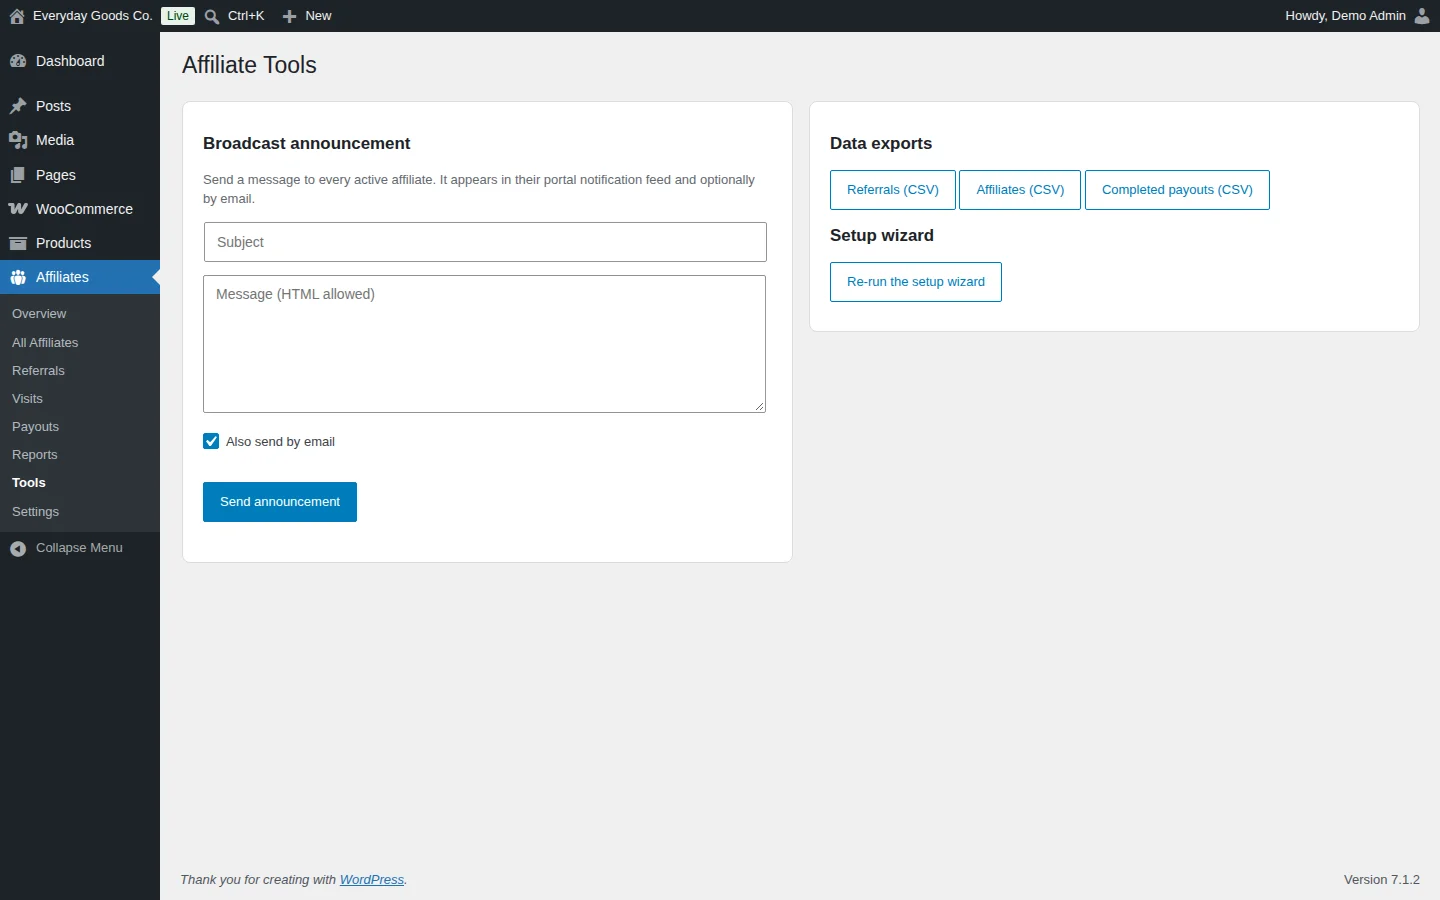
Affiliates > Tools groups a few tasks you do from time to time.
Broadcast announcement
Send a message to every active affiliate. It appears in their portal notification feed.
- Enter a Subject.
- Write your message in Message (HTML allowed).
- Keep Also send by email ticked if affiliates should also receive it by email.
- Click Send announcement.
Data exports
Download your data as CSV with Referrals (CSV), Affiliates (CSV) or Completed payouts (CSV).
Setup wizard
Click Re-run the setup wizard to walk through the initial setup again.
#Settings: Commissions
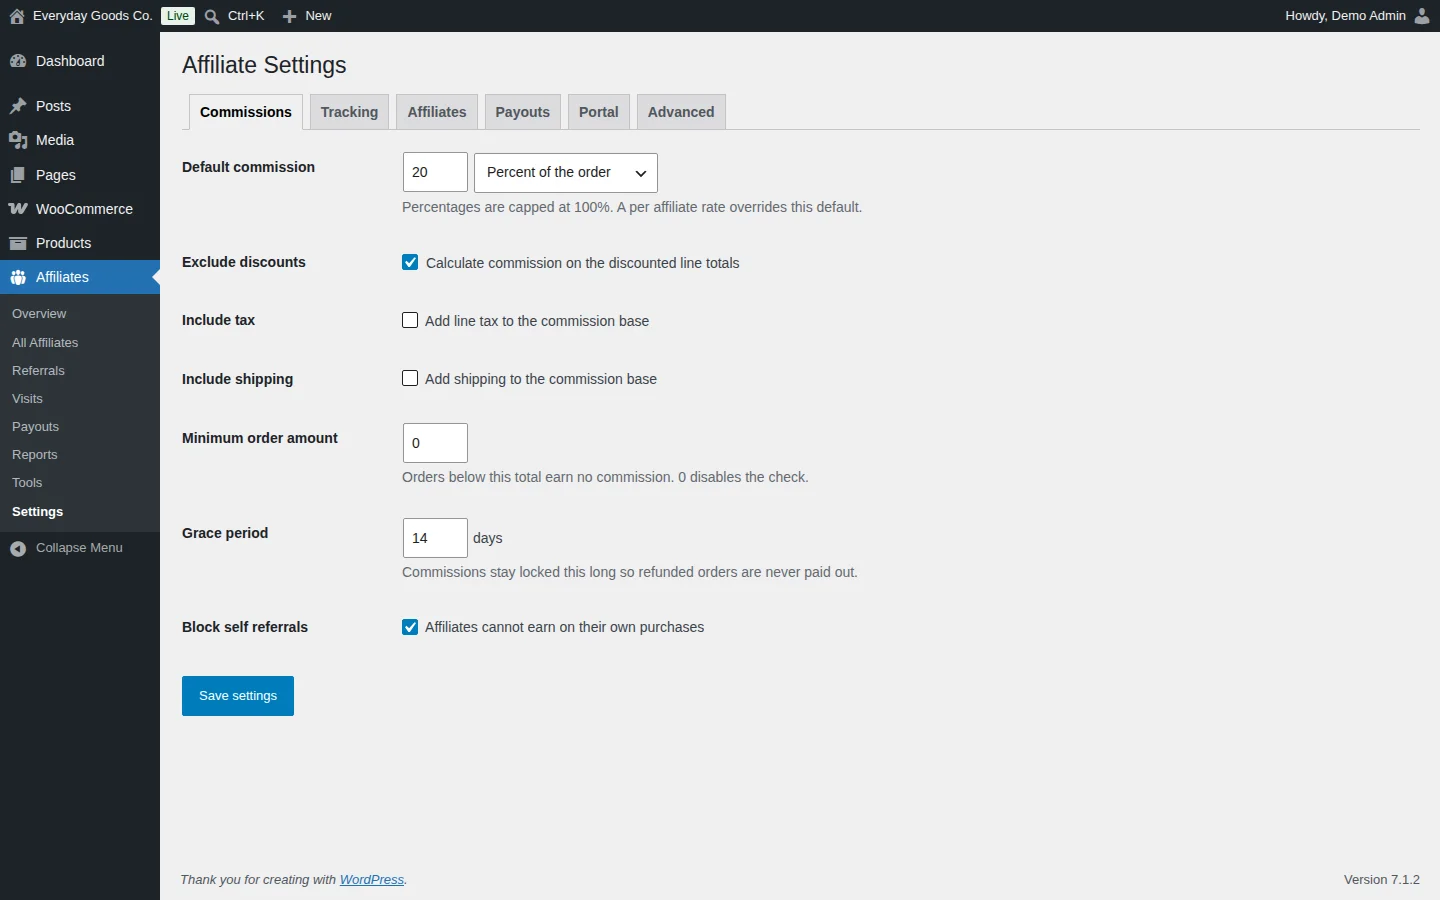
Go to Affiliates > Settings. The Commissions tab opens first and controls how commissions are calculated.
- Default commission: the rate every affiliate earns unless a more specific rate applies. Choose Percent of the order or Fixed amount per order. Percentages are capped at 100%, and a per affiliate rate overrides this default.
- Exclude discounts: calculates the commission on the discounted line totals.
- Include tax and Include shipping: add line tax or shipping to the commission base.
- Minimum order amount: orders below this total earn no commission. Enter
0to turn the check off. - Grace period: the number of days a commission stays locked, so refunded orders are never paid out.
- Block self referrals: stops affiliates from earning on their own purchases.
Beyond the default rate, the plugin supports rates per affiliate, per product, per category, per tier and by purchase sequence (for example a higher rate on a customer's first order). The most specific rate wins, and the store wide default is used last.
#Settings: Tracking
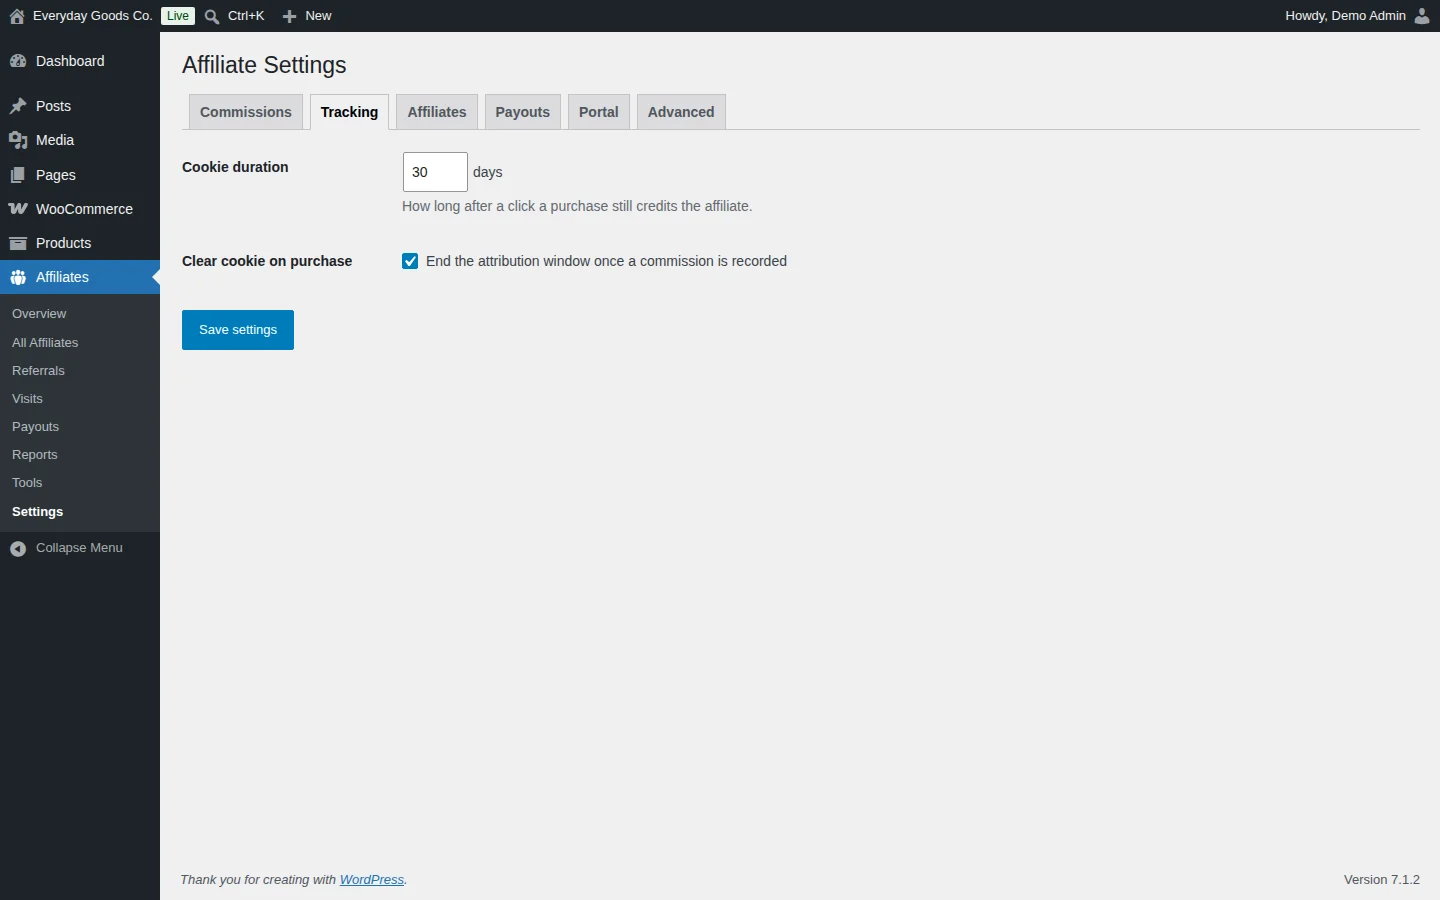
The Tracking tab controls how long a click on an affiliate link counts.
- Cookie duration: how many days after a click a purchase still credits the affiliate.
- Clear cookie on purchase: ends the attribution window once a commission is recorded, so later orders by the same visitor are not credited from that click.
#Settings: Affiliates
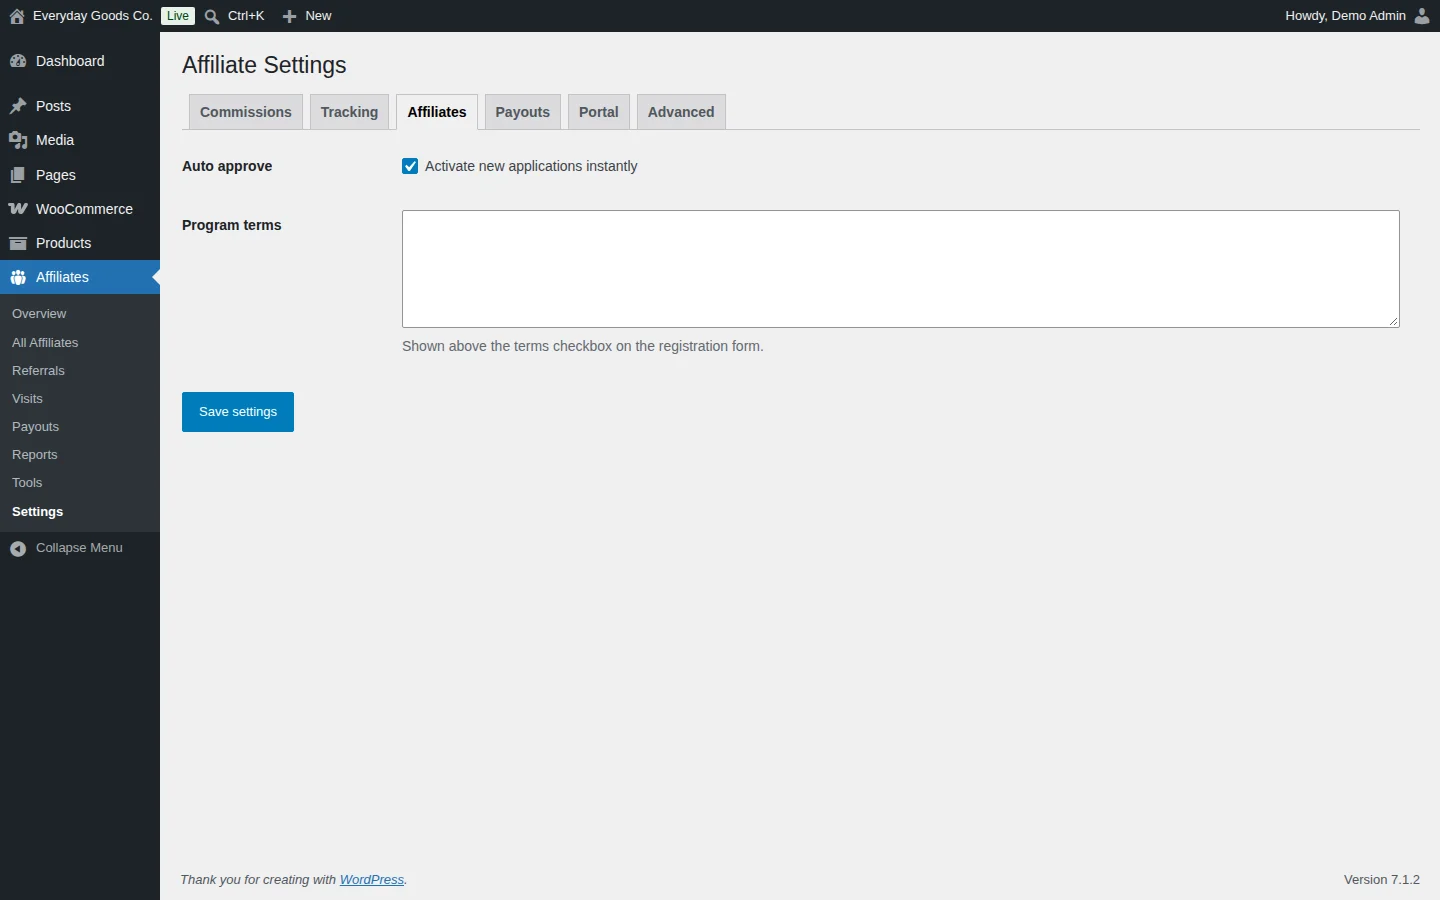
The Affiliates tab controls how new affiliates join.
- Auto approve: when Activate new applications instantly is ticked, new applicants become active right away. Untick it to review each application yourself under Affiliates > All Affiliates.
- Program terms: the text shown above the terms checkbox on the registration form.
#Settings: Payouts
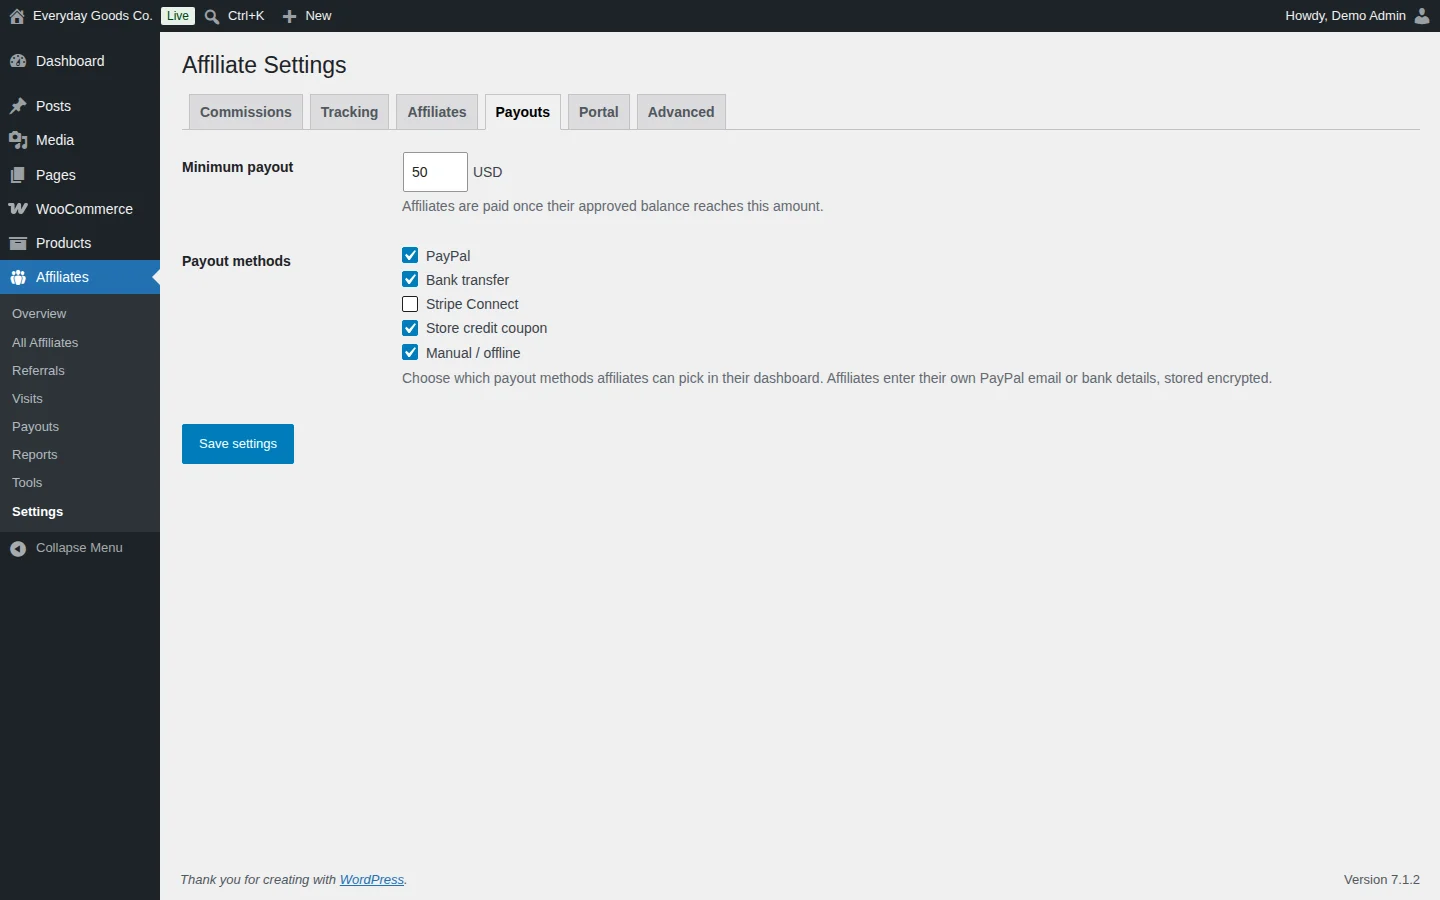
The Payouts tab controls when and how affiliates get paid.
- Minimum payout: affiliates are paid once their approved balance reaches this amount.
- Payout methods: tick the methods affiliates can pick in their dashboard: PayPal, Bank transfer, Stripe Connect, Store credit coupon and Manual / offline. Affiliates enter their own PayPal email or bank details, which are stored encrypted.
Stripe Connect does not need a separate Stripe plugin. It connects to the Stripe API directly using a restricted secret key with transfer permission, which you add under Affiliates > Settings > Payouts.
#Settings: Portal
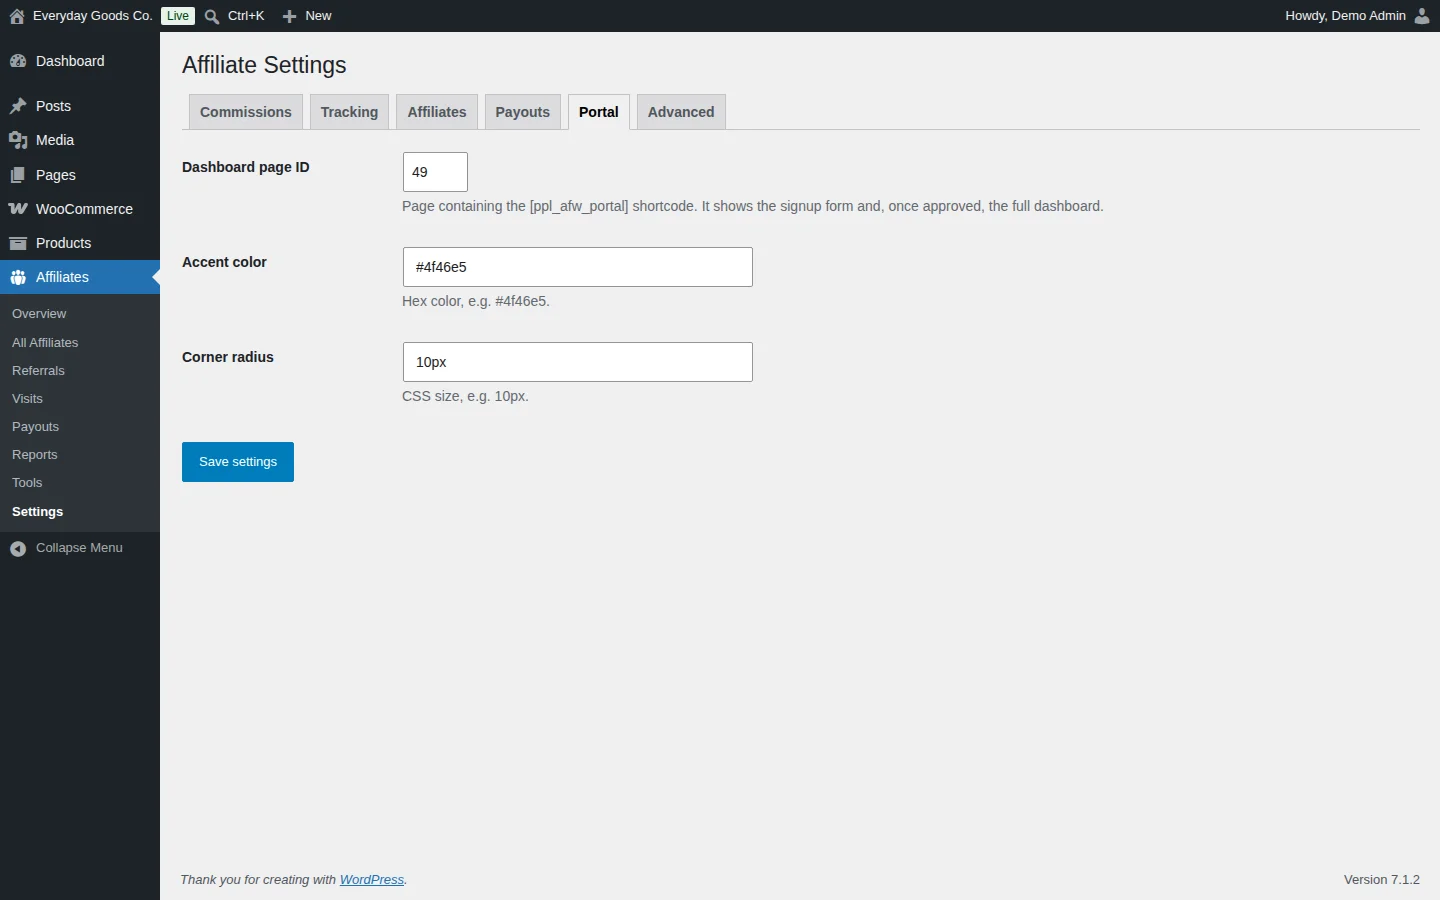
The Portal tab connects the plugin to your affiliate dashboard page and sets its look.
- Dashboard page ID: the ID of the page that contains the
[ppl_afw_portal]shortcode. That page shows the signup form and, once an affiliate is approved, the full dashboard. - Accent color: a hex color, for example
#4f46e5. - Corner radius: a CSS size, for example
10px.
To find a page ID, open the page in Pages and look at the number after post= in the editor address bar.
#Settings: Advanced
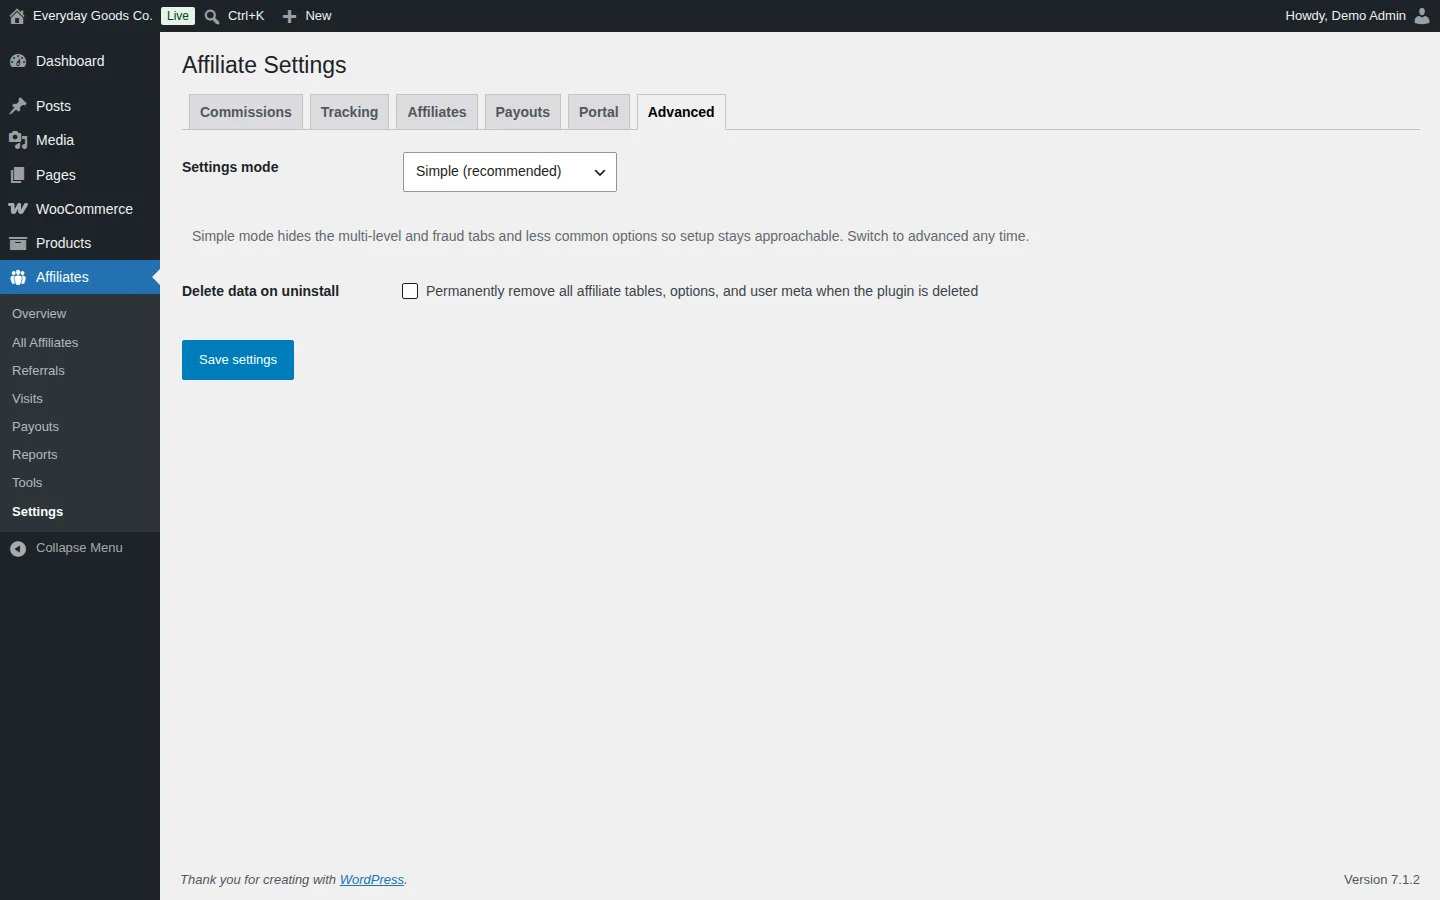
The Advanced tab has two options.
- Settings mode: Simple (recommended) hides the multi-level and fraud tabs and less common options so setup stays approachable. Choose Advanced (show all options) to see everything. You can switch at any time.
- Delete data on uninstall: when ticked, all affiliate tables, options and user meta are permanently removed when you delete the plugin. Leave it unticked to keep your data.
Settings reference
Affiliates > Settings > Commissions
| Setting | Type | Default | What it does |
|---|---|---|---|
| Default commission | number | 20 |
The default commission rate. Percentages are capped at 100%. A per affiliate rate overrides this default. |
| Default commission | select | Percent of the order |
How the default rate is applied: Percent of the order or Fixed amount per order. |
| Calculate commission on the discounted line totals | checkbox | on |
Shown as Exclude discounts. Bases the commission on line totals after discounts. |
| Add line tax to the commission base | checkbox | off |
Shown as Include tax. Adds line tax to the amount the commission is calculated on. |
| Add shipping to the commission base | checkbox | off |
Shown as Include shipping. Adds shipping to the amount the commission is calculated on. |
| Minimum order amount | number | 0 |
Orders below this total earn no commission. 0 disables the check. |
| Grace period | number | 14 |
Number of days commissions stay locked so refunded orders are never paid out. |
| Affiliates cannot earn on their own purchases | checkbox | on |
Shown as Block self referrals. Stops affiliates from earning commission on their own orders. |
Affiliates > Settings > Tracking
| Setting | Type | Default | What it does |
|---|---|---|---|
| Cookie duration | number | 30 |
How many days after a click a purchase still credits the affiliate. |
| End the attribution window once a commission is recorded | checkbox | on |
Shown as Clear cookie on purchase. Stops crediting the affiliate from the same click after a commission is recorded. |
Affiliates > Settings > Affiliates
| Setting | Type | Default | What it does |
|---|---|---|---|
| Activate new applications instantly | checkbox | - | Shown as Auto approve. When ticked, new applicants become active without manual review. |
| Program terms | textarea | - | Shown above the terms checkbox on the registration form. |
Affiliates > Settings > Payouts
| Setting | Type | Default | What it does |
|---|---|---|---|
| Minimum payout | number | 50 |
Affiliates are paid once their approved balance reaches this amount. |
| PayPal | checkbox | - | Lets affiliates choose PayPal as their payout method. They enter their own PayPal email. |
| Bank transfer | checkbox | - | Lets affiliates choose bank transfer. They enter their own bank details, stored encrypted. |
| Stripe Connect | checkbox | - | Lets affiliates choose Stripe Connect as their payout method. |
| Store credit coupon | checkbox | - | Lets affiliates choose to be paid in store credit. |
| Manual / offline | checkbox | - | Lets affiliates choose a manual or offline payout. |
Affiliates > Settings > Portal
| Setting | Type | Default | What it does |
|---|---|---|---|
| Dashboard page ID | number | - | ID of the page containing the [ppl_afw_portal] shortcode. It shows the signup form and, once approved, the full dashboard. |
| Accent color | text | #4f46e5 |
Hex color, for example #4f46e5. |
| Corner radius | text | 10px |
CSS size, for example 10px. |
Affiliates > Settings > Advanced
| Setting | Type | Default | What it does |
|---|---|---|---|
| Settings mode | select | Simple (recommended) |
Simple hides the multi-level and fraud tabs and less common options. Advanced (show all options) shows everything. |
| Permanently remove all affiliate tables, options, and user meta when the plugin is deleted | checkbox | off |
Shown as Delete data on uninstall. Leave unticked to keep your data when the plugin is deleted. |
Shortcodes
[ppl_afw_portal]
Shows the affiliate portal. Visitors see the signup form, and approved affiliates see their full dashboard. Put it on one page and enter that page's ID in Dashboard page ID under Affiliates > Settings > Portal.
[ppl_afw_portal][ppl_afw_registration]
Shows the affiliate registration form.
[ppl_afw_registration]On your site
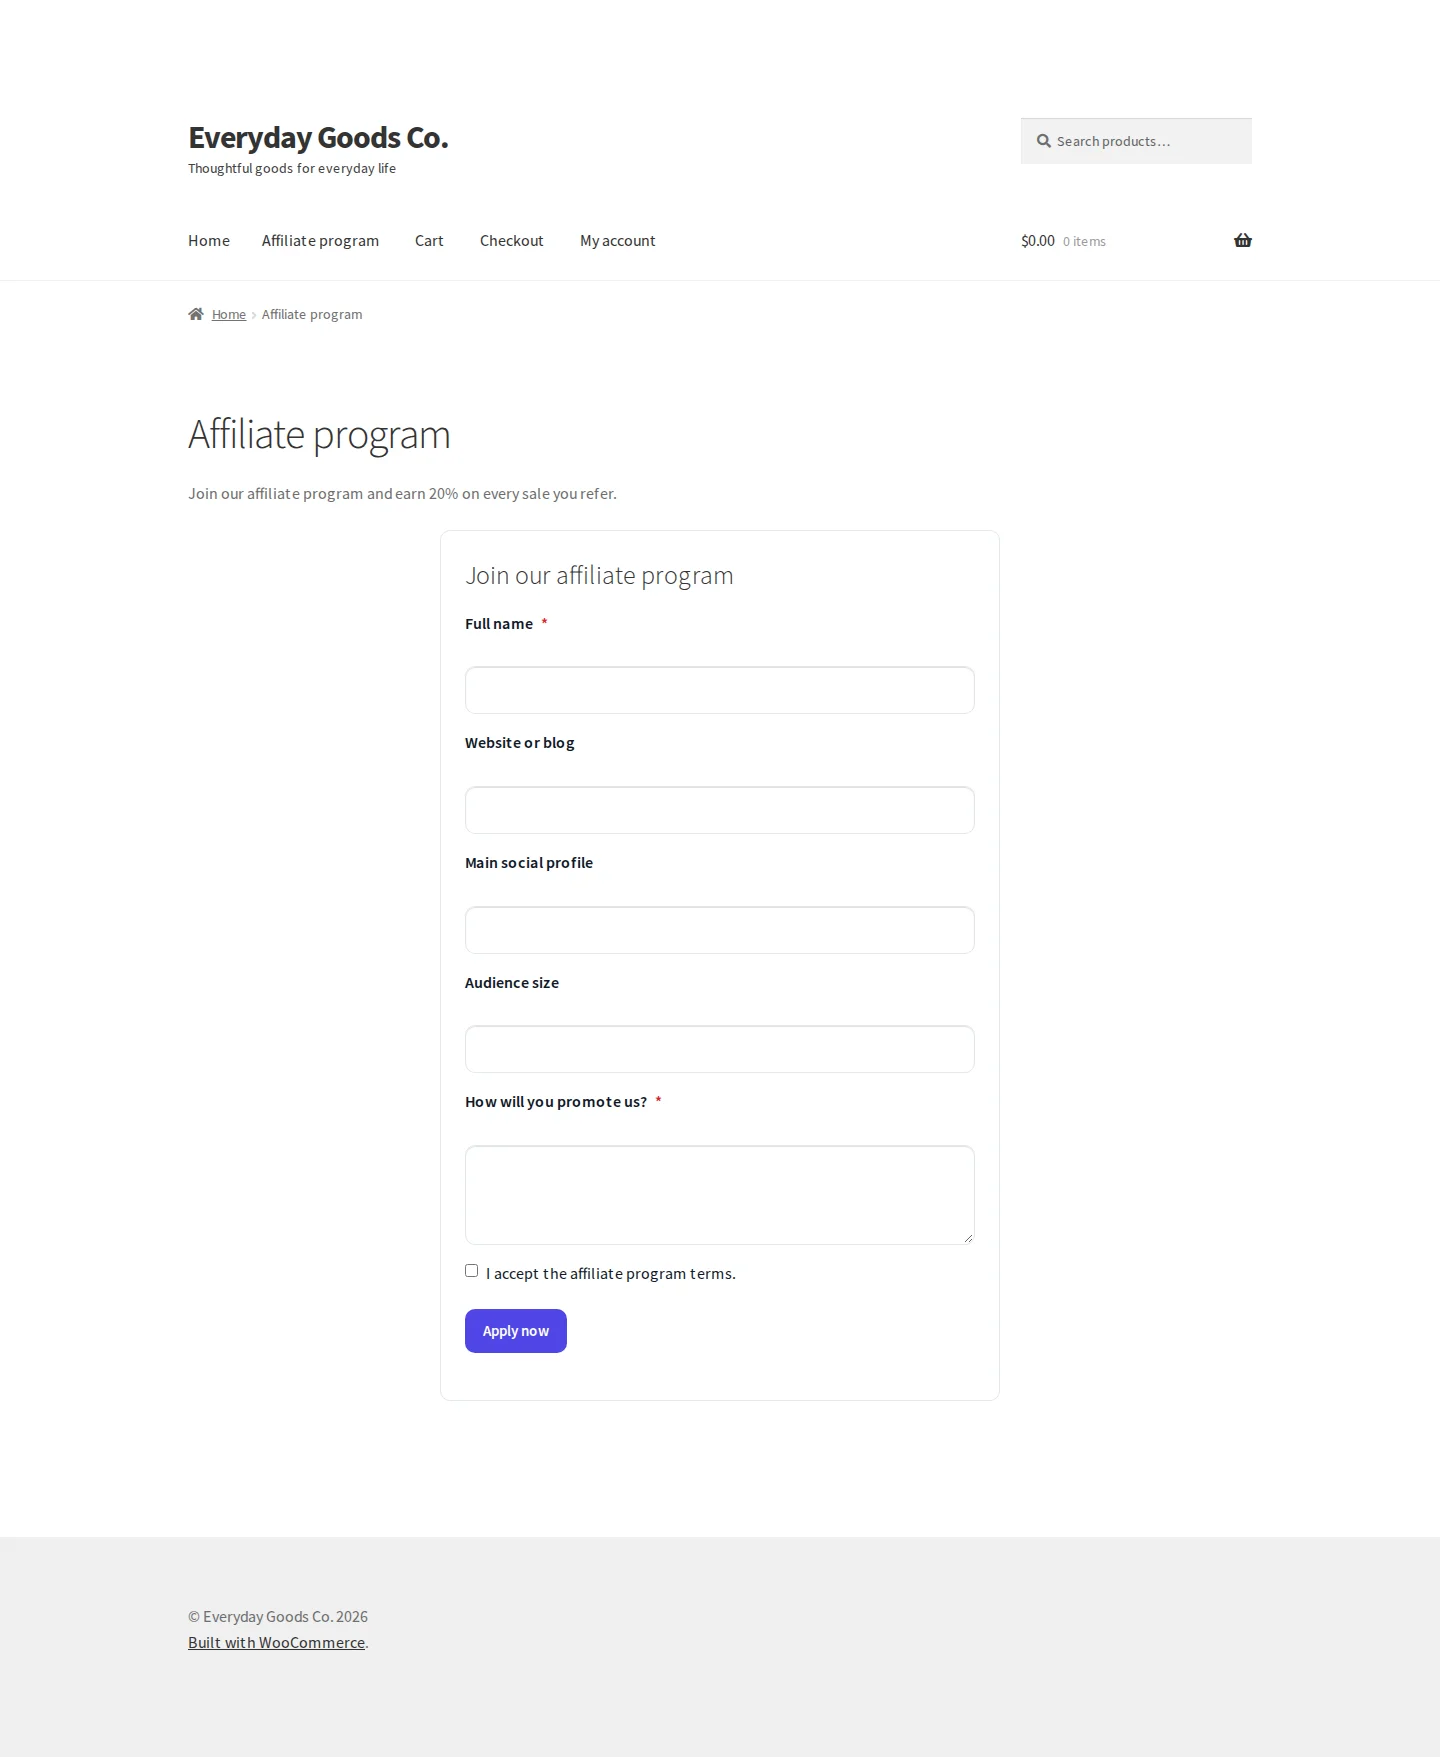
Affireo adds an affiliate portal to the page where you place the [ppl_afw_portal] shortcode.
Visitors who are not yet affiliates see a Join our affiliate program form. It asks for:
- Full name (required)
- Website or blog
- Main social profile
- Audience size
- How will you promote us? (required)
- A checkbox to accept the affiliate program terms. The text you enter in Program terms appears above it.
They submit the form with Apply now. Depending on your Auto approve setting, they become active right away or wait for your review.
Once approved, the same page shows the affiliate's dashboard. There they pick a payout method from the ones you enabled and enter their PayPal email or bank details, and they see your broadcast announcements in their notification feed. The dashboard supports light and dark mode, adapts to screens down to 320px wide, works with a keyboard and works without JavaScript. The Accent color and Corner radius on the Portal settings tab control its styling.
Active affiliates also get a toolbar shortcut on the front end that gives them the tracked referral link for the page they are viewing, with one click copying.
Frequently asked questions
Do I need the free version of Affireo installed as well?
No. Pro is a complete standalone plugin. Only one of the two editions can be active at a time, and Pro deactivates the free one for you when you activate it.
Will I lose data when I upgrade from the free version?
No. Both editions read and write the same database tables and options, so your affiliates, commissions, payouts and settings carry over with no import step. You can delete the free plugin afterwards without touching your data.
Can I go back to the free version?
Yes. Deactivate Pro and activate the free plugin. Your data stays intact, and the Pro features simply stop applying.
Does it work with WooCommerce High Performance Order Storage (HPOS)?
Yes. Pro declares HPOS compatibility and uses the WooCommerce CRUD APIs throughout. It is also compatible with the Blocks checkout.
Does the Stripe Connect payout method need the Stripe plugin?
No. It talks to the Stripe API directly. Add a restricted secret key with transfer permission under Affiliates > Settings > Payouts, and tick Stripe Connect in the payout methods.
Will uninstalling the plugin delete my affiliate data?
No. Your data is kept unless you first tick Delete data on uninstall on the Advanced tab under Affiliates > Settings.
How do affiliates share their referral link?
Each affiliate has a slug, shown in the Slug column under Affiliates > All Affiliates. They can add ?ref=yourslug to a store URL or use a /go/yourslug/ link. Custom vanity slugs and coupon based tracking are also supported.
Can I get an email when a new referral is recorded?
Yes. The New referral (admin) email tells the store admin when an order is credited to an affiliate. It is off by default. Turn it on under WooCommerce > Settings > Emails.
Troubleshooting
- The Affiliates menu does not appear or the plugin will not activate.
Affireo requires WooCommerce. Install and activate WooCommerce 8.0 or later first, then activate Affireo again. Also check that your site runs WordPress 6.2 or later and PHP 7.4 or later.
- The affiliate portal page is blank or shows the wrong content.
- Make sure the page contains the
[ppl_afw_portal]shortcode and is published. - Go to Affiliates > Settings > Portal and check that Dashboard page ID matches that page's ID. Click Save settings.
- The portal shows different content to each visitor. If you use a page caching plugin, exclude this page from the cache.
- Make sure the page contains the
- New applicants stay in Pending.
Applications wait for review when Activate new applications instantly is unticked on the Affiliates tab under Affiliates > Settings. Approve them from Affiliates > All Affiliates using the Pending view, or tick that option if you want new affiliates to be active right away.
- Run payouts now shows 0 eligible.
An affiliate is paid only once their approved balance reaches the Minimum payout on the Payouts settings tab. New commissions also stay locked for the Grace period on the Commissions tab so refunded orders are never paid out. Check the referral statuses under Affiliates > Referrals, or lower the minimum payout if it suits your program.
- An order did not earn the affiliate a commission.
Check these settings under Affiliates > Settings:
- Commissions tab: orders below the Minimum order amount earn nothing, and Block self referrals stops affiliates from earning on their own purchases.
- Tracking tab: the purchase must happen within the Cookie duration. If Clear cookie on purchase is ticked, the click stops counting once a commission is recorded.
If the commission should still count, add it under Affiliates > Referrals with the Add manual referral form.
- You cannot find the multi-level or fraud prevention options.
In Simple (recommended) mode these tabs are hidden. Go to Affiliates > Settings > Advanced, set Settings mode to Advanced (show all options) and click Save settings.