
Overview
Bundle Add-ons is one plugin that holds every add-on for Back In Stock Notifier for WooCommerce. It includes 26 add-ons: marketing platform syncs, SMS and WhatsApp alerts, reminders, analytics, consent tools, CSV import and export, multilingual support and more. One licence key covers the whole bundle and any add-ons added later.
You don't install each add-on on its own. You switch it on or off under Instock Notifier > Add-ons. Switching an add-on off keeps its settings and data, so you can turn it back on later and pick up where you left off. Each add-on that has options gets its own tab under Instock Notifier > Settings. Each tab starts with a short explanation and setup steps.
The bundle is for WooCommerce store owners who already run Back In Stock Notifier and want more from their waitlist, such as syncing it to a marketing platform, following up with reminders or measuring the sales that restock alerts bring in.
Requirements
- WordPress 5.8 or later (tested up to 6.8)
- PHP 7.2 or later
- WooCommerce
- Back In Stock Notifier for WooCommerce, installed and active
- An account with each third-party service you connect (for example Mailchimp, Klaviyo, Brevo or Twilio)
Installation
Bundle Add-ons adds to Back In Stock Notifier for WooCommerce, which runs on WooCommerce. Install and activate both of those before you upload the bundle. If you used individual add-on plugins before, the bundle carries your existing add-on selection, settings and licence keys forward automatically. Deactivate the individual add-on plugins and manage everything from the bundle.
Make sure WooCommerce and Back In Stock Notifier for WooCommerce are installed and active.
Sign in to your ProPluginsLab account and download the Bundle Add-ons zip file from My Account > Downloads.
In WordPress, go to Plugins > Add New > Upload Plugin, choose the zip file and click Install Now.
Click Activate Plugin.
Go to Instock Notifier > Add-ons and switch on the add-ons you need.
Go to Instock Notifier > Add-on Licences, enter your licence key and click Save and validate licences.
Quick start
- Switch on the add-ons you need
Open Instock Notifier > Add-ons. Add-ons are grouped by purpose. Click Switch on or Switch off on a row. To change several at once, tick their checkboxes and use Bulk actions with Apply.
- Enter your licence key
Open Instock Notifier > Add-on Licences, paste the key you got with your purchase and click Save and validate licences. A valid key turns on automatic updates.
- Configure an add-on
On the Add-ons screen, click Settings under an add-on, or go to Instock Notifier > Settings and open its tab. Follow the Setup steps in the box at the top of the tab, then click Save Changes.
- Connect credentials before you enable sync
For marketing platforms, enter your API key, save, click Fetch lists and pick a Target list. Tick Enable sync last. Nothing is sent until it is on.
- Check that everything works
Open Instock Notifier > Help. The System status table and each add-on's status panel show whether credentials are present and whether background jobs are scheduled. Then view an out of stock product on your store to see the subscribe form.
Add-ons in this bundle
#Subscribers list
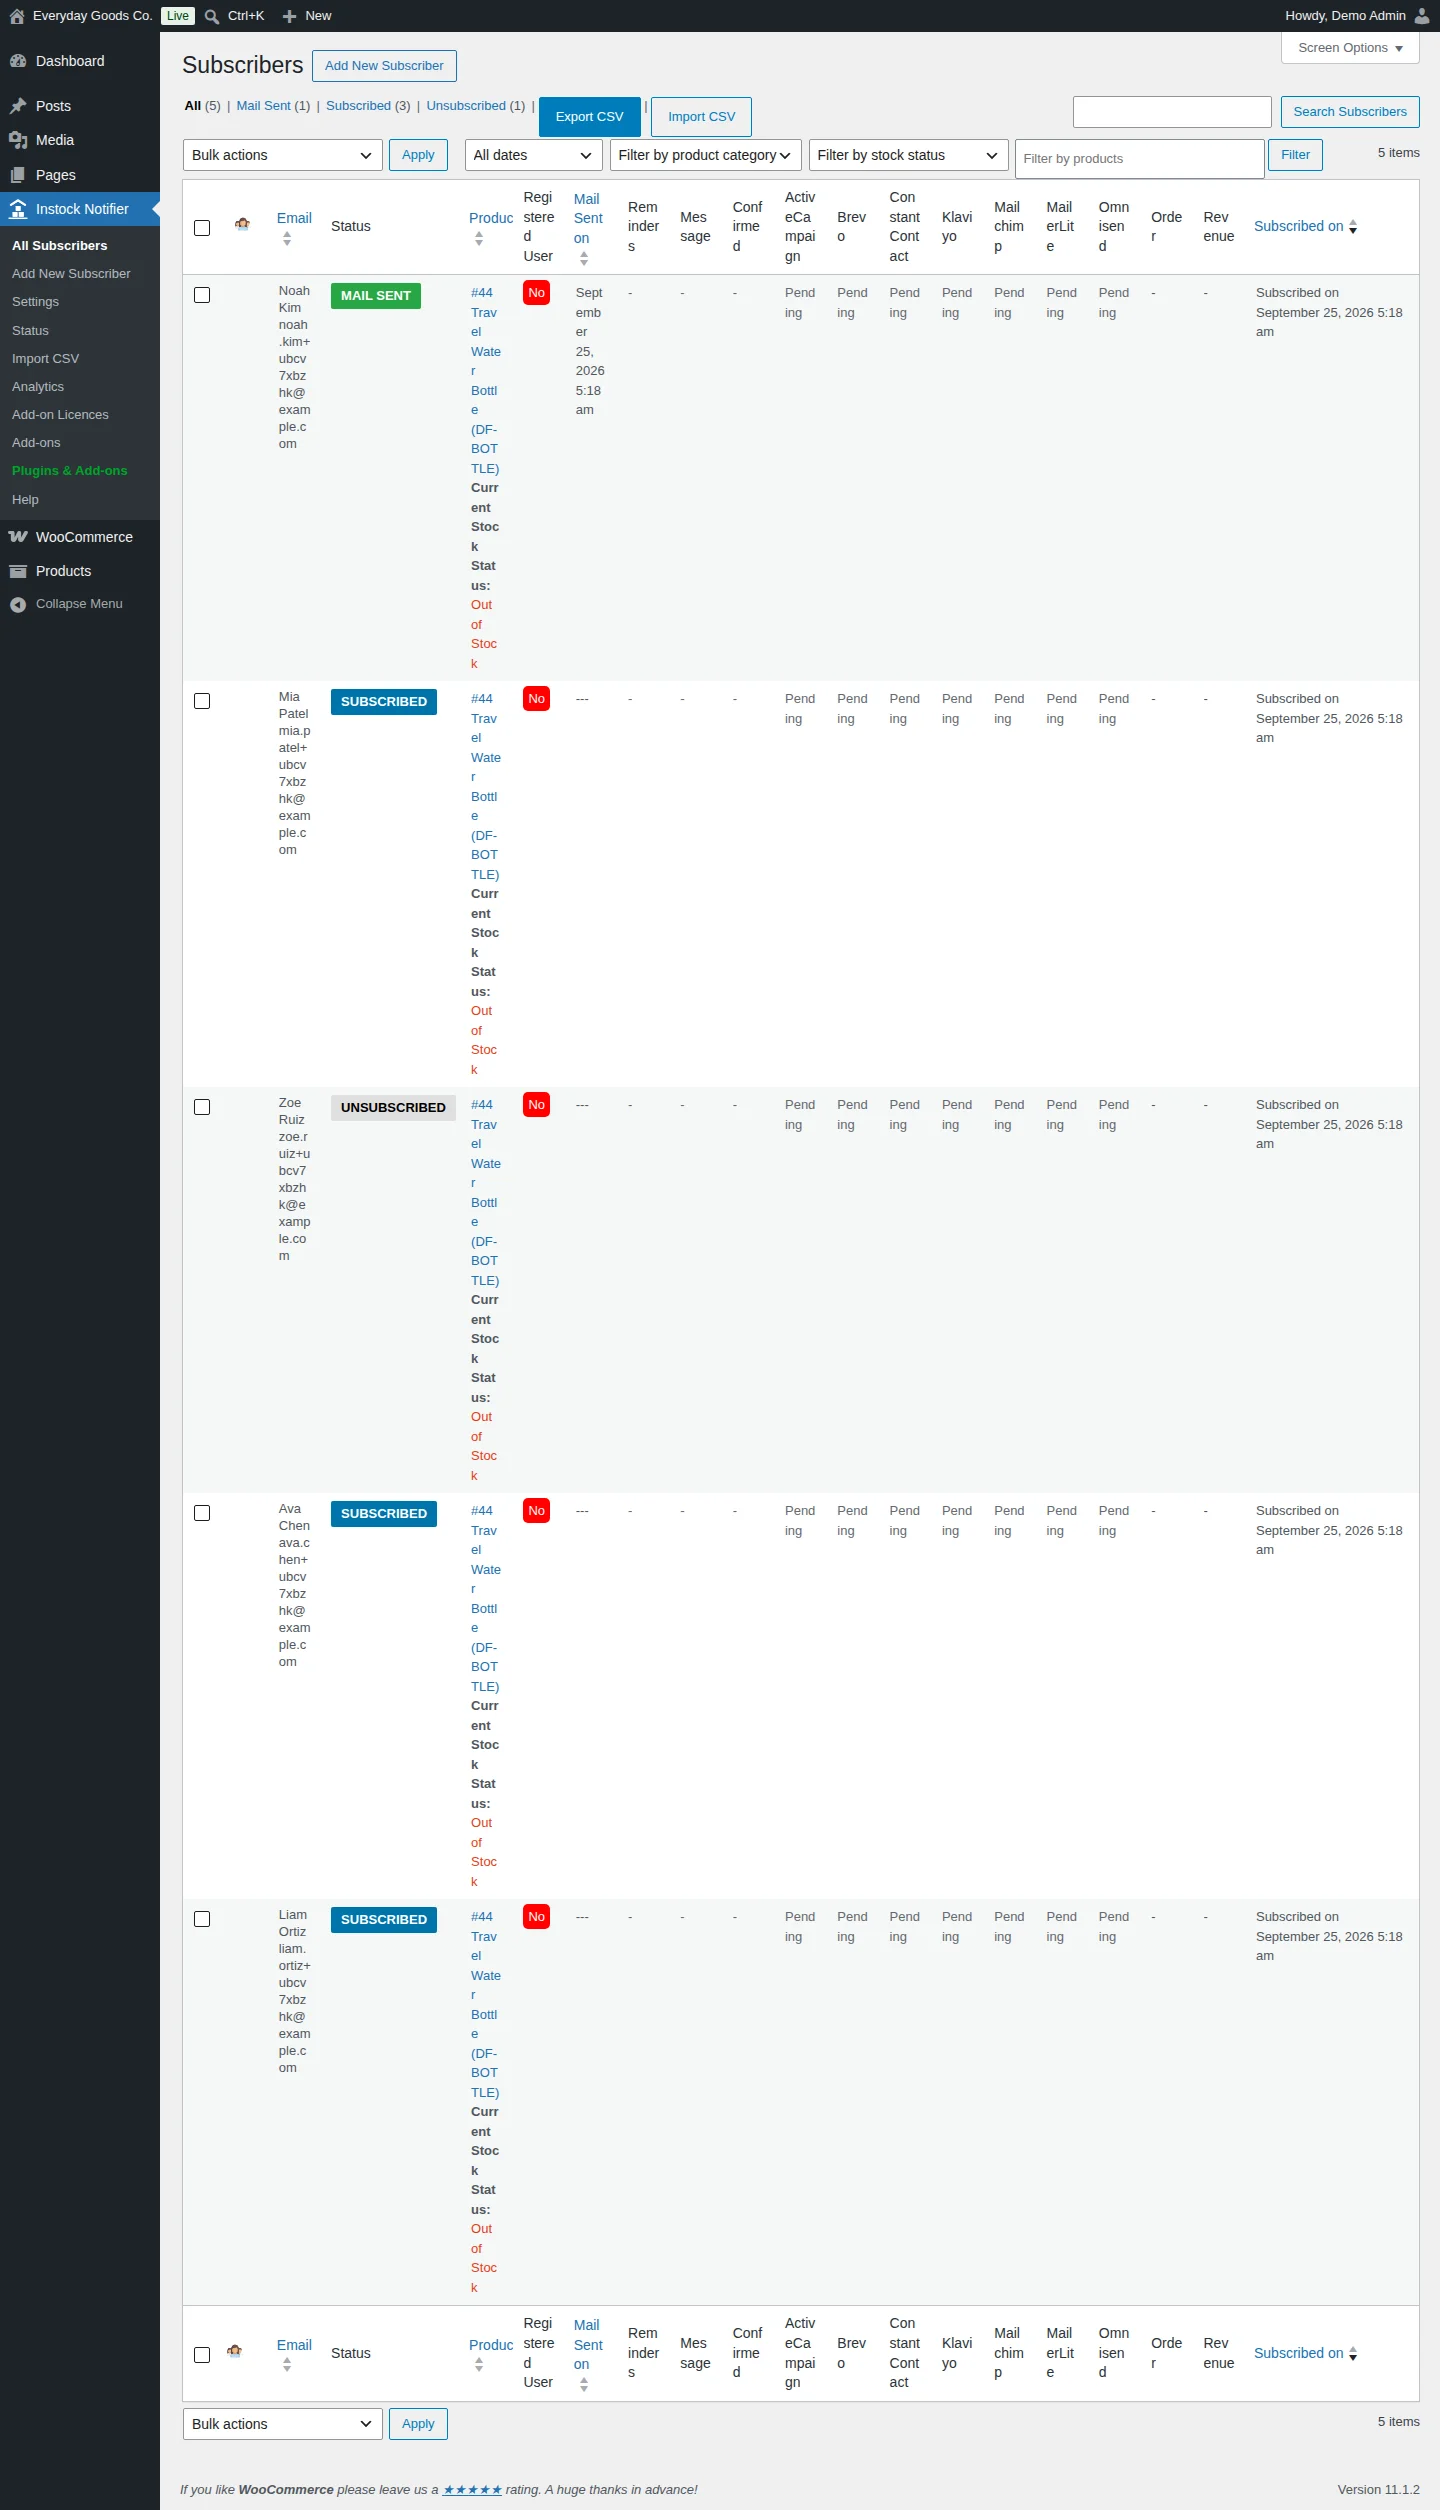
Instock Notifier > All Subscribers lists every waitlist entry. With the bundle active, add-ons add their own columns and buttons to this list:
- Add New Subscriber (Edit Subscribers) adds an entry by hand. Hover a row to see the Edit link.
- Export CSV and Import CSV (Export CSV and Import CSV) sit above the list.
- Reminders (Restock Reminders) shows which reminders each person has had.
- Confirmed (Double Opt-In) shows whether an entry was confirmed by email.
- ActiveCampaign, Brevo, Constant Contact, Klaviyo, Mailchimp, MailerLite and Omnisend show each row's sync state, for example Pending.
- Order and Revenue (Track Sales) show the attributed order and line total.
Use Screen Options to hide columns you don't need.
#Add-on settings tabs
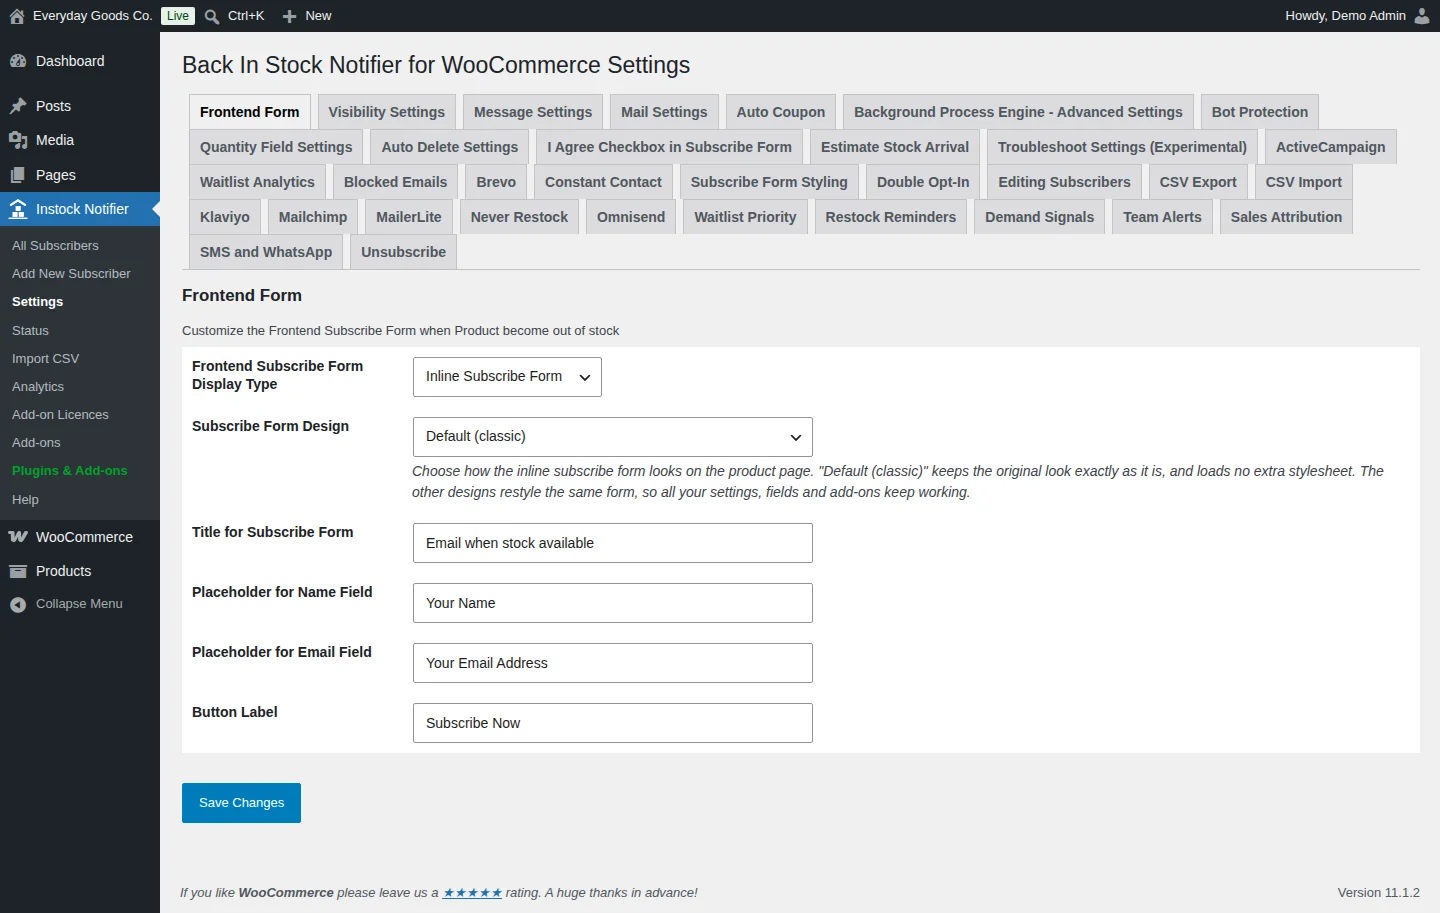
Every switched-on add-on with options gets a tab under Instock Notifier > Settings, next to the tabs that come with Back In Stock Notifier. Each add-on tab starts with a box that explains what the add-on does. The box also lists numbered Setup steps and a Troubleshooting and common questions panel you can expand. Where an add-on supports placeholders, the box includes a Placeholders you can use table.
Some tabs have a different name from their add-on:
| Add-on | Settings tab |
|---|---|
| Ban Emails | Blocked Emails |
| Custom CSS | Subscribe Form Styling |
| Edit Subscribers | Editing Subscribers |
| Export CSV | CSV Export |
| Import CSV | CSV Import |
| Track Sales | Sales Attribution |
| Twilio SMS and WhatsApp | SMS and WhatsApp |
The Frontend Form tab belongs to Back In Stock Notifier. There you choose the Subscribe Form Design and form texts that the Custom CSS add-on then restyles.
#Add-on Licences
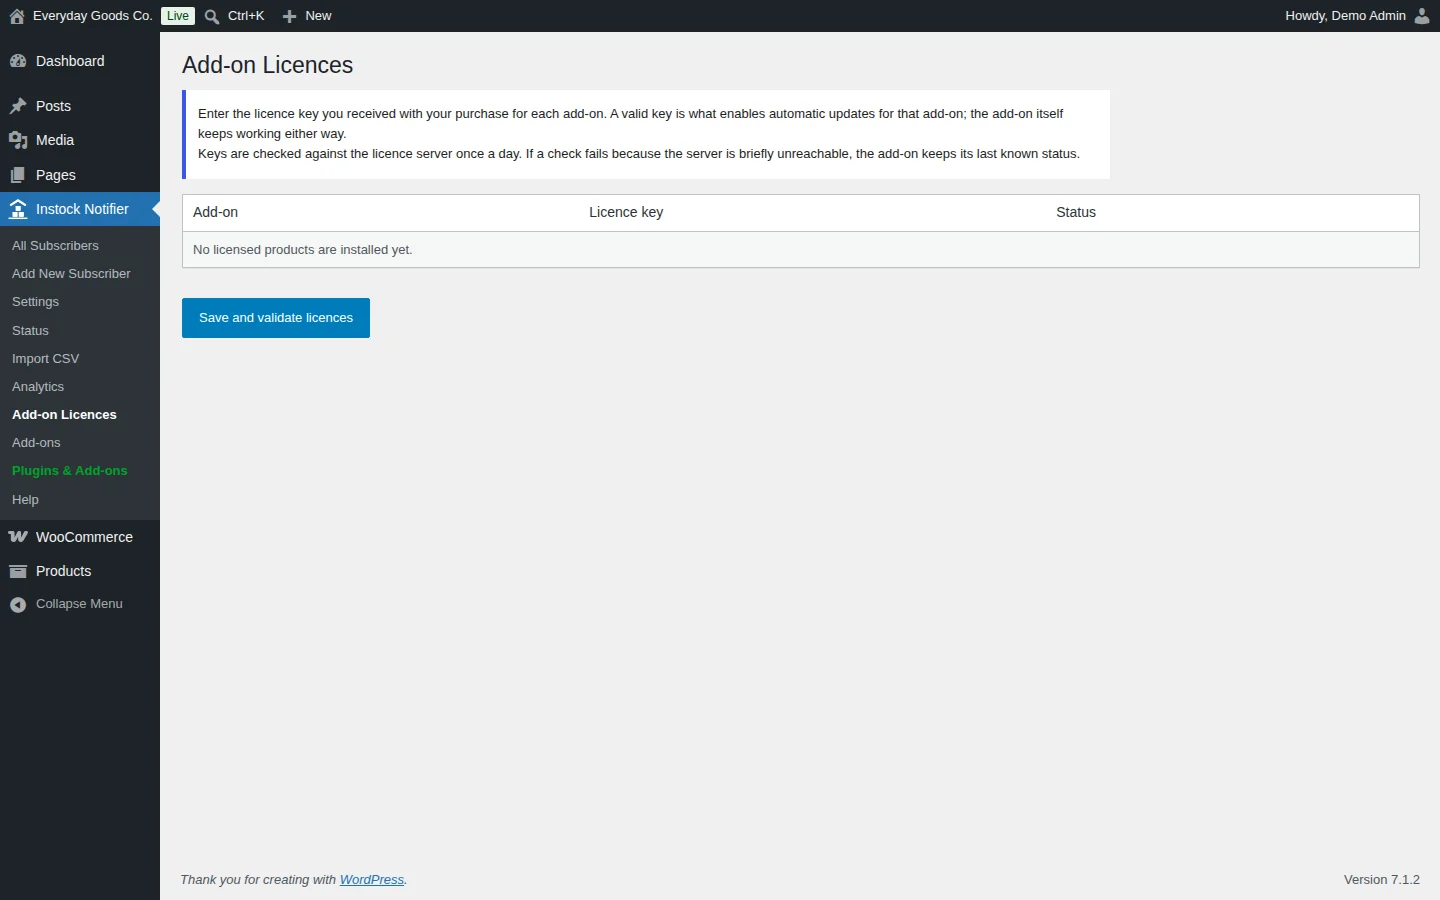
Go to Instock Notifier > Add-on Licences to enter your licence key.
- Paste the key you got with your purchase into the Licence key column.
- Click Save and validate licences.
- Check the Status column.
A valid key enables automatic updates. The add-ons keep working either way. Keys are checked against the licence server once a day. If the server can't be reached for a moment, the add-on keeps its last known status.
#Switching add-ons on and off
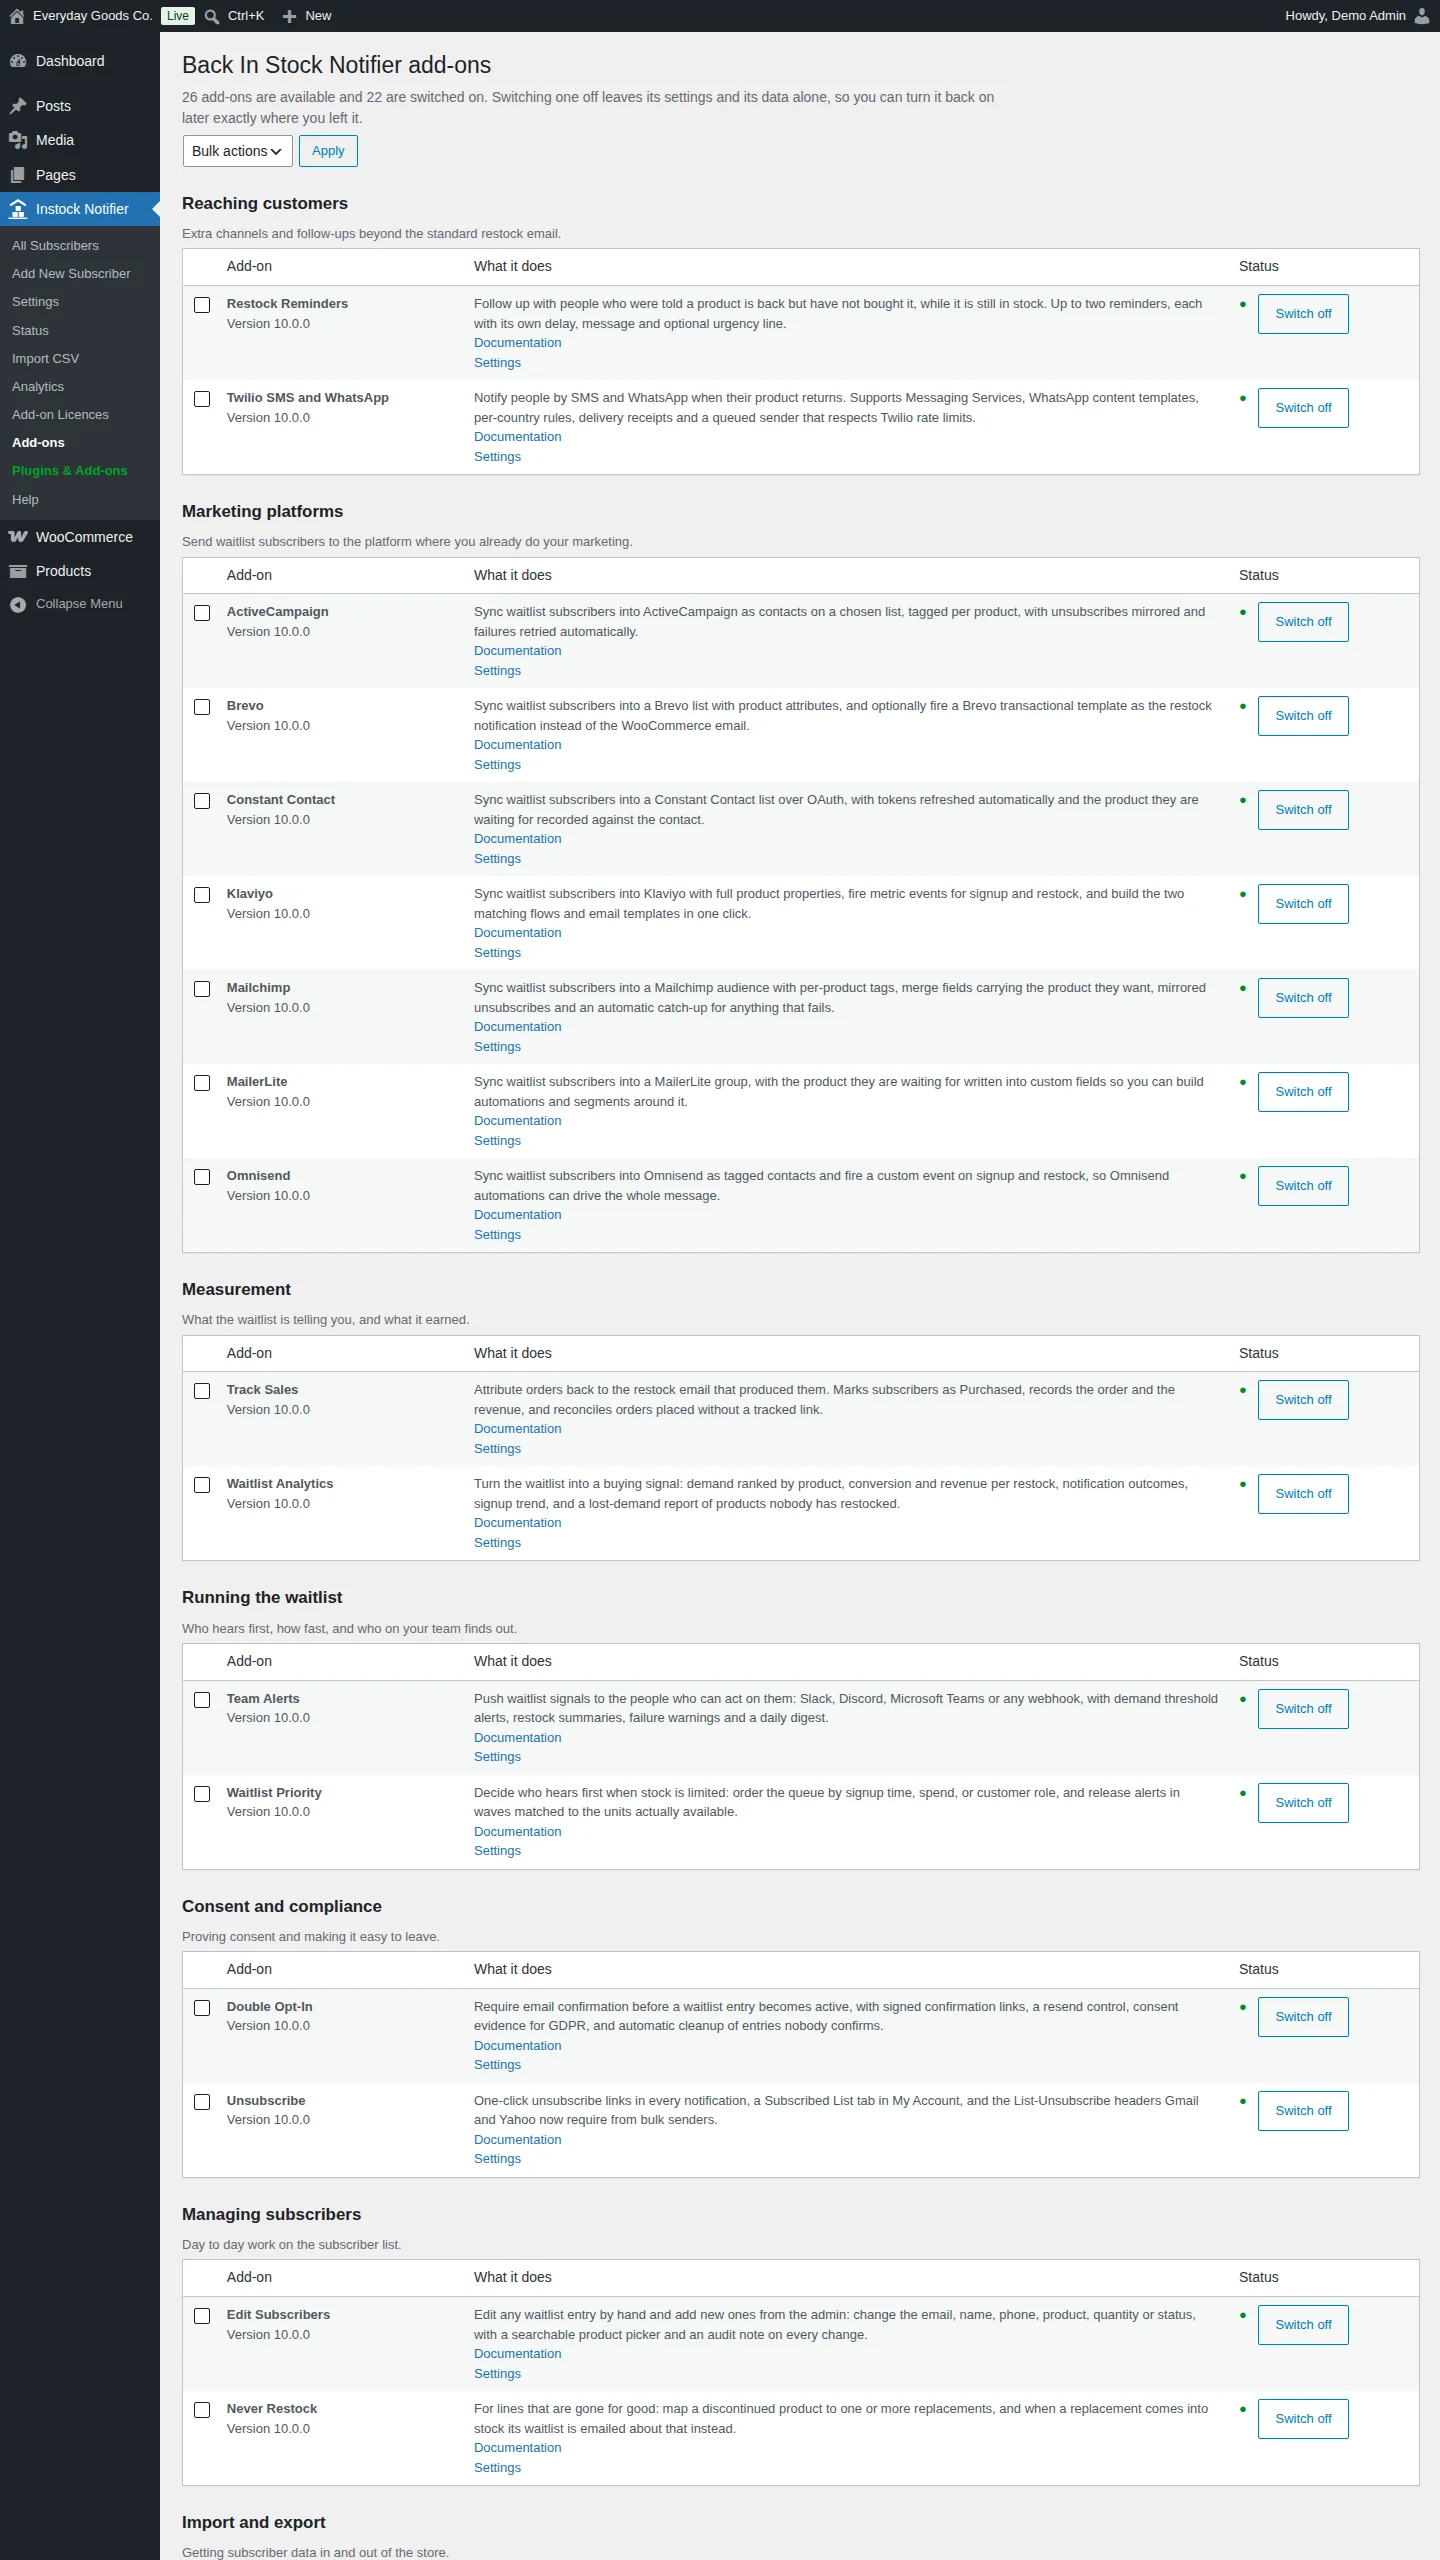
Instock Notifier > Add-ons is the control panel for the bundle. The top of the screen shows how many add-ons are available and how many are switched on.
Add-ons are grouped under Reaching customers, Marketing platforms, Measurement, Running the waitlist, Consent and compliance, Managing subscribers, Import and export, Storefront, Multilingual and List quality. Each row shows:
- the add-on name and version
- What it does, with Documentation and Settings links
- a Status dot and a Switch on or Switch off button
To change several add-ons at once, tick their checkboxes, choose an action from Bulk actions and click Apply.
Switching an add-on off keeps its settings and data. Deactivating the bundle plugin also keeps the record of which add-ons you had switched on.
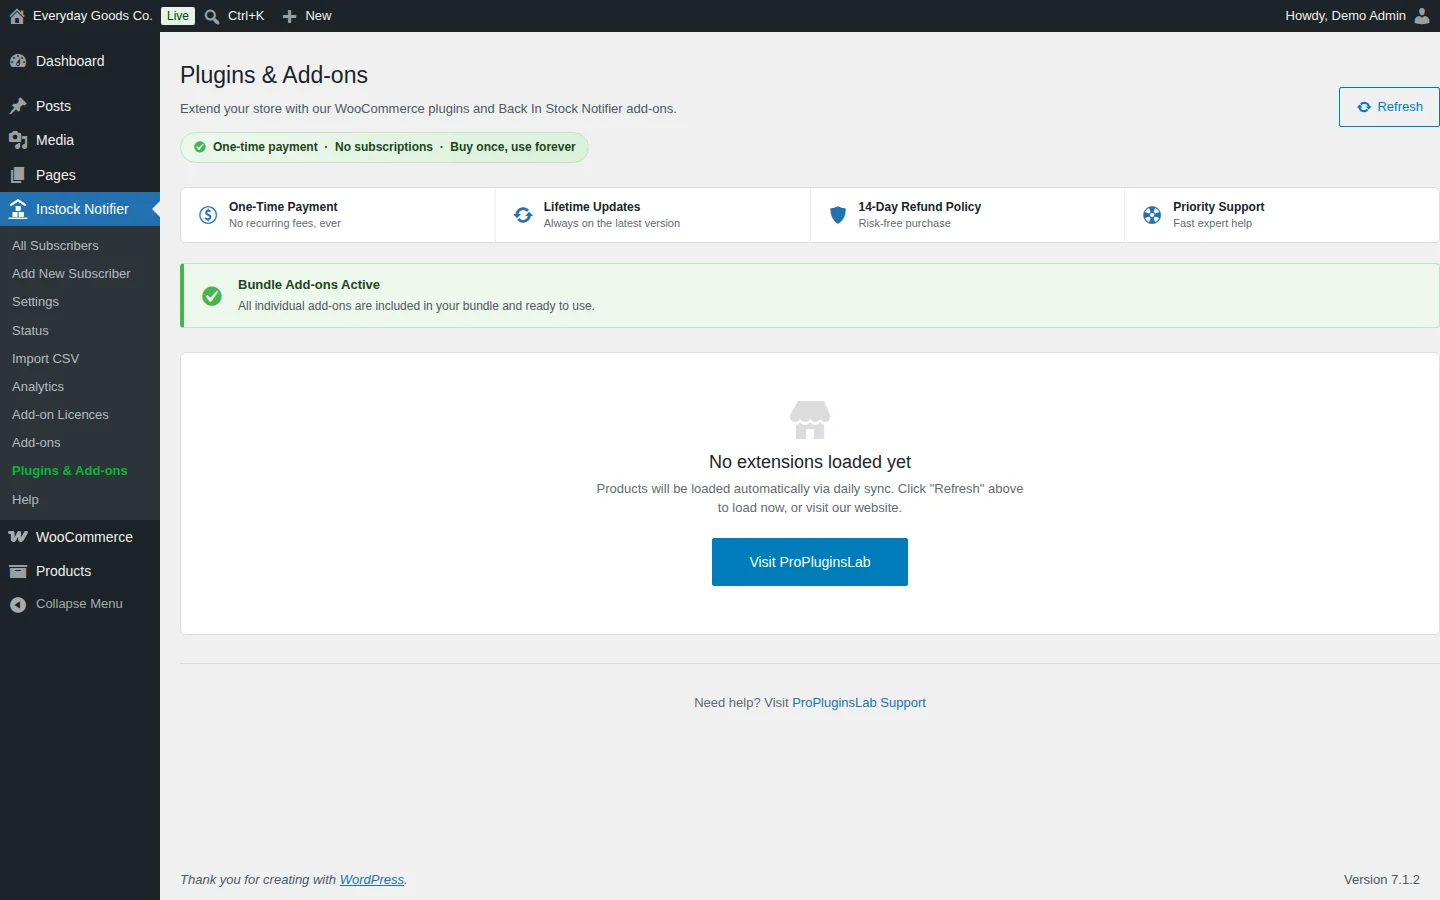
Under Instock Notifier > Plugins & Add-ons, a Bundle Add-ons Active notice confirms that all individual add-ons are included in your bundle.
#Help and status
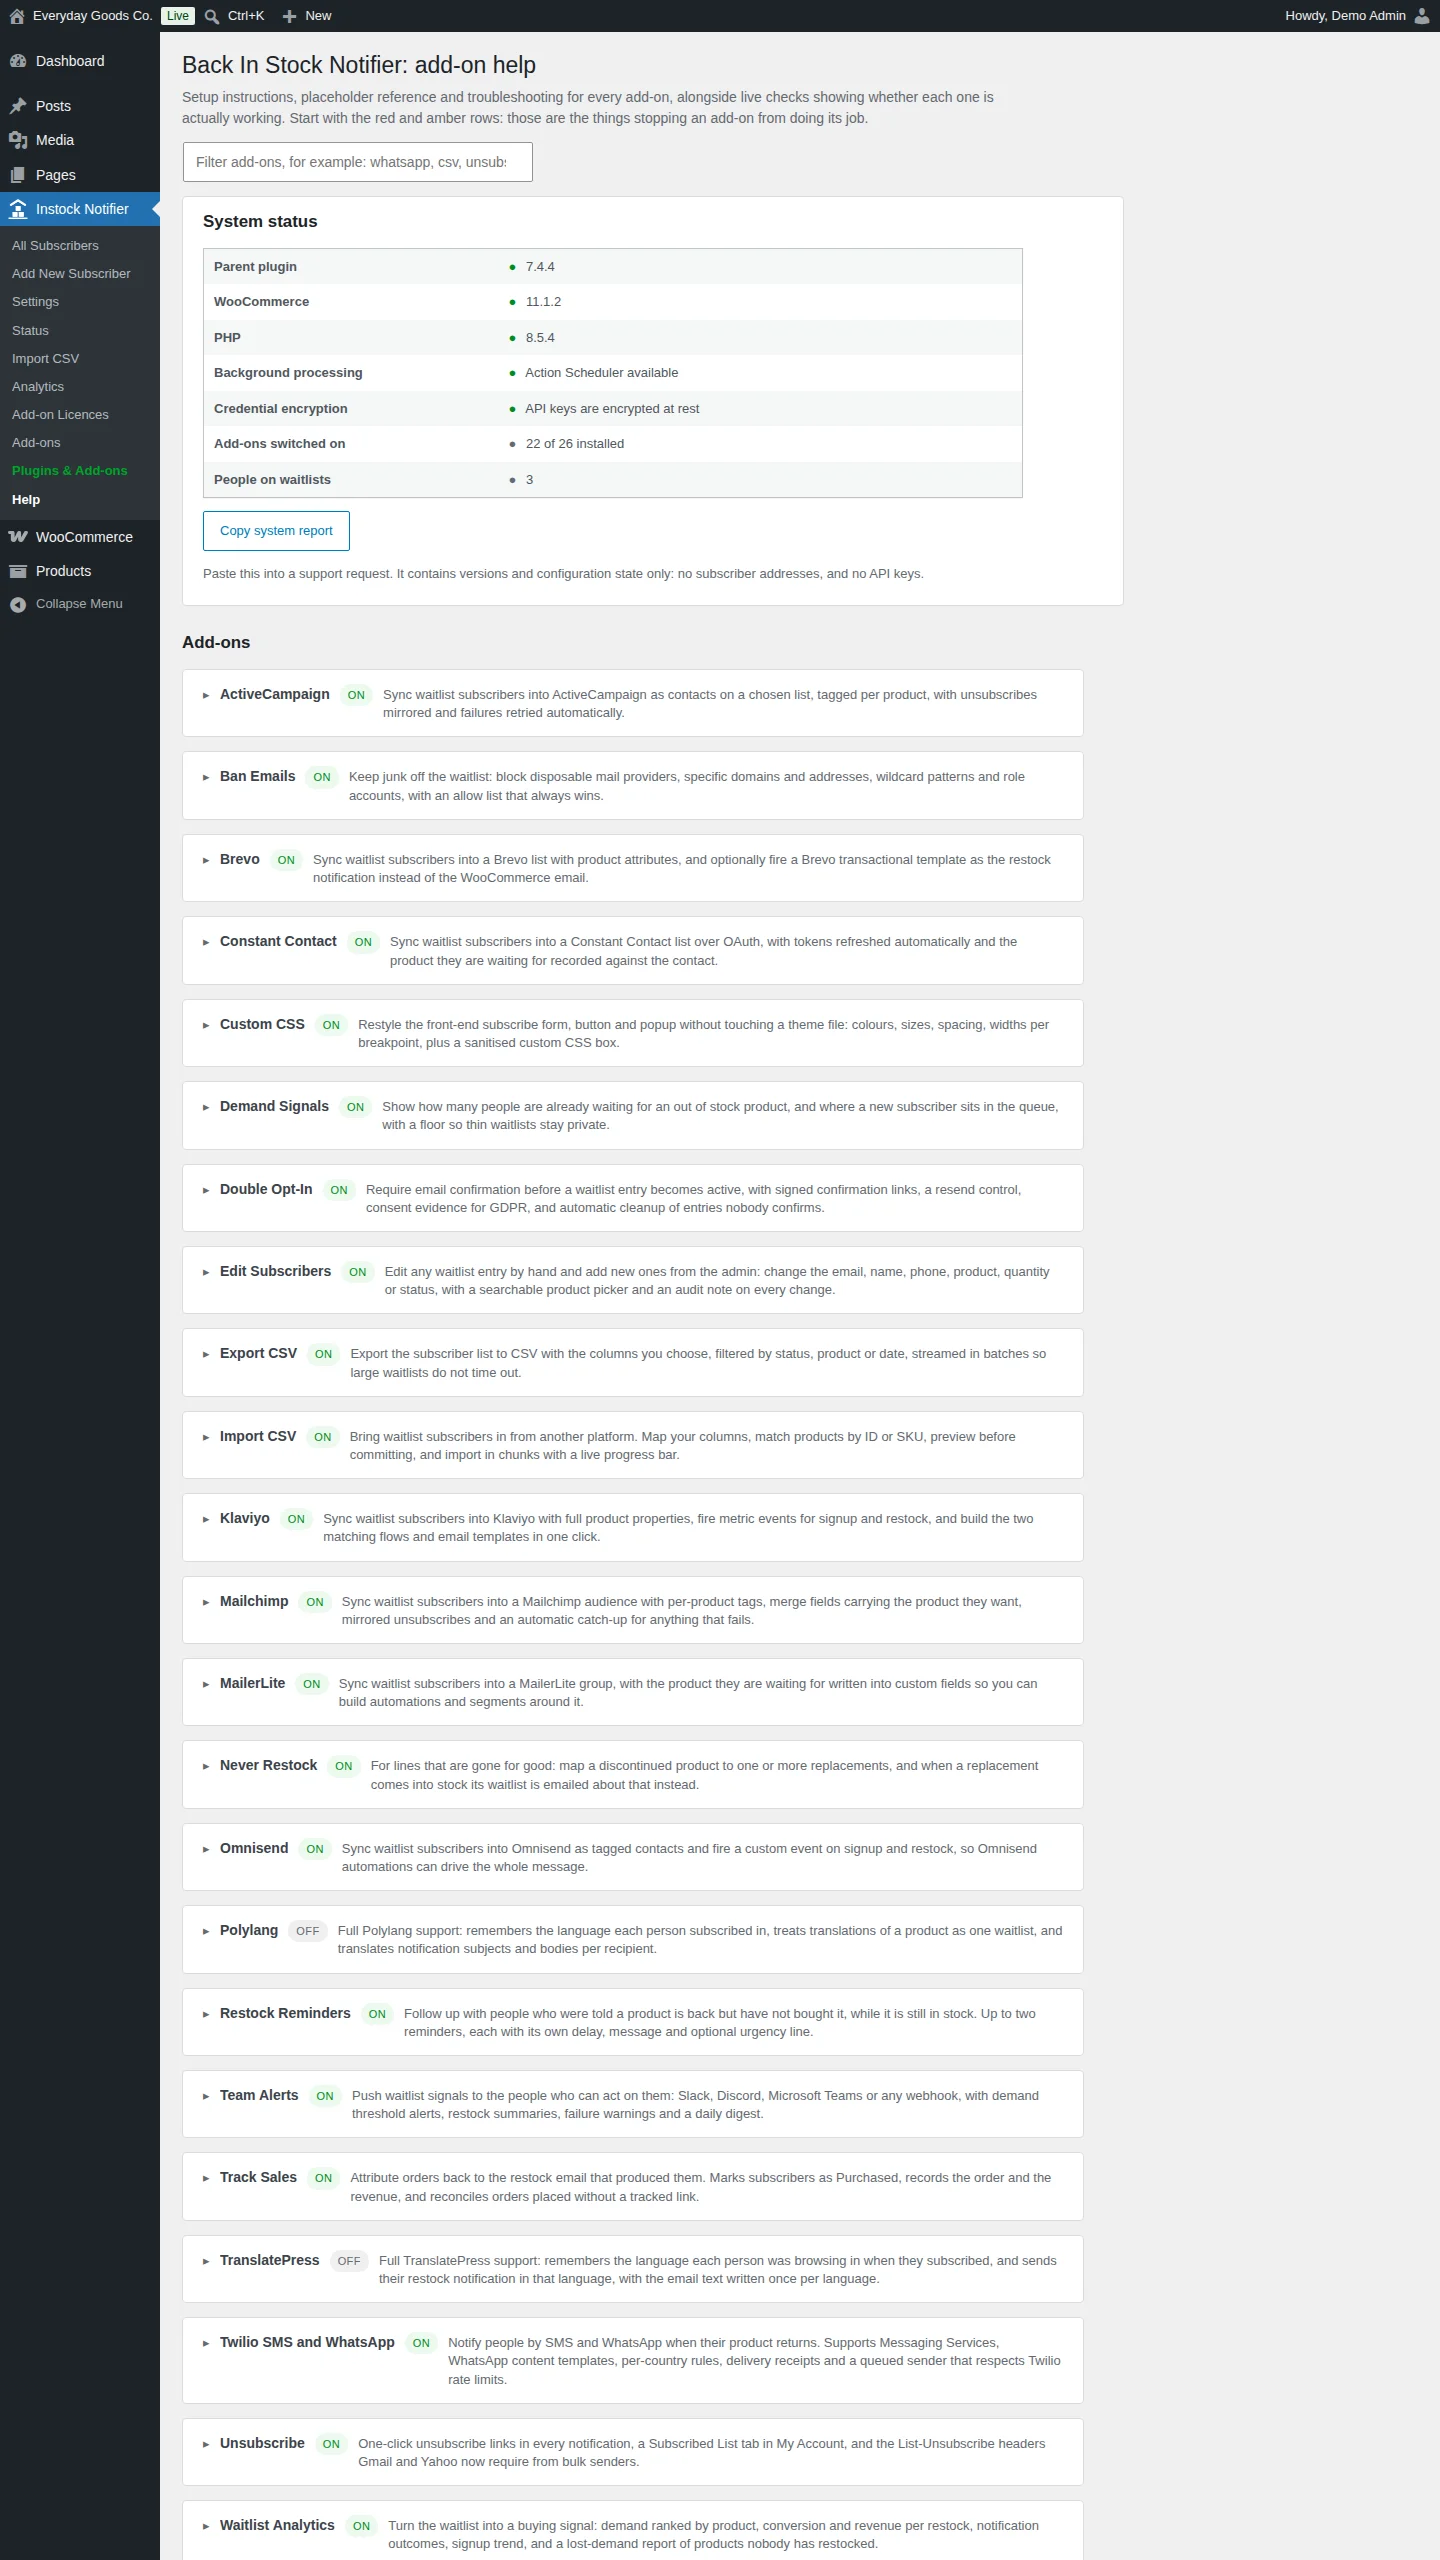
Instock Notifier > Help is the first place to look when something isn't working.
- System status lists the parent plugin, WooCommerce and PHP versions, background processing, credential encryption, how many add-ons are switched on and how many people are on waitlists.
- Copy system report copies versions and configuration state for a support request. It contains no subscriber addresses and no API keys.
- The Add-ons list shows each add-on with an ON or OFF badge. Expand a row to see its current status, setup steps, how it works, a settings reference, error messages, troubleshooting and what it stores and sends.
- Use the filter box (for example
whatsapp,csvorunsubscribe) to find an add-on quickly.
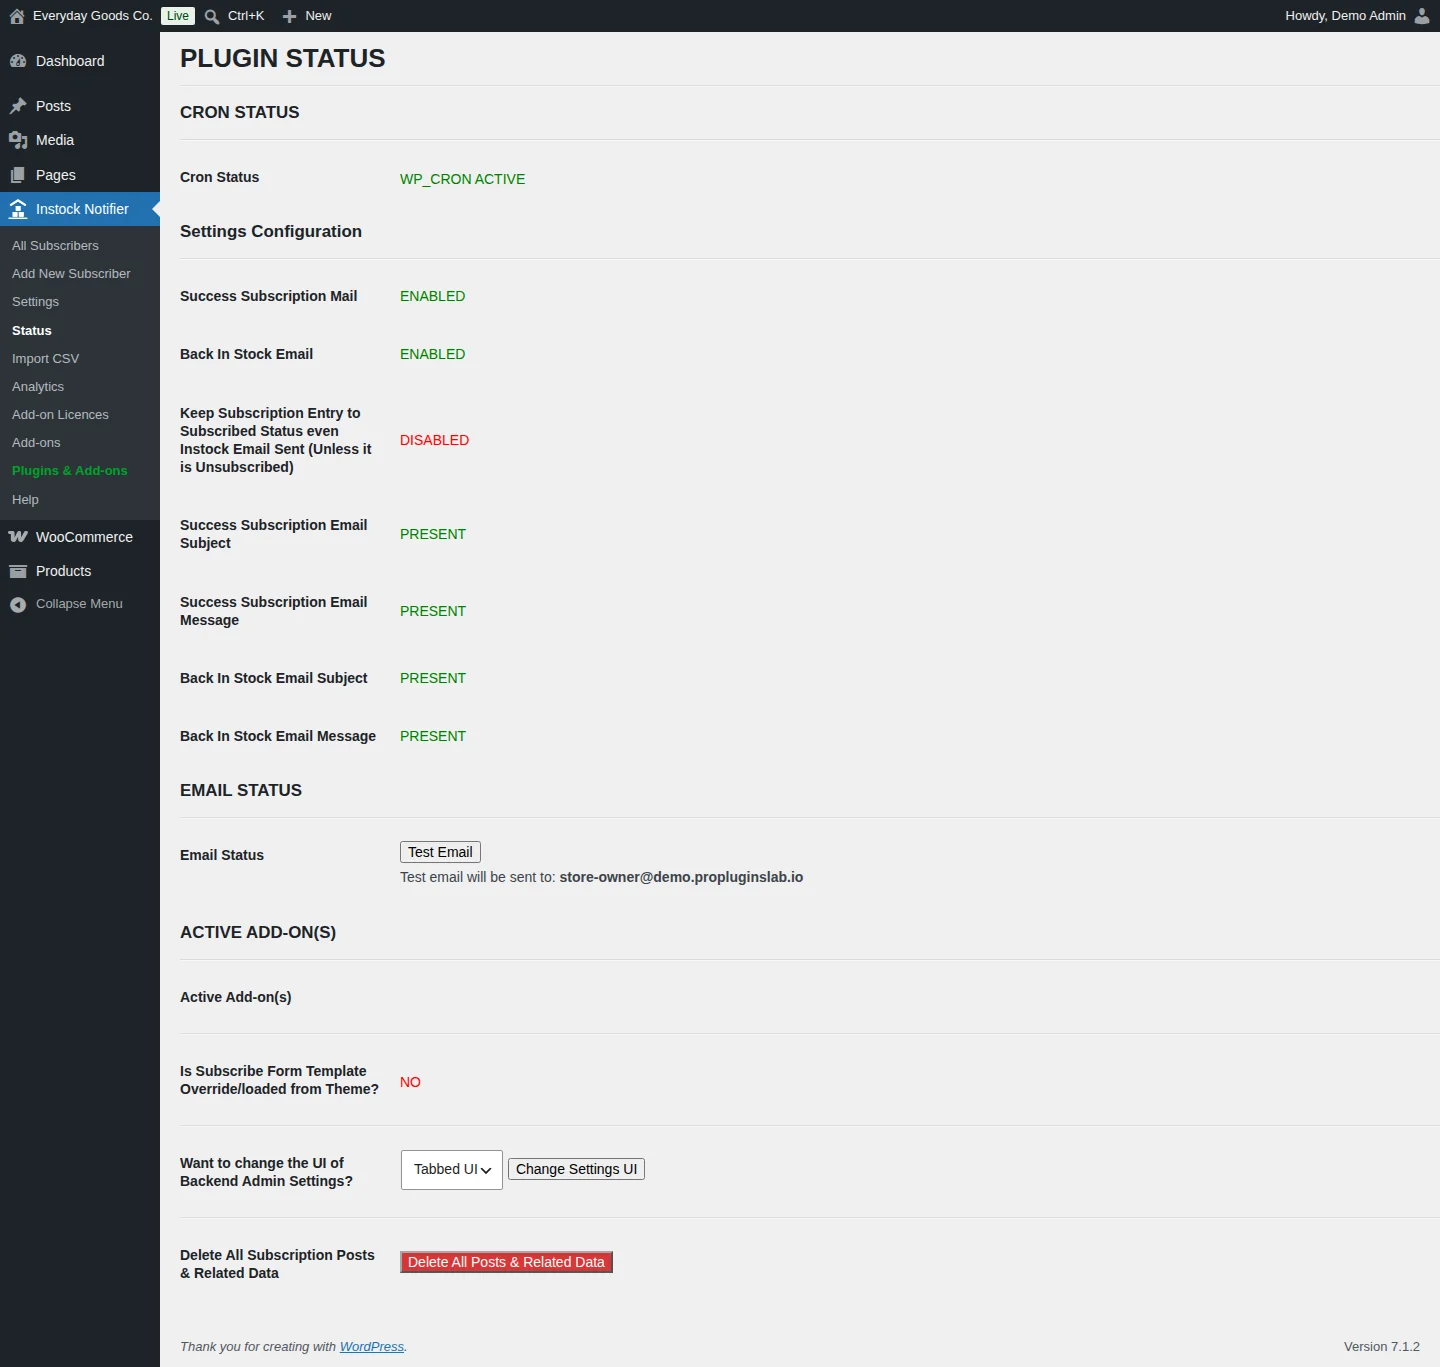
Instock Notifier > Status comes with Back In Stock Notifier. It shows cron status, email settings and a Test Email button. Use it to check that your site can send mail at all.
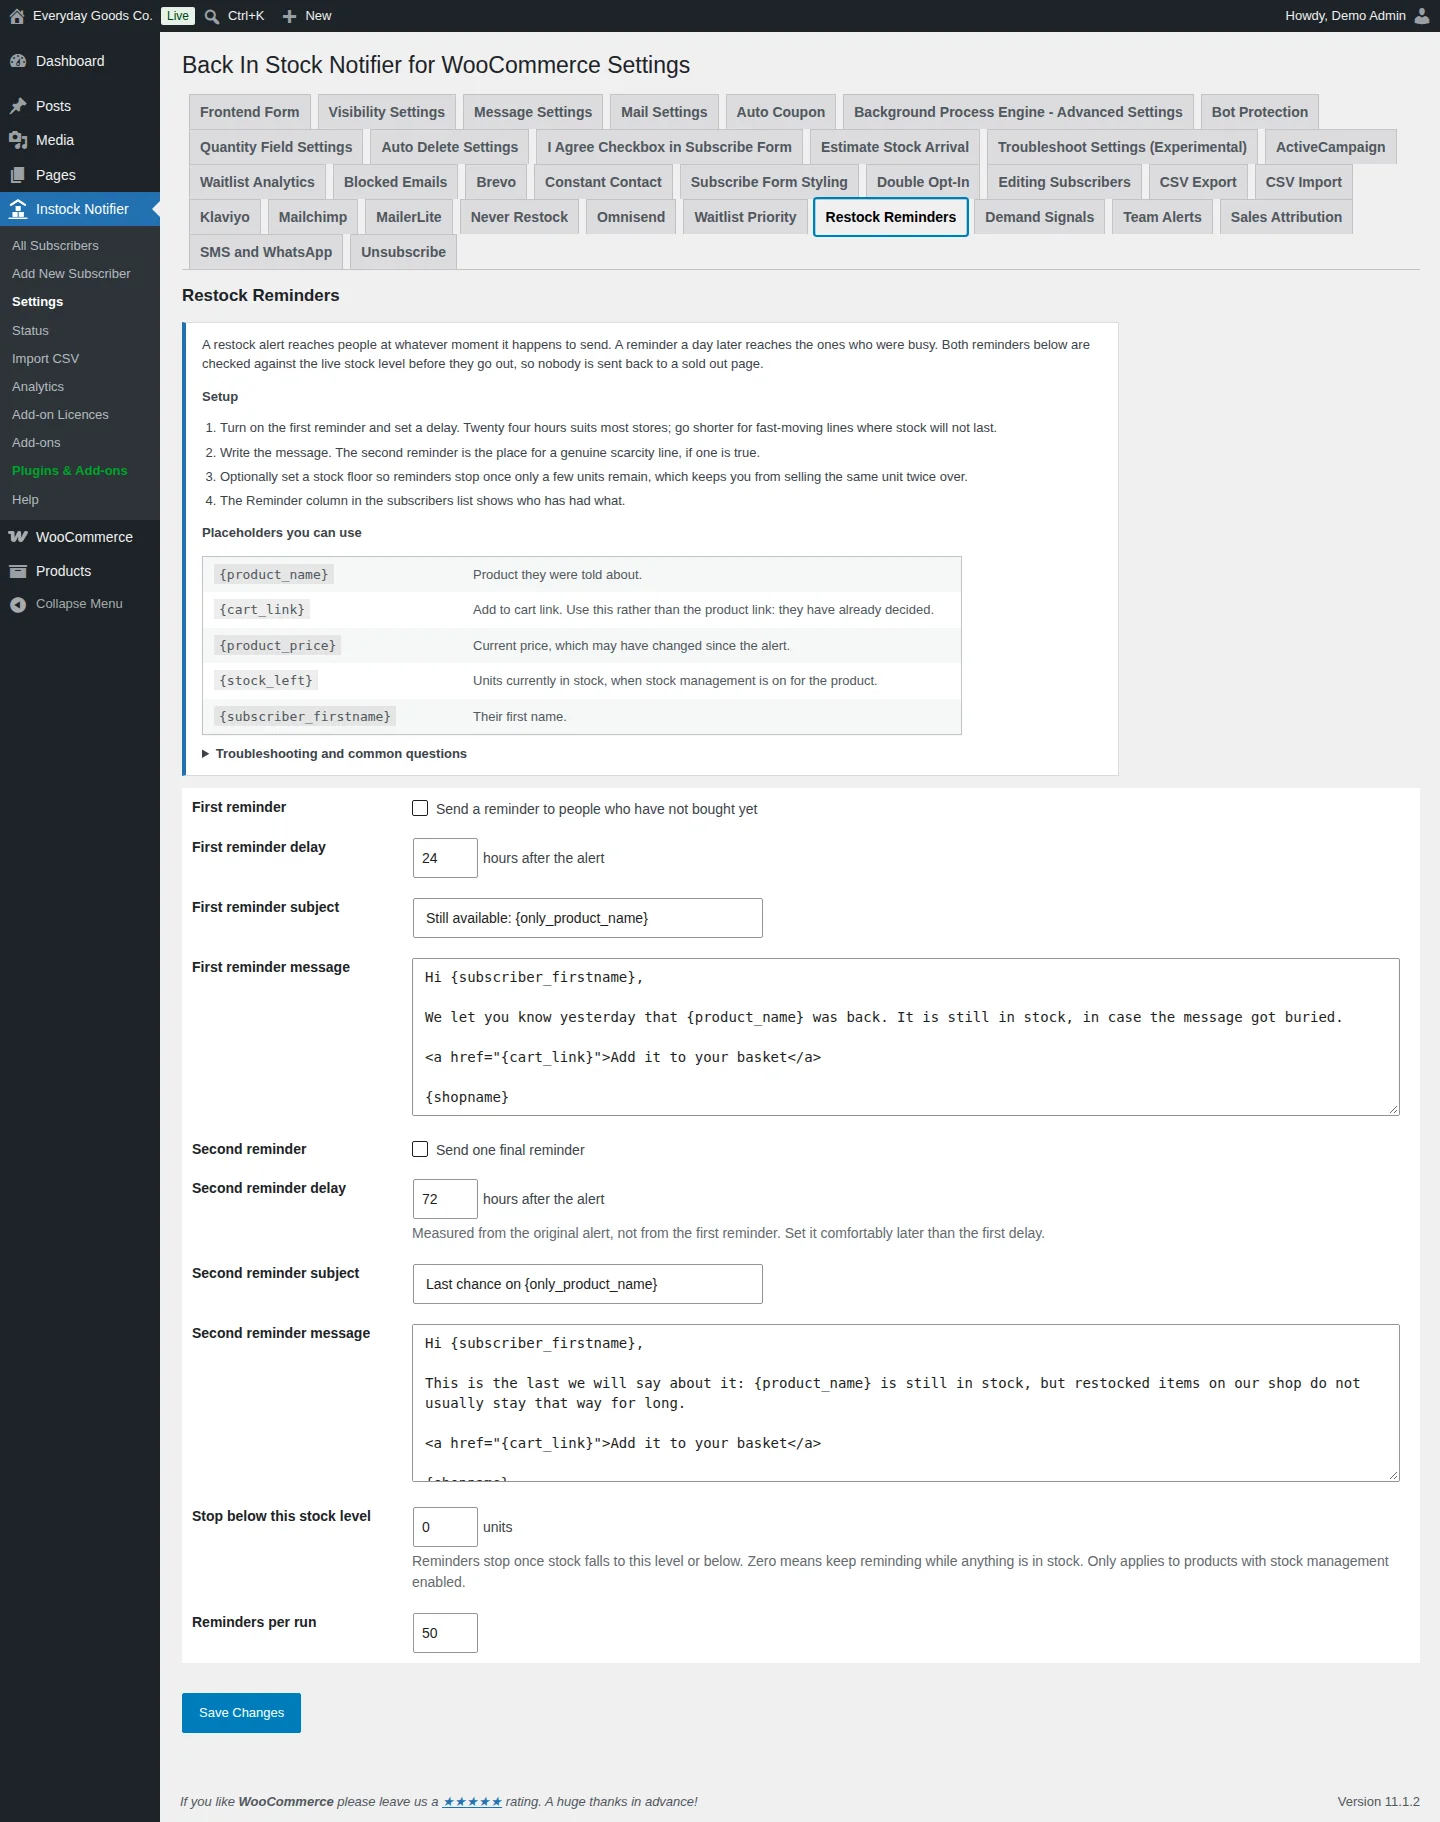
#Restock Reminders
Restock Reminders follows up with people who were told a product is back but haven't bought it yet, while it is still in stock. You can send up to two reminders.
Set it up under Instock Notifier > Settings > Restock Reminders:
- Tick First reminder and set First reminder delay in hours after the alert. Twenty four hours suits most stores. Go shorter for fast-moving lines.
- Edit the subject and message. You can use
{product_name},{cart_link},{product_price},{stock_left}and{subscriber_firstname}. - Optionally tick Second reminder. Its delay is measured from the original alert, not from the first reminder, so set it comfortably later.
- Optionally set Stop below this stock level so reminders stop once only a few units remain. This only applies to products with stock management enabled.
Each reminder is checked right before it sends. If the subscriber bought or unsubscribed, or the product sold out or fell below your floor, the reminder is skipped and not retried. The Reminders column in the subscribers list shows who has had what.
Switch on Track Sales too. Without it, nothing links an order to the notification, so people who already bought can still get a reminder.
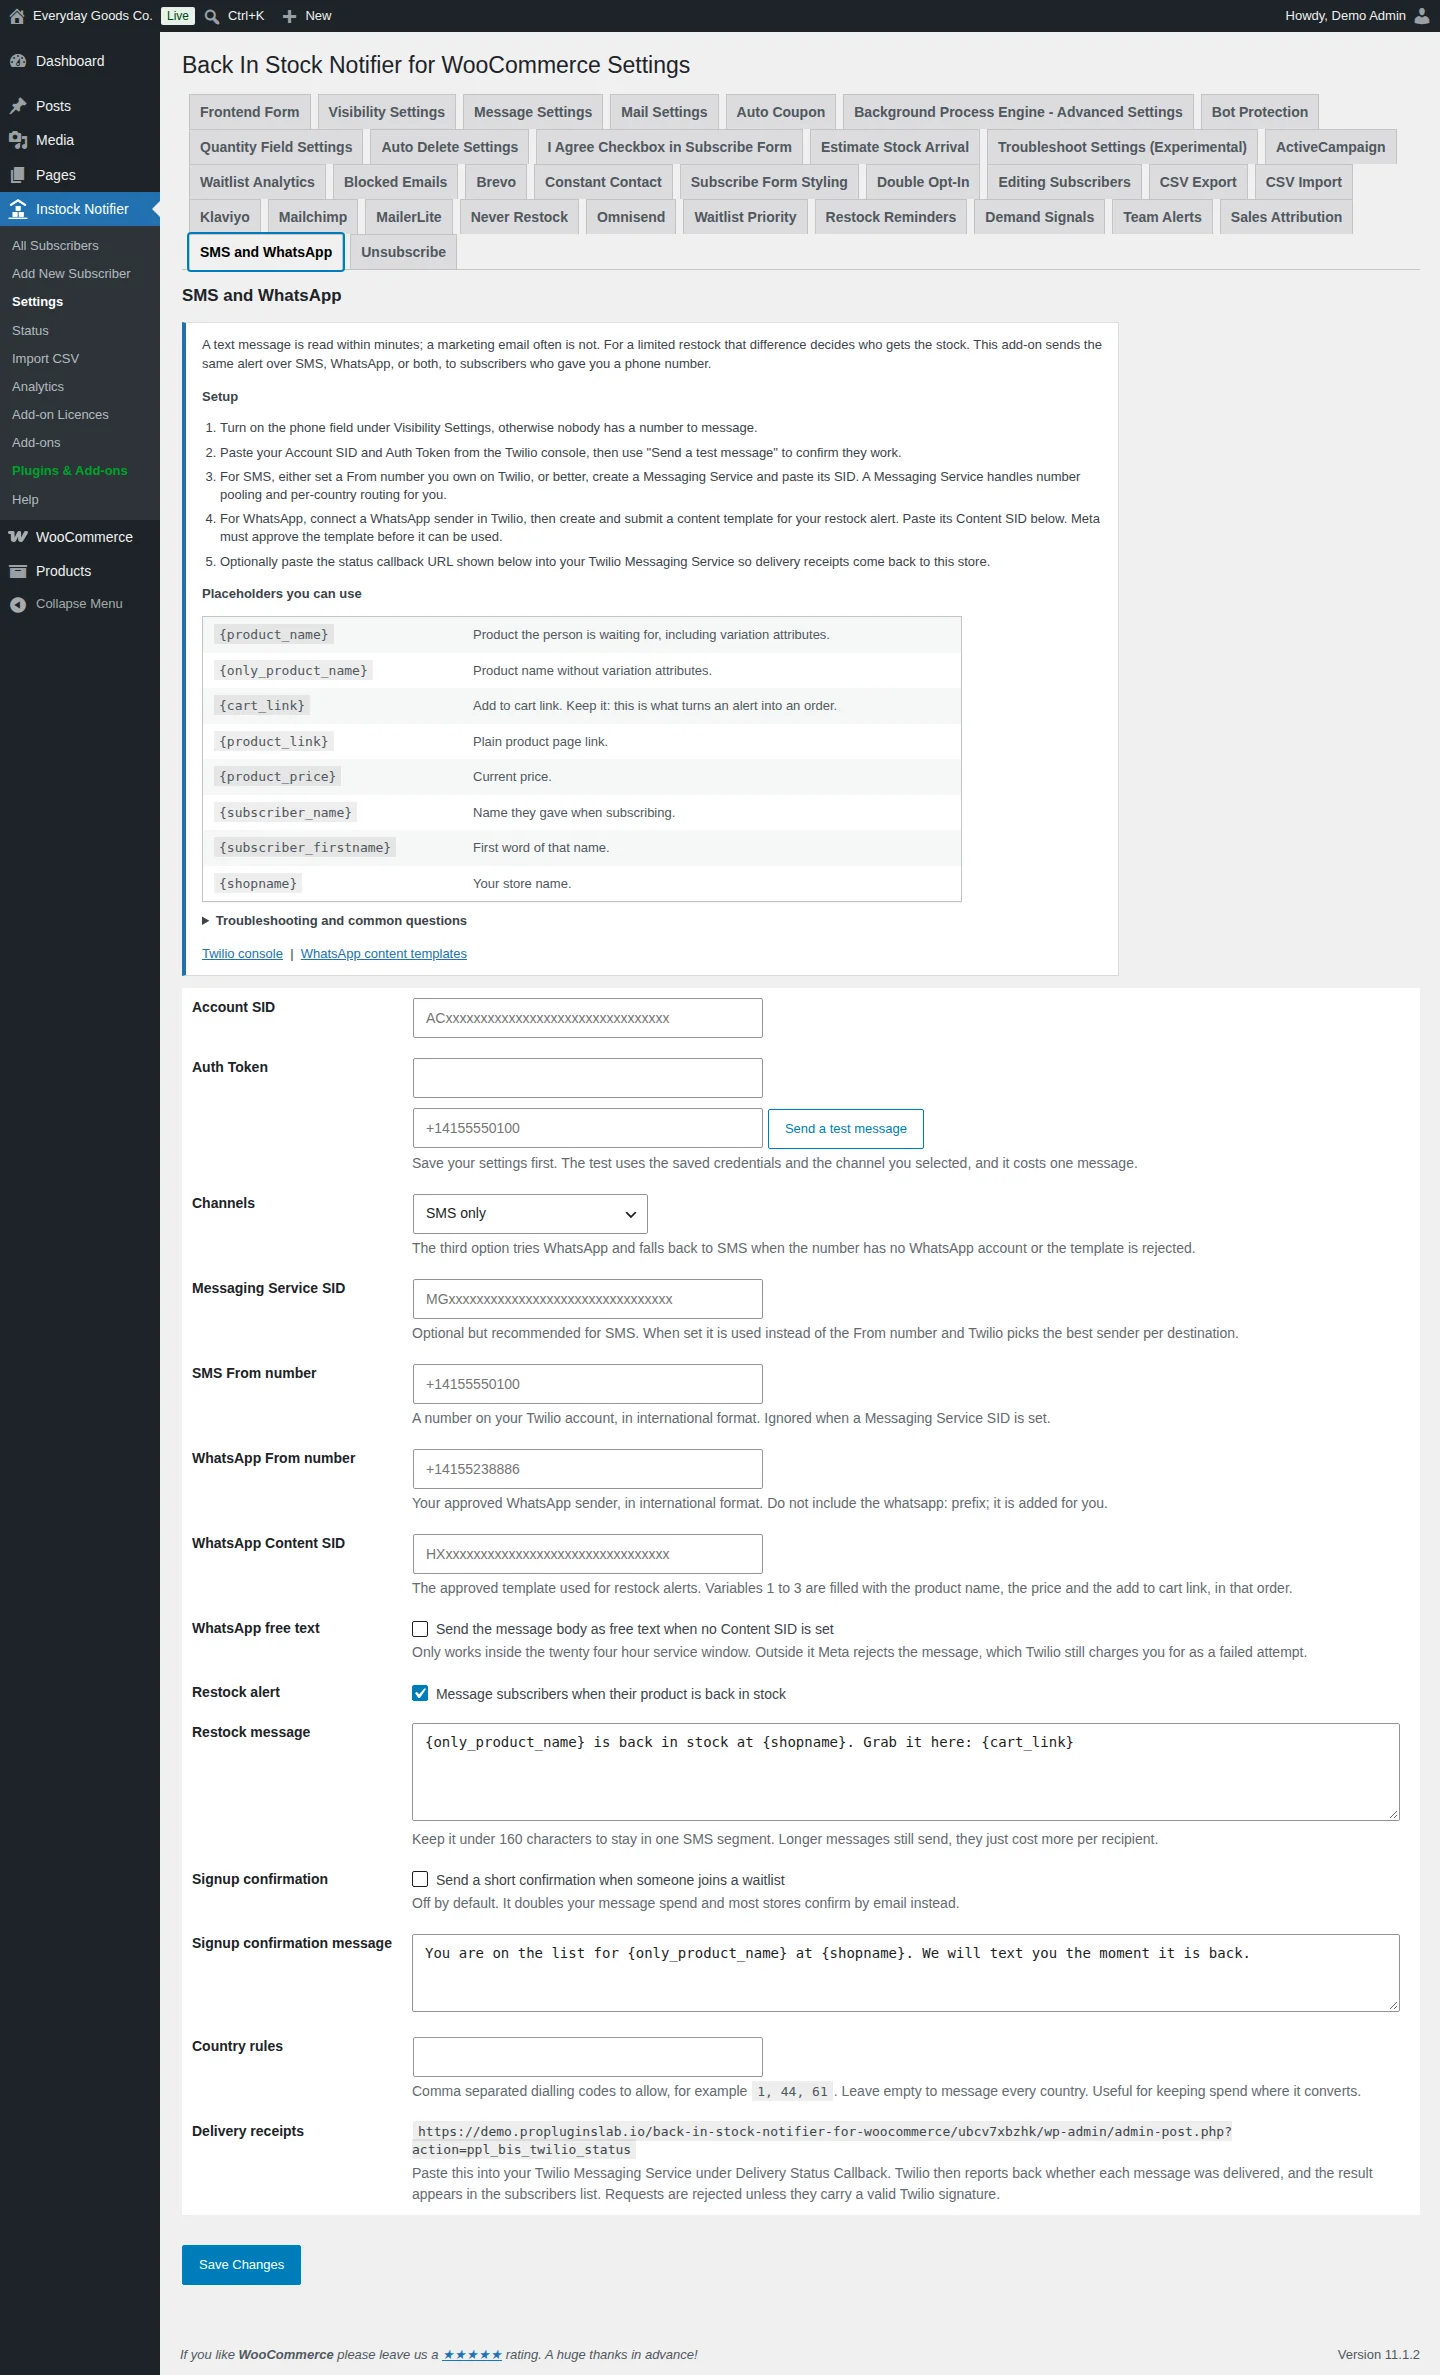
#Twilio SMS and WhatsApp
This add-on sends the restock alert by SMS, WhatsApp or both to subscribers who gave a phone number. It uses your Twilio account.
Set it up under Instock Notifier > Settings > SMS and WhatsApp:
- Turn on the phone field under the Visibility Settings tab. Otherwise nobody has a number to message.
- Paste your Account SID and Auth Token from the Twilio console. Save, then use Send a test message to confirm they work. The test costs one message.
- For SMS, set an SMS From number you own on Twilio. Or, better, paste a Messaging Service SID, which is used instead of the From number.
- For WhatsApp, connect a WhatsApp sender in Twilio, create a content template for your restock alert and paste its WhatsApp Content SID. Meta must approve the template first. Variables 1 to 3 are filled with the product name, the price and the add to cart link.
- Choose Channels:
SMS only,WhatsApp onlyorWhatsApp first, SMS if that fails. - Optionally paste the URL shown under Delivery receipts into your Twilio Messaging Service. Delivery results then appear in the subscribers list.
Keep the Restock message under 160 characters to stay in one SMS segment. Use Country rules to limit sending to certain dialling codes. Sending is queued, so a large restock doesn't hold up your store.
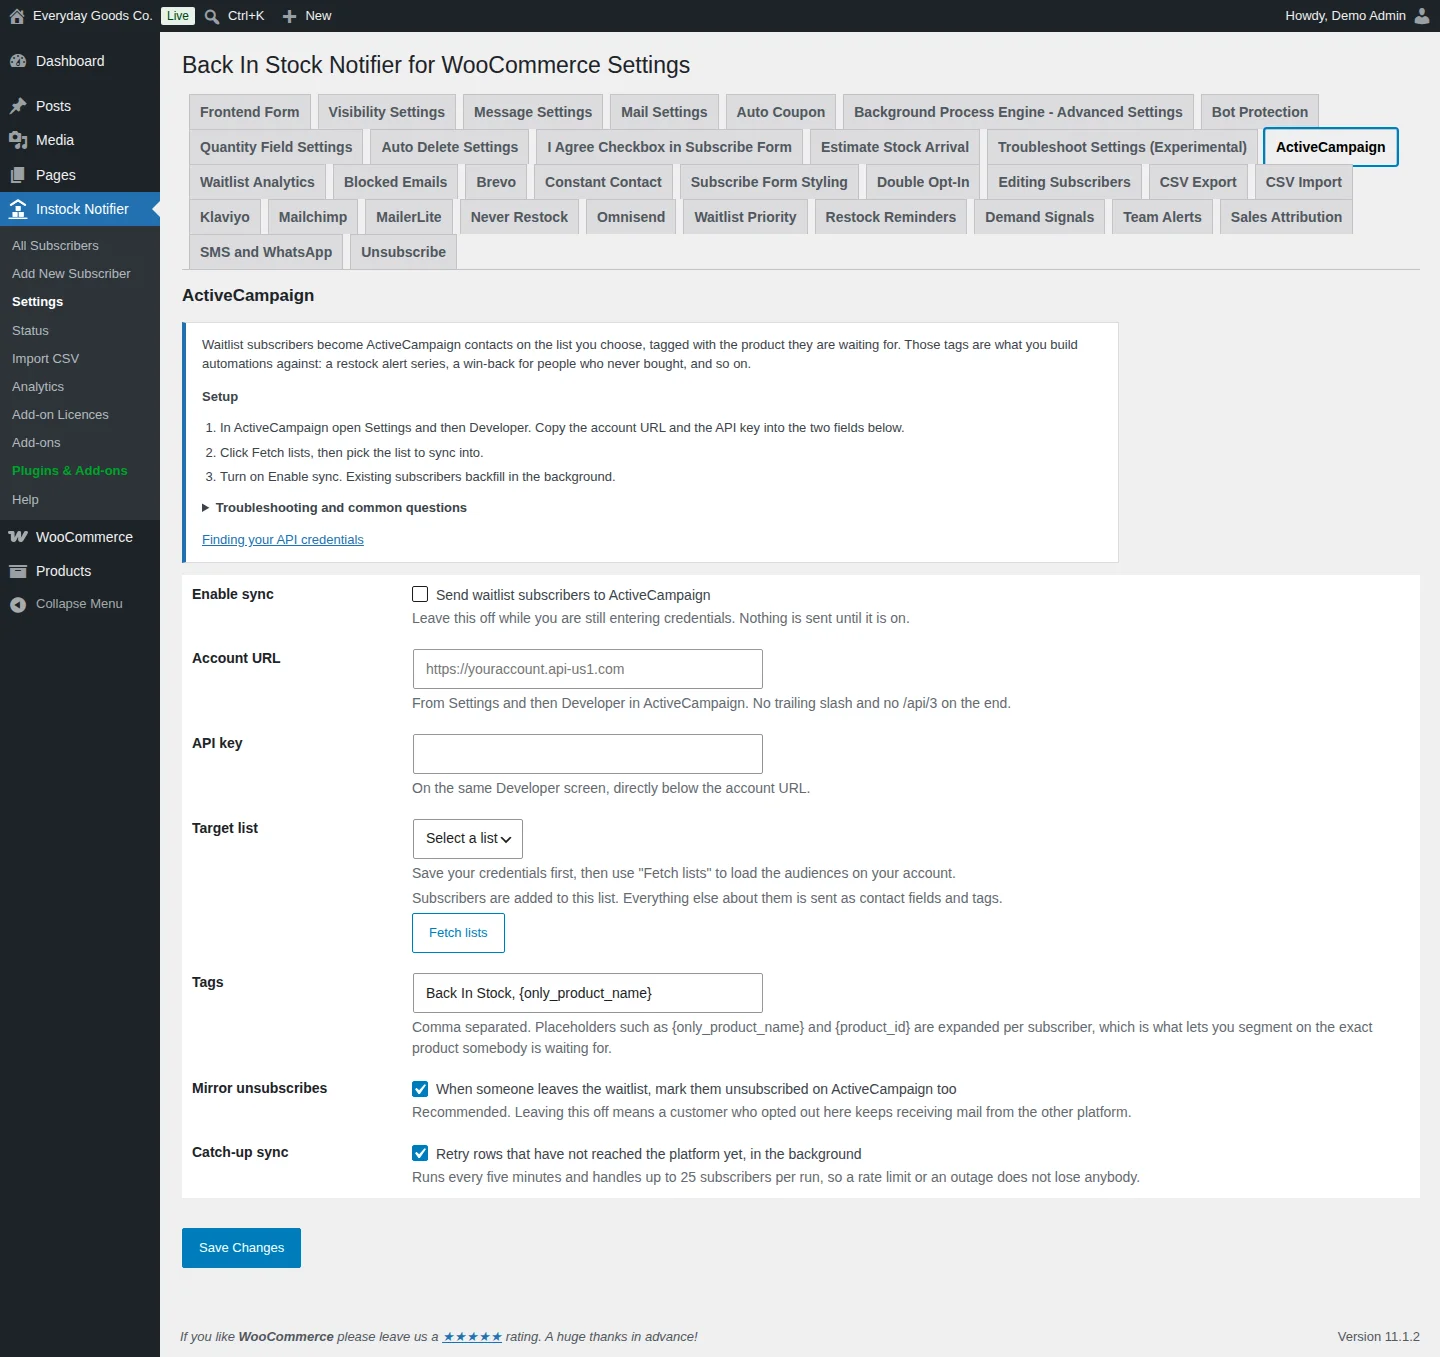
#ActiveCampaign
This add-on adds waitlist subscribers to ActiveCampaign as contacts on the list you choose. Each contact is tagged with the product they're waiting for. You build automations against those tags.
Set it up under Instock Notifier > Settings > ActiveCampaign:
- In ActiveCampaign, open Settings and then Developer. Copy the account URL into Account URL (no trailing slash and no
/api/3) and the key into API key. - Save, click Fetch lists and pick a Target list.
- Adjust Tags if you like. Placeholders such as
{only_product_name}and{product_id}are filled in per subscriber. - Tick Enable sync. Existing subscribers are backfilled in the background.
Missing tags are created in ActiveCampaign automatically, so give the first sync a minute. Mirror unsubscribes sets the contact to unsubscribed on that list only. It doesn't delete the contact. A 403 error when fetching lists almost always means the account URL is wrong.
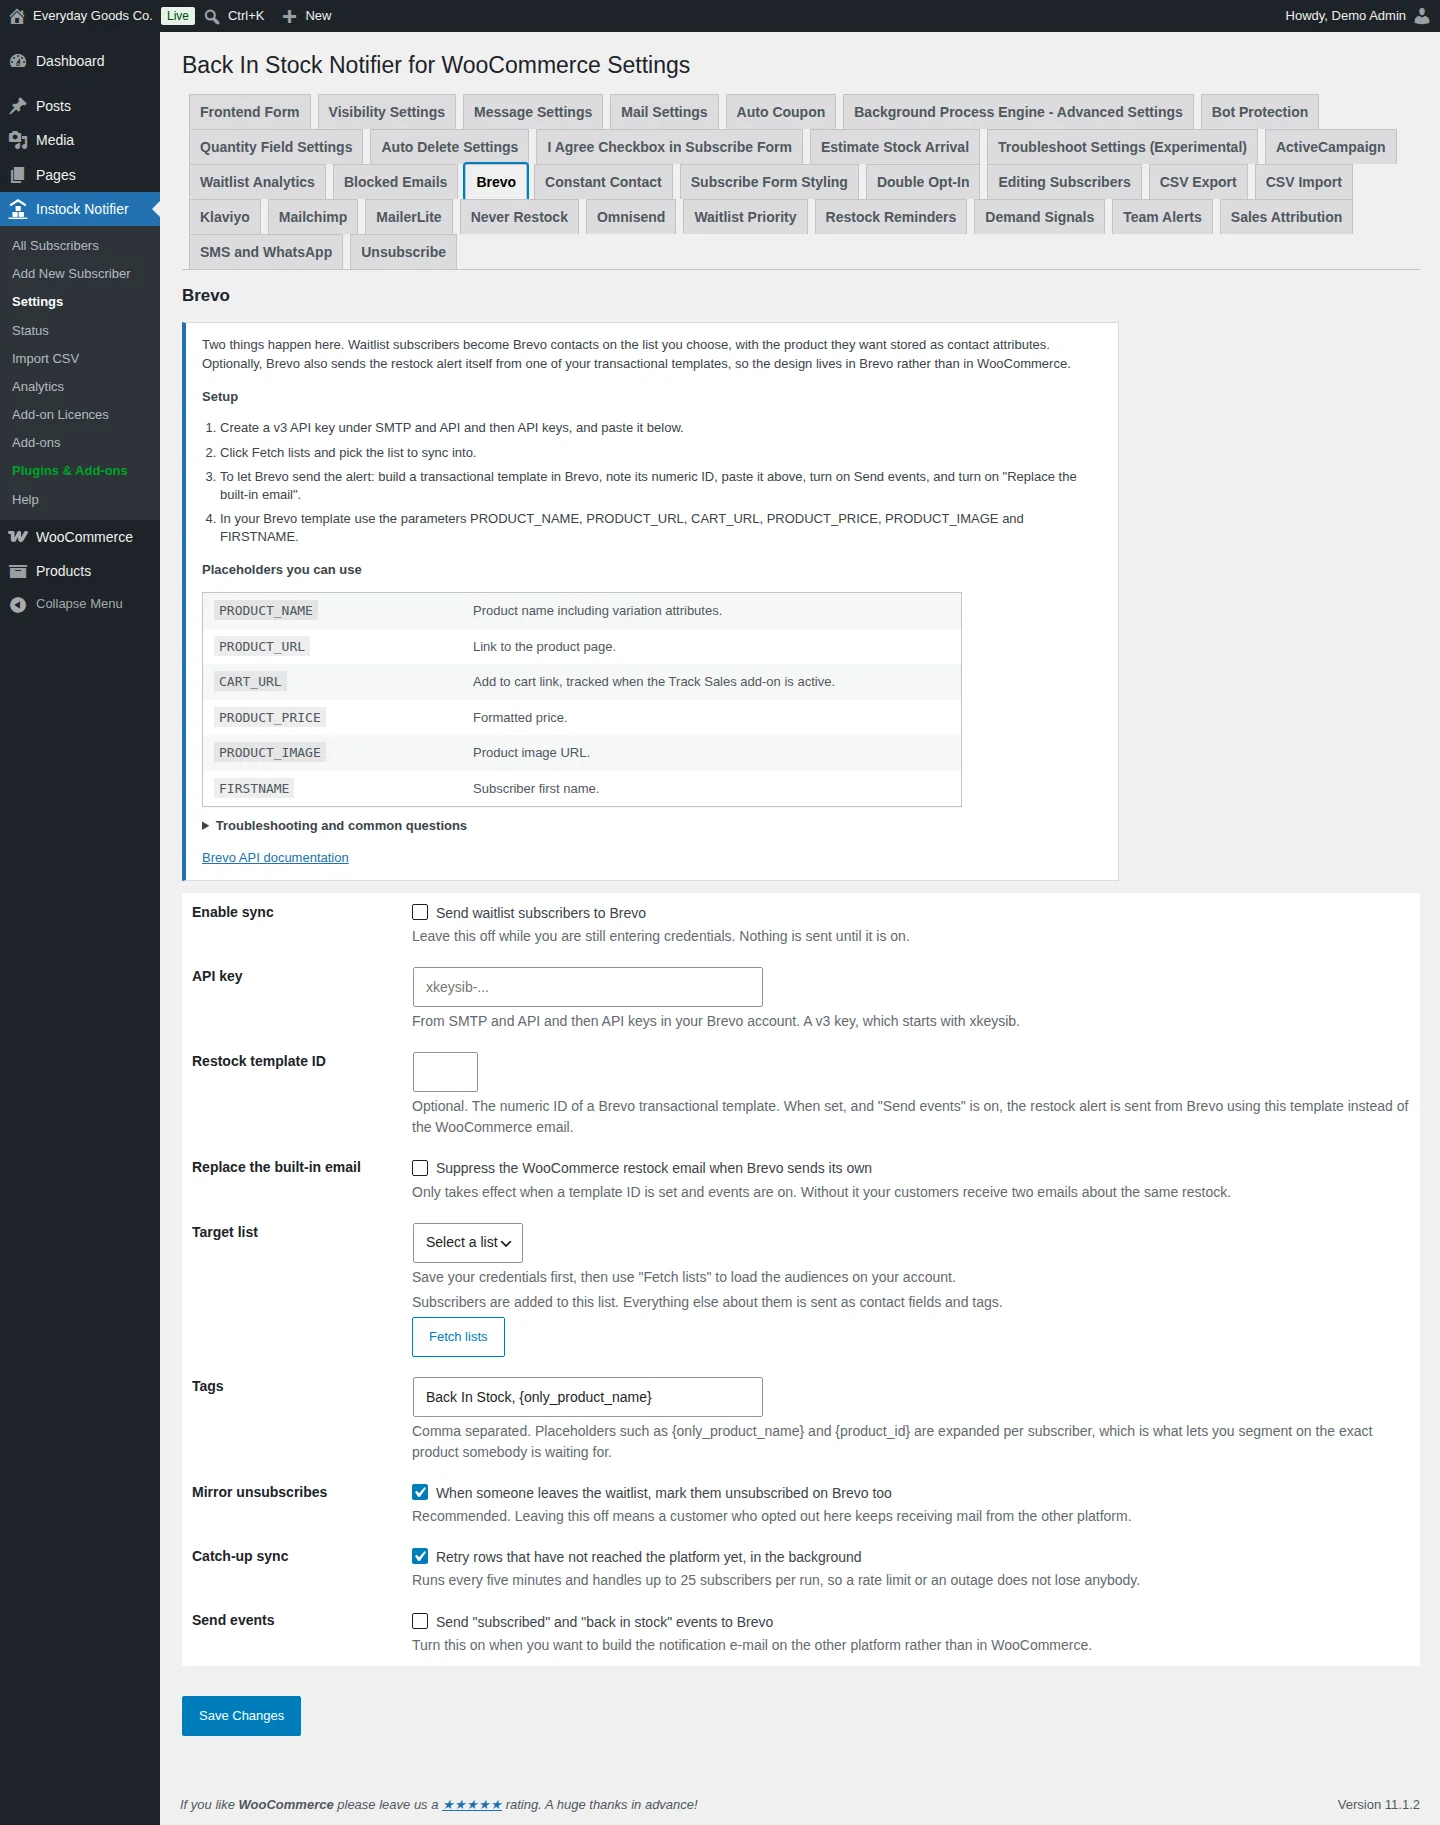
#Brevo
This add-on adds waitlist subscribers to a Brevo list, with the product stored as contact attributes. It can also let Brevo send the restock alert from one of your transactional templates.
Set it up under Instock Notifier > Settings > Brevo:
- Create a v3 API key (it starts with
xkeysib) under SMTP and API and then API keys in Brevo, and paste it into API key. - Save, click Fetch lists and pick a Target list.
- Tick Enable sync.
To let Brevo send the alert, build a transactional template in Brevo and enter its numeric ID in Restock template ID. Then tick Send events and Replace the built-in email. Without the replace option, customers get two emails about the same restock. In the template, use the parameters PRODUCT_NAME, PRODUCT_URL, CART_URL, PRODUCT_PRICE, PRODUCT_IMAGE and FIRSTNAME, written in Brevo's syntax, for example {{ params.PRODUCT_NAME }}.
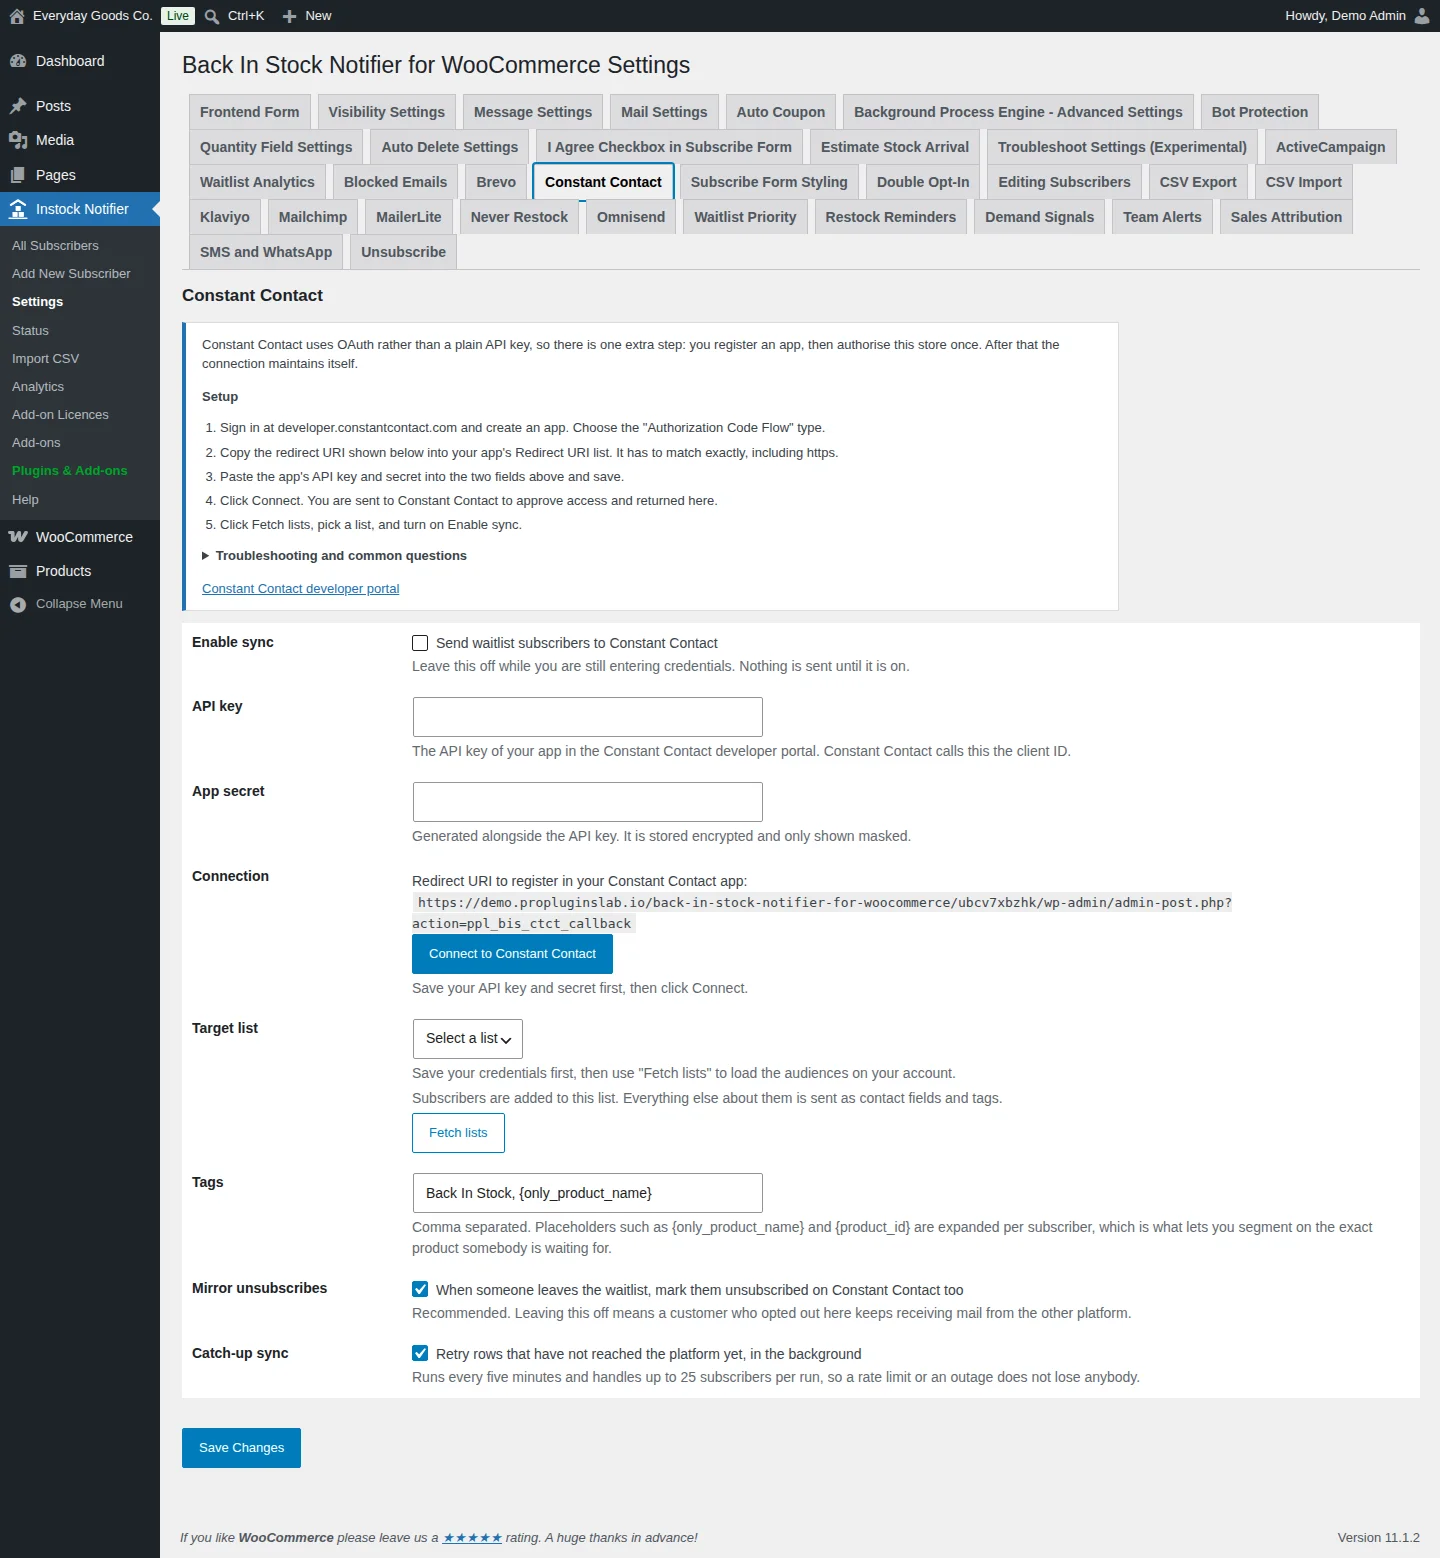
#Constant Contact
This add-on adds waitlist subscribers to a Constant Contact list. Constant Contact uses OAuth, so you register an app once and authorise your store. After that, tokens are refreshed automatically.
Set it up under Instock Notifier > Settings > Constant Contact:
- Sign in to the Constant Contact developer portal and create an app of the "Authorization Code Flow" type.
- Copy the redirect URI shown under Connection into your app's Redirect URI list. It must match exactly, including https.
- Paste the app's API key (Constant Contact calls it the client ID) and App secret, then save.
- Click Connect to Constant Contact, approve access and you are returned to your site.
- Click Fetch lists, pick a Target list and tick Enable sync.
Constant Contact has no tags, so the product someone is waiting for is saved as a note on the contact. If the connection stops working, the refresh token may have been revoked or the app secret regenerated. Connect again to fix it.
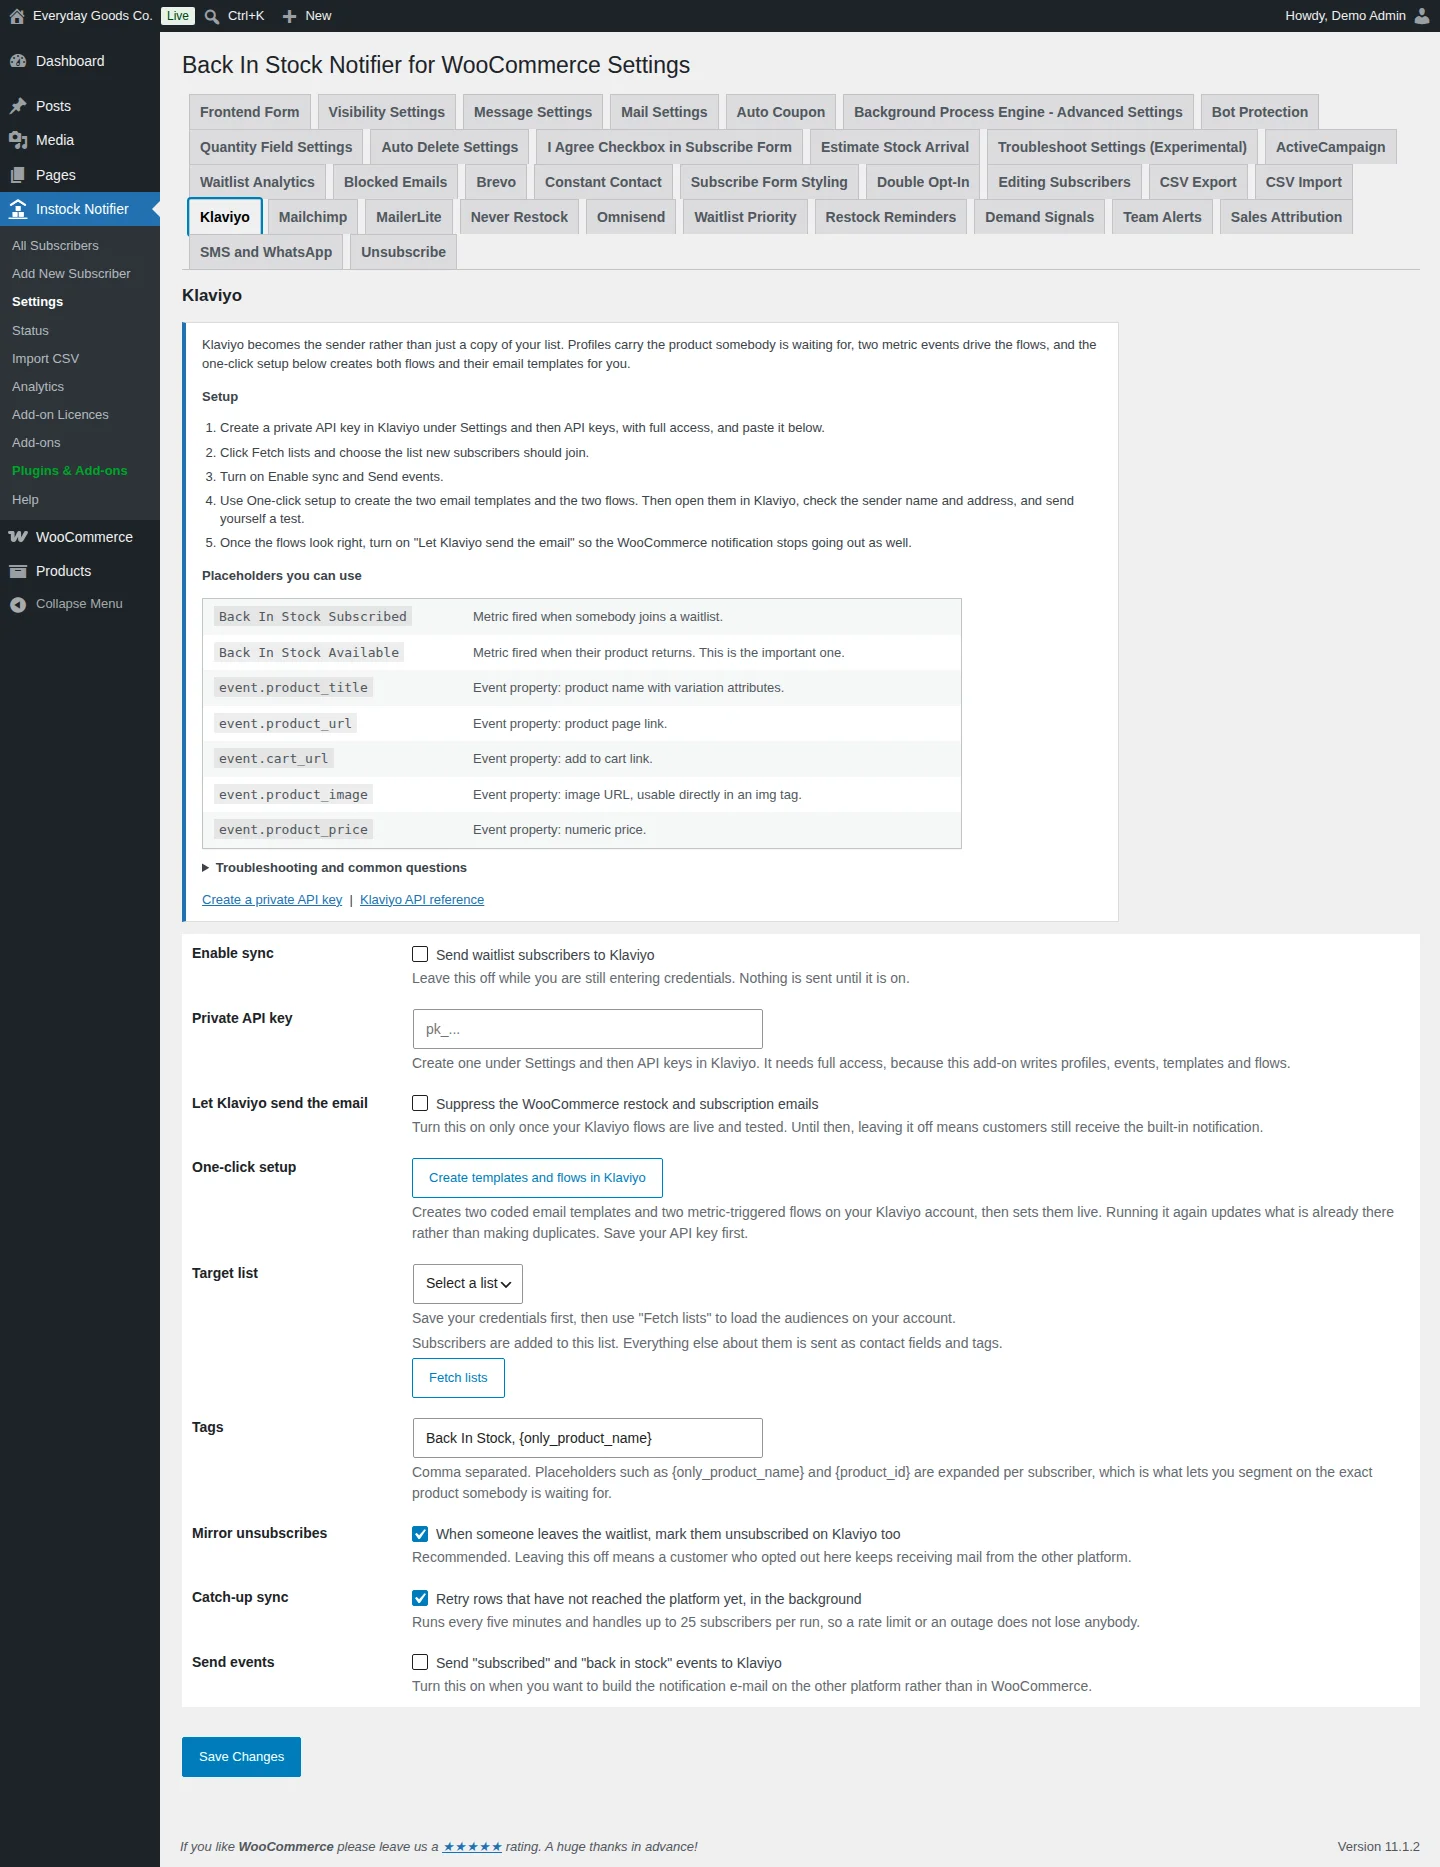
#Klaviyo
This add-on adds waitlist subscribers to Klaviyo with product properties. It fires two metric events, Back In Stock Subscribed and Back In Stock Available. It can also create the matching email templates and flows for you, so Klaviyo sends the notification.
Set it up under Instock Notifier > Settings > Klaviyo:
- Create a private API key with full access under Settings and then API keys in Klaviyo, and paste it into Private API key.
- Save, click Fetch lists and choose a Target list.
- Tick Enable sync and Send events.
- Click Create templates and flows in Klaviyo. Then open them in Klaviyo, check the sender name and address, and send yourself a test. Running it again updates what exists rather than making duplicates.
- Once the flows look right, tick Let Klaviyo send the email so the WooCommerce notification stops going out too.
In flows, you can use the event properties event.product_title, event.product_url, event.cart_url, event.product_image and event.product_price. A metric only exists in Klaviyo once it has been received. If setup reports an unknown metric, subscribe a test address with events on and run a restock first.
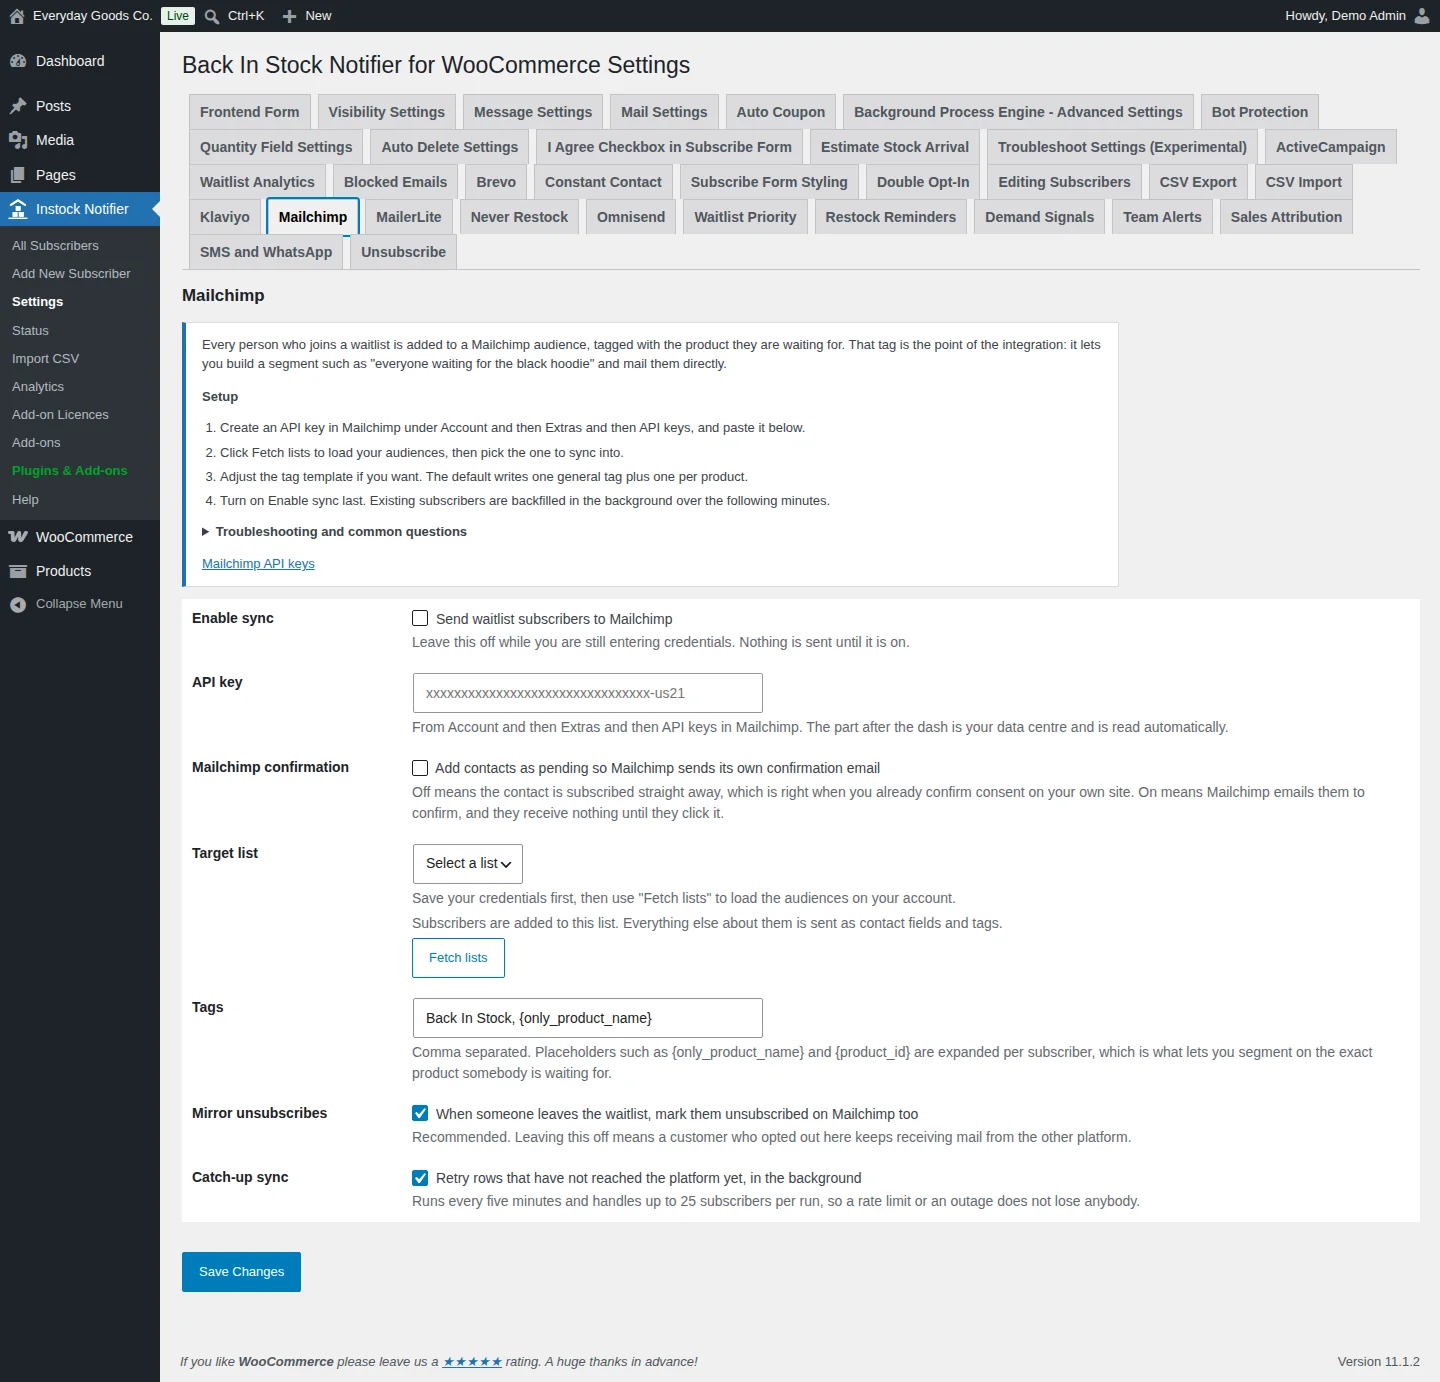
#Mailchimp
This add-on adds everyone who joins a waitlist to a Mailchimp audience, tagged with the product they're waiting for. Use those tags to build segments such as everyone waiting for one product.
Set it up under Instock Notifier > Settings > Mailchimp:
- Create an API key under Account, Extras and then API keys in Mailchimp, and paste it into API key. The part after the dash is your data centre and is read automatically.
- Save, click Fetch lists and pick an audience in Target list.
- Adjust Tags if you want. The default writes one general tag plus one per product.
- Tick Enable sync last. Existing subscribers are backfilled in the background.
Leave Mailchimp confirmation off if you already confirm consent on your own site, for example with Double Opt-In. Turn it on to have Mailchimp email contacts to confirm. The name goes into FNAME and LNAME, and the phone number goes into PHONE if your audience has that field. Contacts who were deleted or archived in Mailchimp can't be re-added by API. That is Mailchimp policy.
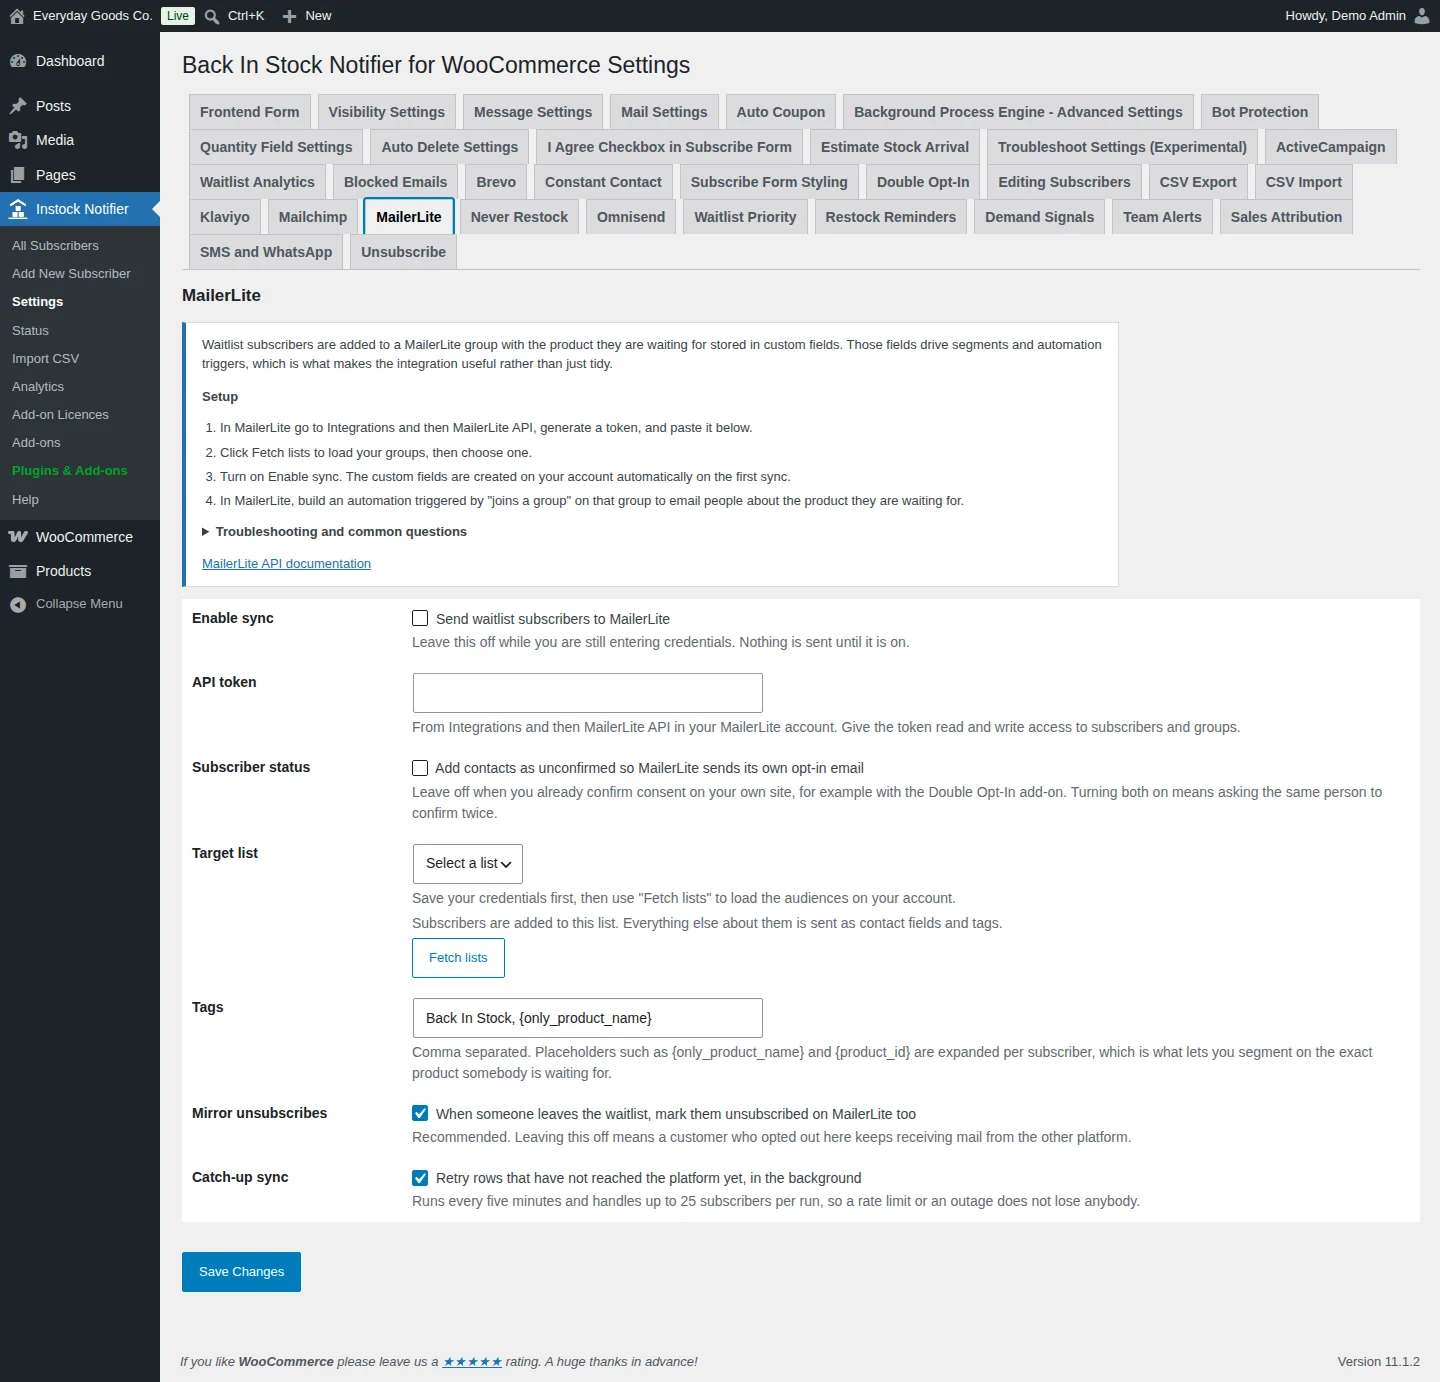
#MailerLite
This add-on adds waitlist subscribers to a MailerLite group. The product they're waiting for is written into custom fields, so you can build segments and automations around it.
Set it up under Instock Notifier > Settings > MailerLite:
- In MailerLite, go to Integrations and then MailerLite API, generate a token with read and write access to subscribers and groups, and paste it into API token.
- Save, click Fetch lists and choose a group in Target list.
- Tick Enable sync. The custom fields
bis_product,bis_product_id,bis_product_sku,bis_product_urlandbis_tagsare created on your account on the first sync. - In MailerLite, build an automation triggered by "joins a group" on that group.
MailerLite keeps one contact per email address. The product fields show the most recent product someone joined a waitlist for, and bis_tags builds up the full set. Leave Subscriber status off if you already use Double Opt-In. Otherwise people are asked to confirm twice.
#Omnisend
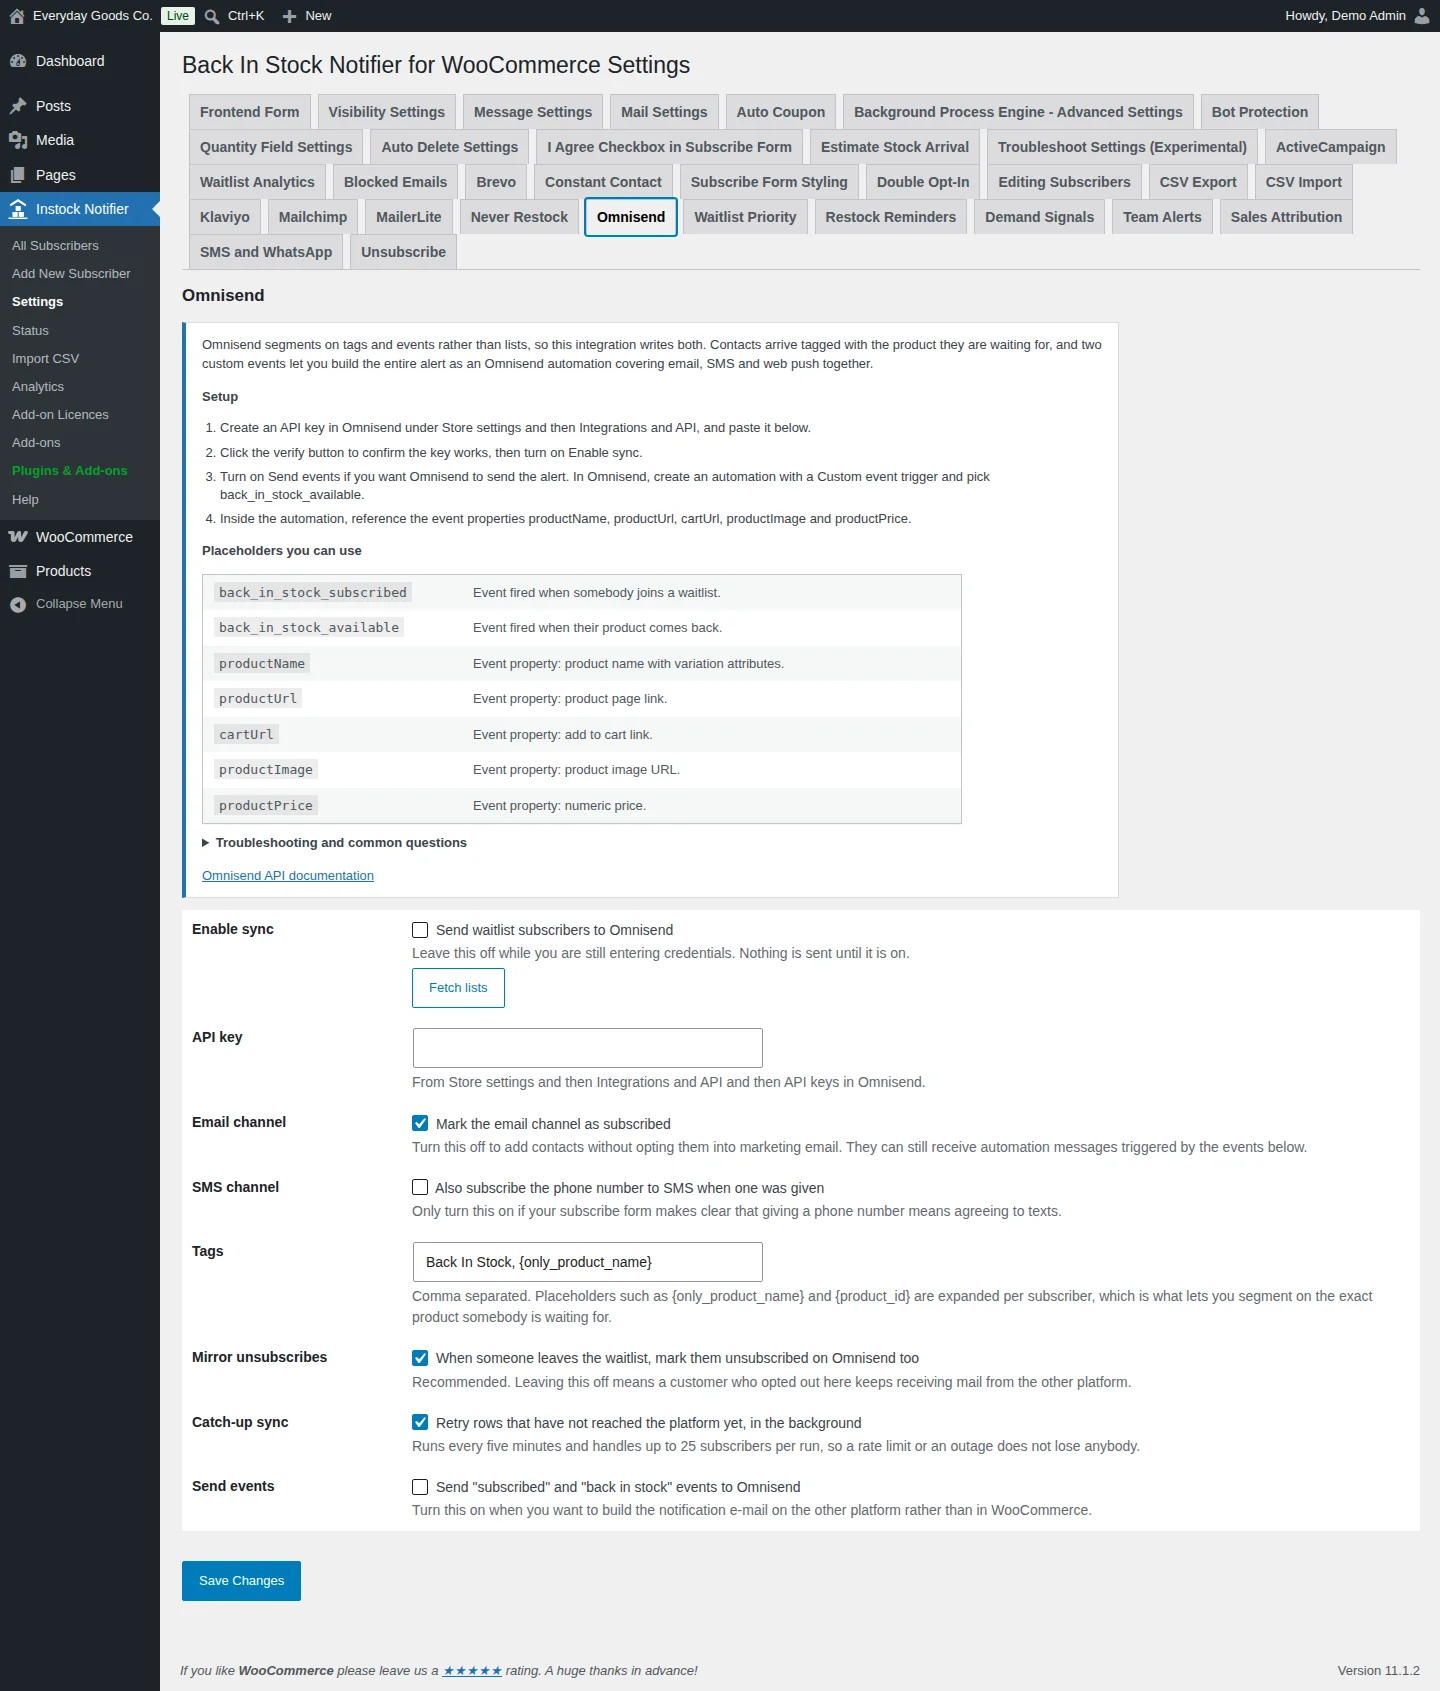
This add-on adds waitlist subscribers to Omnisend as tagged contacts. It can fire the custom events back_in_stock_subscribed and back_in_stock_available, so an Omnisend automation can send the alert. Omnisend doesn't use lists, so you won't see a list selector here.
Set it up under Instock Notifier > Settings > Omnisend:
- Create an API key under Store settings, Integrations and API and then API keys in Omnisend, and paste it into API key.
- Confirm the key works, then tick Enable sync.
- To let Omnisend send the alert, tick Send events. In Omnisend, create an automation with a Custom event trigger and pick
back_in_stock_available. - Inside the automation, use the event properties
productName,productUrl,cartUrl,productImageandproductPrice.
A custom event only appears in Omnisend's trigger list after it has been received once. Subscribe a test address and run a restock first. Only tick SMS channel if your subscribe form makes clear that giving a phone number means agreeing to texts. A contact who unsubscribed in Omnisend is never switched back to subscribed.
#Track Sales
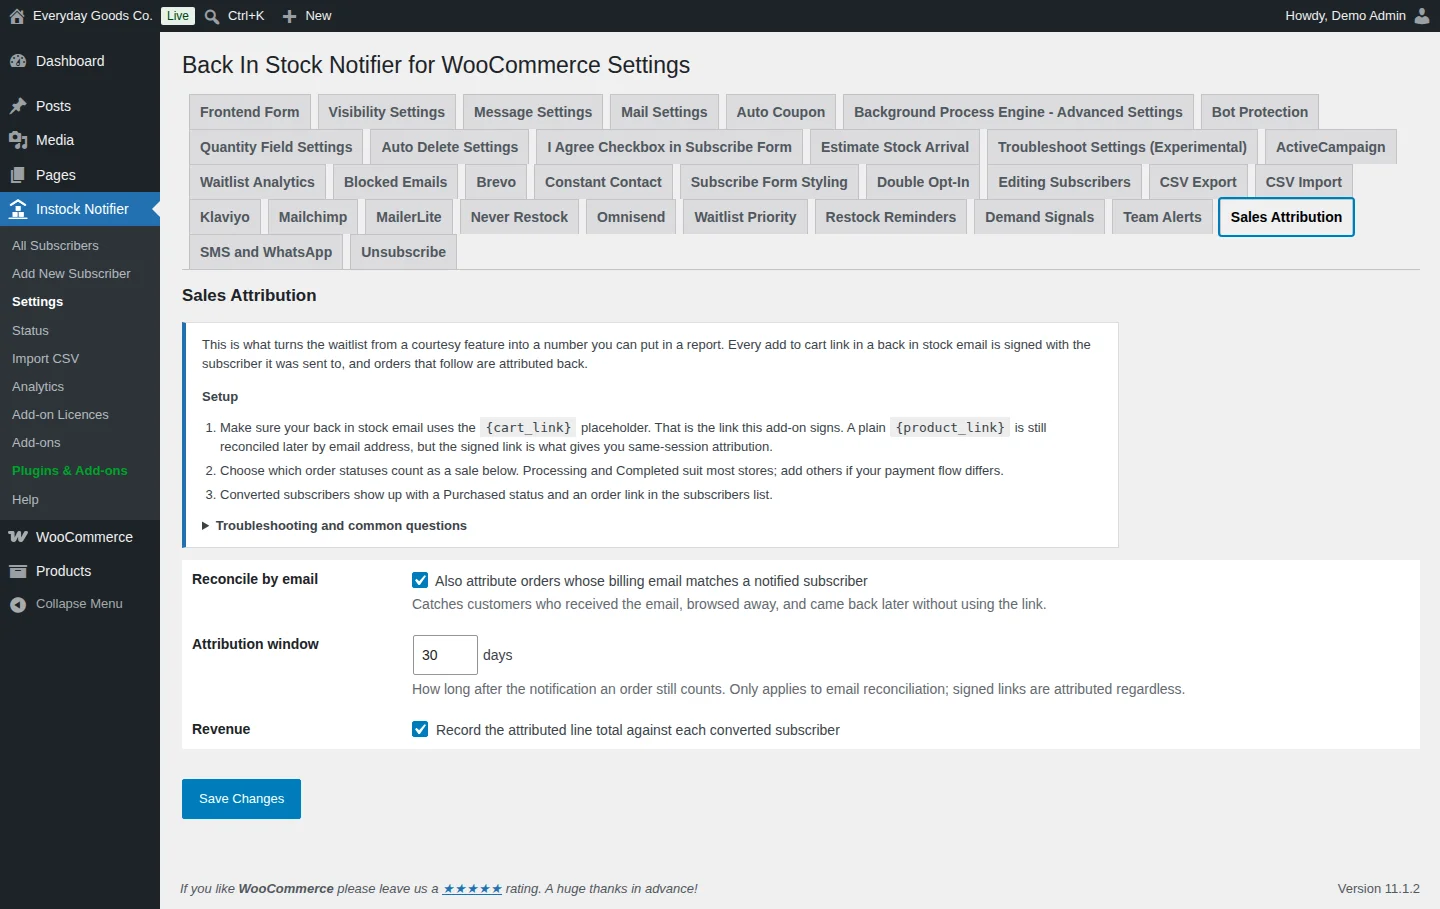
Track Sales links orders back to the restock email that produced them. Converted subscribers get the Purchased status, and their order and revenue appear in the subscribers list.
Set it up under Instock Notifier > Settings > Sales Attribution:
- Make sure your back in stock email uses the
{cart_link}placeholder. That is the link this add-on signs. Orders from people who used a plain{product_link}are still matched later by email address. - Leave Reconcile by email on to catch customers who came back later without using the link, and set the Attribution window in days.
- Leave Revenue on to record the attributed line total.
Orders placed from a signed link are attributed immediately. Orders matched by billing email are picked up by a background job every fifteen minutes. Attributed revenue is the line total of the product the person subscribed to, not the whole order value. Waitlist Analytics and Restock Reminders both rely on this add-on.
#Waitlist Analytics
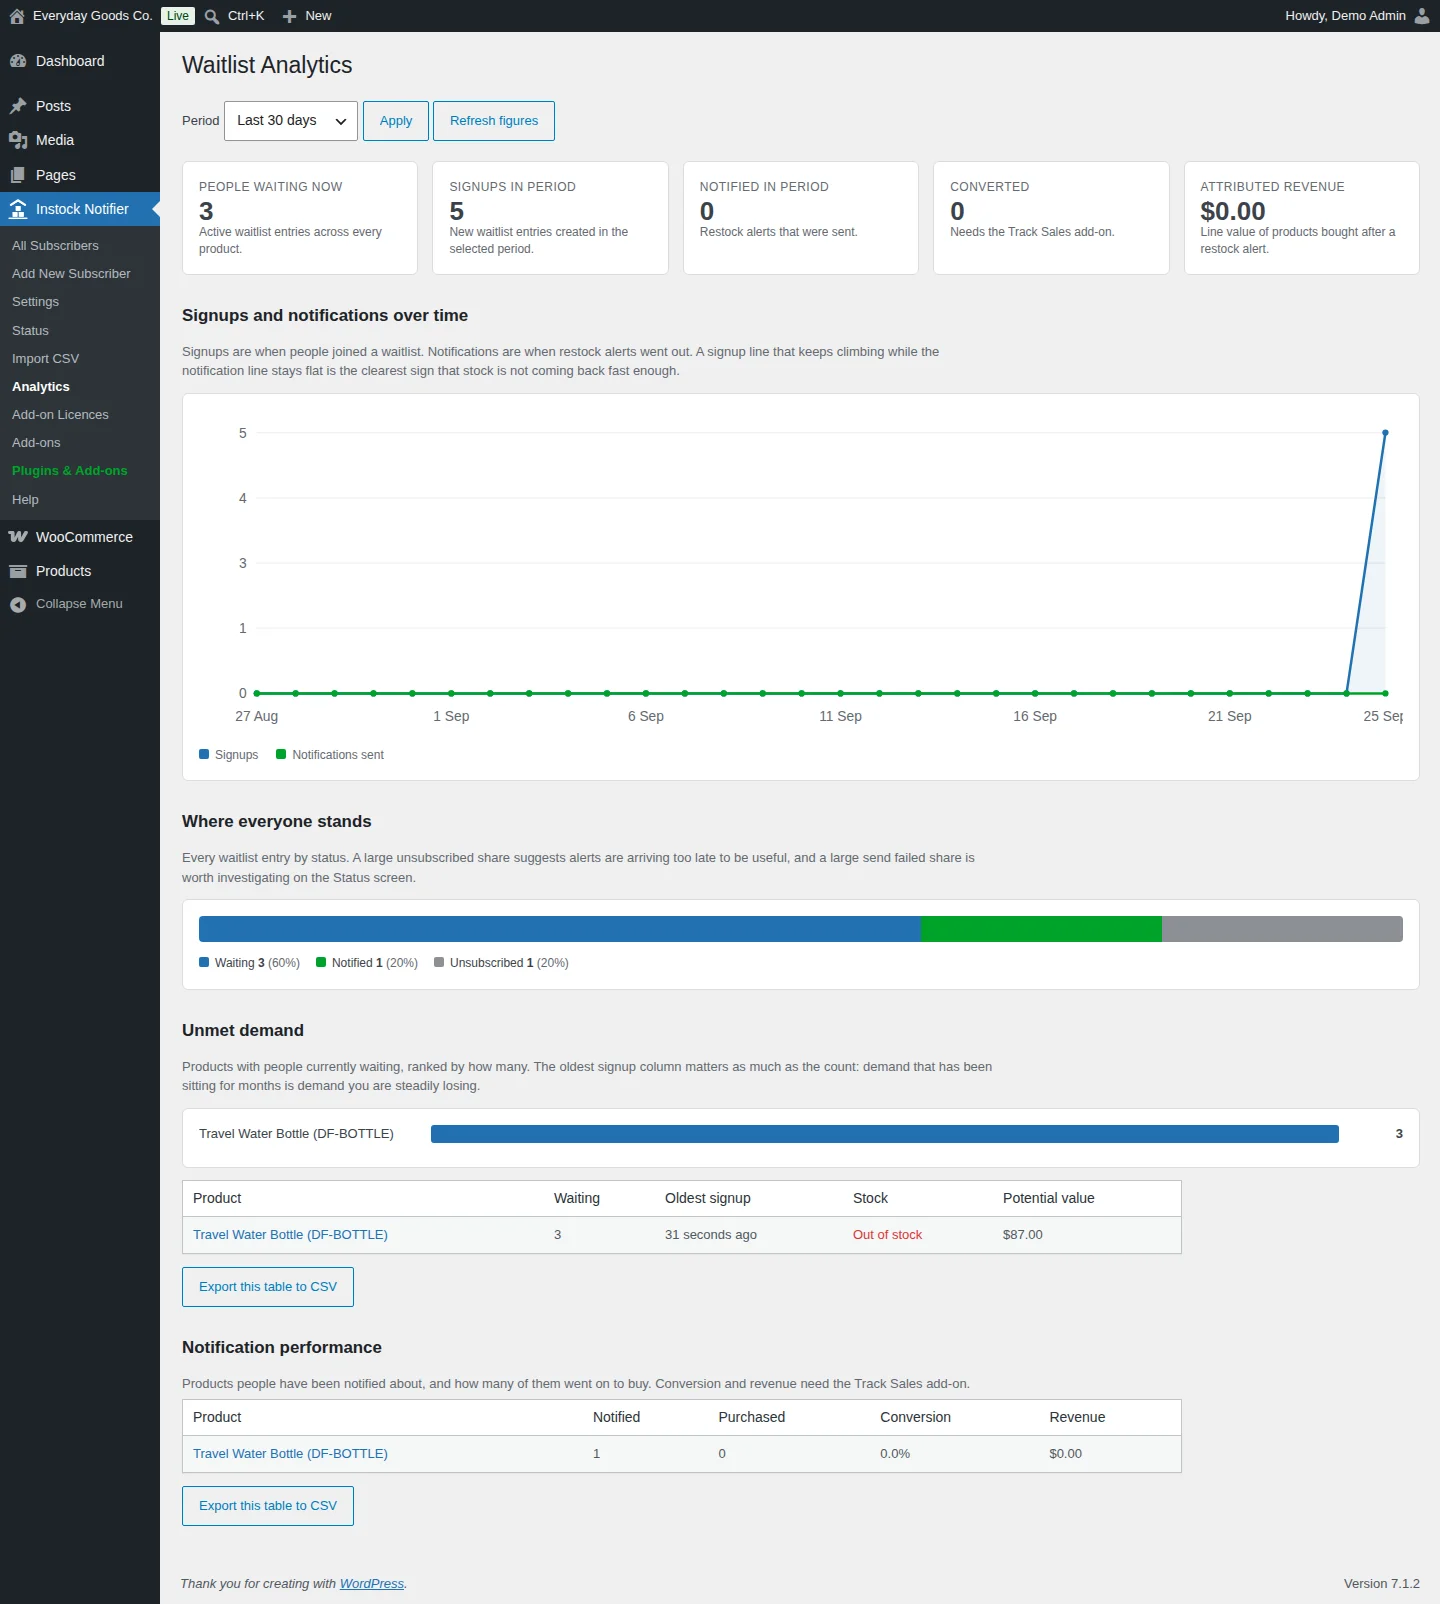
Waitlist Analytics adds a report screen under Instock Notifier > Analytics. It needs no setup.
- Summary cards: People waiting now, Signups in period, Notified in period, Converted and Attributed revenue.
- Signups and notifications over time: a chart of signups against alerts sent.
- Where everyone stands: every waitlist entry by status.
- Unmet demand: products with people waiting, ranked by how many, with oldest signup, stock and potential value. This is the best report to start with.
- Notification performance: notified, purchased, conversion and revenue per product.
Pick a Period and click Apply. Reports are cached for fifteen minutes. Click Refresh figures to recompute now. Use Export this table to CSV under a table to download it. Conversion and revenue figures need the Track Sales add-on.
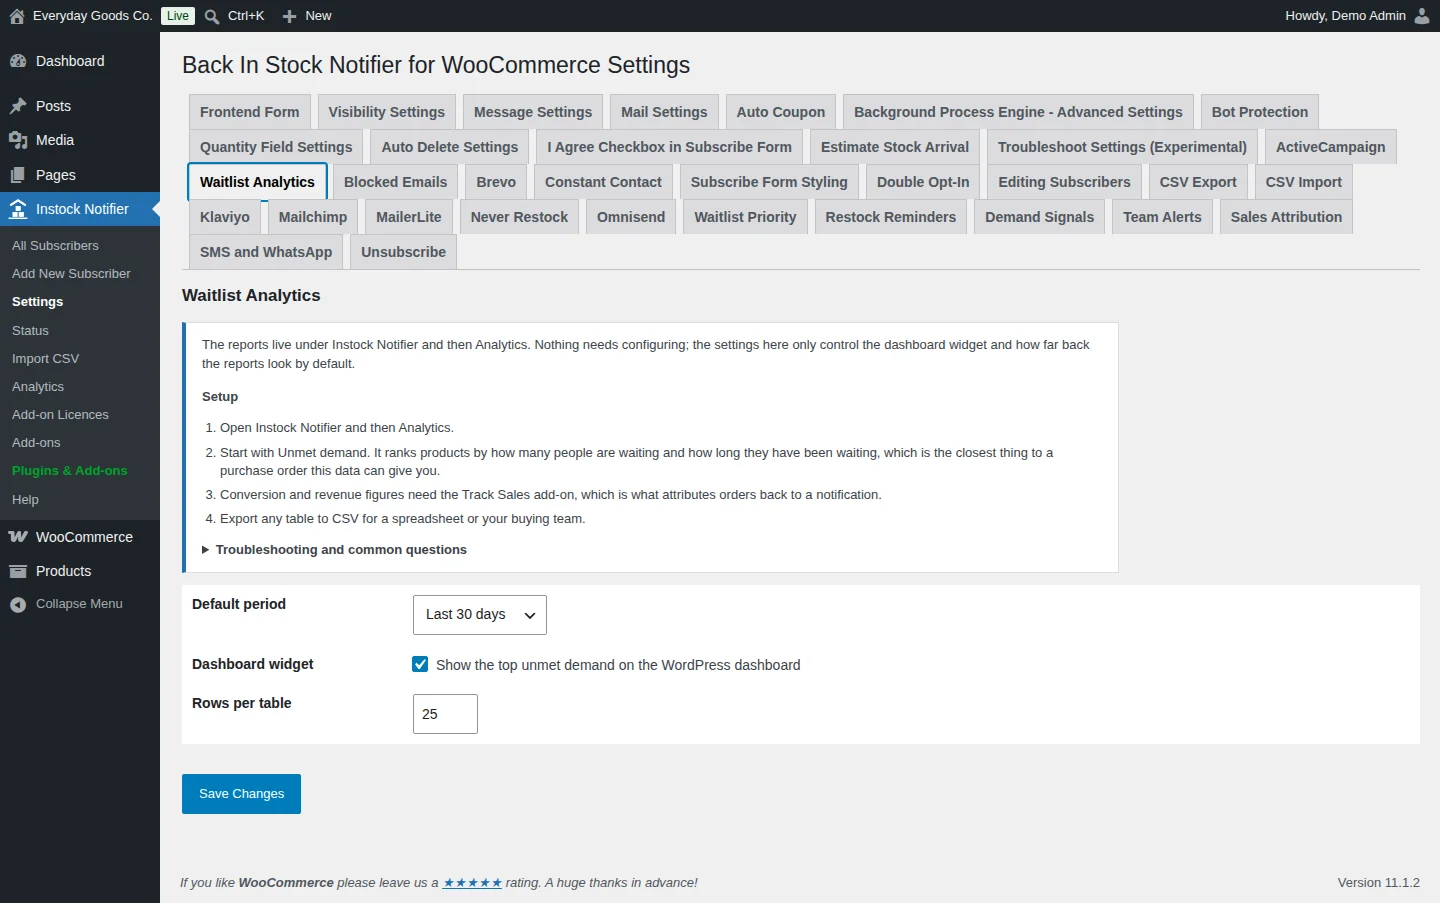
Under Instock Notifier > Settings > Waitlist Analytics, you set the Default period and Rows per table, and choose whether the top unmet demand shows on the WordPress dashboard.
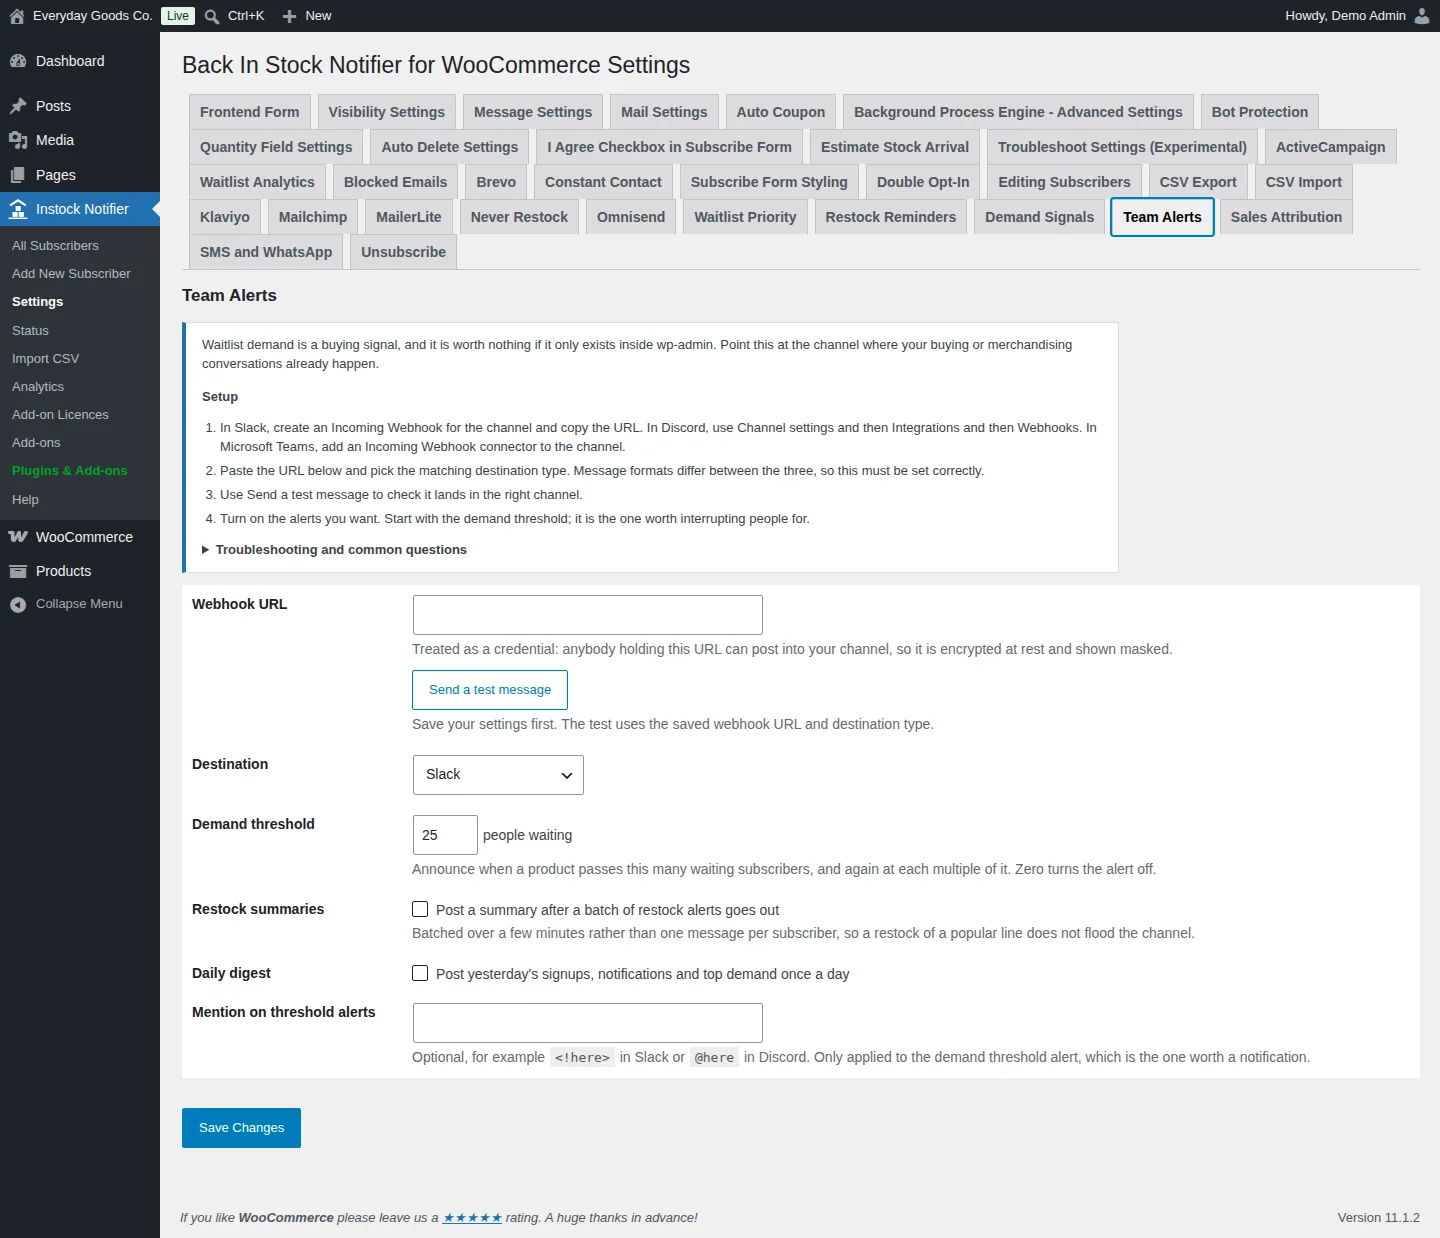
#Team Alerts
Team Alerts posts waitlist signals to Slack, Discord, Microsoft Teams or any webhook, so your buying team sees demand without opening wp-admin.
Set it up under Instock Notifier > Settings > Team Alerts:
- Create an incoming webhook. In Slack, create an Incoming Webhook for the channel. In Discord, use Channel settings, Integrations and then Webhooks. In Microsoft Teams, add an Incoming Webhook connector to the channel.
- Paste the URL into Webhook URL and pick the matching Destination. Message formats differ, so this must be correct.
- Save, then click Send a test message.
- Set a Demand threshold. A product is announced when it passes this many waiting subscribers, and again at each multiple. Zero turns the alert off.
- Optionally tick Restock summaries and Daily digest, and add a Mention on threshold alerts such as
<!here>in Slack or@herein Discord.
Alerts carry product names, counts and potential values only. No email addresses or phone numbers are sent. The webhook URL is encrypted at rest and shown masked. The URL must be HTTPS.
#Waitlist Priority
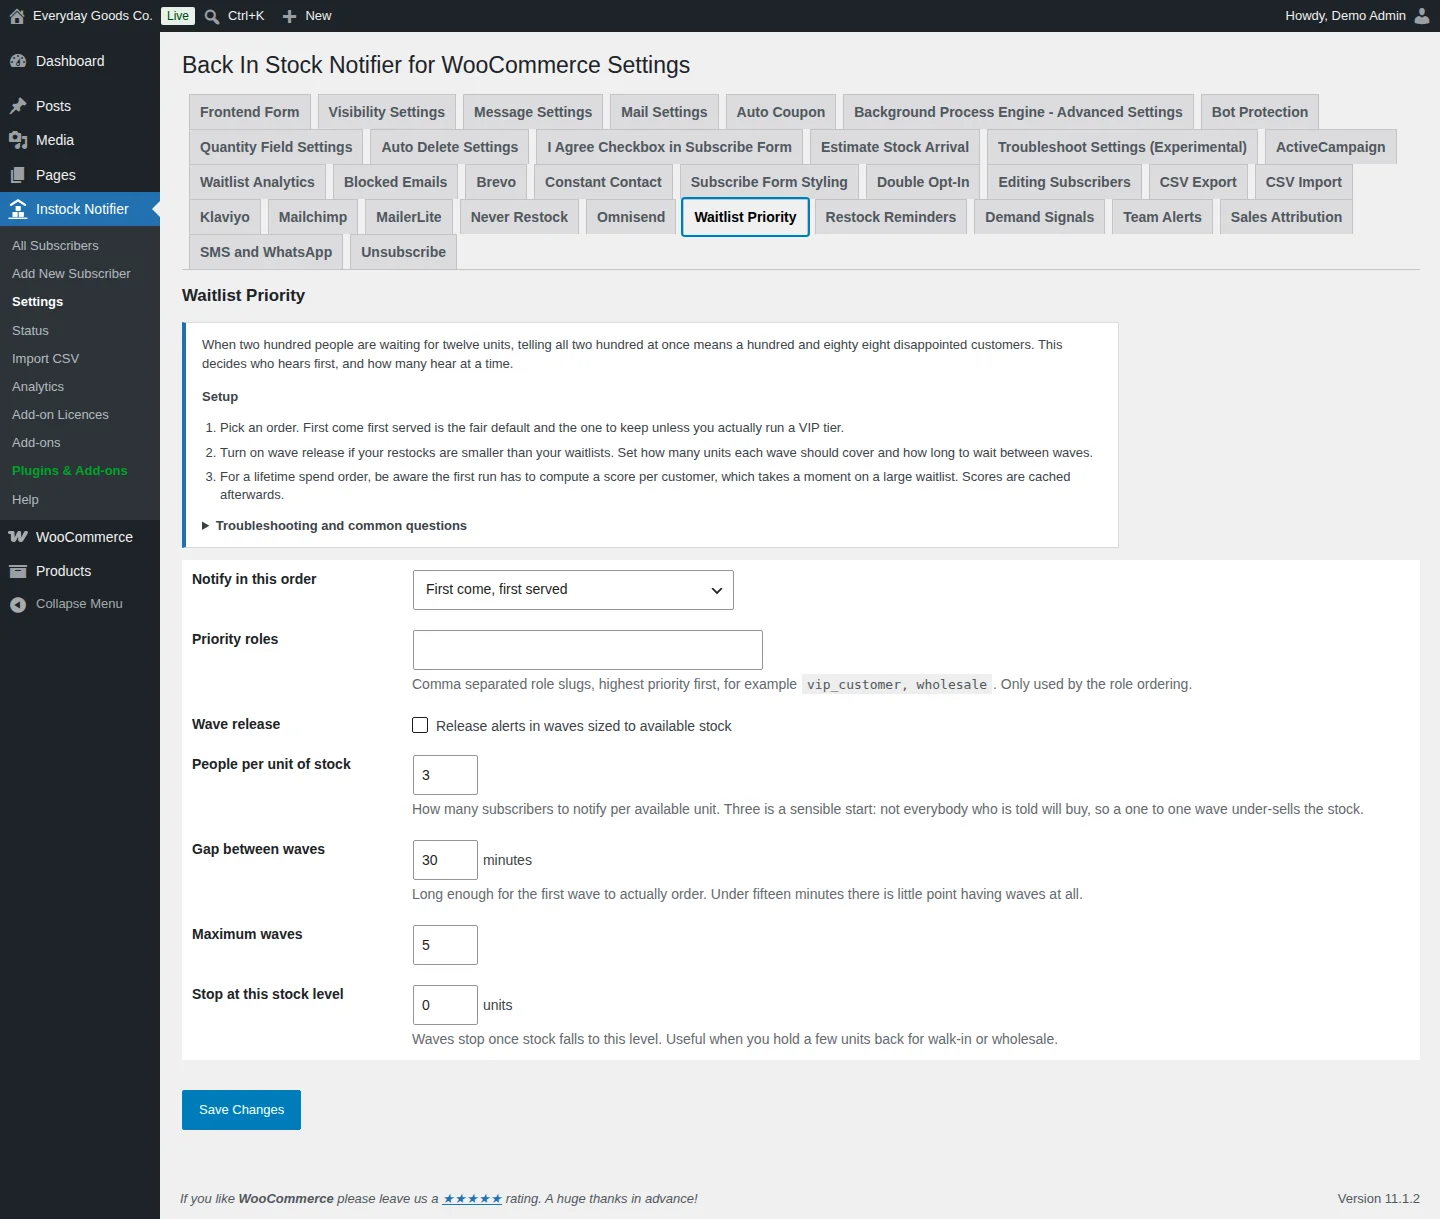
Waitlist Priority decides who hears first when stock is limited and how many people are told at a time.
Set it up under Instock Notifier > Settings > Waitlist Priority:
- Choose Notify in this order:
First come, first served,Highest lifetime spend first,Priority customer roles first, then signup orderorRegistered customers first, then guests. - For role ordering, list role slugs in Priority roles, highest first, for example
vip_customer, wholesale. - Tick Wave release if your restocks are often smaller than your waitlists. Set People per unit of stock, Gap between waves in minutes and Maximum waves.
- Optionally set Stop at this stock level to hold a few units back.
Stock is re-read before every wave. When the product sells out, the remaining waves are cancelled and those subscribers stay on the waitlist for the next restock. Wave sizing needs a stock number. For products that don't manage stock, the add-on paces sending with a fixed batch instead. Scores for spend ordering are only computed for registered customers.
#Double Opt-In
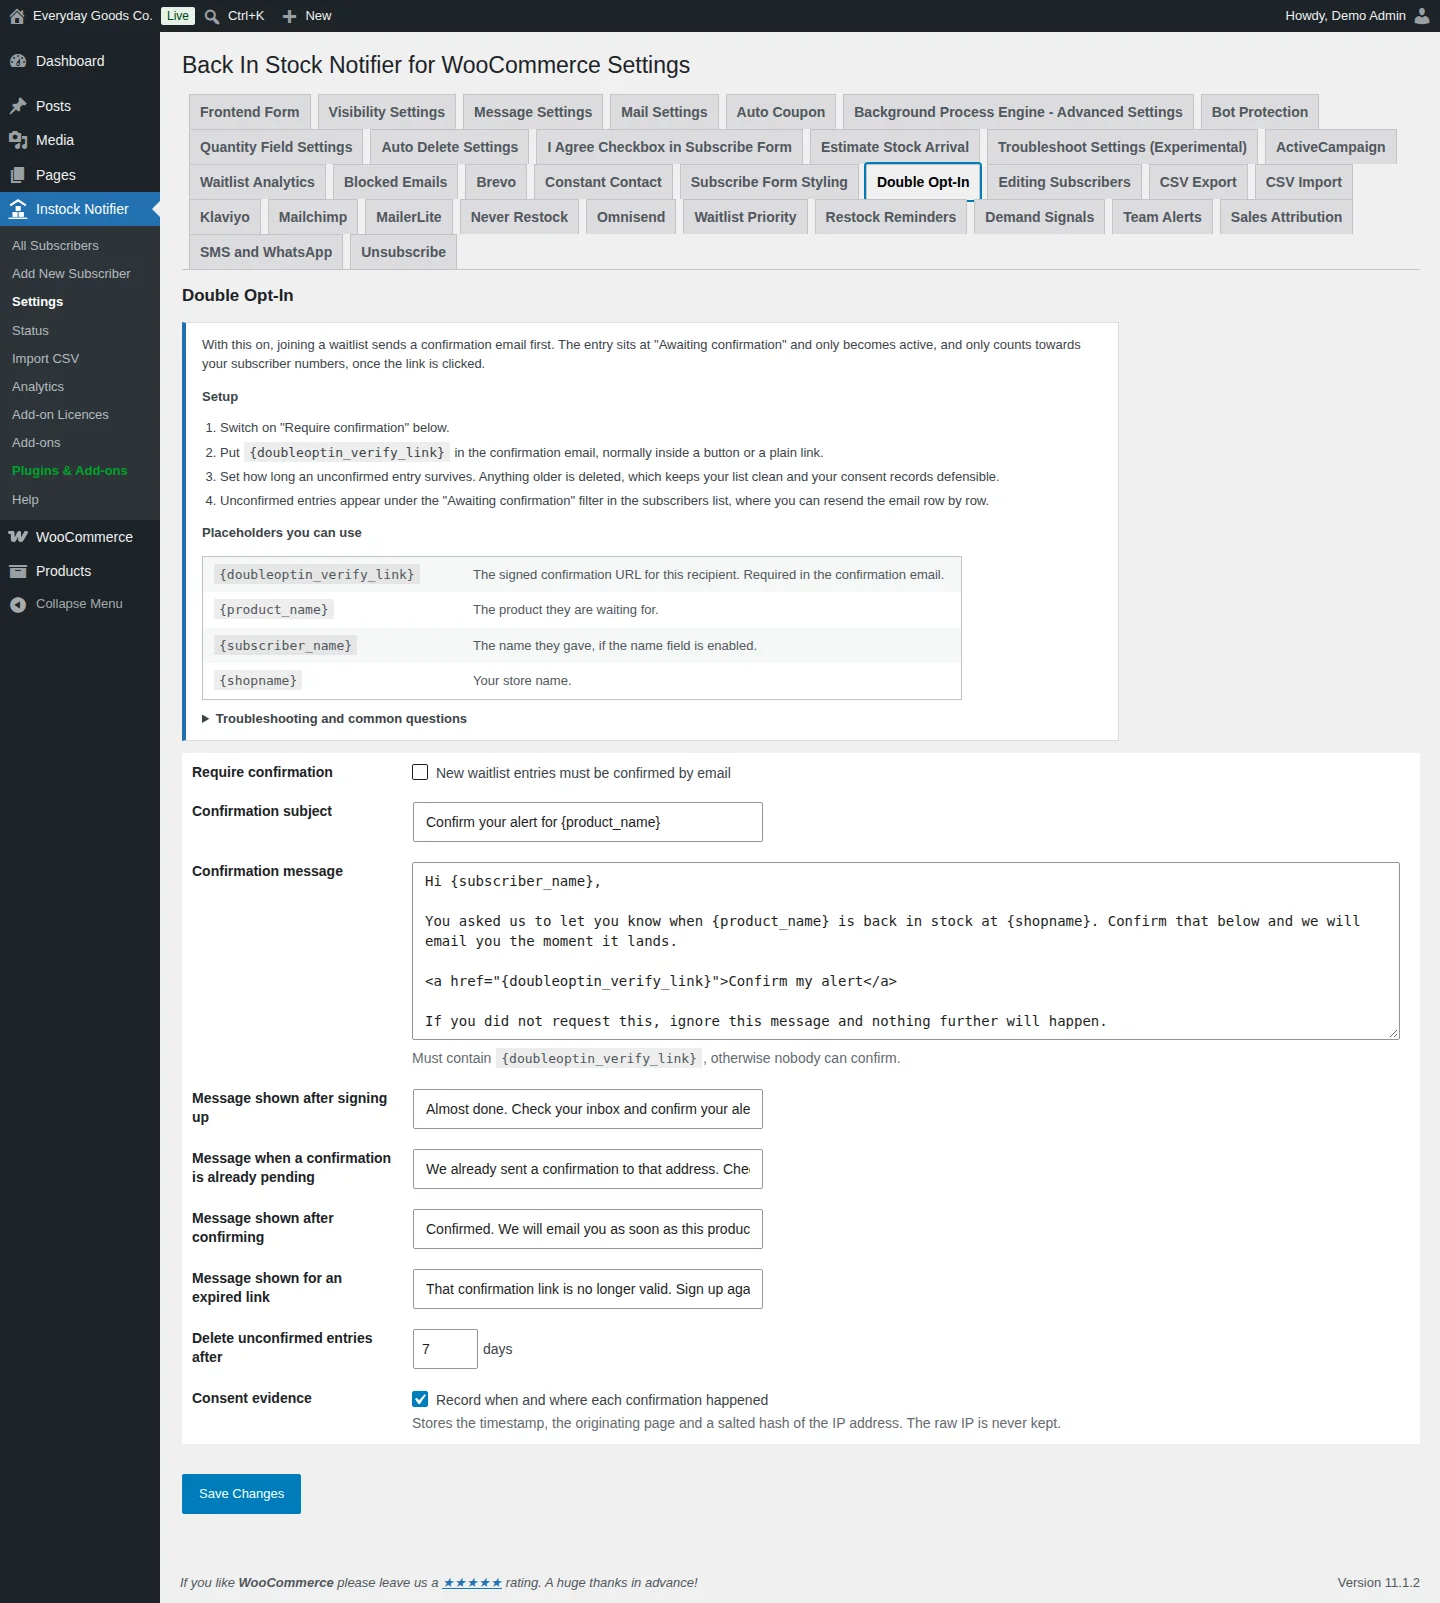
Double Opt-In makes new subscribers confirm by email before their waitlist entry becomes active. Until they click the link, the entry sits at Awaiting confirmation and doesn't count towards your subscriber numbers.
Set it up under Instock Notifier > Settings > Double Opt-In:
- Tick Require confirmation.
- Make sure Confirmation message contains
{doubleoptin_verify_link}. Otherwise nobody can confirm. You can also use{product_name},{subscriber_name}and{shopname}. - Adjust the messages shoppers see after signing up, when a confirmation is already pending, after confirming and for an expired link.
- Set Delete unconfirmed entries after in days. Older unconfirmed entries are deleted automatically.
Unconfirmed entries appear under the Awaiting confirmation filter in the subscribers list, where you can resend the email row by row. People already on a waitlist when you switch this on stay active. With Consent evidence on, the confirmation time, the page the form was on and a salted hash of the IP address are stored. The raw IP is never kept.
#Unsubscribe
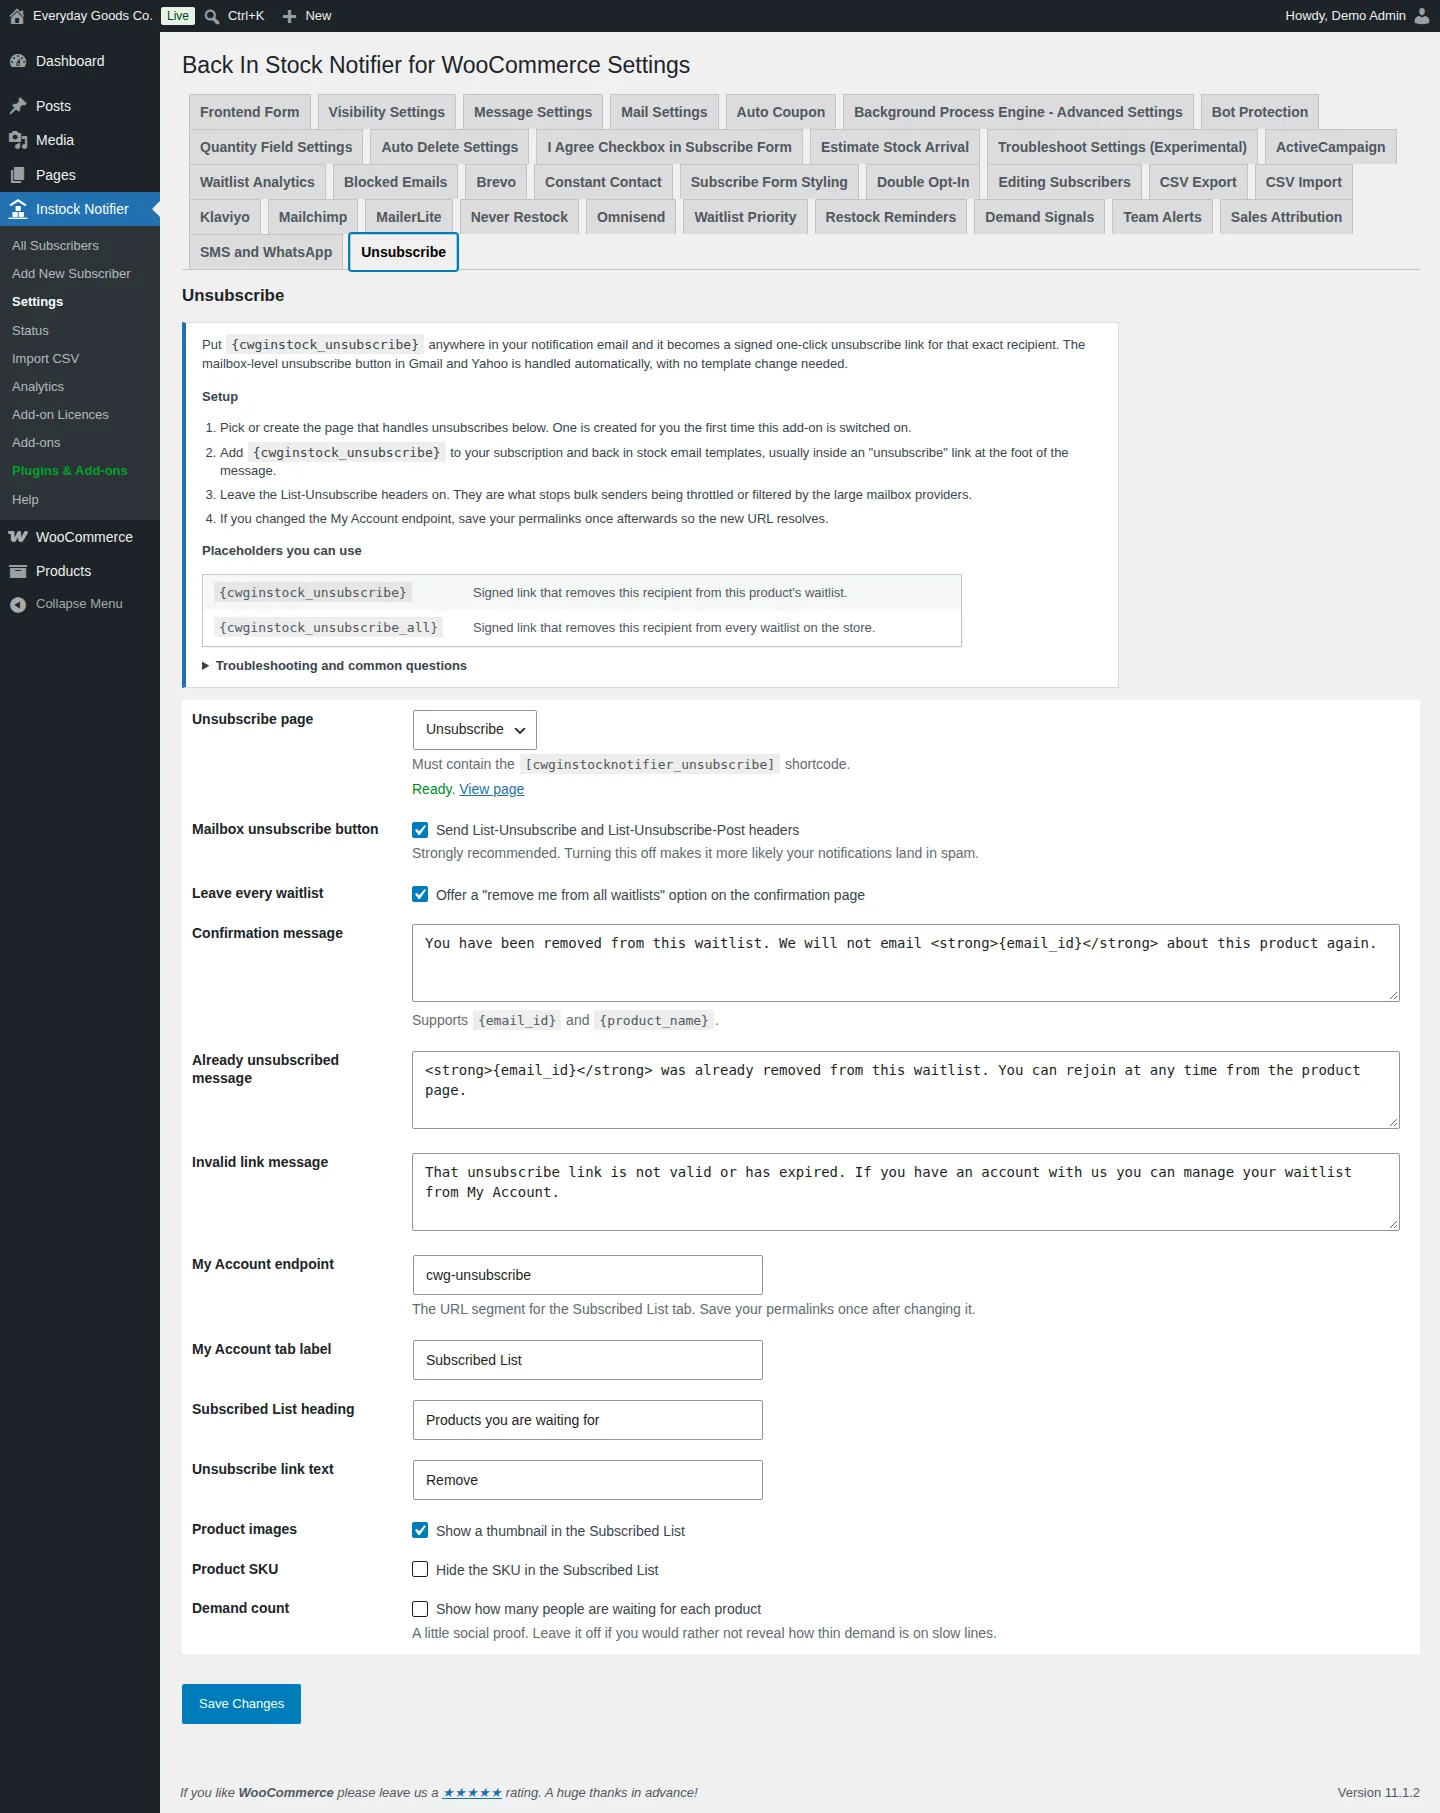
Unsubscribe adds one-click unsubscribe links to your notifications, a Subscribed List tab in My Account and the List-Unsubscribe headers that Gmail and Yahoo read.
Set it up under Instock Notifier > Settings > Unsubscribe:
- Choose the Unsubscribe page. One is created for you the first time the add-on is switched on. The page must contain the
[cwginstocknotifier_unsubscribe]shortcode. - Add
{cwginstock_unsubscribe}to your subscription and back in stock email templates, usually in an unsubscribe link at the foot of the message.{cwginstock_unsubscribe_all}removes the recipient from every waitlist. - Leave Mailbox unsubscribe button on. Turning it off makes it more likely your notifications land in spam.
- Adjust the confirmation, already unsubscribed and invalid link messages. The confirmation message supports
{email_id}and{product_name}. - If you change My Account endpoint, save your permalinks once afterwards.
You can also set the My Account tab label, the Subscribed List heading and link text, and whether to show thumbnails, hide the SKU or show how many people are waiting for each product.
#Edit Subscribers
Edit Subscribers lets you correct any waitlist entry by hand and add new ones from the admin. Use it to fix a mistyped address, move someone to a different variation or add a customer who asked by phone.
- Go to Instock Notifier > All Subscribers, hover a row and click Edit. Use Add New Subscriber to create an entry.
- You can change the email, name, phone, product, quantity or status. The product field searches your catalogue, including variations.
- Setting someone back to Subscribed makes them eligible for the next restock notification.
Edits are silent. No email is sent when you edit a row. Only users who can manage WooCommerce can edit subscribers.
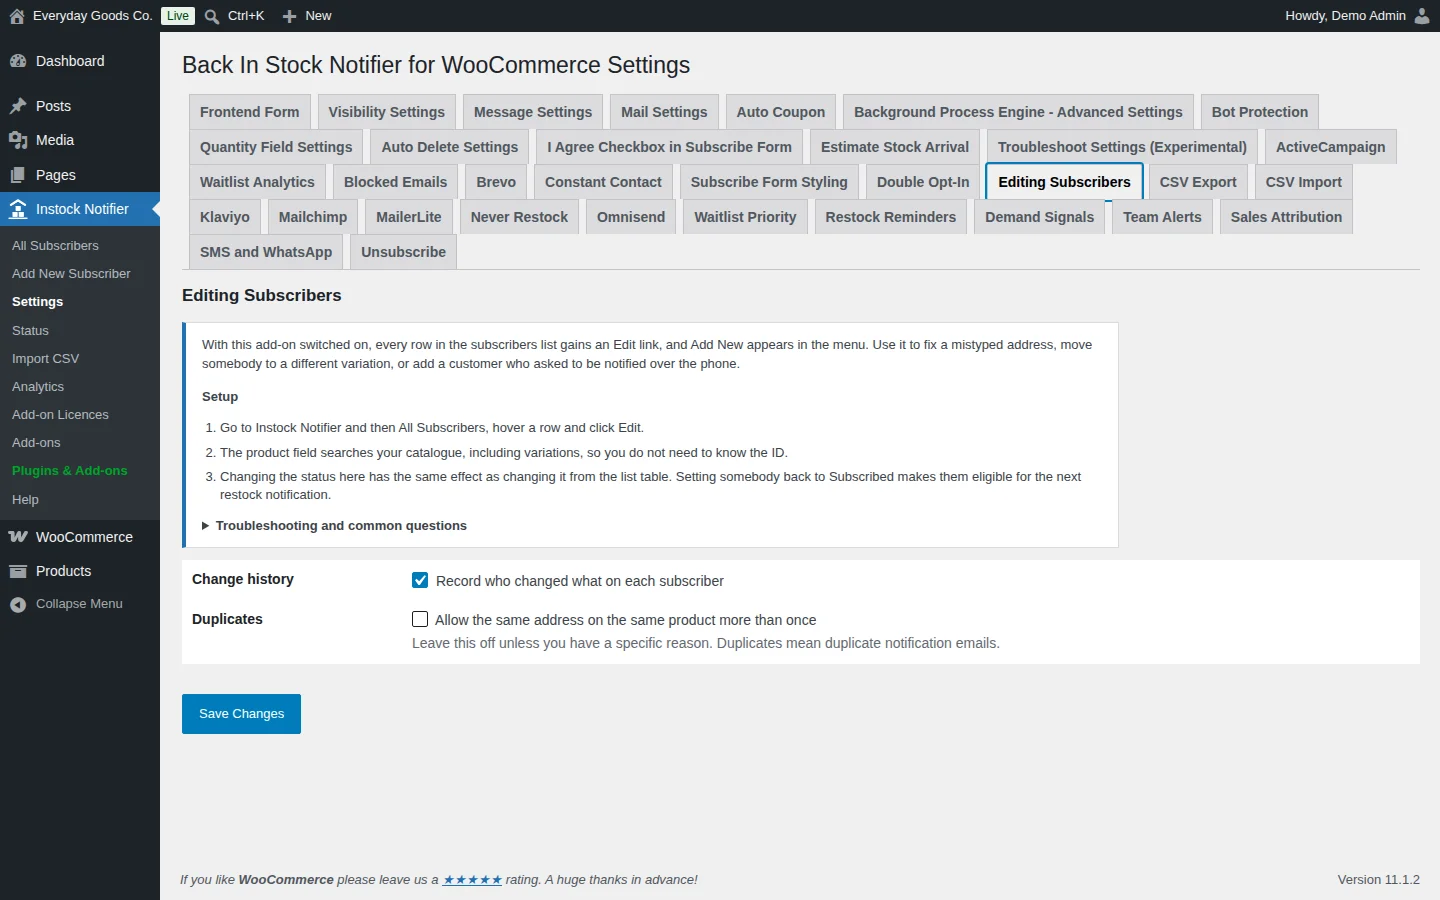
Under Instock Notifier > Settings > Editing Subscribers, Change history records who changed what on each subscriber. The last few entries appear under the edit form. Leave Duplicates off unless you have a specific reason, because duplicates mean duplicate notification emails.
#Never Restock
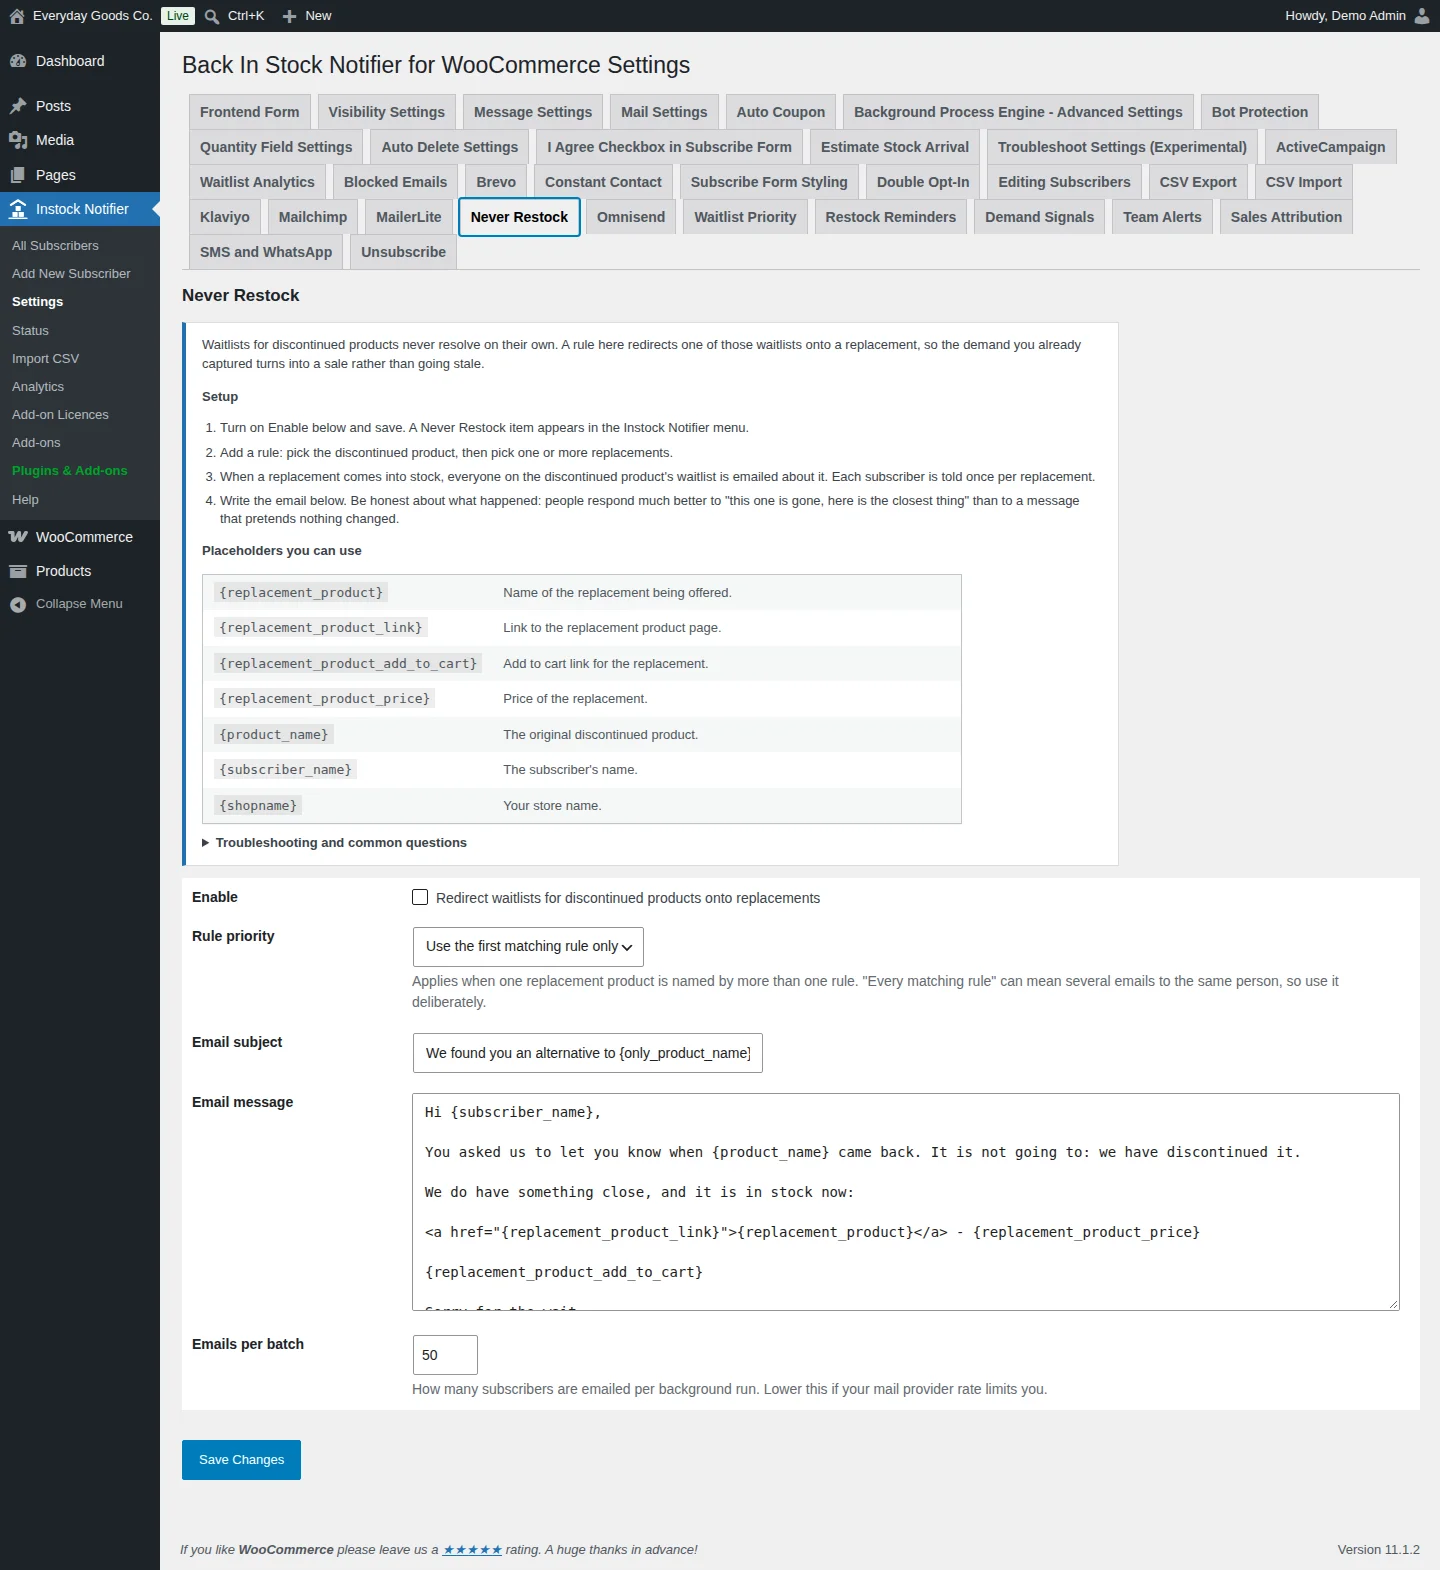
Never Restock is for products that are gone for good. You map a discontinued product to one or more replacements. When a replacement comes into stock, everyone on the discontinued product's waitlist is emailed about it.
- Under Instock Notifier > Settings > Never Restock, tick Enable and save. A Never Restock item appears in the Instock Notifier menu.
- There, add a rule: pick the discontinued product, then one or more replacements.
- Back on the settings tab, write the Email subject and Email message. Use
{replacement_product},{replacement_product_link},{replacement_product_add_to_cart}and{replacement_product_price}for the replacement. Use{product_name}for the original, plus{subscriber_name}and{shopname}. - If one replacement is named by several rules, Rule priority decides which applies.
Apply every matching rulecan mean several emails to the same person.
Each subscriber is told once per replacement and then marked Notified. Stock is re-read before each batch. If the replacement has sold out again, nothing is sent. Lower Emails per batch if your mail provider rate limits you.
#Export CSV
Export CSV downloads your subscriber list as a spreadsheet file.
- Go to Instock Notifier > All Subscribers.
- Click Export CSV above the list.
- Tick the columns you want and optionally narrow the export by status, product or date. The file downloads straight away.
The file is UTF-8 with a byte order mark, so Excel shows accented names correctly. Rows are fetched in batches, so large waitlists don't run out of memory. Values that begin with =, +, - or @ get an apostrophe in front, so the spreadsheet treats them as text.
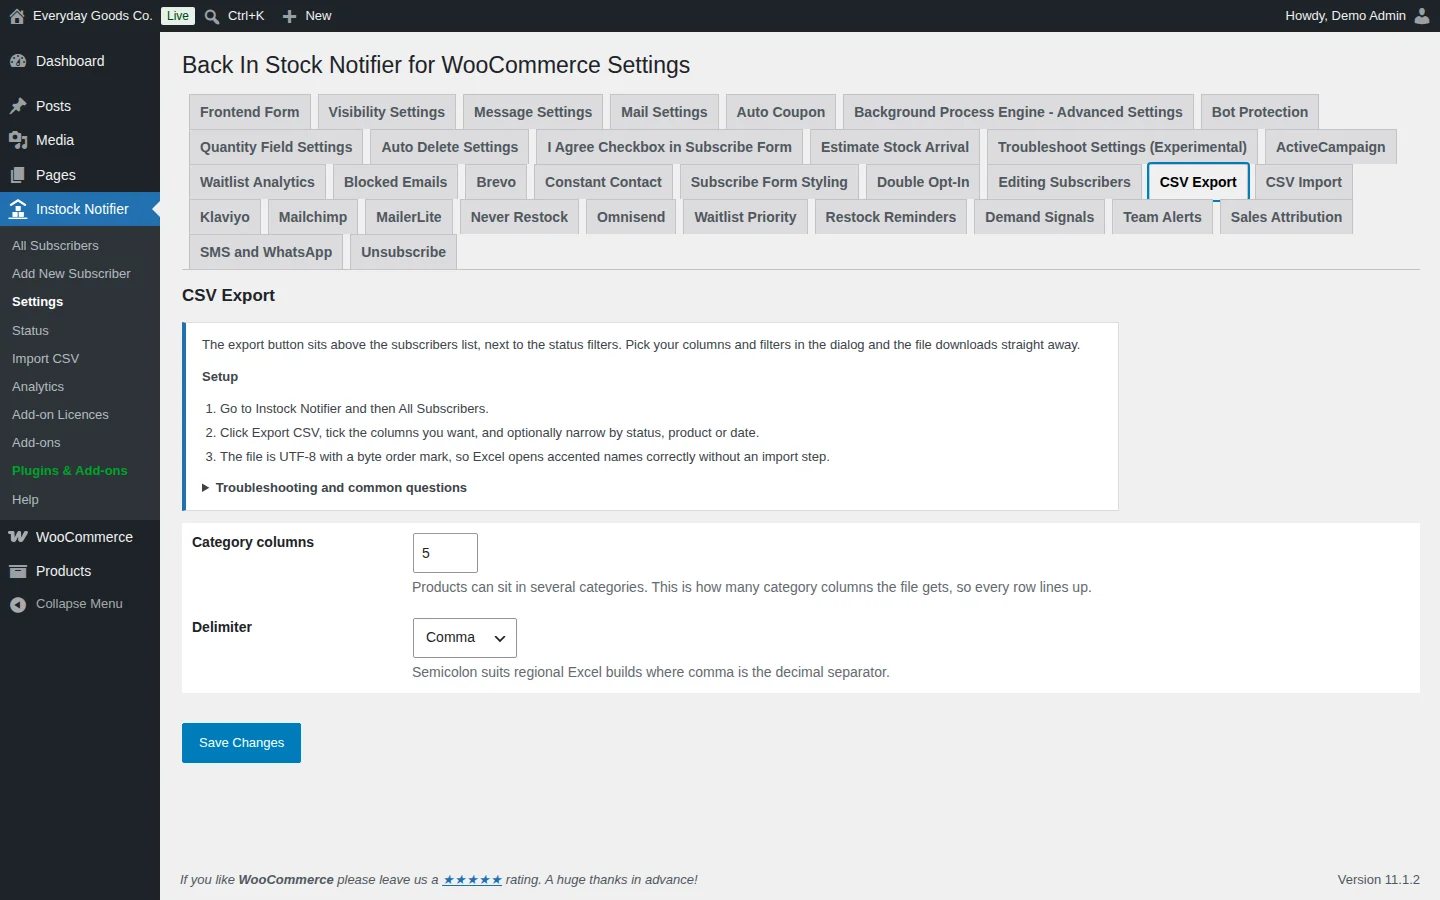
Under Instock Notifier > Settings > CSV Export, set how many Category columns the file gets and the Delimiter. Choose Semicolon for regional Excel builds that use a comma as the decimal separator. Only users who can manage WooCommerce can export. The file may contain personal data, so handle it with care.
#Import CSV
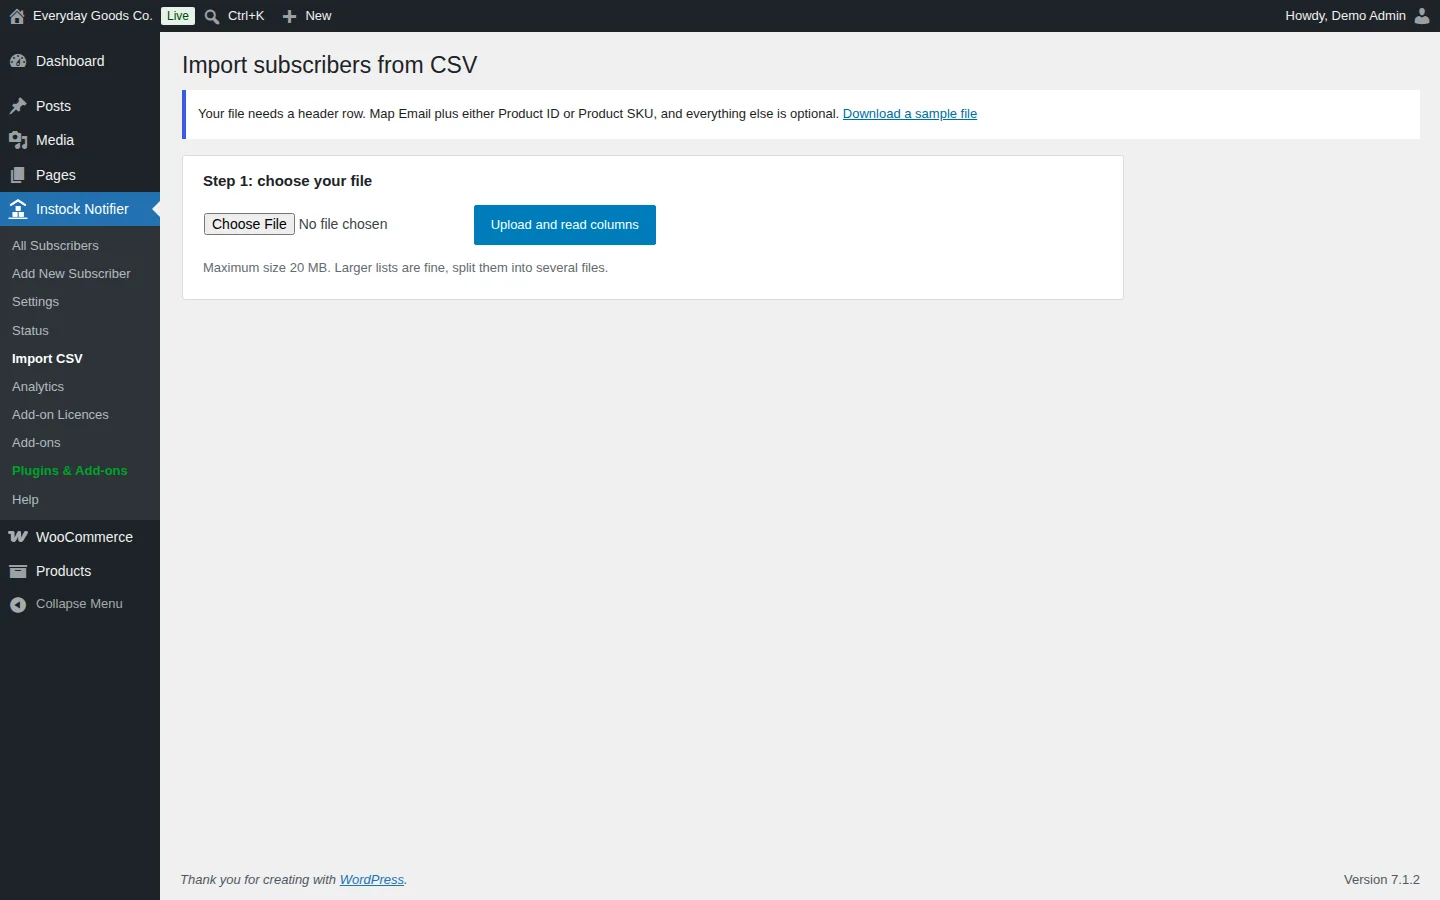
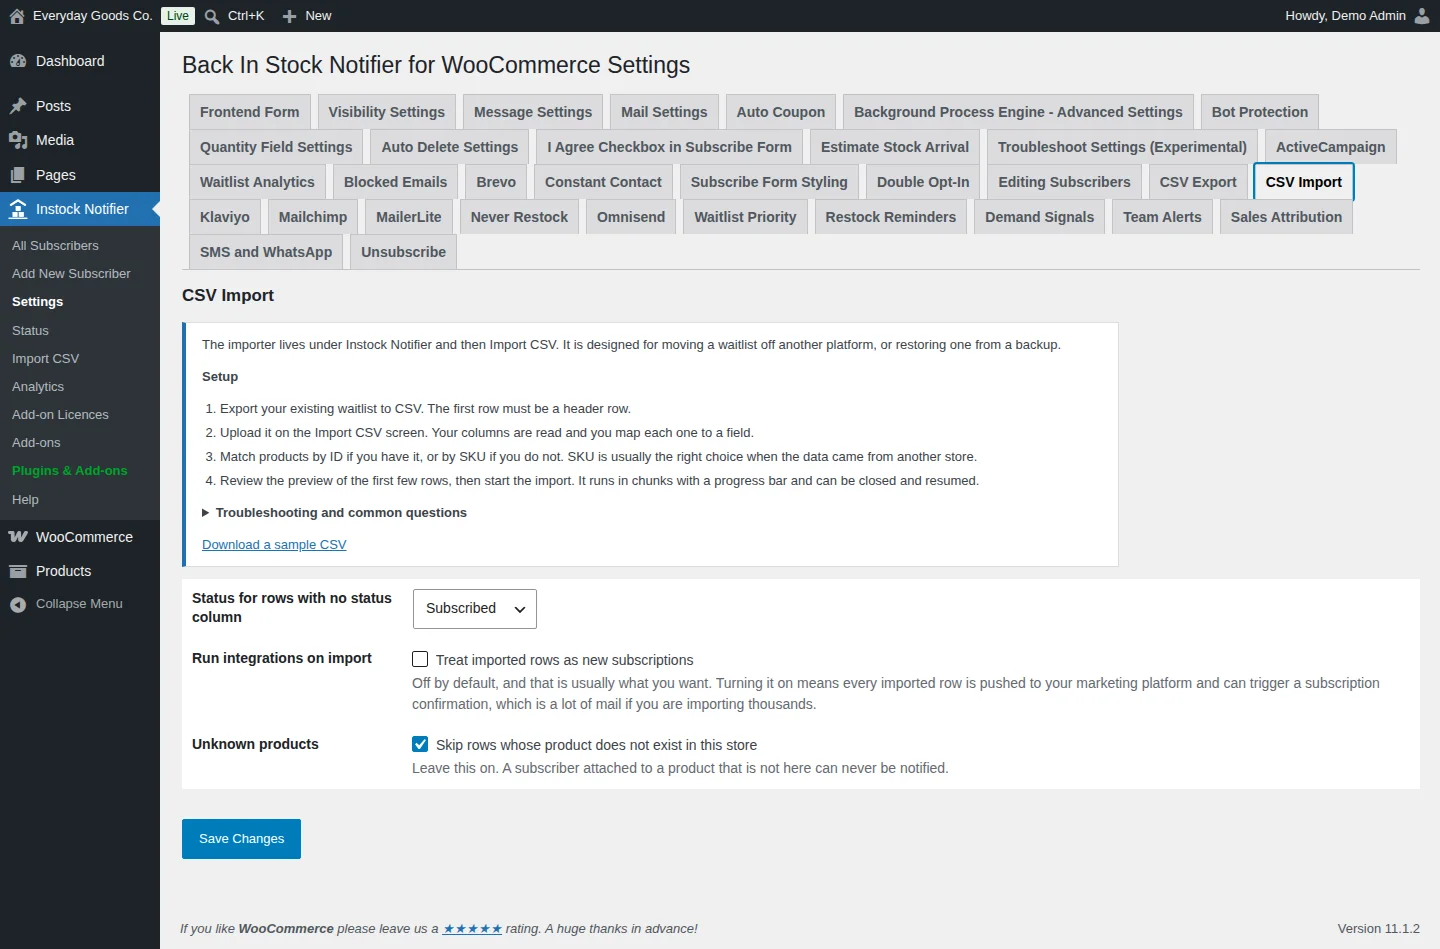
Import CSV brings waitlist subscribers in from another platform or from a backup. The importer is under Instock Notifier > Import CSV.
- Export your existing waitlist to CSV. The first row must be a header row. Download a sample file shows the expected layout.
- On Import subscribers from CSV, choose the file and click Upload and read columns. The maximum size is 20 MB. Split larger lists into several files.
- Map your columns. You need Email plus either Product ID or Product SKU. Everything else is optional. SKU is usually the right choice when the data came from another store.
- Review the preview of the first rows, then start the import. It runs in chunks with a progress bar and can be closed and resumed.
Rows whose email and product already exist are skipped as duplicates. Import sessions last an hour. Dates are best in YYYY-MM-DD or YYYY-MM-DD HH:MM:SS format. If Ban Emails is on, blocked addresses are skipped.
Under Instock Notifier > Settings > CSV Import, choose the status for rows without a status column. Leave Run integrations on import off unless you want every imported row pushed to your marketing platform. Leave Unknown products on to skip rows whose product isn't in your store.
#Custom CSS
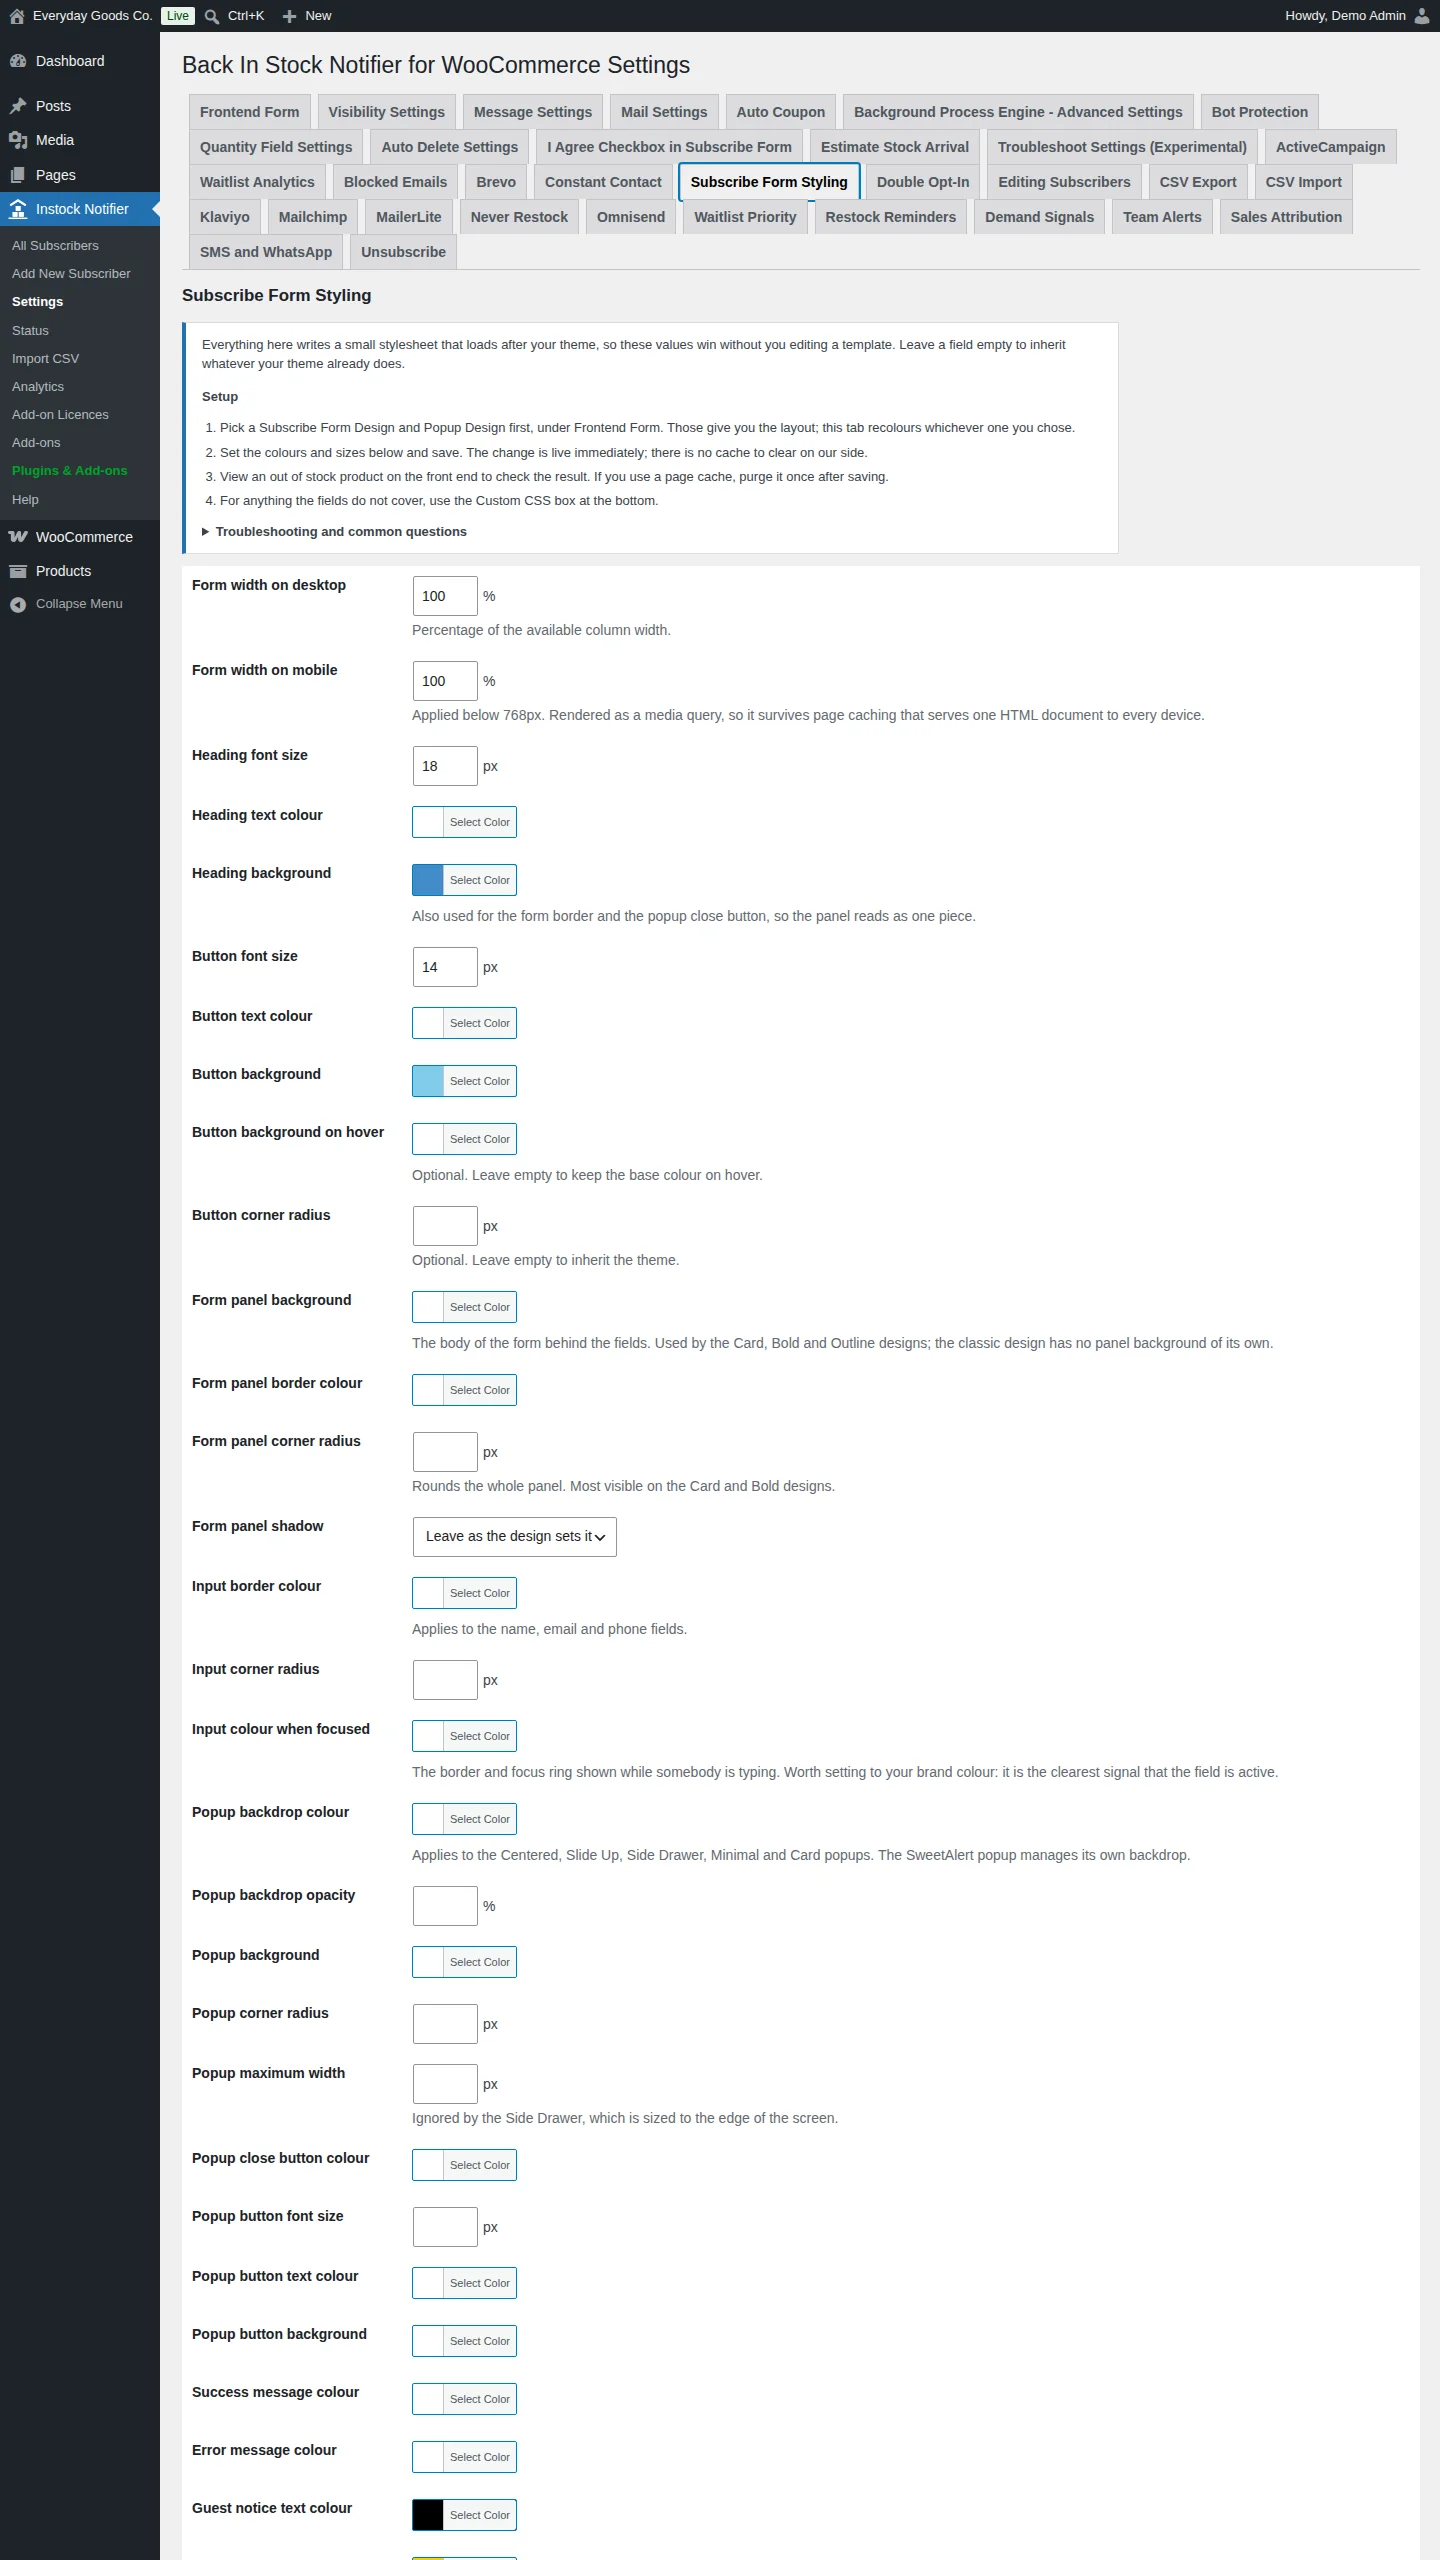
Custom CSS restyles the subscribe form, button and popup without editing theme files. Its settings create a small stylesheet that loads after your theme. Leave a field empty to keep your theme's look.
Set it up under Instock Notifier > Settings > Subscribe Form Styling:
- First pick a Subscribe Form Design and popup design on the Frontend Form tab. This tab recolours whichever design you chose.
- Set widths, font sizes, corner radii and shadow, and use the Select Color pickers for headings, buttons, the form panel, inputs, the popup, messages and the guest notice. Save.
- View an out of stock product to check the result. If you use a page cache, purge it once after saving.
- For anything the fields don't cover, use the Custom CSS box at the bottom. It is output after every other rule, so it always wins. Tags and scripts are stripped on save.
The mobile width applies below 768px as a media query, so it works with full page caching. Useful classes: the wrapper is .cwginstock-subscribe-form, the panel .cwginstock-panel-primary, the heading .cwginstock-panel-heading, the body .cwginstock-panel-body, the button .cwgstock_button and the guest notice .cwg-guest-message.
#Demand Signals
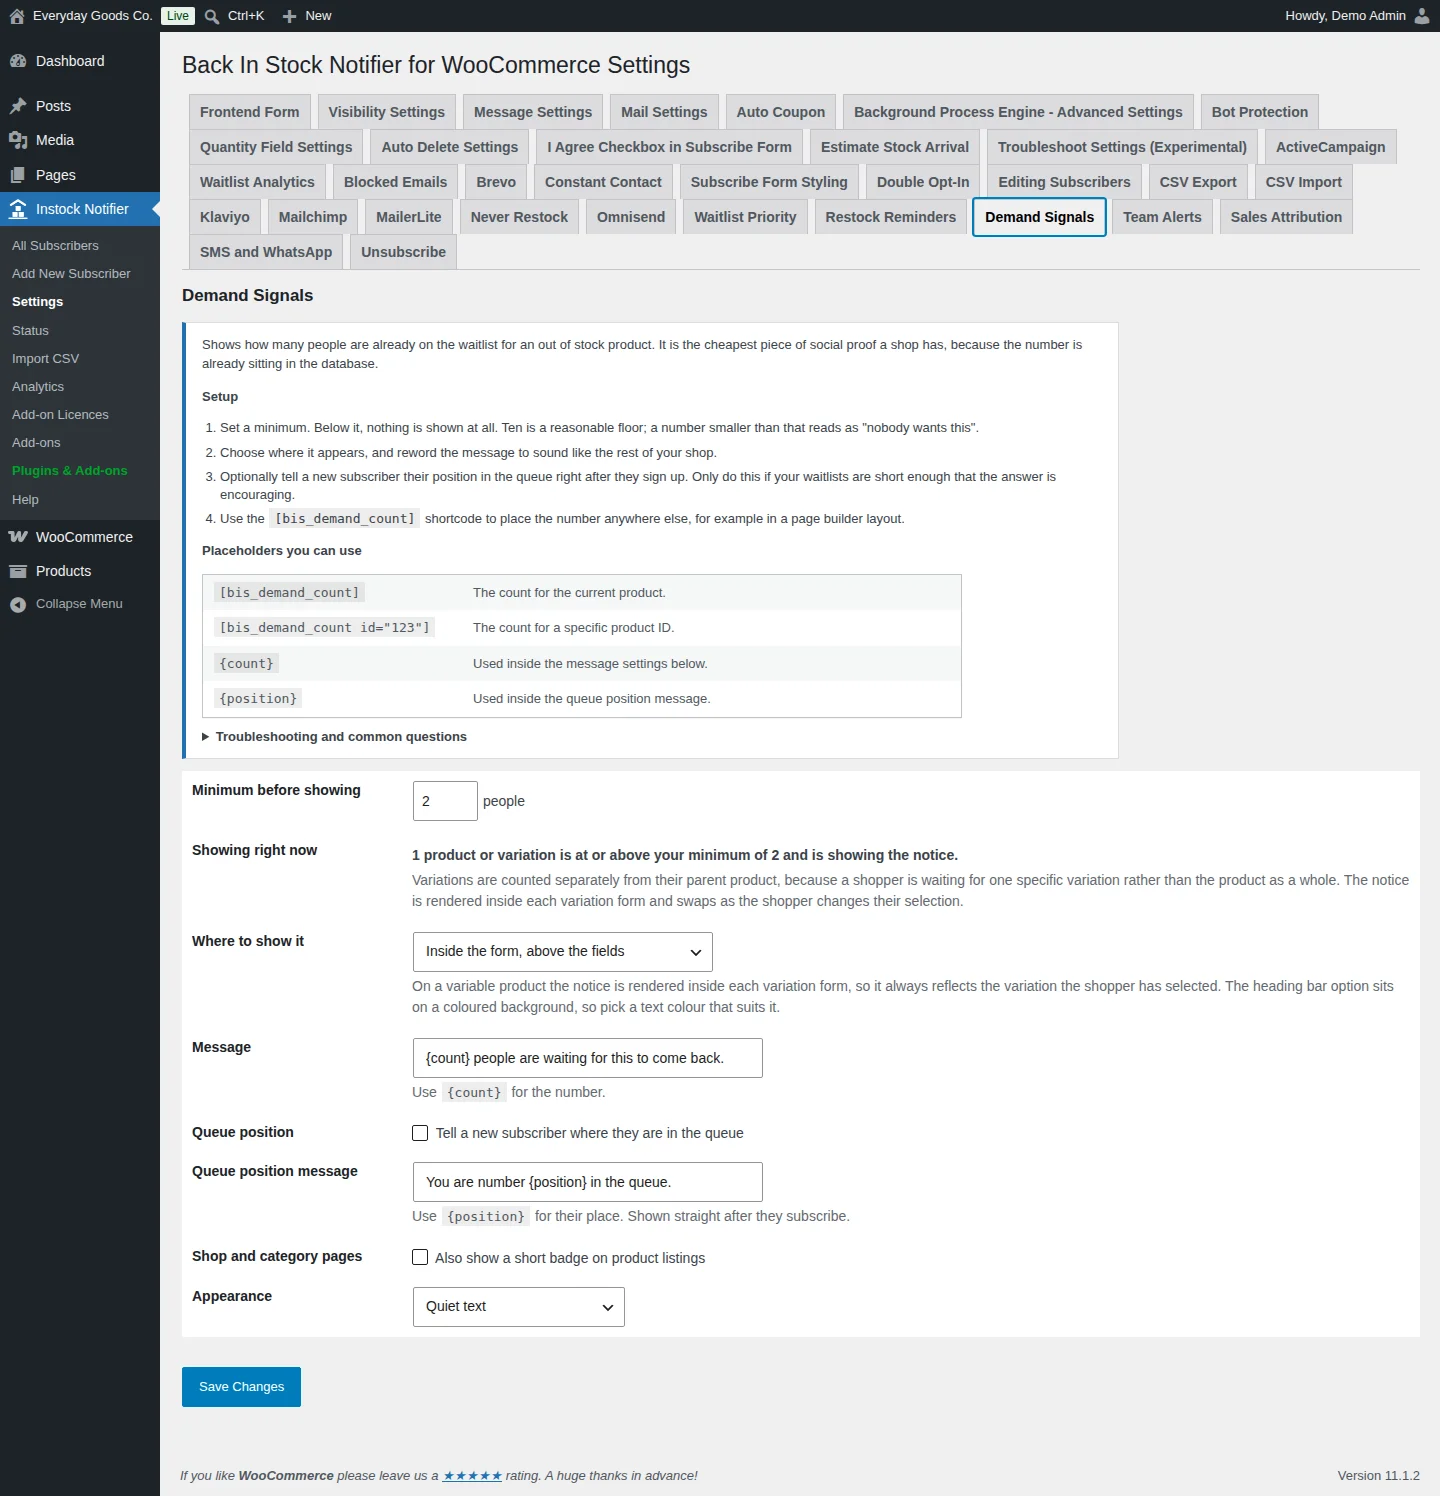
Demand Signals shows shoppers how many people are already waiting for an out of stock product. It can also tell a new subscriber their place in the queue. Only real counts are shown.
Set it up under Instock Notifier > Settings > Demand Signals:
- Set Minimum before showing. Below this number nothing is shown, so thin waitlists stay private.
- Choose Where to show it and reword the Message. Use
{count}for the number. - Optionally tick Queue position and edit the Queue position message. Use
{position}for their place. - Optionally tick Shop and category pages to add a short badge on product listings, and pick an Appearance.
The Showing right now line tells you how many products are at or above your minimum. On variable products, each variation has its own waitlist and count, and the notice follows the variation the shopper selects. To place the count anywhere else, use the [bis_demand_count] shortcode. Choose Only where I place the shortcode if you only want it there.
#Polylang
The Polylang add-on remembers the language each person subscribed in. It treats all translations of a product as one waitlist and sends each notification in the subscriber's own language.
- Switch it on under Instock Notifier > Add-ons.
- Go to Languages > String translations and filter by the group "Back In Stock Notifier". Translate the email subject, heading and body for each language you sell in.
- Check the add-on's translation status table. A cross means that language gets the original text.
- Leave "Treat translations as one waitlist" on unless each translation of a product really has its own stock.
- Test by subscribing on a translated product page, then restocking.
If the strings don't appear under String translations, open WooCommerce > Settings > Emails once, then look again. Edit the original email text on the Back In Stock emails there. A fallback language code covers subscribers with no recorded language, such as imported rows. Don't run this add-on alongside the WPML add-on.
#TranslatePress
The TranslatePress add-on remembers the language each person was browsing in when they subscribed. Their restock notification is sent in that language.
TranslatePress translates rendered pages, and an email is never rendered as a page. So you write the email text for each language in this add-on's settings instead of the TranslatePress editor.
- Switch it on under Instock Notifier > Add-ons.
- Write the email subject, heading and body for each language you have set up in TranslatePress.
- Check the translation status table. A cross means that language gets the original text rather than a blank email.
- Test by switching the shop to another language, subscribing on an out of stock product, then restocking it.
TranslatePress doesn't duplicate products, so each product already has one waitlist and no shared waitlist setting is needed. Subscribers who joined before you switched the add-on on have no recorded language. Set a fallback language code for them. If only half the email is translated, check that the language code matches a locale WordPress has installed, for example de_DE rather than de.
#Weglot
The Weglot add-on remembers the language each person was browsing in when they subscribed. Their restock notification is sent in that language.
Weglot translates pages as they are shown to visitors. Emails never pass through it, so without this add-on every notification goes out in your original language.
- Switch it on under Instock Notifier > Add-ons.
- Write the email subject, heading and body for each destination language set up in Weglot.
- Install the WordPress language pack for each language under Settings > General, so the email template around your text is translated too.
- Check the translation status table. A cross means that language gets the original text.
- Test by switching the shop to another language, subscribing on an out of stock product, then restocking it.
The email text you enter is stored on your own site and never sent to Weglot, so notifications don't count against your word quota. A fallback language code covers subscribers with no recorded language.
#WPML
The WPML add-on remembers the language each person subscribed in. It treats all translations of a product as one waitlist and sends every notification in the subscriber's own language.
- Switch it on under Instock Notifier > Add-ons.
- Go to WPML > String Translation and filter by the domain "Back In Stock Notifier". Translate the email subject, heading and body for each language you sell in.
- Check the add-on's translation status table. A cross means that language gets the original text.
- Leave "Treat translations as one waitlist" on unless each translation of a product really has its own stock. Without it, a restock on the original product doesn't reach people who signed up on a translation.
- Test by subscribing on a translated product page, then restocking. The email should arrive fully translated, with a link to the translated product.
The original email text is under WooCommerce > Settings > Emails, on the Back In Stock emails. Editing it creates a new string, so re-check the status table afterwards. Don't run this add-on alongside the Polylang add-on.
#Ban Emails
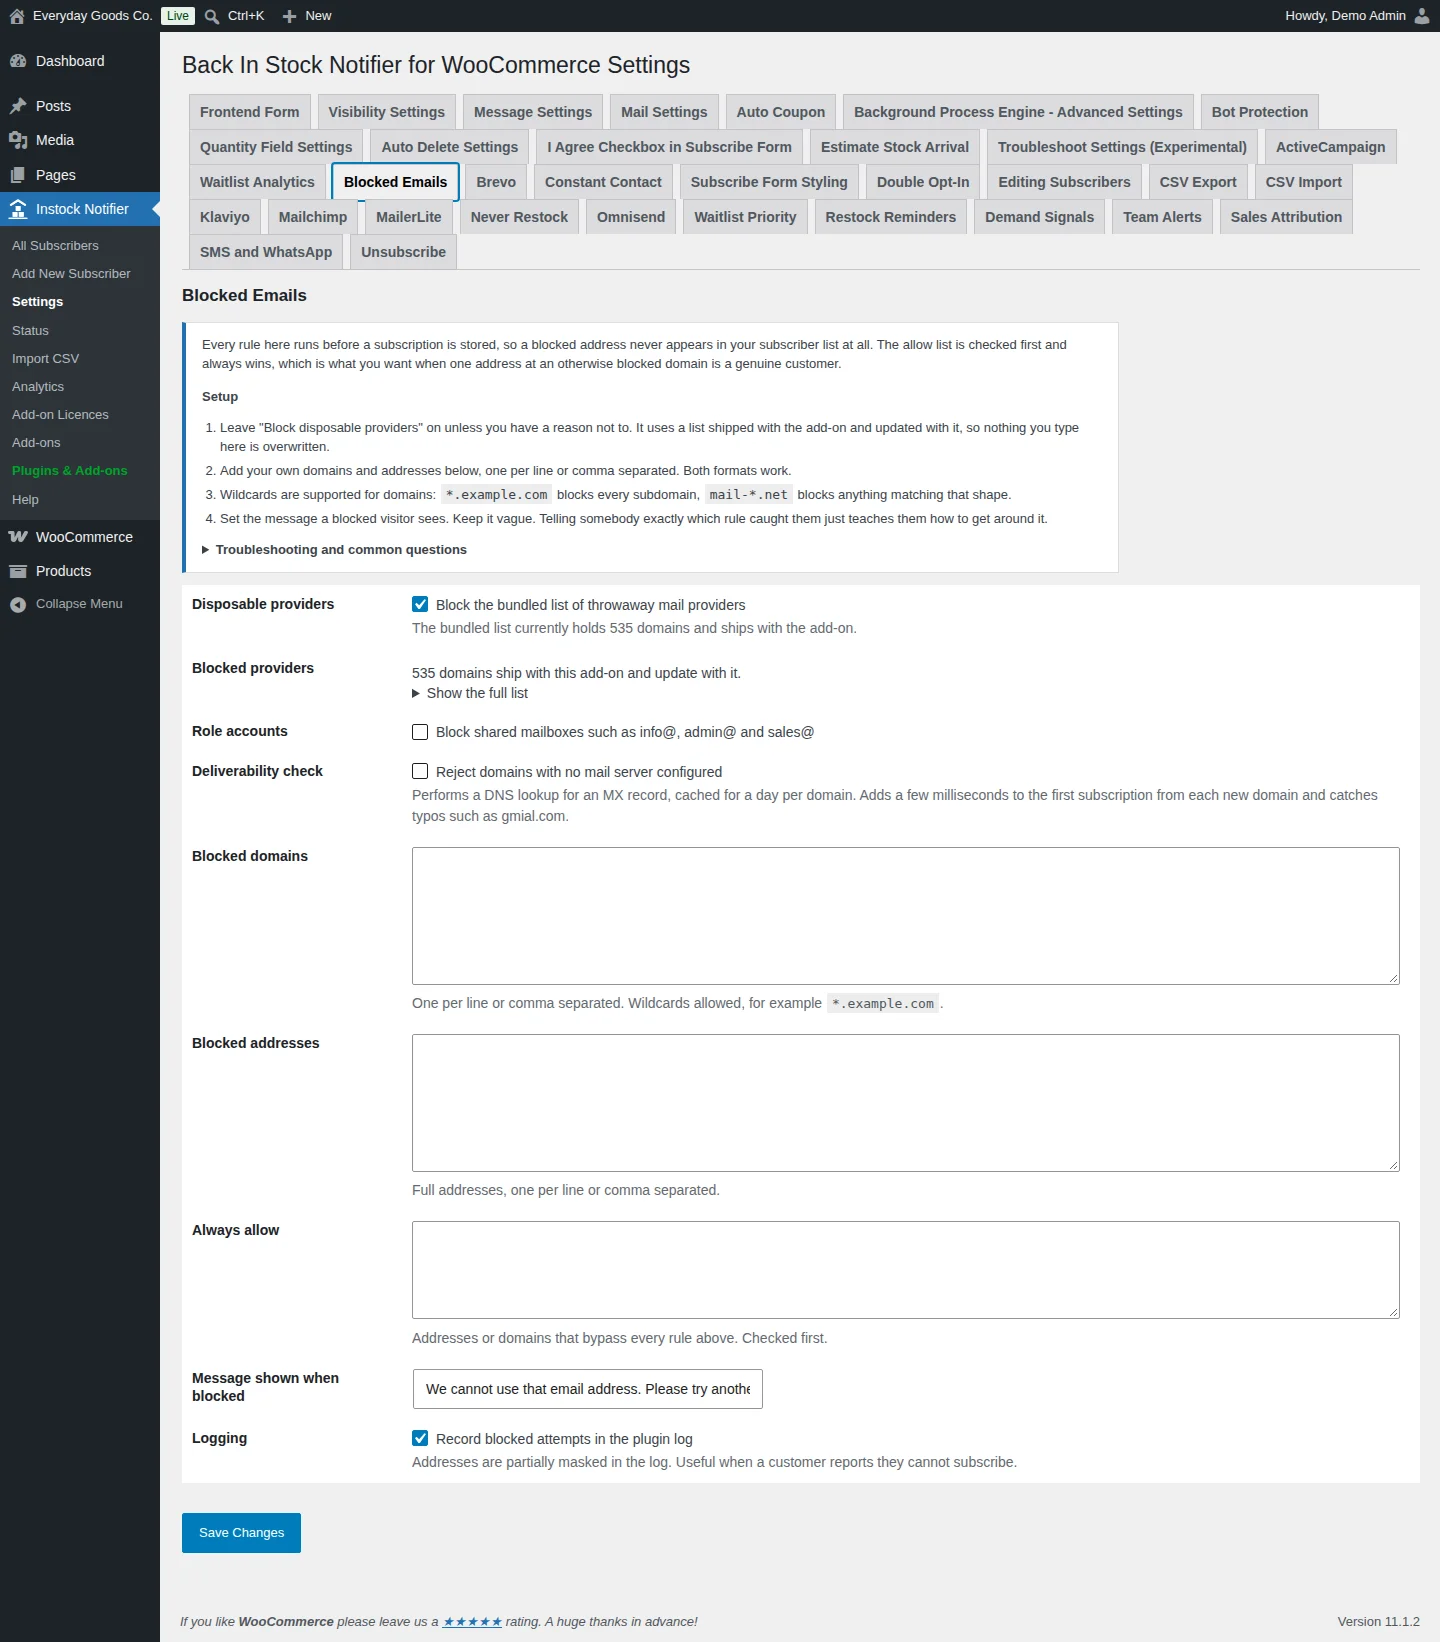
Ban Emails keeps junk addresses off your waitlist. Rules run before a subscription is stored, so a blocked address never appears in your subscriber list.
Set it up under Instock Notifier > Settings > Blocked Emails:
- Leave Disposable providers on. It blocks a bundled list of throwaway mail domains that updates with the add-on. Click Show the full list under Blocked providers to see it.
- Optionally tick Role accounts to block shared mailboxes such as info@, admin@ and sales@.
- Optionally tick Deliverability check to reject domains with no mail server. This catches typos such as gmial.com.
- Add your own Blocked domains and Blocked addresses, one per line or comma separated. Domains accept wildcards, for example
*.example.com. - Put genuine customers in Always allow. It is checked first and overrides every other rule.
- Set the Message shown when blocked. Keep it vague.
Rules only apply when someone subscribes. Existing entries are left alone. With Logging on, blocked attempts are recorded in the plugin log with the address partly masked.
Settings reference
Instock Notifier > Settings > Restock Reminders
| Setting | Type | Default | What it does |
|---|---|---|---|
| Send a reminder to people who have not bought yet | checkbox | Off |
Turns on the first reminder. |
| First reminder delay | number | 24 |
Hours after the restock alert before the first reminder is sent. |
| First reminder subject | text | Still available: {only_product_name} |
Subject line of the first reminder. |
| First reminder message | textarea | - | Body of the first reminder. Supports {product_name}, {cart_link}, {product_price}, {stock_left} and {subscriber_firstname}. |
| Send one final reminder | checkbox | Off |
Turns on the second reminder. |
| Second reminder delay | number | 72 |
Hours after the original alert, not after the first reminder. Set it comfortably later than the first delay. |
| Second reminder subject | text | Last chance on {only_product_name} |
Subject line of the second reminder. |
| Second reminder message | textarea | - | Body of the second reminder. |
| Stop below this stock level | number | 0 |
Reminders stop once stock falls to this level or below. Zero means keep reminding while anything is in stock. Only applies to products with stock management enabled. |
| Reminders per run | number | 50 |
How many reminders are sent per background run. |
Instock Notifier > Settings > SMS and WhatsApp
| Setting | Type | Default | What it does |
|---|---|---|---|
| Account SID | text | - | Your Twilio Account SID from the Twilio console. |
| Auth Token | text | - | Your Twilio Auth Token. Save your settings first, then use Send a test message. The test uses the saved credentials and the channel you selected, and it costs one message. |
| Channels | select | SMS only |
SMS only, WhatsApp only, or WhatsApp first, SMS if that fails. The third option falls back to SMS when the number has no WhatsApp account or the template is rejected. |
| Messaging Service SID | text | - | Optional but recommended for SMS. When set it is used instead of the From number and Twilio picks the best sender per destination. |
| SMS From number | text | - | A number on your Twilio account, in international format. Ignored when a Messaging Service SID is set. |
| WhatsApp From number | text | - | Your approved WhatsApp sender, in international format. Do not include the whatsapp: prefix; it is added for you. |
| WhatsApp Content SID | text | - | The approved template used for restock alerts. Variables 1 to 3 are filled with the product name, the price and the add to cart link, in that order. |
| Send the message body as free text when no Content SID is set | checkbox | Off |
Only works inside the twenty four hour service window. Outside it Meta rejects the message, which Twilio still charges you for as a failed attempt. |
| Message subscribers when their product is back in stock | checkbox | On |
Sends the restock alert by SMS or WhatsApp. |
| Restock message | textarea | {only_product_name} is back in stock at {shopname}. Grab it here: {cart_link} |
Keep it under 160 characters to stay in one SMS segment. Longer messages still send, they just cost more per recipient. |
| Send a short confirmation when someone joins a waitlist | checkbox | Off |
Off by default. It doubles your message spend and most stores confirm by email instead. |
| Signup confirmation message | textarea | You are on the list for {only_product_name} at {shopname}. We will text you the moment it is back. |
Text of the signup confirmation message. |
| Country rules | text | - | Comma separated dialling codes to allow, for example 1, 44, 61. Leave empty to message every country. |
Instock Notifier > Settings > ActiveCampaign
| Setting | Type | Default | What it does |
|---|---|---|---|
| Send waitlist subscribers to ActiveCampaign | checkbox | Off |
Enable sync. Leave this off while you are still entering credentials. Nothing is sent until it is on. |
| Account URL | url | - | From Settings and then Developer in ActiveCampaign. No trailing slash and no /api/3 on the end. |
| API key | text | - | On the same Developer screen, directly below the account URL. |
| Target list | select | - | Save your credentials first, then use Fetch lists to load the lists on your account. Subscribers are added to this list. |
| Tags | text | Back In Stock, {only_product_name} |
Comma separated. Placeholders such as {only_product_name} and {product_id} are expanded per subscriber. |
| When someone leaves the waitlist, mark them unsubscribed on ActiveCampaign too | checkbox | On |
Mirror unsubscribes. Recommended, so a customer who opted out does not keep receiving mail from ActiveCampaign. |
| Retry rows that have not reached the platform yet, in the background | checkbox | On |
Catch-up sync. Runs every five minutes and handles up to 25 subscribers per run. |
Instock Notifier > Settings > Brevo
| Setting | Type | Default | What it does |
|---|---|---|---|
| Send waitlist subscribers to Brevo | checkbox | Off |
Enable sync. Leave this off while you are still entering credentials. Nothing is sent until it is on. |
| API key | text | - | From SMTP and API and then API keys in your Brevo account. A v3 key, which starts with xkeysib. |
| Restock template ID | number | - | Optional. The numeric ID of a Brevo transactional template. When set, and Send events is on, the restock alert is sent from Brevo using this template instead of the WooCommerce email. |
| Suppress the WooCommerce restock email when Brevo sends its own | checkbox | Off |
Replace the built-in email. Only takes effect when a template ID is set and events are on. Without it your customers receive two emails about the same restock. |
| Target list | select | - | Save your credentials first, then use Fetch lists to load the lists on your account. |
| Tags | text | Back In Stock, {only_product_name} |
Comma separated. Placeholders such as {only_product_name} and {product_id} are expanded per subscriber. |
| When someone leaves the waitlist, mark them unsubscribed on Brevo too | checkbox | On |
Mirror unsubscribes. Recommended. |
| Retry rows that have not reached the platform yet, in the background | checkbox | On |
Catch-up sync. Runs every five minutes and handles up to 25 subscribers per run. |
| Send "subscribed" and "back in stock" events to Brevo | checkbox | Off |
Send events. Turn this on when you want to build the notification email in Brevo rather than in WooCommerce. |
Instock Notifier > Settings > Constant Contact
| Setting | Type | Default | What it does |
|---|---|---|---|
| Send waitlist subscribers to Constant Contact | checkbox | Off |
Enable sync. Leave this off while you are still entering credentials. Nothing is sent until it is on. |
| API key | text | - | The API key of your app in the Constant Contact developer portal. Constant Contact calls this the client ID. |
| App secret | text | - | Generated alongside the API key. It is stored encrypted and only shown masked. |
| Target list | select | - | Save your credentials and connect first, then use Fetch lists to load the lists on your account. |
| Tags | text | Back In Stock, {only_product_name} |
Comma separated. Placeholders such as {only_product_name} and {product_id} are expanded per subscriber. |
| When someone leaves the waitlist, mark them unsubscribed on Constant Contact too | checkbox | On |
Mirror unsubscribes. Recommended. |
| Retry rows that have not reached the platform yet, in the background | checkbox | On |
Catch-up sync. Runs every five minutes and handles up to 25 subscribers per run. |
Instock Notifier > Settings > Klaviyo
| Setting | Type | Default | What it does |
|---|---|---|---|
| Send waitlist subscribers to Klaviyo | checkbox | Off |
Enable sync. Leave this off while you are still entering credentials. Nothing is sent until it is on. |
| Private API key | text | - | Create one under Settings and then API keys in Klaviyo. It needs full access, because this add-on writes profiles, events, templates and flows. |
| Suppress the WooCommerce restock and subscription emails | checkbox | Off |
Let Klaviyo send the email. Turn this on only once your Klaviyo flows are live and tested. |
| Target list | select | - | Save your credentials first, then use Fetch lists to load the lists on your account. |
| Tags | text | Back In Stock, {only_product_name} |
Comma separated. Placeholders such as {only_product_name} and {product_id} are expanded per subscriber. |
| When someone leaves the waitlist, mark them unsubscribed on Klaviyo too | checkbox | On |
Mirror unsubscribes. Recommended. |
| Retry rows that have not reached the platform yet, in the background | checkbox | On |
Catch-up sync. Runs every five minutes and handles up to 25 subscribers per run. |
| Send "subscribed" and "back in stock" events to Klaviyo | checkbox | Off |
Send events. Needed for the Klaviyo flows that send the notification. |
Instock Notifier > Settings > Mailchimp
| Setting | Type | Default | What it does |
|---|---|---|---|
| Send waitlist subscribers to Mailchimp | checkbox | Off |
Enable sync. Leave this off while you are still entering credentials. Nothing is sent until it is on. |
| API key | text | - | From Account and then Extras and then API keys in Mailchimp. The part after the dash is your data centre and is read automatically. |
| Add contacts as pending so Mailchimp sends its own confirmation email | checkbox | Off |
Mailchimp confirmation. Off subscribes the contact straight away. On makes Mailchimp email them to confirm first. |
| Target list | select | - | Save your credentials first, then use Fetch lists to load the audiences on your account. |
| Tags | text | Back In Stock, {only_product_name} |
Comma separated. Placeholders such as {only_product_name} and {product_id} are expanded per subscriber. |
| When someone leaves the waitlist, mark them unsubscribed on Mailchimp too | checkbox | On |
Mirror unsubscribes. Recommended. |
| Retry rows that have not reached the platform yet, in the background | checkbox | On |
Catch-up sync. Runs every five minutes and handles up to 25 subscribers per run. |
Instock Notifier > Settings > MailerLite
| Setting | Type | Default | What it does |
|---|---|---|---|
| Send waitlist subscribers to MailerLite | checkbox | Off |
Enable sync. Leave this off while you are still entering credentials. Nothing is sent until it is on. |
| API token | text | - | From Integrations and then MailerLite API in your MailerLite account. Give the token read and write access to subscribers and groups. |
| Add contacts as unconfirmed so MailerLite sends its own opt-in email | checkbox | Off |
Subscriber status. Leave off when you already confirm consent on your own site, for example with the Double Opt-In add-on. |
| Target list | select | - | Save your credentials first, then use Fetch lists to load the groups on your account. |
| Tags | text | Back In Stock, {only_product_name} |
Comma separated. Placeholders such as {only_product_name} and {product_id} are expanded per subscriber. |
| When someone leaves the waitlist, mark them unsubscribed on MailerLite too | checkbox | On |
Mirror unsubscribes. Recommended. |
| Retry rows that have not reached the platform yet, in the background | checkbox | On |
Catch-up sync. Runs every five minutes and handles up to 25 subscribers per run. |
Instock Notifier > Settings > Omnisend
| Setting | Type | Default | What it does |
|---|---|---|---|
| Send waitlist subscribers to Omnisend | checkbox | Off |
Enable sync. Leave this off while you are still entering credentials. Nothing is sent until it is on. |
| API key | text | - | From Store settings and then Integrations and API and then API keys in Omnisend. |
| Mark the email channel as subscribed | checkbox | On |
Email channel. Turn this off to add contacts without opting them into marketing email. They can still receive automation messages triggered by events. |
| Also subscribe the phone number to SMS when one was given | checkbox | Off |
SMS channel. Only turn this on if your subscribe form makes clear that giving a phone number means agreeing to texts. |
| Tags | text | Back In Stock, {only_product_name} |
Comma separated. Placeholders such as {only_product_name} and {product_id} are expanded per subscriber. |
| When someone leaves the waitlist, mark them unsubscribed on Omnisend too | checkbox | On |
Mirror unsubscribes. Recommended. |
| Retry rows that have not reached the platform yet, in the background | checkbox | On |
Catch-up sync. Runs every five minutes and handles up to 25 subscribers per run. |
| Send "subscribed" and "back in stock" events to Omnisend | checkbox | Off |
Send events. Turn this on when you want an Omnisend automation to send the notification. |
Instock Notifier > Settings > Sales Attribution
| Setting | Type | Default | What it does |
|---|---|---|---|
| Also attribute orders whose billing email matches a notified subscriber | checkbox | On |
Reconcile by email. Catches customers who received the email, browsed away, and came back later without using the link. |
| Attribution window | number | 30 |
Days after the notification that an order still counts. Only applies to email reconciliation; signed links are attributed regardless. |
| Record the attributed line total against each converted subscriber | checkbox | On |
Revenue. Stores the line total of the subscribed product on the order. |
Instock Notifier > Settings > Waitlist Analytics
| Setting | Type | Default | What it does |
|---|---|---|---|
| Default period | select | Last 30 days |
The period the reports use when you open them: Last 7 days, Last 30 days, Last 90 days, Last 12 months or All time. |
| Show the top unmet demand on the WordPress dashboard | checkbox | On |
Dashboard widget. |
| Rows per table | number | 25 |
How many rows each report table shows. |
Instock Notifier > Settings > Team Alerts
| Setting | Type | Default | What it does |
|---|---|---|---|
| Webhook URL | text | - | Treated as a credential: anybody holding this URL can post into your channel, so it is encrypted at rest and shown masked. |
| Destination | select | Slack |
Slack, Discord, Microsoft Teams or Plain JSON webhook. Must match the webhook URL. |
| Demand threshold | number | 25 |
Announce when a product passes this many waiting subscribers, and again at each multiple of it. Zero turns the alert off. |
| Post a summary after a batch of restock alerts goes out | checkbox | Off |
Restock summaries. Batched over a few minutes rather than one message per subscriber. |
| Post yesterday's signups, notifications and top demand once a day | checkbox | Off |
Daily digest. |
| Mention on threshold alerts | text | - | Optional, for example <!here> in Slack or @here in Discord. Only applied to the demand threshold alert. |
Instock Notifier > Settings > Waitlist Priority
| Setting | Type | Default | What it does |
|---|---|---|---|
| Notify in this order | select | First come, first served |
First come, first served; Highest lifetime spend first; Priority customer roles first, then signup order; or Registered customers first, then guests. |
| Priority roles | text | - | Comma separated role slugs, highest priority first, for example vip_customer, wholesale. Only used by the role ordering. |
| Release alerts in waves sized to available stock | checkbox | Off |
Wave release. |
| People per unit of stock | number | 3 |
How many subscribers to notify per available unit. Not everybody who is told will buy, so a one to one wave under-sells the stock. |
| Gap between waves | number | 30 |
Minutes between waves. Under fifteen minutes there is little point having waves at all. |
| Maximum waves | number | 5 |
The most waves released for one restock. |
| Stop at this stock level | number | 0 |
Waves stop once stock falls to this level. Useful when you hold a few units back for walk-in or wholesale. |
Instock Notifier > Settings > Double Opt-In
| Setting | Type | Default | What it does |
|---|---|---|---|
| New waitlist entries must be confirmed by email | checkbox | Off |
Require confirmation. |
| Confirmation subject | text | Confirm your alert for {product_name} |
Subject of the confirmation email. |
| Confirmation message | textarea | - | Must contain {doubleoptin_verify_link}, otherwise nobody can confirm. |
| Message shown after signing up | text | Almost done. Check your inbox and confirm your alert. |
Shown on the product page after someone subscribes. |
| Message when a confirmation is already pending | text | We already sent a confirmation to that address. Check your inbox, including the spam folder. |
Shown when the same address signs up again before confirming. |
| Message shown after confirming | text | Confirmed. We will email you as soon as this product is back in stock. |
Shown after the confirmation link is clicked. |
| Message shown for an expired link | text | That confirmation link is no longer valid. Sign up again on the product page and we will send a new one. |
Shown when a confirmation link is no longer valid. |
| Delete unconfirmed entries after | number | 7 |
Days before an unconfirmed entry is deleted. |
| Record when and where each confirmation happened | checkbox | On |
Consent evidence. Stores the timestamp, the originating page and a salted hash of the IP address. The raw IP is never kept. |
Instock Notifier > Settings > Unsubscribe
| Setting | Type | Default | What it does |
|---|---|---|---|
| Unsubscribe page | select | - | Must contain the [cwginstocknotifier_unsubscribe] shortcode. A page is created for you the first time the add-on is switched on. |
| Send List-Unsubscribe and List-Unsubscribe-Post headers | checkbox | On |
Mailbox unsubscribe button. Strongly recommended. Turning this off makes it more likely your notifications land in spam. |
| Offer a "remove me from all waitlists" option on the confirmation page | checkbox | On |
Leave every waitlist. |
| Confirmation message | textarea | - | Shown after unsubscribing. Supports {email_id} and {product_name}. |
| Already unsubscribed message | textarea | - | Shown when the address was already removed from this waitlist. |
| Invalid link message | textarea | That unsubscribe link is not valid or has expired. If you have an account with us you can manage your waitlist from My Account. |
Shown when an unsubscribe link cannot be verified. |
| My Account endpoint | text | cwg-unsubscribe |
The URL segment for the Subscribed List tab. Save your permalinks once after changing it. |
| My Account tab label | text | Subscribed List |
Label of the tab in My Account. |
| Subscribed List heading | text | Products you are waiting for |
Heading shown on the Subscribed List tab. |
| Unsubscribe link text | text | Remove |
Text of the remove link on each row of the Subscribed List. |
| Show a thumbnail in the Subscribed List | checkbox | On |
Product images. |
| Hide the SKU in the Subscribed List | checkbox | Off |
Product SKU. |
| Show how many people are waiting for each product | checkbox | Off |
Demand count. Leave it off if you would rather not reveal how thin demand is on slow lines. |
Instock Notifier > Settings > Editing Subscribers
| Setting | Type | Default | What it does |
|---|---|---|---|
| Record who changed what on each subscriber | checkbox | On |
Change history. The last few entries are shown under the edit form. |
| Allow the same address on the same product more than once | checkbox | Off |
Duplicates. Leave this off unless you have a specific reason. Duplicates mean duplicate notification emails. |
Instock Notifier > Settings > Never Restock
| Setting | Type | Default | What it does |
|---|---|---|---|
| Redirect waitlists for discontinued products onto replacements | checkbox | Off |
Enable. Once saved, a Never Restock item appears in the Instock Notifier menu for your rules. |
| Rule priority | select | Use the first matching rule only |
Applies when one replacement product is named by more than one rule. Apply every matching rule can mean several emails to the same person. |
| Email subject | text | We found you an alternative to {only_product_name} |
Subject of the replacement email. |
| Email message | textarea | - | Body of the replacement email. Use {replacement_product} and {replacement_product_link} so it mentions the replacement. |
| Emails per batch | number | 50 |
How many subscribers are emailed per background run. Lower this if your mail provider rate limits you. |
Instock Notifier > Settings > CSV Export
| Setting | Type | Default | What it does |
|---|---|---|---|
| Category columns | number | 5 |
Products can sit in several categories. This is how many category columns the file gets, so every row lines up. |
| Delimiter | select | Comma |
Comma, Semicolon or Tab. Semicolon suits regional Excel builds where comma is the decimal separator. |
Instock Notifier > Settings > CSV Import
| Setting | Type | Default | What it does |
|---|---|---|---|
| Status for rows with no status column | select | Subscribed |
Subscribed, Notified or Unsubscribed. |
| Treat imported rows as new subscriptions | checkbox | Off |
Run integrations on import. Turning it on pushes every imported row to your marketing platform and can trigger a subscription confirmation. |
| Skip rows whose product does not exist in this store | checkbox | On |
Unknown products. Leave this on. A subscriber attached to a product that is not here can never be notified. |
Instock Notifier > Settings > Subscribe Form Styling
| Setting | Type | Default | What it does |
|---|---|---|---|
| Form width on desktop | number | 100 |
Percentage of the available column width. |
| Form width on mobile | number | 100 |
Applied below 768px. Rendered as a media query, so it survives page caching that serves one HTML document to every device. |
| Heading font size | number | 18 |
In pixels. |
| Button font size | number | 14 |
In pixels. |
| Button corner radius | number | - | Optional. Leave empty to inherit the theme. |
| Form panel corner radius | number | - | Rounds the whole panel. Most visible on the Card and Bold designs. |
| Form panel shadow | select | Leave as the design sets it |
Leave as the design sets it, None, Subtle or Pronounced. |
| Input corner radius | number | - | In pixels. Applies to the form fields. |
| Popup backdrop opacity | number | - | Percentage opacity of the popup backdrop. |
| Popup corner radius | number | - | In pixels. |
| Popup maximum width | number | - | Ignored by the Side Drawer, which is sized to the edge of the screen. |
| Popup button font size | number | - | In pixels. |
| Guest notice font size | number | - | In pixels. |
| Custom CSS | textarea | - | Emitted after every rule above, so it always wins. Tags and scripts are stripped on save. |
Instock Notifier > Settings > Demand Signals
| Setting | Type | Default | What it does |
|---|---|---|---|
| Minimum before showing | number | - | Number of people waiting before the count is shown. Below it nothing is shown. |
| Where to show it | select | - | Above the subscribe form, inside the form above the fields, below the subscribe button, inside the form heading bar, or only where you place the shortcode. On a variable product the notice follows the selected variation. |
| Message | text | {count} people are waiting for this to come back. |
Use {count} for the number. |
| Tell a new subscriber where they are in the queue | checkbox | Off |
Queue position. |
| Queue position message | text | You are number {position} in the queue. |
Use {position} for their place. Shown straight after they subscribe. |
| Also show a short badge on product listings | checkbox | Off |
Shop and category pages. |
| Appearance | select | - | Quiet text, Coloured badge, or No styling, inherit the theme. |
Instock Notifier > Settings > Blocked Emails
| Setting | Type | Default | What it does |
|---|---|---|---|
| Block the bundled list of throwaway mail providers | checkbox | On |
Disposable providers. The bundled list ships with the add-on and updates with it. |
| Blocked providers | textarea | - | Read only, because this list is refreshed when the add-on updates. To allow one of these domains, add it to Always allow. To block more, use Blocked domains. |
| Block shared mailboxes such as info@, admin@ and sales@ | checkbox | Off |
Role accounts. |
| Reject domains with no mail server configured | checkbox | Off |
Deliverability check. Performs a DNS lookup for an MX record, cached for a day per domain. Catches typos such as gmial.com. |
| Blocked domains | textarea | - | One per line or comma separated. Wildcards allowed, for example *.example.com. |
| Blocked addresses | textarea | - | Full addresses, one per line or comma separated. |
| Always allow | textarea | - | Addresses or domains that bypass every rule above. Checked first. |
| Message shown when blocked | text | We cannot use that email address. Please try another one. |
Shown to a visitor whose address is blocked. |
| Record blocked attempts in the plugin log | checkbox | On |
Logging. Addresses are partially masked in the log. Useful when a customer reports they cannot subscribe. |
Shortcodes
[bis_demand_count]
Shows how many people are waiting for a product. Provided by the Demand Signals add-on. Without an attribute, it shows the count for the current product. Use it to place the number anywhere, for example in a page builder layout.
[bis_demand_count id="123"]| Attribute | Default | Description |
|---|---|---|
id | - | The product ID to show the count for. Leave it out to use the current product. |
[cwginstocknotifier_unsubscribe]
Handles unsubscribe links on the page you choose as the Unsubscribe page in the Unsubscribe add-on. The page must contain this shortcode.
[cwginstocknotifier_unsubscribe]On your site
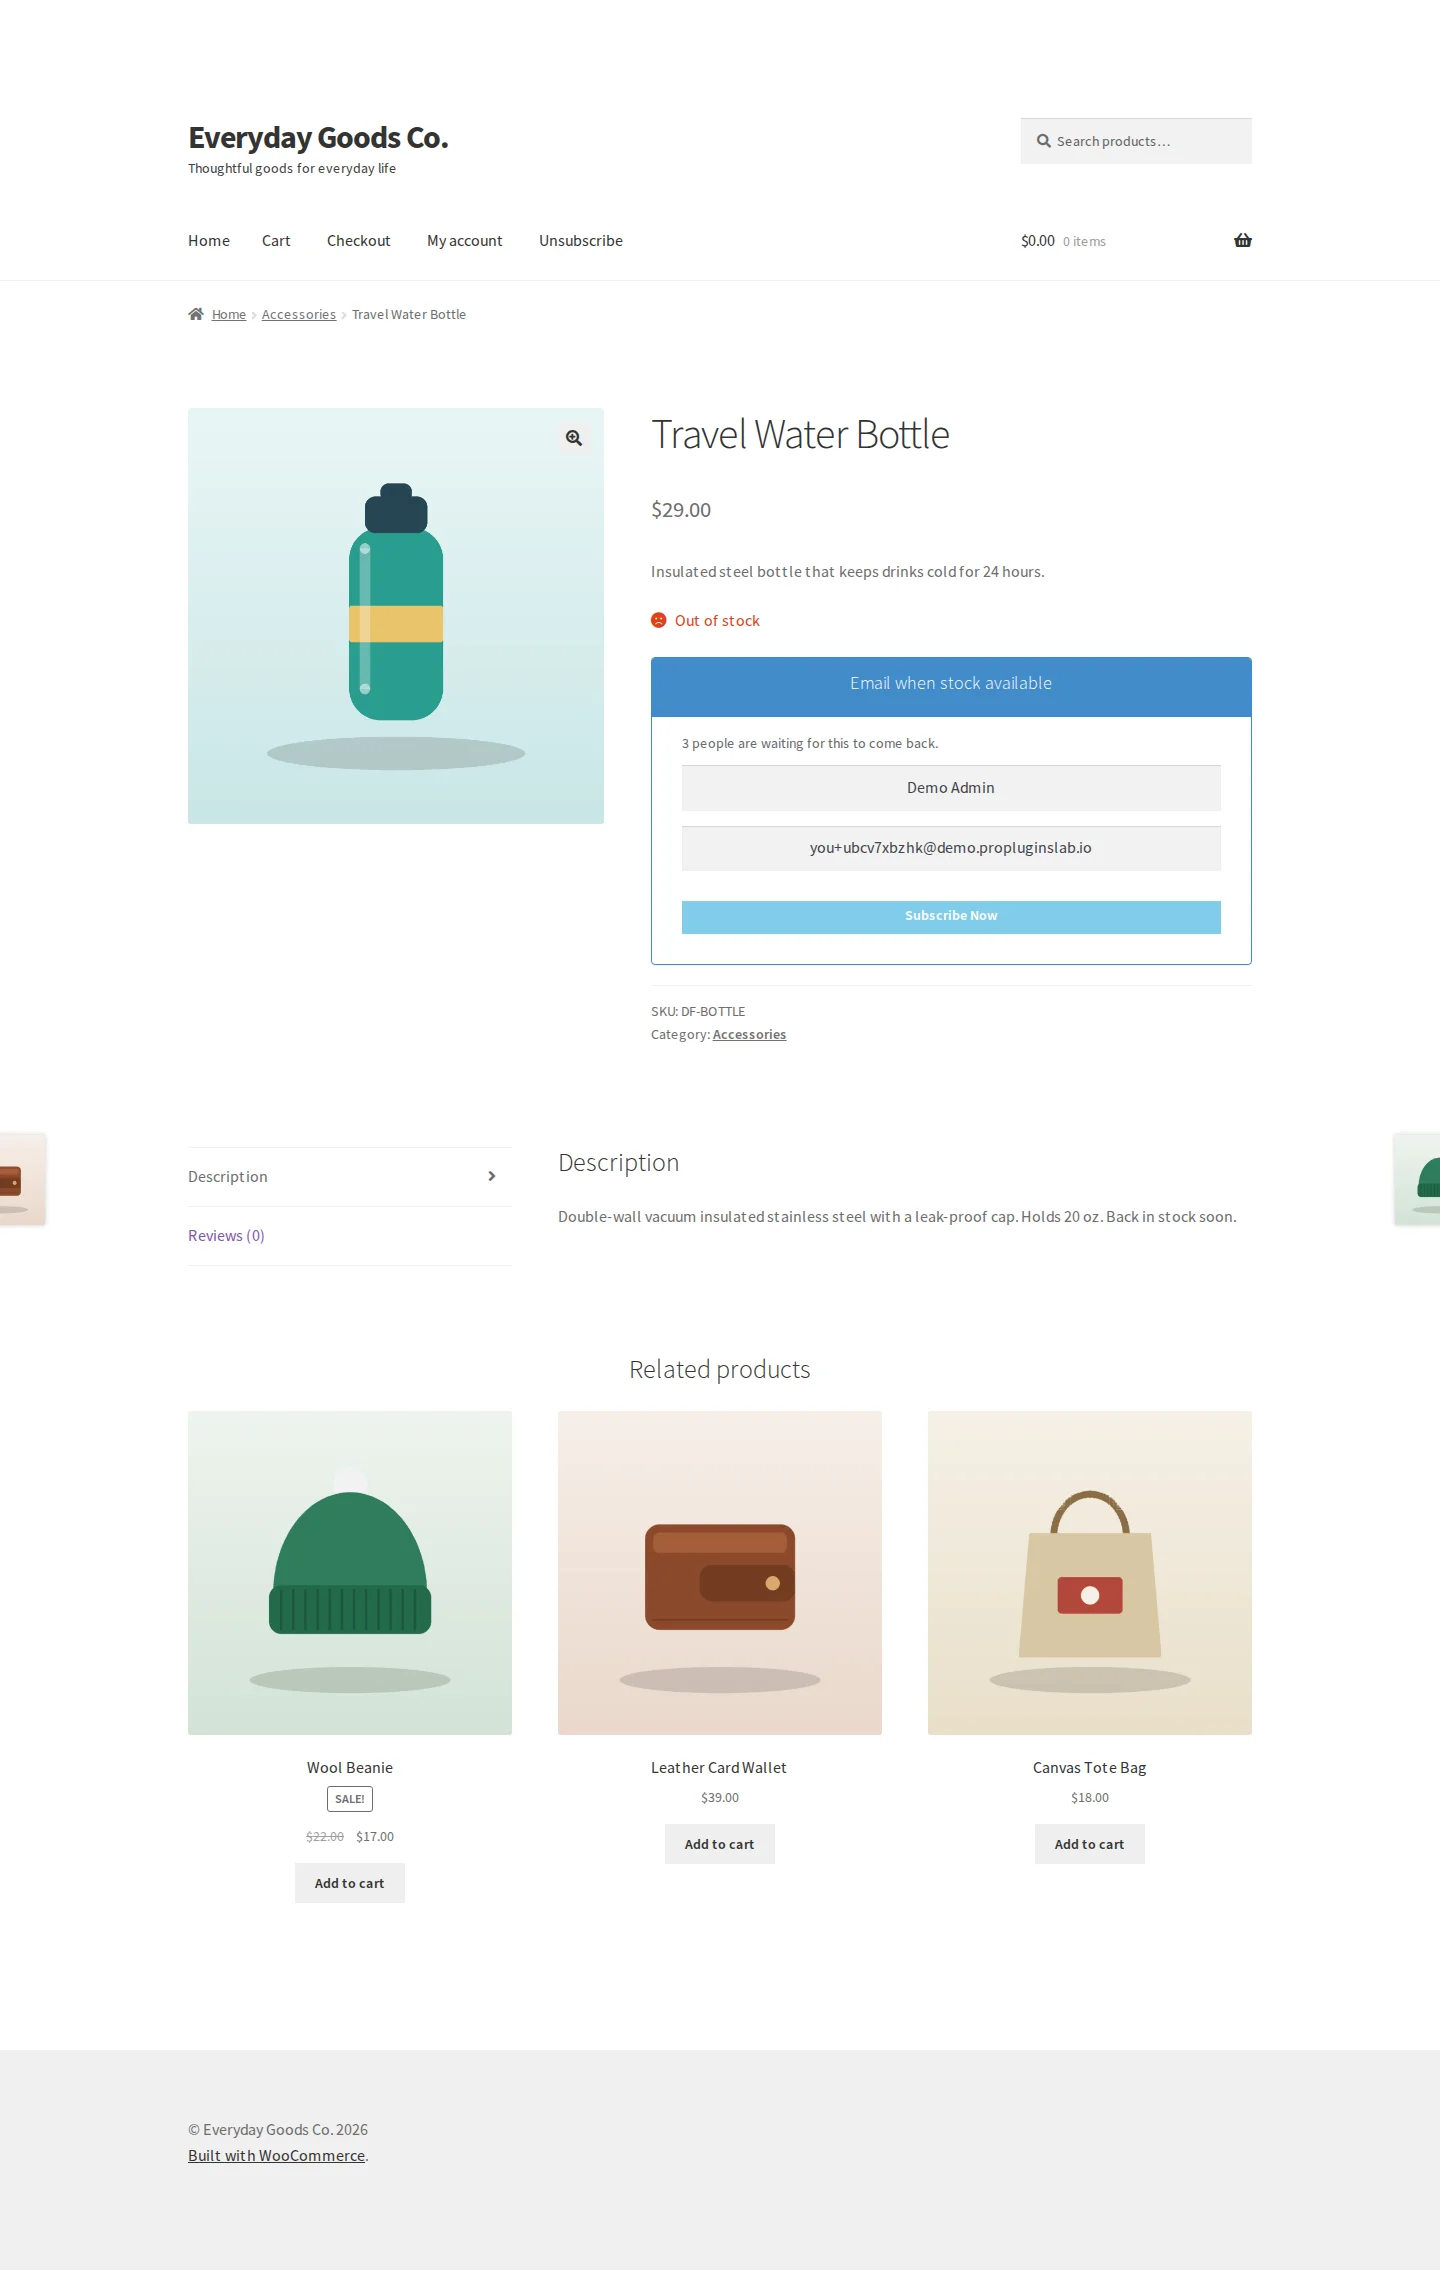
When a product is out of stock, Back In Stock Notifier shows its subscribe form on the product page. The bundle's add-ons change what shoppers see there:
- Demand Signals adds a line such as "{count} people are waiting for this to come back." once a product reaches your minimum. It can also show the new subscriber's queue position and a short badge on shop and category pages.
- Custom CSS controls the form's widths, font sizes, colours, corner radii and popup styling.
- Double Opt-In shows a "check your inbox" message after signing up, and a confirmation or expired link message when the email link is clicked.
- Ban Emails shows your blocked message when an address is rejected.
- Unsubscribe adds a Subscribed List tab in My Account, where customers can see and remove the products they're waiting for. It also adds an unsubscribe page that confirms removals.
If your changes don't show, purge any page cache or CDN once after saving.
Frequently asked questions
Does switching an add-on off delete its settings?
No. Switching an add-on off leaves its settings and data alone, so you can turn it back on later and pick up where you left off. Deactivating the bundle also keeps the record of which add-ons you had switched on.
I already have individual add-on plugins installed. What should I do?
Your add-on selection, settings and licence keys are carried forward to the bundle automatically, and you don't need to enter anything again. Deactivate the individual add-on plugins and manage everything from Instock Notifier > Add-ons.
What happens if my licence key is missing or invalid?
The add-ons keep working. A valid key under Instock Notifier > Add-on Licences is what enables automatic updates. Keys are checked once a day. If the licence server is briefly unreachable, the last known status is kept.
Can I use the WPML and Polylang add-ons together?
No. Switch on the one that matches the multilingual plugin you actually use. TranslatePress and Weglot don't duplicate products, so their add-ons don't need the shared waitlist setting.
Does importing a CSV send emails to the imported subscribers?
Not by default. Imported rows are added at the status you map, and Run integrations on import is off. Turn it on only if you want each row pushed to your marketing platform, which can trigger confirmation emails.
Why are conversion and revenue empty in Waitlist Analytics?
Those figures come from the Track Sales add-on, which links orders back to the restock email. Switch it on and make sure your back in stock email uses the {cart_link} placeholder.
Is customer data sent to Slack, Discord or Teams?
No. Team Alerts sends product names, counts and potential values only. No email addresses or phone numbers leave your site through that add-on.
Will people who already bought still get a restock reminder?
Not if Track Sales is active. It moves buyers to Purchased, and Restock Reminders skips that status. Without Track Sales, there is no way to know they bought.
Troubleshooting
- The bundle can't be activated.
The bundle requires Back In Stock Notifier for WooCommerce. Install and activate it (and WooCommerce) first, then activate Bundle Add-ons again.
- An add-on's settings tab or feature doesn't appear.
Open Instock Notifier > Add-ons and check the add-on's status. If it shows Switch on, it's off. Click Switch on. You can also check the ON or OFF badge next to each add-on under Instock Notifier > Help. Features that edit subscribers are only available to users who can manage WooCommerce.
- Subscribers aren't reaching my marketing platform.
On the platform's settings tab, check that Enable sync is ticked, a Target list is selected and Fetch lists loads your lists with the saved key. The subscribers list shows a sync state per row. Open Instock Notifier > Help for the add-on's live status, and use Copy system report if you contact support.
- Customers receive two emails for the same restock.
If Brevo, Klaviyo or Omnisend sends the alert, stop the WooCommerce email too. For Brevo, tick Replace the built-in email. For Klaviyo, tick Let Klaviyo send the email once your flows are live. For Omnisend, turn off the built-in notification under WooCommerce > Settings > Emails.
- Styling changes to the subscribe form don't show.
This is almost always a page cache or CDN. Purge both and reload the product page. If it still looks unchanged, your theme may load its stylesheet later. Put the rule in the Custom CSS box on the Subscribe Form Styling tab, which is output last.
- Confirmation or notification emails never arrive for anyone.
This is email delivery, not a specific add-on. Use Test Email under Instock Notifier > Status to check that your site can send mail. If the test doesn't arrive, consider an SMTP plugin.