
Overview
Christmas Snow for WordPress adds a falling snow effect to your site. It draws the snow on a lightweight HTML5 Canvas. The snow starts as soon as you activate the plugin, so you don't have to set anything up first.
When you want to change how it looks, open Settings > Christmas Snow. The tabs cover the flake style, how the snow moves, where it appears, who sees it and which weeks of the year it runs. A Live preview panel updates as you change settings, and six one click Presets give you a starting point.
The plugin suits blogs, business sites and WooCommerce stores that want some seasonal decoration. WooCommerce cart, checkout and account pages are excluded by default. Visitors who ask their device to reduce motion don't see the animation, and the plugin is completely free with no locked features.
Requirements
- WordPress 5.0 or later (tested up to WordPress 7.1)
- PHP 7.0 or later
- WooCommerce is not required. If you use it, cart, checkout and account pages are excluded by default.
Installation
Christmas Snow for WordPress is a free plugin. Install it from the WordPress.org plugin directory in your WordPress admin.
Log in to your WordPress admin dashboard.
Go to Plugins > Add New.
Search for Christmas Snow.
Click Install Now, then click Activate.
Optional: go to Settings > Christmas Snow to shape the effect. The snow already runs with sensible defaults.
Quick start
- Check that the snow is live
Go to Settings > Christmas Snow. The header of the settings screen shows a status badge, for example Snowfall is live. On the General tab, make sure Enable snowfall is switched on.
- Pick a preset
In the Presets panel on the right, click a look such as Gentle Drift, Classic Christmas or Heavy Blizzard. A preset fills in the appearance and motion settings. Your display rules and schedule stay as they are.
- Fine-tune it in the live preview
Adjust the flakes on the Appearance and Motion tabs. The Live preview panel updates as you change a setting. Use the Preview background dots to check the snow on a dark, blue or light background.
- Decide where the snow appears
On the Display Rules tab, choose under Show on whether the snow covers the entire site, the home page only or selected content types and pages. Add any pages that should never show snow under Never show on.
- Save your changes
Click Save changes. Changes apply to your site as soon as you save.
#General
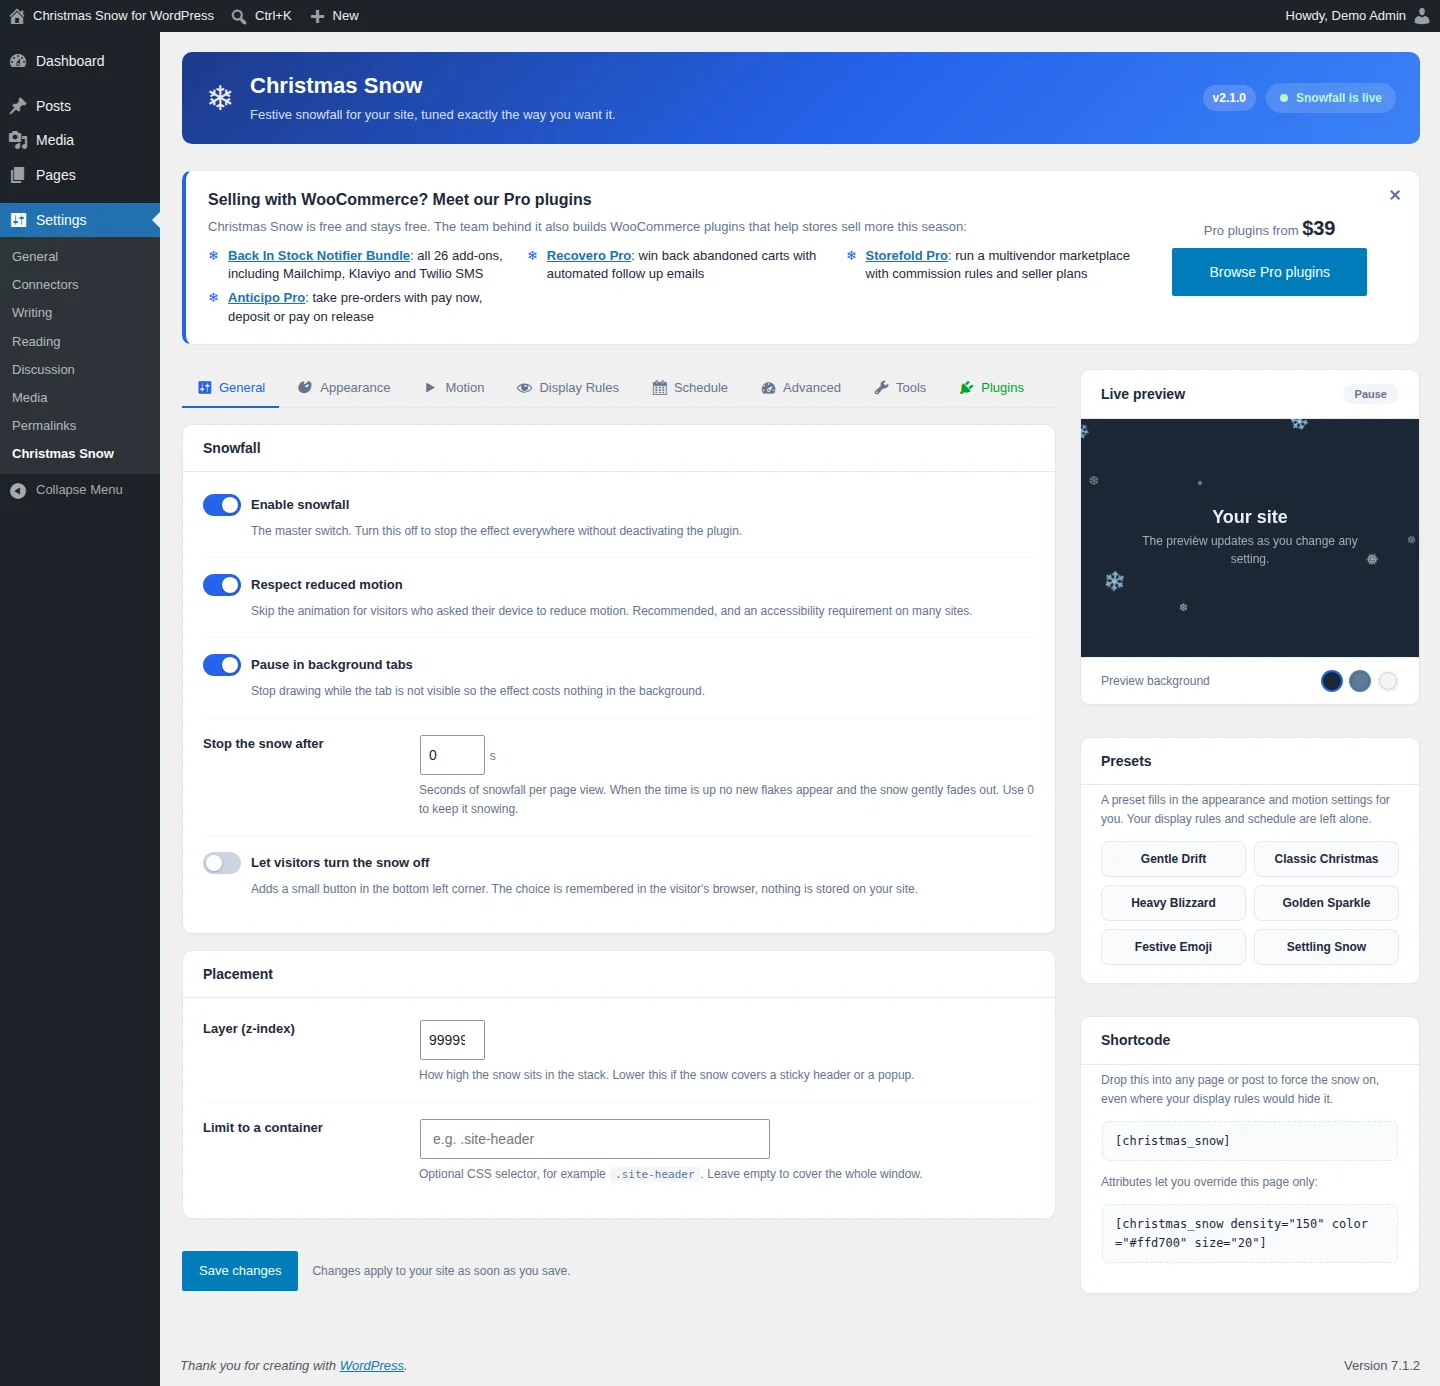
The General tab under Settings > Christmas Snow holds the main switches for the effect.
Snowfall
- Enable snowfall is the master switch. Turn it off to stop the effect everywhere without deactivating the plugin.
- Respect reduced motion skips the animation for visitors who asked their device to reduce motion. This is recommended, and many sites need it for accessibility.
- Pause in background tabs stops drawing while the browser tab is not visible, so the effect costs nothing in the background.
- Stop the snow after sets how many seconds the snow falls per page view. When the time is up, no new flakes appear and the snow fades out. Use
0to keep it snowing. - Let visitors turn the snow off adds a small button in the bottom left corner. The visitor's choice is remembered in their own browser, and nothing is stored on your site.
Placement
- Layer (z-index) sets how high the snow sits in the page stack. Lower it if the snow covers a sticky header or a popup.
- Limit to a container takes an optional CSS selector, for example
.site-header. Leave it empty to cover the whole window.
The header of the settings screen also shows the plugin version and a status badge. It tells you whether the snow is live, off, waiting for its season or in shortcode only mode.
#Live preview, presets and shortcode panel
Three panels stay on the right of every settings tab.
Live preview shows the snow with your current settings and updates as you change any setting. Click Pause to stop the animation. Use the Preview background dots to switch between a dark, blue and light background.
Presets gives you six one click looks:
- Gentle Drift
- Classic Christmas
- Heavy Blizzard
- Golden Sparkle
- Festive Emoji
- Settling Snow
A preset fills in the appearance and motion settings for you. Your display rules and schedule are left alone. Click Save changes to keep the result.
Shortcode shows the [christmas_snow] shortcode and an example with attributes, ready to copy. See the Shortcodes reference on this page for details.
#Appearance
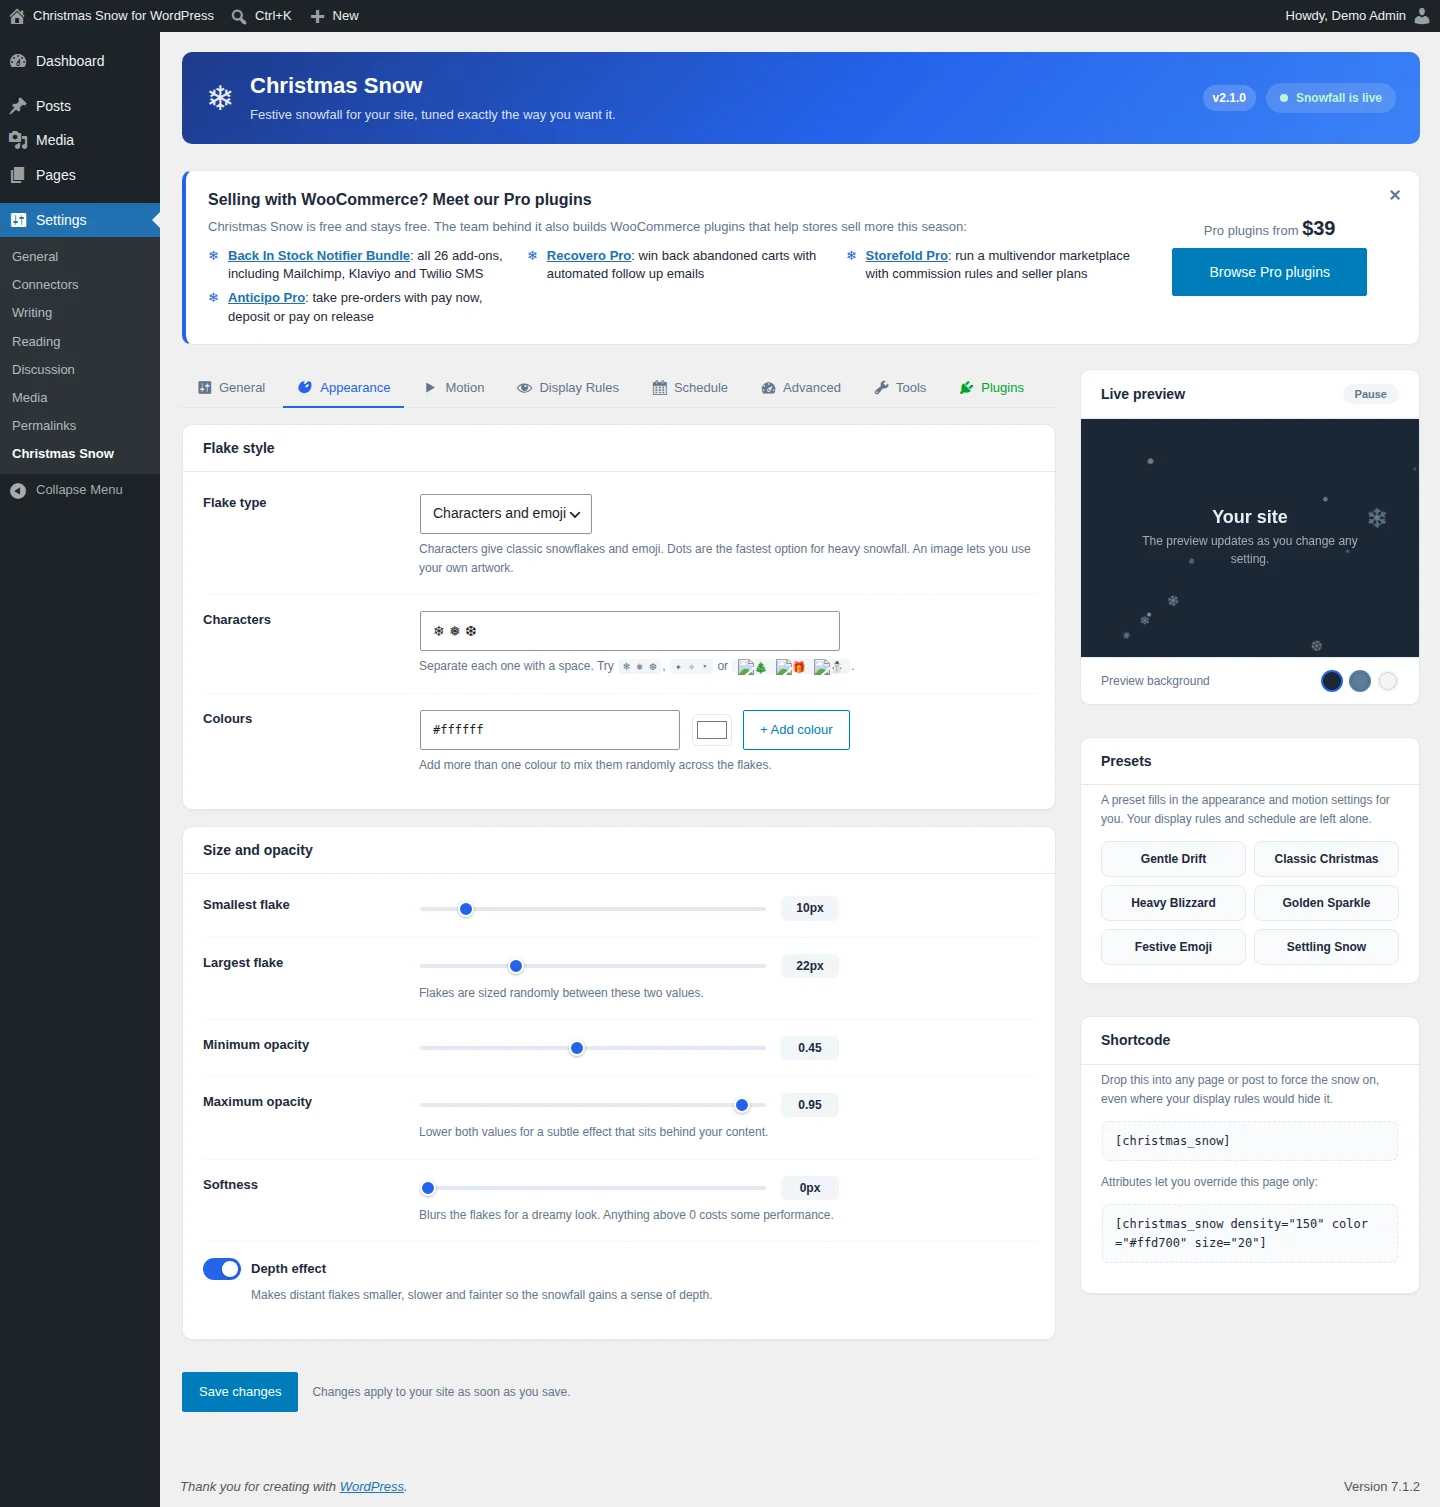
The Appearance tab controls what each flake looks like.
Flake style
- Flake type: choose
Characters and emoji,Soft dots (fastest)orCustom image. Characters give classic snowflakes and emoji. Dots are the fastest option for heavy snowfall. An image lets you use your own artwork, for example a small transparent PNG or SVG from your media library. - Characters: the characters to use as flakes. Separate each one with a space. Snowflakes, sparkles, stars and holiday emoji all work.
- Colours: the flake colour. Click + Add colour to add more colours (up to eight). The colours are mixed randomly across the flakes.
Size and opacity
- Smallest flake and Largest flake: flakes are sized randomly between these two values.
- Minimum opacity and Maximum opacity: lower both values for a subtle effect that sits behind your content.
- Softness: blurs the flakes for a dreamy look. Anything above 0 costs some performance.
- Depth effect: makes distant flakes smaller, slower and fainter, so the snowfall gains a sense of depth.
Fields that don't apply to your current choices are hidden automatically. For example, Characters only matters when the flake type is Characters and emoji.
#Motion
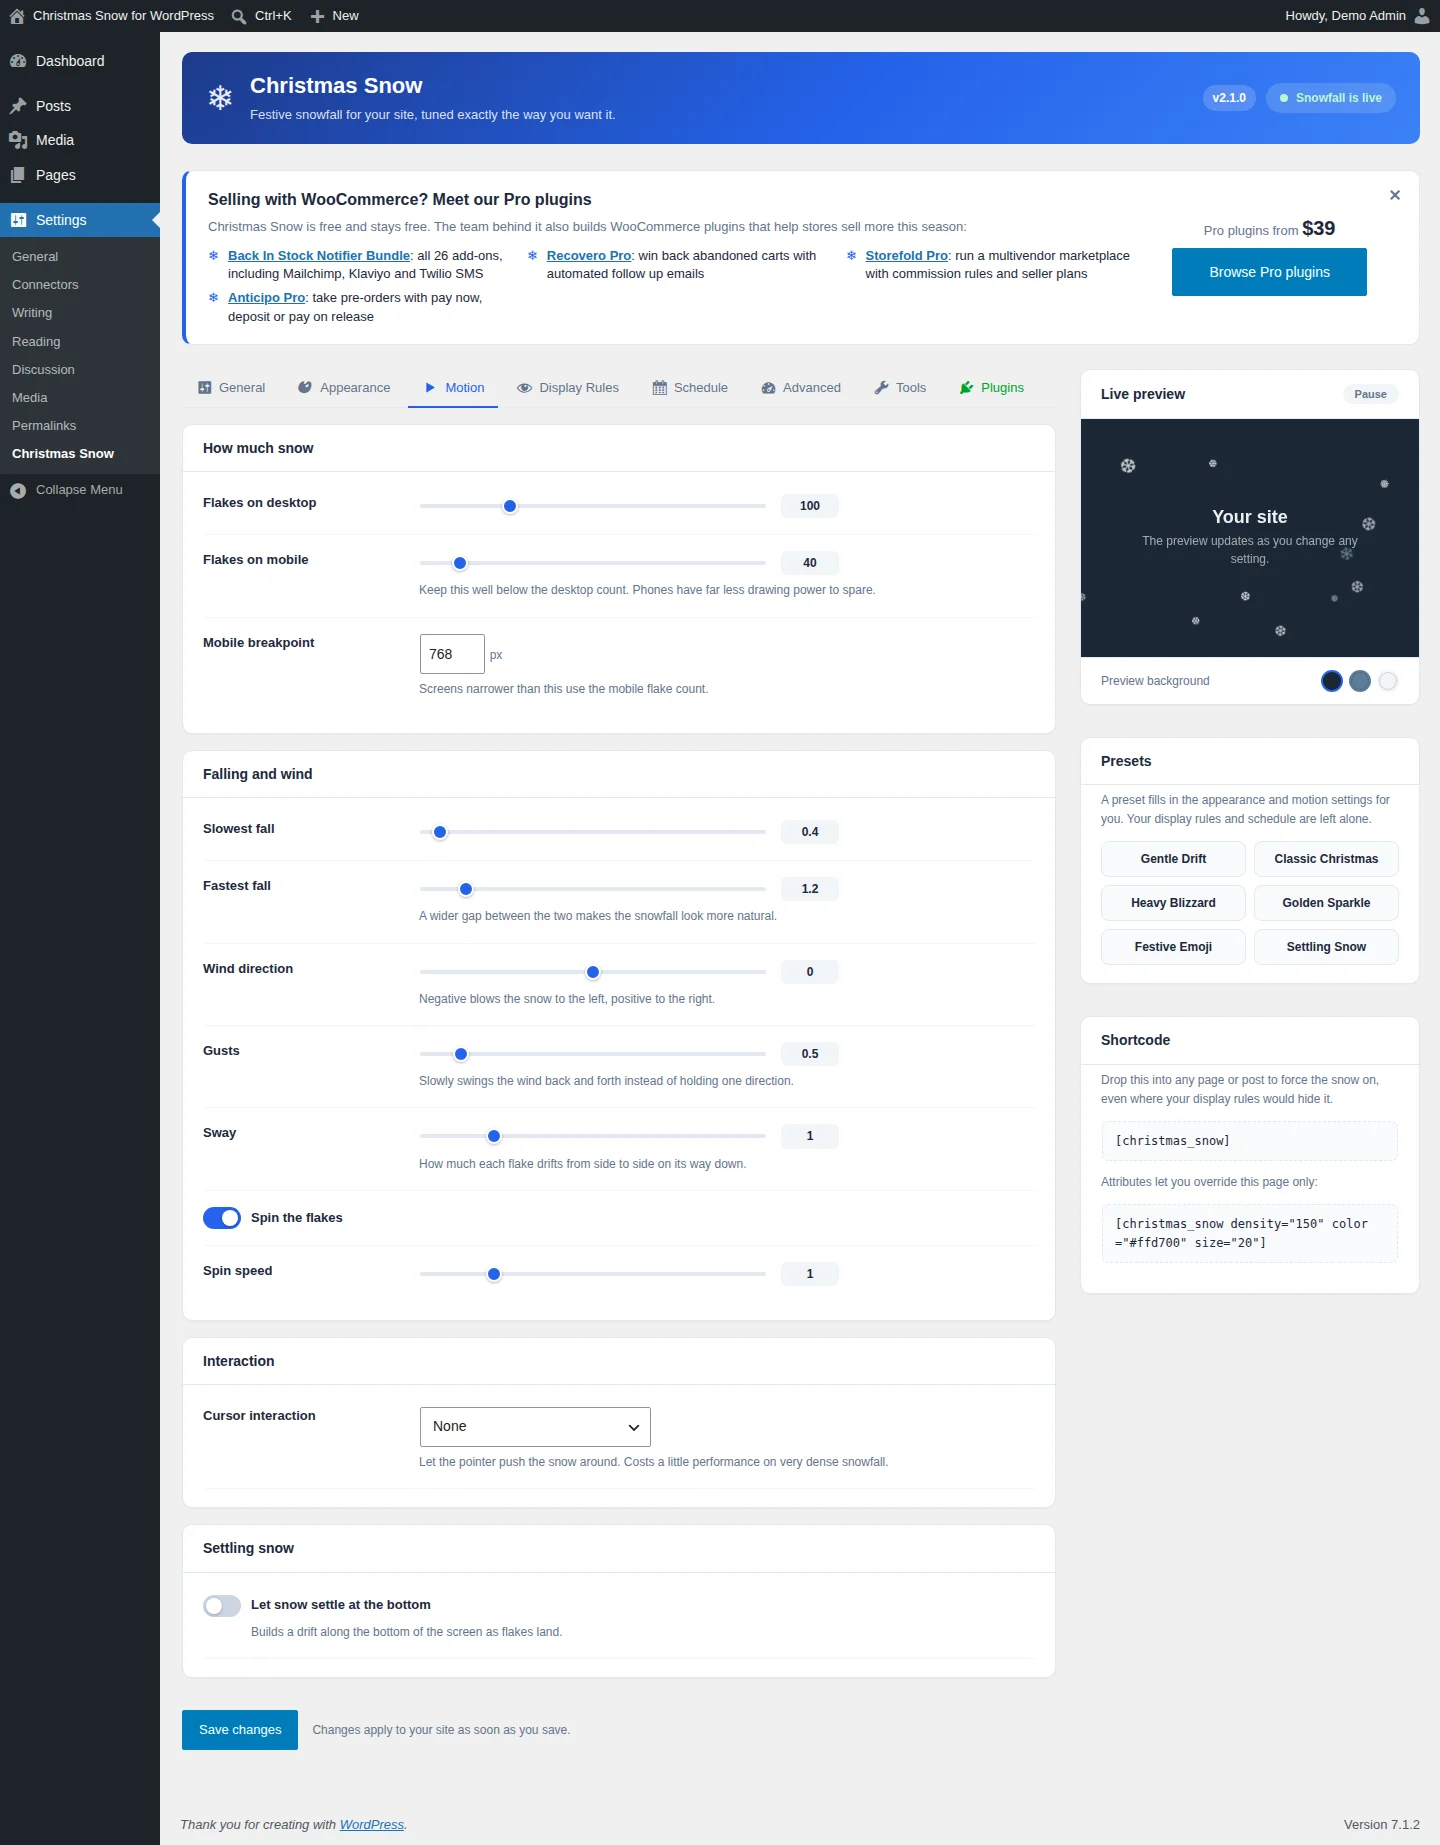
The Motion tab controls how much snow falls and how it moves.
How much snow
- Flakes on desktop and Flakes on mobile: keep the mobile count well below the desktop count. Phones have far less drawing power to spare.
- Mobile breakpoint: screens narrower than this width (in pixels) use the mobile flake count.
Falling and wind
- Slowest fall and Fastest fall: a wider gap between the two makes the snowfall look more natural.
- Wind direction: negative values blow the snow to the left, positive values to the right.
- Gusts: slowly swings the wind back and forth instead of holding one direction.
- Sway: how much each flake drifts from side to side on its way down.
- Spin the flakes turns rotation on, and Spin speed sets how fast the flakes spin.
Interaction
- Cursor interaction: choose
None,Push flakes away,Pull flakes inorGentle wind towards the cursor. Letting the pointer push the snow around costs a little performance on very dense snowfall.
Settling snow
- Let snow settle at the bottom builds a drift along the bottom of the screen as flakes land.
#Display Rules
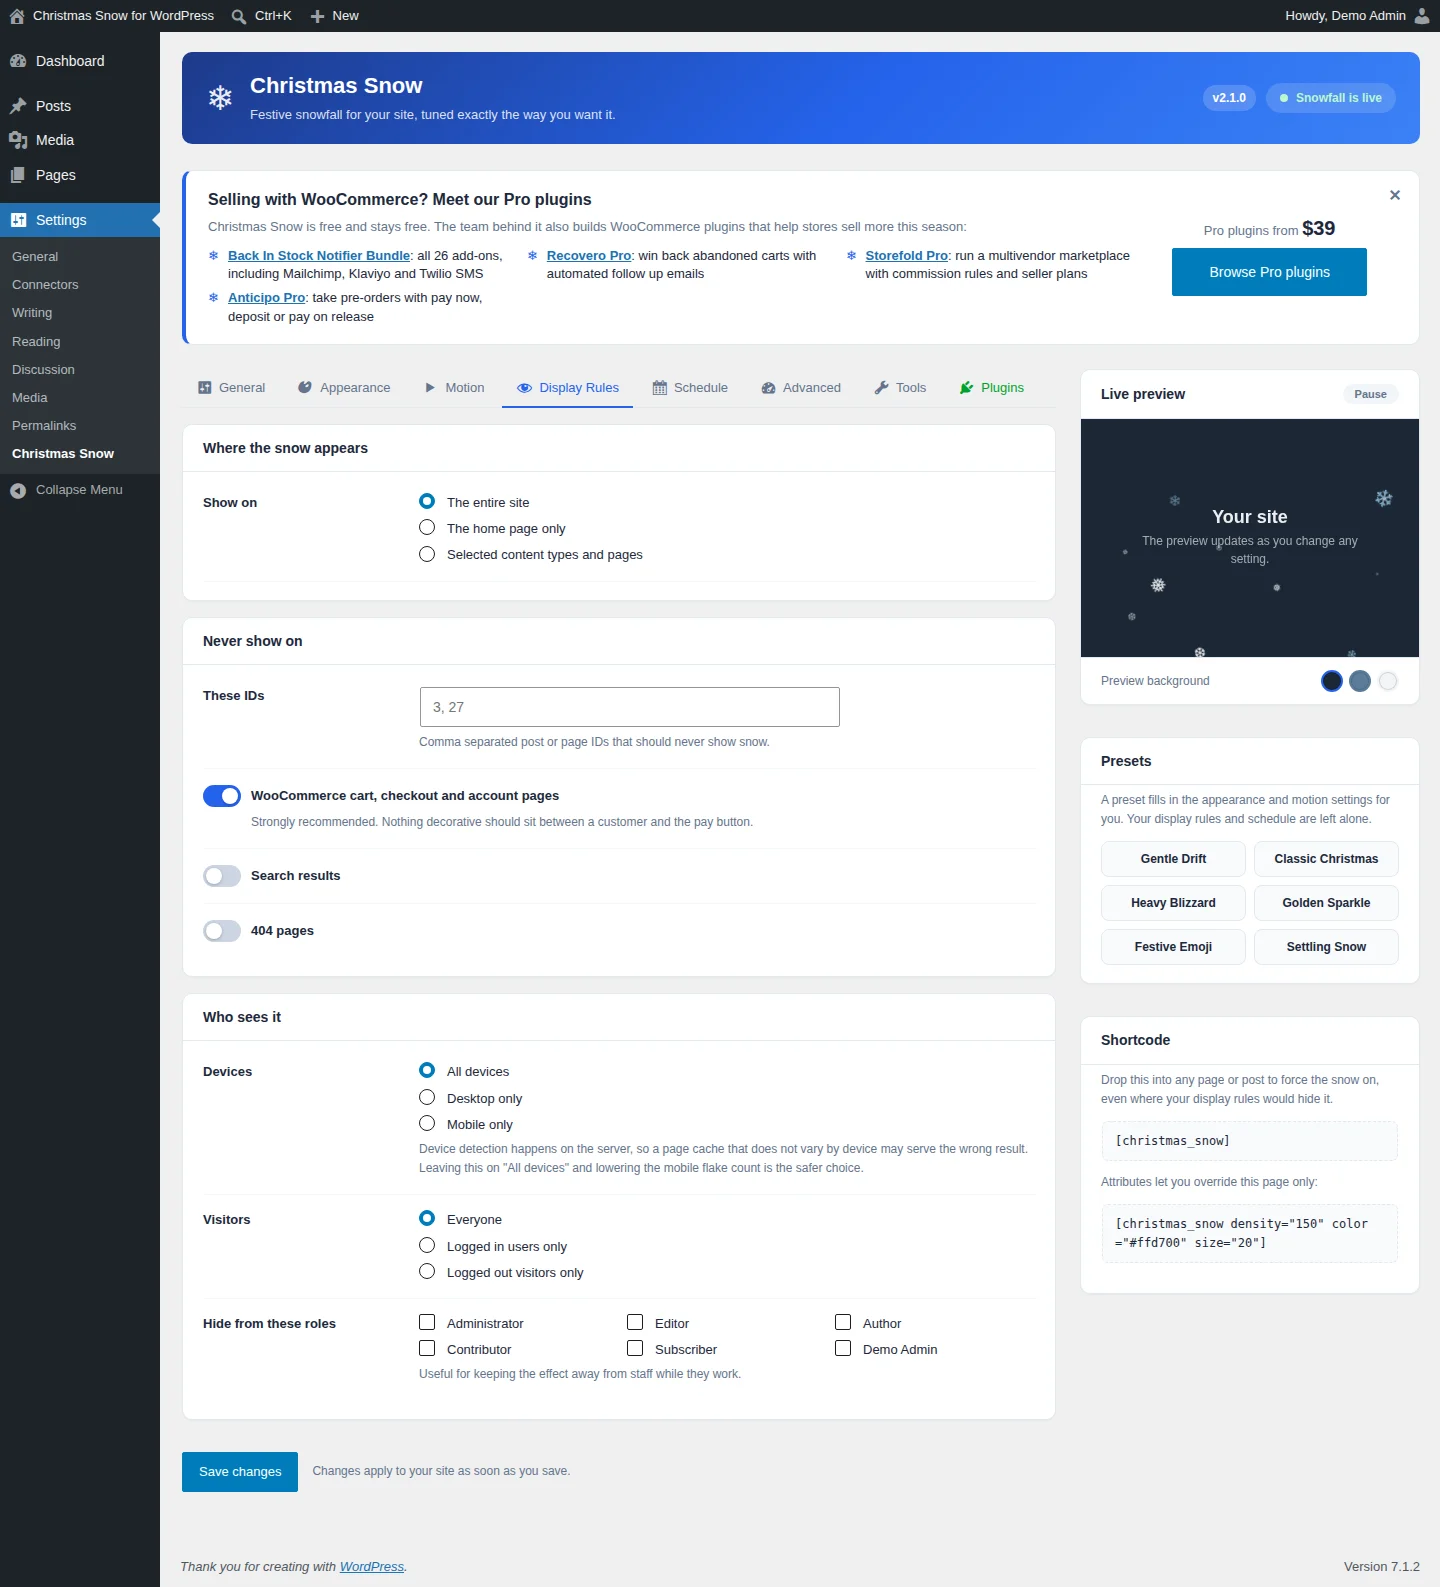
The Display Rules tab decides where the snow appears and who sees it.
Where the snow appears
Under Show on, choose one of these:
- The entire site
- The home page only
- Selected content types and pages, which lets you pick content types and list specific post or page IDs that always show snow
Never show on
- These IDs: comma separated post or page IDs that should never show snow, for example
3, 27. - WooCommerce cart, checkout and account pages: on by default and strongly recommended, so nothing decorative sits between a customer and the pay button.
- Search results and 404 pages: turn these on to hide the snow there too.
Who sees it
- Devices:
All devices,Desktop onlyorMobile only. Device detection happens on the server, so a page cache that does not vary by device may serve the wrong result. Leaving this onAll devicesand lowering the mobile flake count is the safer choice. - Visitors:
Everyone,Logged in users onlyorLogged out visitors only. - Hide from these roles: tick user roles (for example Administrator or Editor) that should not see the effect. This is useful for keeping the snow away from staff while they work.
#Schedule
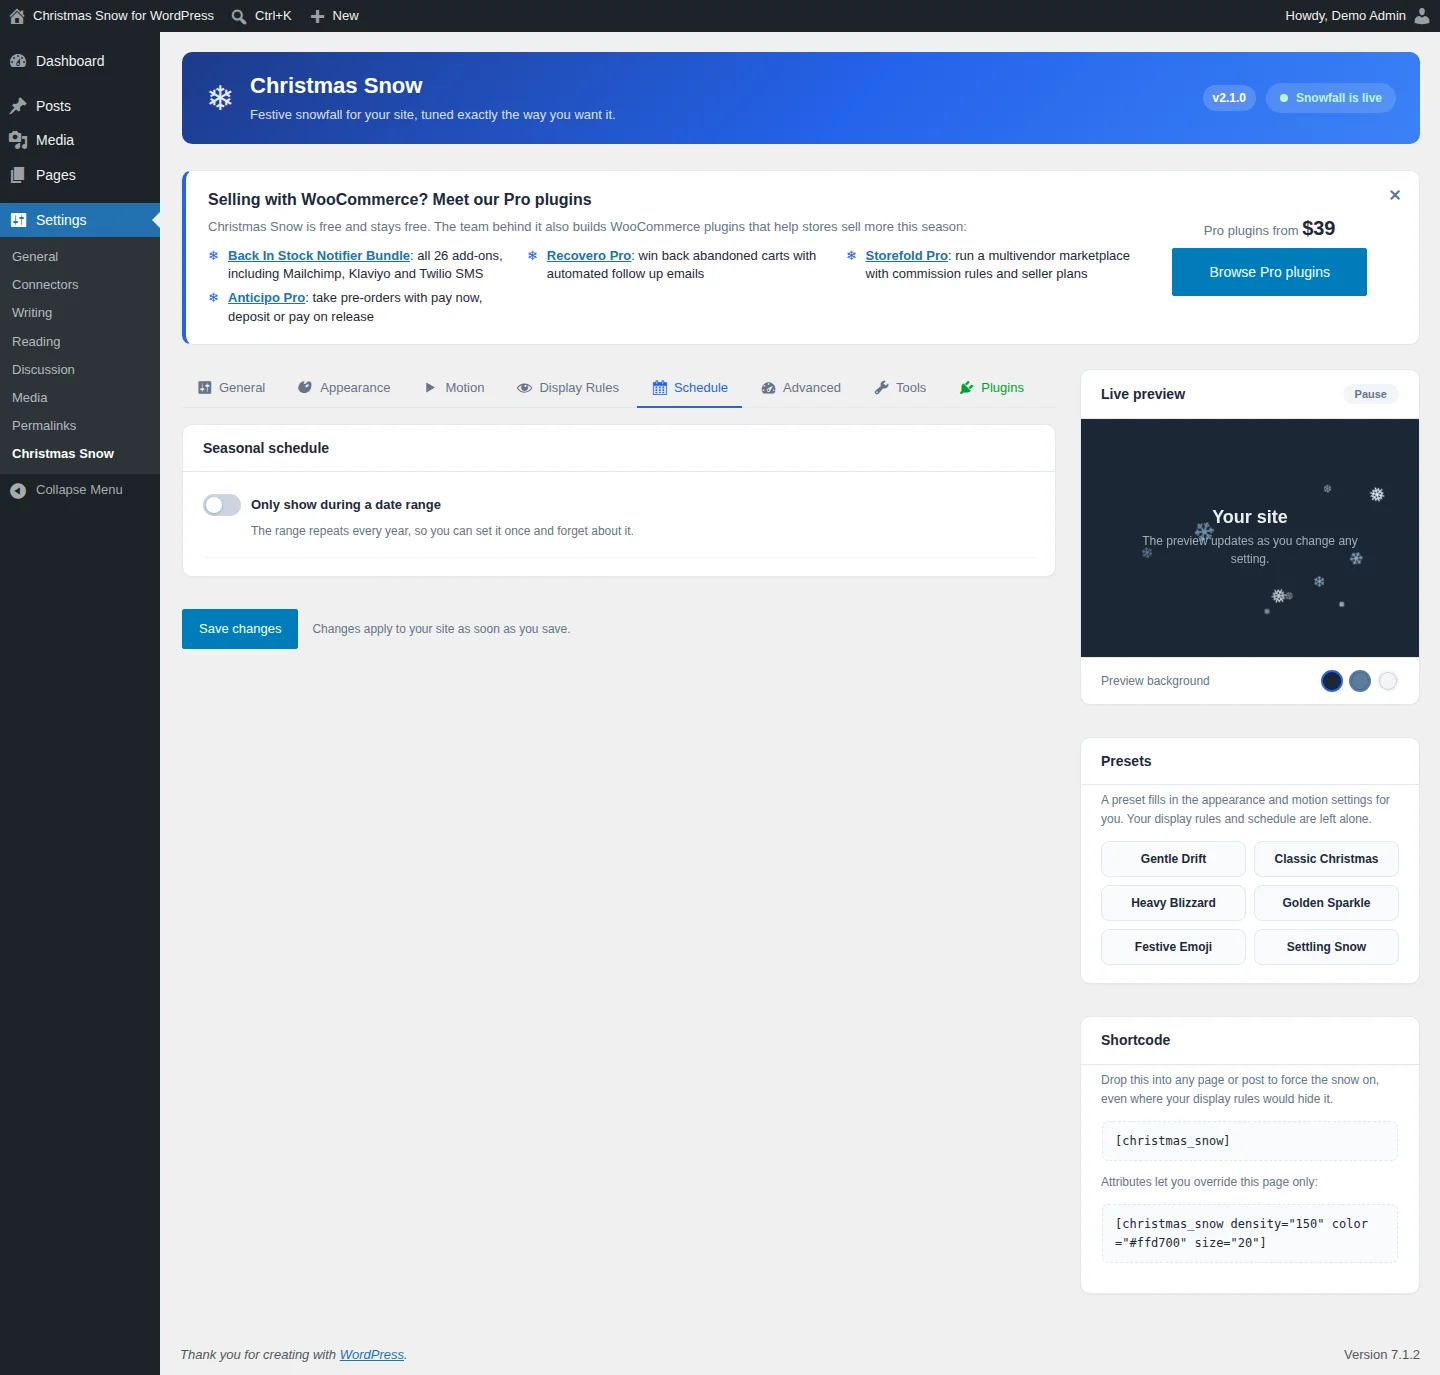
The Schedule tab limits the snow to a season.
- Turn on Only show during a date range.
- Set your start and end dates.
- Click Save changes.
The range repeats every year, so you only set it once. Ranges that cross New Year work correctly, for example 1 December to 6 January. Outside the range, the status badge in the settings header shows that the snow is waiting for its season.
#Advanced
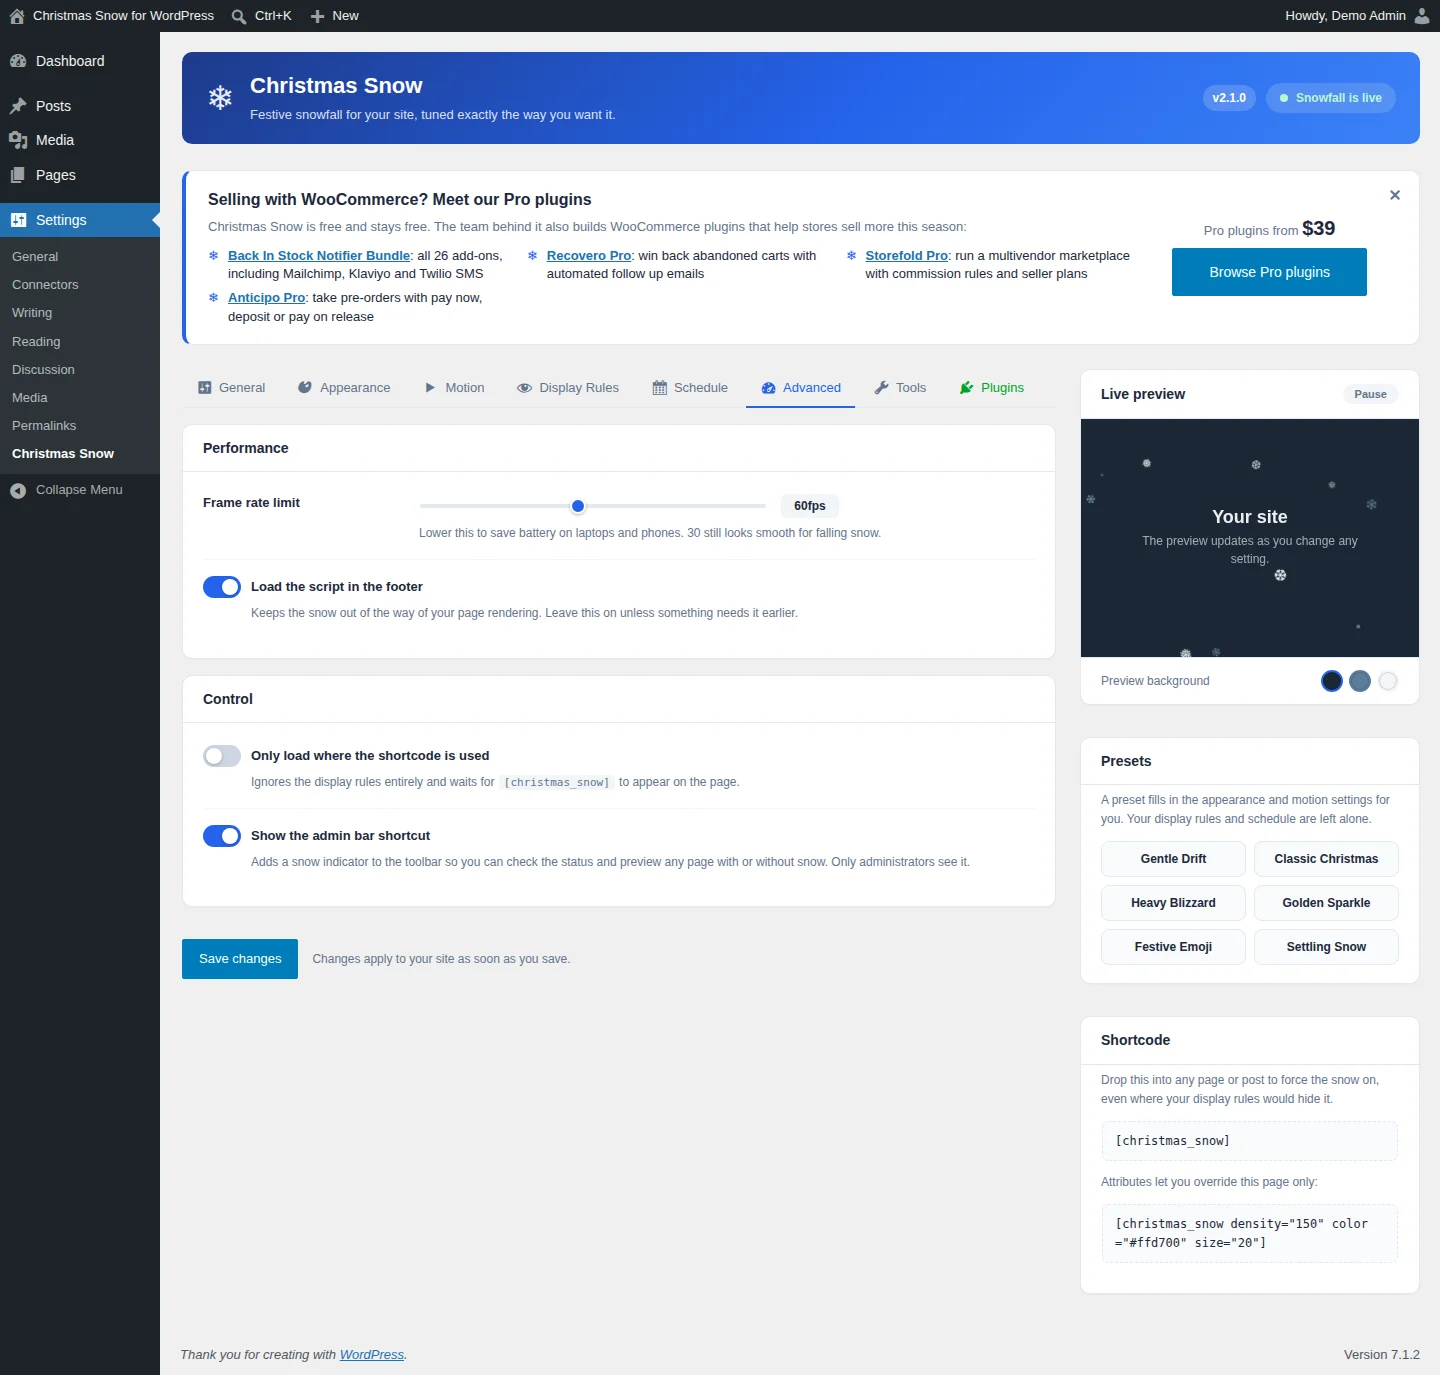
The Advanced tab has performance and control options.
Performance
- Frame rate limit: lower this to save battery on laptops and phones. 30 fps still looks smooth for falling snow.
- Load the script in the footer: keeps the snow out of the way of your page rendering. Leave this on unless something needs the script earlier.
Control
- Only load where the shortcode is used: ignores the display rules entirely and waits for
[christmas_snow]to appear on the page. Use this to show snow on only a few pages. - Show the admin bar shortcut: adds a snowflake item to the toolbar. It shows whether the snow runs on the current page and lets you preview the page with or without snow. Only administrators see it.
#Tools
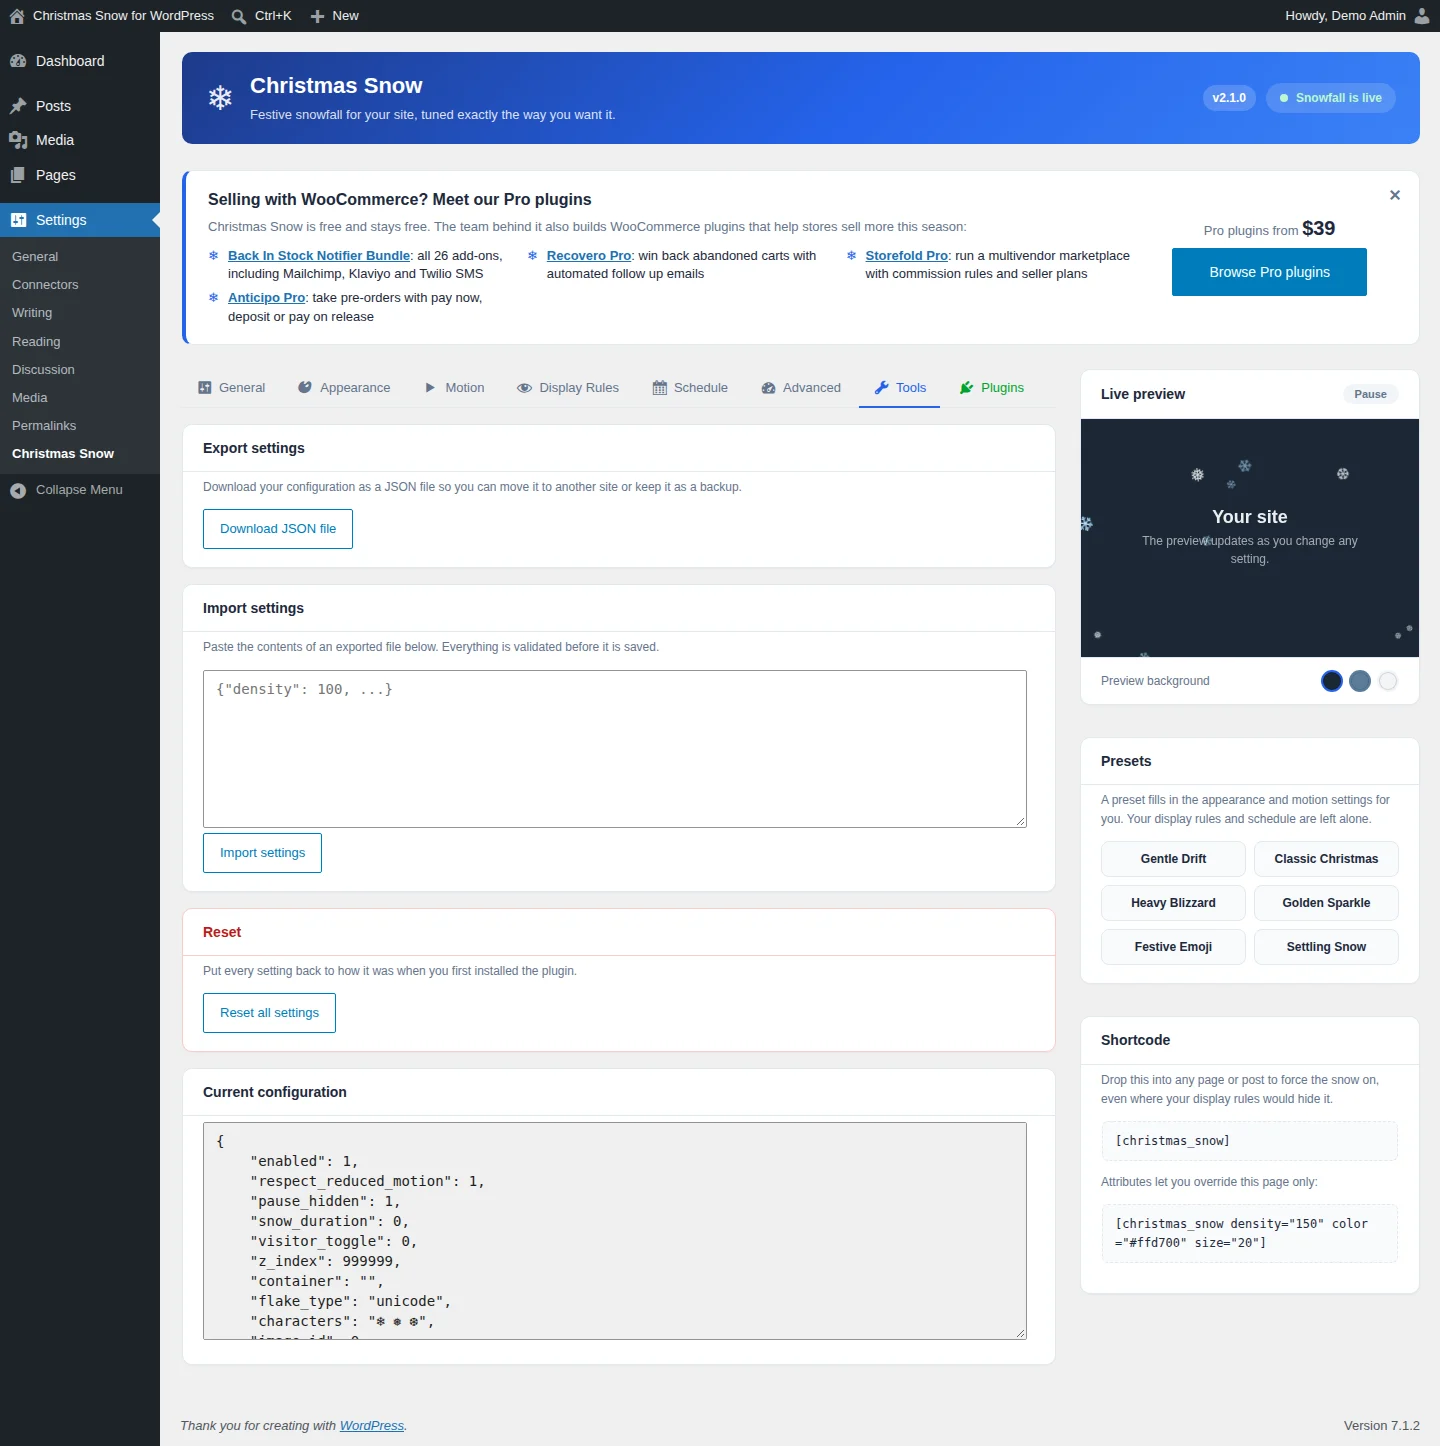
The Tools tab helps you move, back up or reset your configuration.
- Export settings: click Download JSON file to save your configuration. You can move it to another site or keep it as a backup.
- Import settings: paste the contents of an exported file into the box and click Import settings. Everything is validated before it is saved.
- Reset: click Reset all settings to put every setting back to how it was when you first installed the plugin.
- Current configuration: shows your saved settings as JSON, for reference.
#Plugins
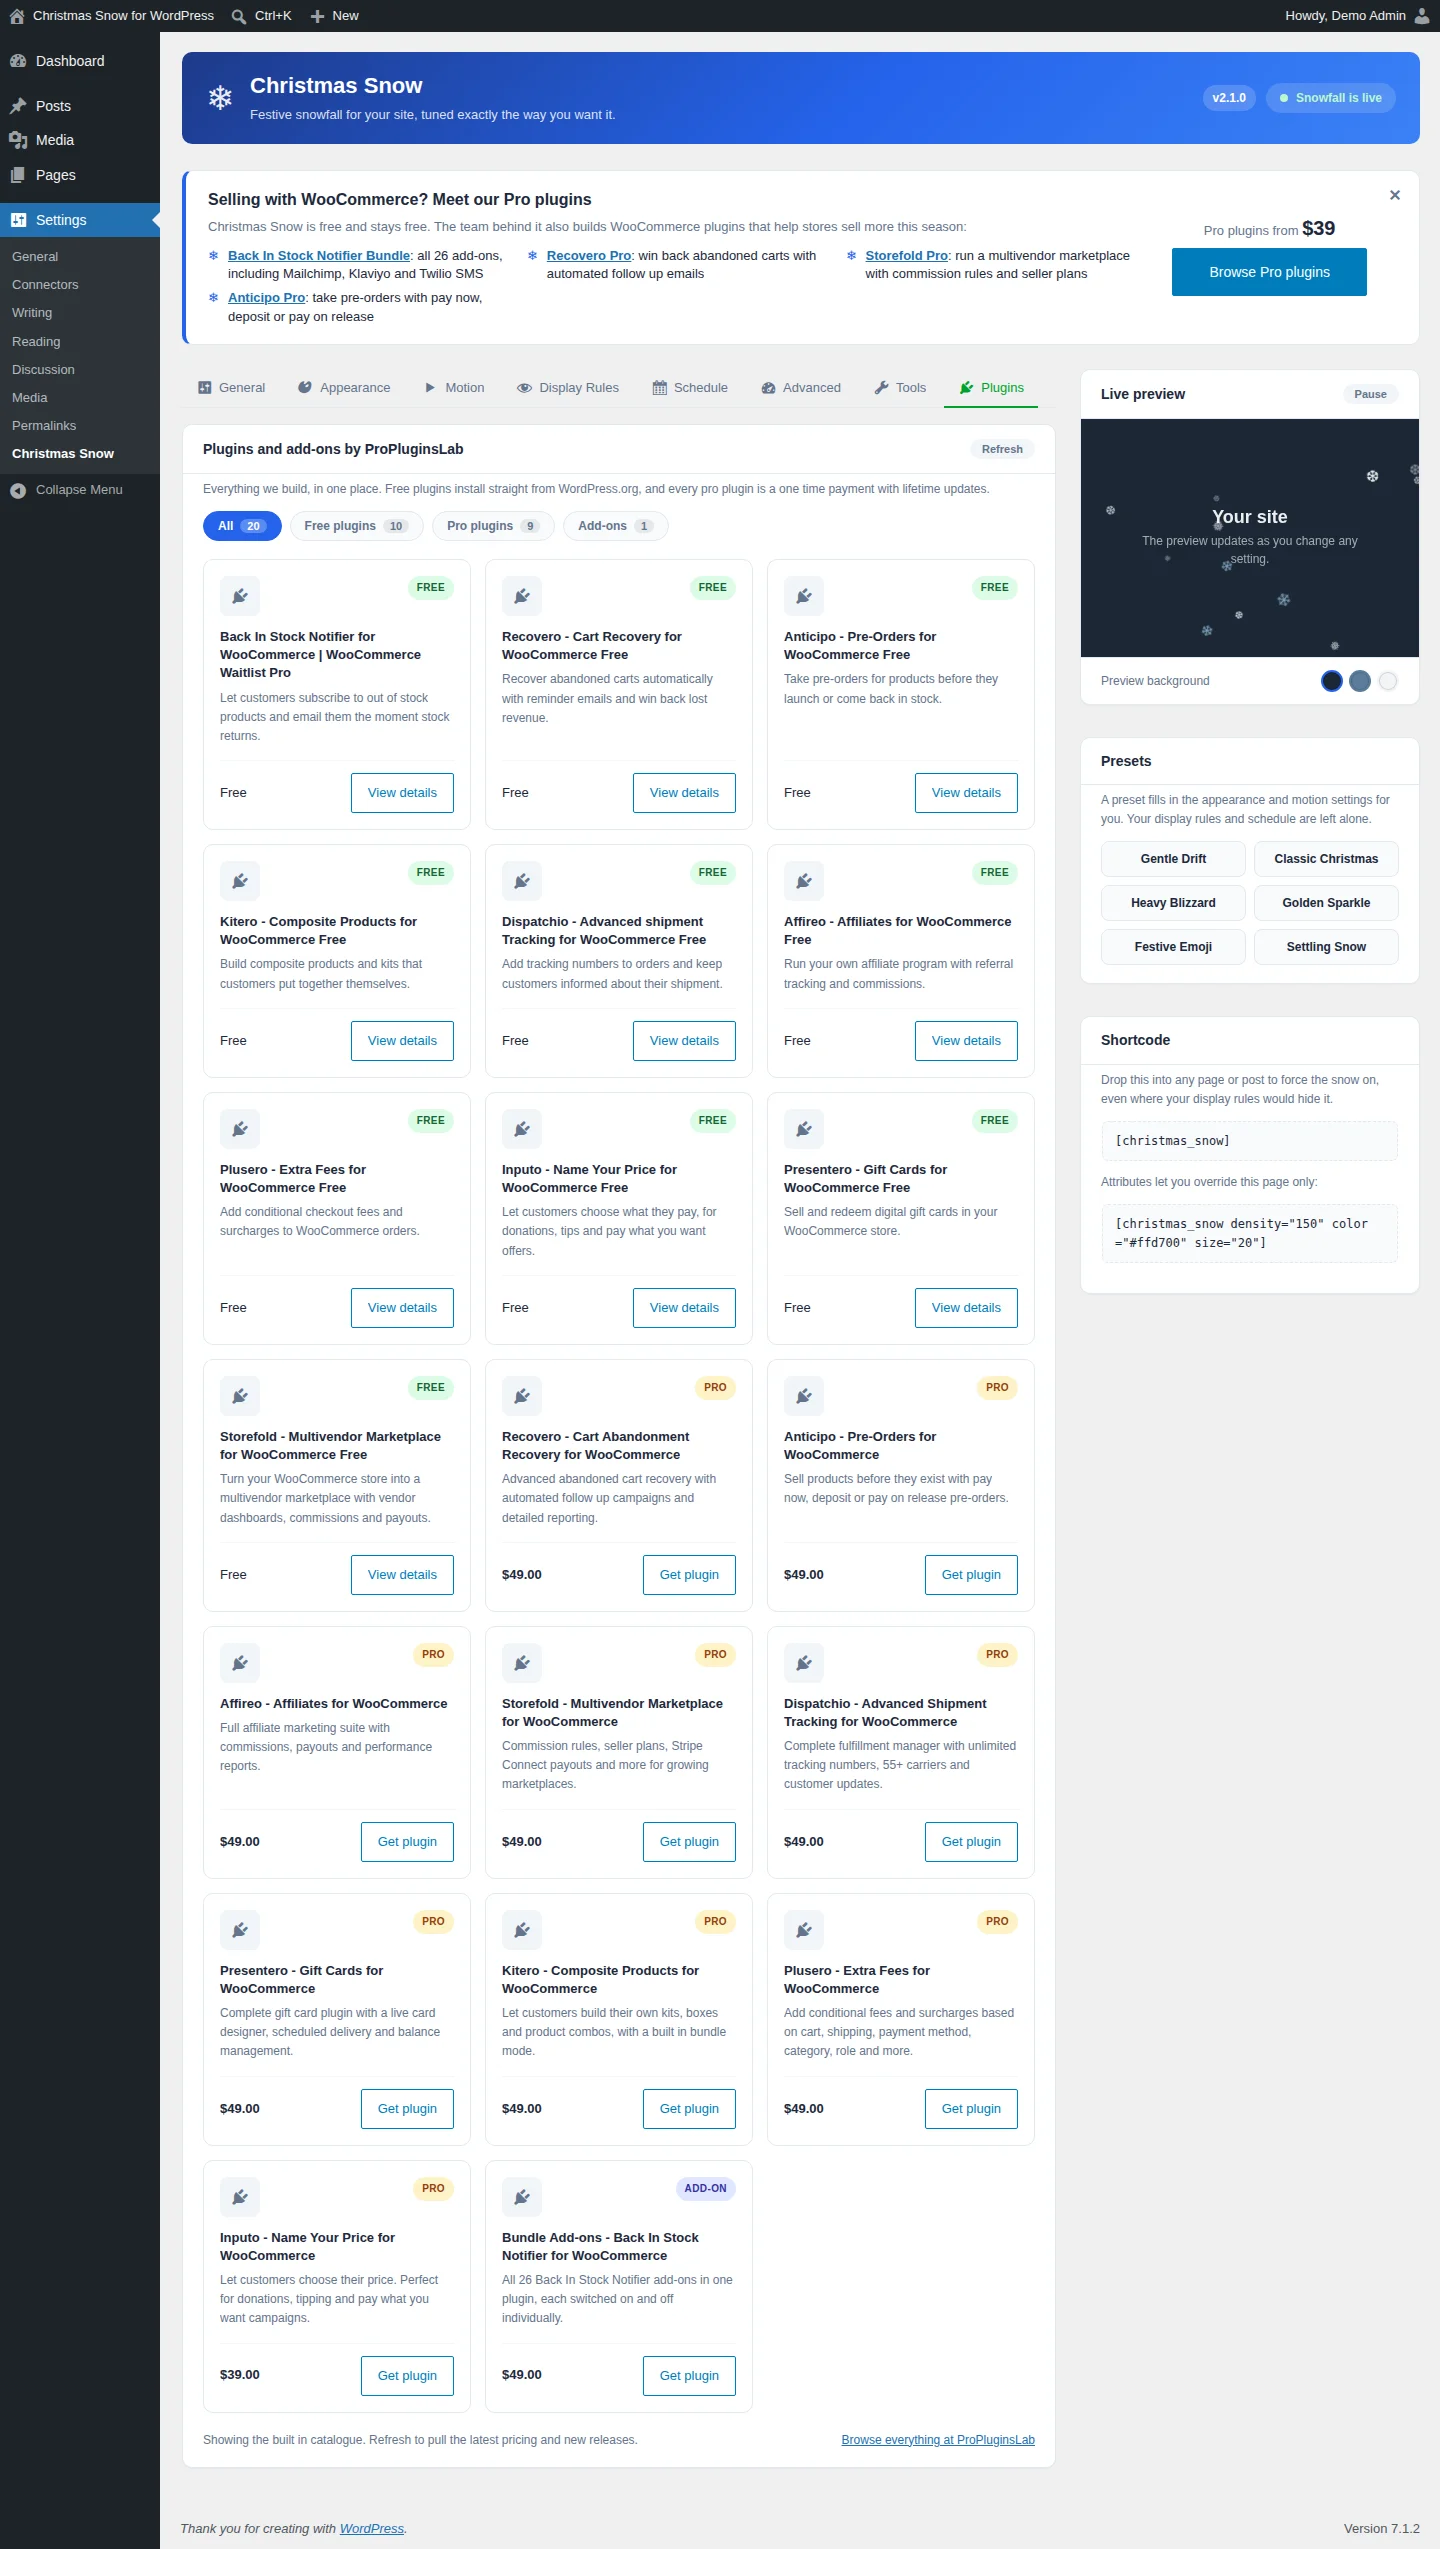
The Plugins tab lists plugins and add-ons from ProPluginsLab, the team behind Christmas Snow. You don't need this tab to use the snow effect.
- Filter the list with All, Free plugins, Pro plugins and Add-ons.
- Click View details on a free plugin or Get plugin on a pro plugin or add-on.
- Plugins already on your site are marked as installed or active.
- Click Refresh to update the list by hand.
To keep the list current, the plugin requests the catalogue from propluginslab.io once a day with WP-Cron, and again when an administrator clicks Refresh. The request sends the plugin version and your site address in the user agent, nothing else. Product icons load from propluginslab.io when you open the tab. If your site can't reach the internet, the tab shows a built in catalogue. Your visitors never trigger these requests.
The settings screen also shows a dismissible banner about ProPluginsLab's WooCommerce plugins. Click the close icon to dismiss it.
Settings reference
Settings > Christmas Snow > General
| Setting | Type | Default | What it does |
|---|---|---|---|
| Enable snowfall | checkbox | on |
The master switch. Turn this off to stop the effect everywhere without deactivating the plugin. |
| Respect reduced motion | checkbox | on |
Skip the animation for visitors who asked their device to reduce motion. |
| Pause in background tabs | checkbox | on |
Stop drawing while the tab is not visible so the effect costs nothing in the background. |
| Stop the snow after | number | 0 |
Seconds of snowfall per page view. When the time is up, no new flakes appear and the snow fades out. Use 0 to keep it snowing. |
| Let visitors turn the snow off | checkbox | off |
Adds a small button in the bottom left corner. The choice is remembered in the visitor's browser, and nothing is stored on your site. |
| Layer (z-index) | number | 999999 |
How high the snow sits in the stack. Lower this if the snow covers a sticky header or a popup. |
| Limit to a container | text | - | Optional CSS selector, for example .site-header. Leave empty to cover the whole window. |
Settings > Christmas Snow > Appearance
| Setting | Type | Default | What it does |
|---|---|---|---|
| Flake type | select | Characters and emoji |
Characters and emoji, Soft dots (fastest) or Custom image. Dots are the fastest option for heavy snowfall. An image lets you use your own artwork. |
| Characters | text | ❄ ❅ ❆ |
The characters used as flakes. Separate each one with a space. |
| Colours | text | #ffffff |
Flake colour. Add more than one colour with + Add colour to mix them randomly across the flakes. |
| Colour 1 | color | #ffffff |
Colour picker for the first flake colour. |
| Smallest flake | range | 10 |
Smallest flake size in pixels. Flakes are sized randomly between the smallest and largest values. |
| Largest flake | range | 22 |
Largest flake size in pixels. |
| Minimum opacity | range | 0.45 |
Lowest flake opacity. |
| Maximum opacity | range | 0.95 |
Highest flake opacity. Lower both opacity values for a subtle effect that sits behind your content. |
| Softness | range | 0 |
Blurs the flakes for a dreamy look (in pixels). Anything above 0 costs some performance. |
| Depth effect | checkbox | on |
Makes distant flakes smaller, slower and fainter so the snowfall gains a sense of depth. |
Settings > Christmas Snow > Motion
| Setting | Type | Default | What it does |
|---|---|---|---|
| Flakes on desktop | range | 100 |
Number of flakes on desktop screens. |
| Flakes on mobile | range | 40 |
Number of flakes on mobile screens. Keep this well below the desktop count. |
| Mobile breakpoint | number | 768 |
Screens narrower than this width in pixels use the mobile flake count. |
| Slowest fall | range | 0.4 |
Slowest fall speed. |
| Fastest fall | range | 1.2 |
Fastest fall speed. A wider gap between the two speeds looks more natural. |
| Wind direction | range | 0 |
Negative values blow the snow to the left, positive values to the right. |
| Gusts | range | 0.5 |
Slowly swings the wind back and forth instead of holding one direction. |
| Sway | range | 1 |
How much each flake drifts from side to side on its way down. |
| Spin the flakes | checkbox | on |
Rotates the flakes as they fall. |
| Spin speed | range | 1 |
How fast the flakes spin. |
| Cursor interaction | select | None |
None, Push flakes away, Pull flakes in or Gentle wind towards the cursor. Costs a little performance on very dense snowfall. |
| Let snow settle at the bottom | checkbox | off |
Builds a drift along the bottom of the screen as flakes land. |
Settings > Christmas Snow > Display Rules
| Setting | Type | Default | What it does |
|---|---|---|---|
| The entire site | radio | The entire site |
The Show on option: The entire site, The home page only, or Selected content types and pages. |
| These IDs | text | - | Comma separated post or page IDs that should never show snow. |
| WooCommerce cart, checkout and account pages | checkbox | on |
Never show snow on these pages. Strongly recommended. |
| Search results | checkbox | off |
Never show snow on search results. |
| 404 pages | checkbox | off |
Never show snow on 404 pages. |
| All devices | radio | All devices |
The Devices option: All devices, Desktop only or Mobile only. Device detection happens on the server, so a page cache that does not vary by device may serve the wrong result. |
| Everyone | radio | Everyone |
The Visitors option: Everyone, Logged in users only or Logged out visitors only. |
| Administrator | checkbox | off |
Hide from these roles: hide the effect from administrators. |
| Editor | checkbox | off |
Hide from these roles: hide the effect from editors. |
| Author | checkbox | off |
Hide from these roles: hide the effect from authors. |
| Contributor | checkbox | off |
Hide from these roles: hide the effect from contributors. |
| Subscriber | checkbox | off |
Hide from these roles: hide the effect from subscribers. |
Settings > Christmas Snow > Schedule
| Setting | Type | Default | What it does |
|---|---|---|---|
| Only show during a date range | checkbox | off |
Show the snow only between a start and end date. The range repeats every year. |
Settings > Christmas Snow > Advanced
| Setting | Type | Default | What it does |
|---|---|---|---|
| Frame rate limit | range | 60 |
Maximum frames per second. Lower this to save battery on laptops and phones. 30 still looks smooth for falling snow. |
| Load the script in the footer | checkbox | on |
Keeps the snow out of the way of your page rendering. Leave this on unless something needs it earlier. |
| Only load where the shortcode is used | checkbox | off |
Ignores the display rules entirely and waits for [christmas_snow] to appear on the page. |
| Show the admin bar shortcut | checkbox | on |
Adds a snow indicator to the toolbar so you can check the status and preview any page with or without snow. Only administrators see it. |
Shortcodes
[christmas_snow]
Forces the snow on for the page or post where you add it, even where your display rules would normally hide it. With Only load where the shortcode is used turned on under Advanced, the snow appears only on pages that contain this shortcode. Attributes override settings for that page only.
[christmas_snow density="150" color="#ffd700" size="20" speed="1.5" wind="2"]| Attribute | Default | Description |
|---|---|---|
density | - | Overrides how much snow falls on this page, for example 150. |
color | - | Overrides the flake colour on this page, for example #ffd700. |
characters | - | Overrides the characters used as flakes on this page. |
type | - | Overrides the flake type on this page. |
speed | - | Overrides the fall speed on this page, for example 1.5. |
wind | - | Overrides the wind on this page, for example 2. |
size | - | Overrides the flake size on this page, for example 20. |
zindex | - | Overrides the layer (z-index) of the snow on this page. |
On your site
Visitors see snow falling over the pages where your display rules allow it, or on pages that contain [christmas_snow]. The snow is drawn on a canvas that screen readers ignore, because it is marked as decorative.
What visitors experience depends on your settings:
- Phones get their own, lower flake count.
- Visitors whose device asks to reduce motion don't see the animation while Respect reduced motion is on.
- The animation pauses completely while the browser tab is in the background.
- When Stop the snow after is set, the snow falls for that many seconds and then fades out.
- When Let visitors turn the snow off is on, a small button appears in the bottom left corner. The visitor's choice is remembered in their own browser.
- When Let snow settle at the bottom is on, a drift builds up along the bottom of the screen.
- WooCommerce cart, checkout and account pages don't show snow by default.
The front end makes no external requests.
Frequently asked questions
Do I have to configure anything?
No. The snow works as soon as you activate the plugin. The settings under Settings > Christmas Snow are there when you want them.
Will this slow my site down?
The script is small, loads in the footer and is deferred. Flakes are drawn from cached sprites, and the animation stops entirely when the tab is not visible. To be extra careful, lower the flake count on the Motion tab, lower Frame rate limit under Advanced, or set Flake type to Soft dots (fastest).
Can I use it with WooCommerce?
Yes. Cart, checkout and account pages are excluded by default. You can change that with WooCommerce cart, checkout and account pages on the Display Rules tab.
Can I show snow on only one page?
Yes, in two ways. Set Show on to Selected content types and pages and list the page ID. Or turn on Only load where the shortcode is used under Advanced and add [christmas_snow] to that page.
Can I use emoji or my own image instead of snowflakes?
Yes. Set Flake type to Characters and emoji and type any characters you like, separated by spaces. Or set it to Custom image and pick a small transparent PNG or SVG from your media library.
How do I make the snow appear only in December?
Open the Schedule tab, turn on Only show during a date range and set your start and end dates. The range repeats every year, and ranges that cross New Year are handled correctly.
Can visitors turn the snow off?
Yes. Turn on Let visitors turn the snow off on the General tab. A small button appears in the bottom left corner, and the visitor's choice is remembered in their own browser. Nothing is stored on your site.
Will I lose my settings when I update or deactivate?
No. Settings are kept on deactivation and across updates. They are only removed if you delete the plugin. To keep a copy, use Download JSON file on the Tools tab.
Troubleshooting
- The snow doesn't appear anywhere on the site.
Check the status badge at the top of Settings > Christmas Snow. Then check these settings:
- Enable snowfall on the General tab must be on.
- If Only show during a date range is on under Schedule, the snow only runs between your dates.
- If Only load where the shortcode is used is on under Advanced, the snow only appears on pages that contain
[christmas_snow]. - If Stop the snow after is above
0, the snow fades out after that many seconds.
- The snow covers my sticky header or a popup.
On the General tab, lower the Layer (z-index) value until the snow sits behind that element, then click Save changes.
- The snow doesn't show on the cart or checkout page.
This is the default. On the Display Rules tab, WooCommerce cart, checkout and account pages is on under Never show on. Turn it off only if you want snow on those pages.
- Some visitors or staff don't see the snow.
Visitors whose device asks to reduce motion don't see the animation while Respect reduced motion is on. Also check Visitors and Hide from these roles on the Display Rules tab, and check whether they turned it off with the visitor button.
- Desktop only or mobile only targeting shows the wrong result.
Device detection happens on the server, so a page cache that does not vary by device may serve the wrong version. Set Devices to
All devicesand lower Flakes on mobile on the Motion tab instead.- The snow only shows in part of the page.
Check Limit to a container on the General tab. When it holds a CSS selector, the snow stays inside that element. Leave it empty to cover the whole window.