

Overview
Dispatchio lets you add one or more tracking numbers to each WooCommerce order and keeps your customers informed. It adds real order statuses (Shipped, Partially Shipped, Updated Tracking and Delivered), each with its own email, and shows tracking details in WooCommerce emails, in My Account and on a public tracking page.
The Pro edition is a standalone plugin. It contains everything in the free edition and adds live delivery tracking through TrackShip, 17TRACK or AfterShip, a fulfillment dashboard with a scanner mode, scheduled FTP, FTPS and SFTP imports, integrations with shipping apps, PayPal and Stripe tracking sync, shipment analytics, outbound webhooks and WP-CLI commands.
It is built for WooCommerce store owners and fulfillment staff who ship physical orders and want a single place to record, import and follow shipments.
Requirements
- WordPress 6.2 or later (tested up to 7.1)
- PHP 7.4 or later
- WooCommerce 5.2 or later, installed and active
- Optional: an account with TrackShip, 17TRACK or AfterShip for live delivery tracking
- Optional: PayPal REST API credentials for PayPal tracking sync
Installation
Dispatchio Pro needs WooCommerce, so install and activate WooCommerce first. You do not need the free edition of Dispatchio. If it is installed, activating Pro deactivates it for you, and your settings, carriers and tracking data carry over untouched.
Make sure WooCommerce is installed and active.
Log in to your ProPluginsLab account and open My Account > Downloads.
Download the Dispatchio Pro zip file.
In WordPress, go to Plugins > Add New > Upload Plugin, choose the zip file and click Install Now.
Click Activate Plugin. A new Dispatchio menu appears in the admin sidebar.
Quick start
- Choose your carriers
Go to Dispatchio > Settings > Shipping Carriers and tick the carriers you actually ship with. Only ticked carriers appear in the carrier dropdown on an order.
- Check the order statuses
On the General tab, confirm which custom order statuses you want and which WooCommerce emails should include tracking. Click Save Settings.
- Review the shipment emails
Open WooCommerce > Settings > Emails and adjust the wording of the Shipped order and Partially shipped order emails if needed.
- Add your first tracking number
Open an order, find the Dispatchio box, choose a carrier, type or scan the tracking number and click Add Tracking. You can also go to Dispatchio > Fulfillment, pick a carrier, enter the number and click Fulfill.
- Publish a tracking page
Create a page that contains
[dispatchio_tracking_page], then select it under Dispatchio > Settings > Automation > Tracking page and click Save Automation Settings. - Turn on live tracking (optional)
On the Live Tracking tab, tick Enable live delivery tracking, choose a provider, paste your API key and click Test API Key.
#Fulfillment dashboard
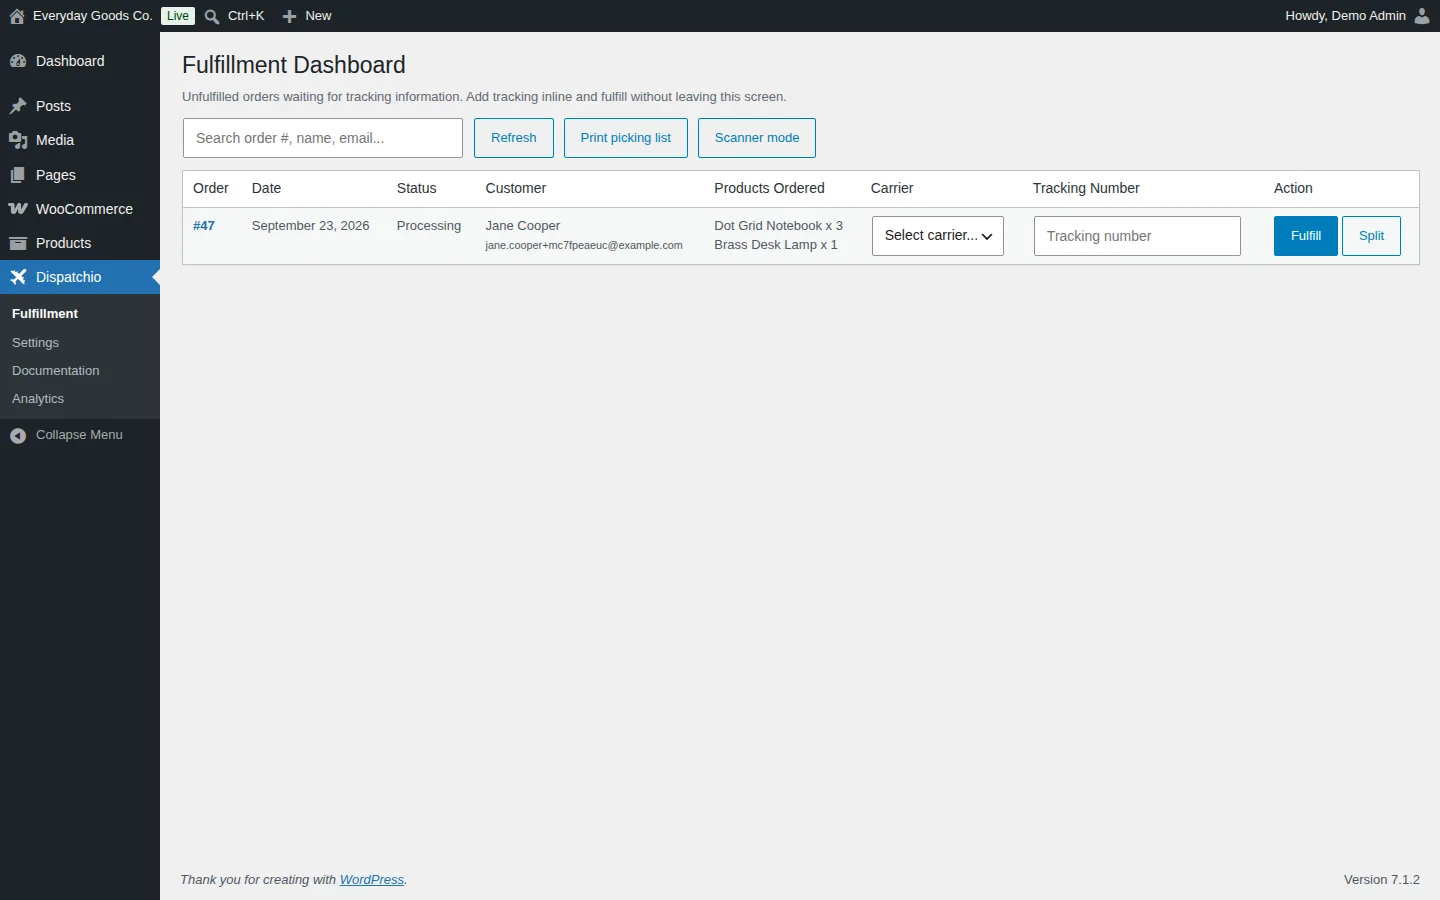
Dispatchio > Fulfillment lists every order that still needs to be shipped, so you can add tracking and fulfill orders without opening each one.
Each row shows the Order, Date, Status, Customer, Products Ordered, a Carrier dropdown and a Tracking Number field. To ship an order:
- Choose the carrier in the Carrier dropdown.
- Type or scan the number into Tracking Number.
- Click Fulfill.
Click Split to send an order in several parcels, each with its own tracking number.
The toolbar gives you:
- A search box to find an order by number, name or email.
- Refresh to reload the list.
- Print picking list for a print-friendly list of the items to pack.
- Scanner mode, which lets you scan the order barcode, then the shipping label, and moves straight to the next order without touching the mouse.
Which order statuses count as unfulfilled is set under Settings > Automation > Unfulfilled statuses.
#Adding tracking to an order
On the order edit screen, the Dispatchio box lets you add tracking by hand. Choose a carrier, type or scan the tracking number and click Add Tracking. You can add several tracking numbers to one order.
| Field | What it does |
|---|---|
| Carrier | The shipping company. Choosing Custom lets you type a one-off carrier name and tracking link for this shipment only. |
| Tracking number | The number from the label. If you leave the carrier empty, Dispatchio tries to work it out from the number format. |
| Date shipped | Defaults to today. It is shown to the customer and used for the estimated delivery date. |
| Shipping note | A short line shown to the customer next to this tracking number. |
| Order status | What the order becomes once this tracking is saved. Leave it as no change to add a tracking number quietly without emailing the customer. |
| Ship specific products | Attaches only some items to this tracking number. Dispatchio remembers what is already covered. |
| This is a return | Records an inbound return label. Return tracking never changes the order status. |
When some items have tracking and some do not, the order uses Partially Shipped, and it moves to Shipped once the last item is covered. You can also search the WooCommerce orders list by tracking number: pick Tracking number in the orders search dropdown.
#General settings
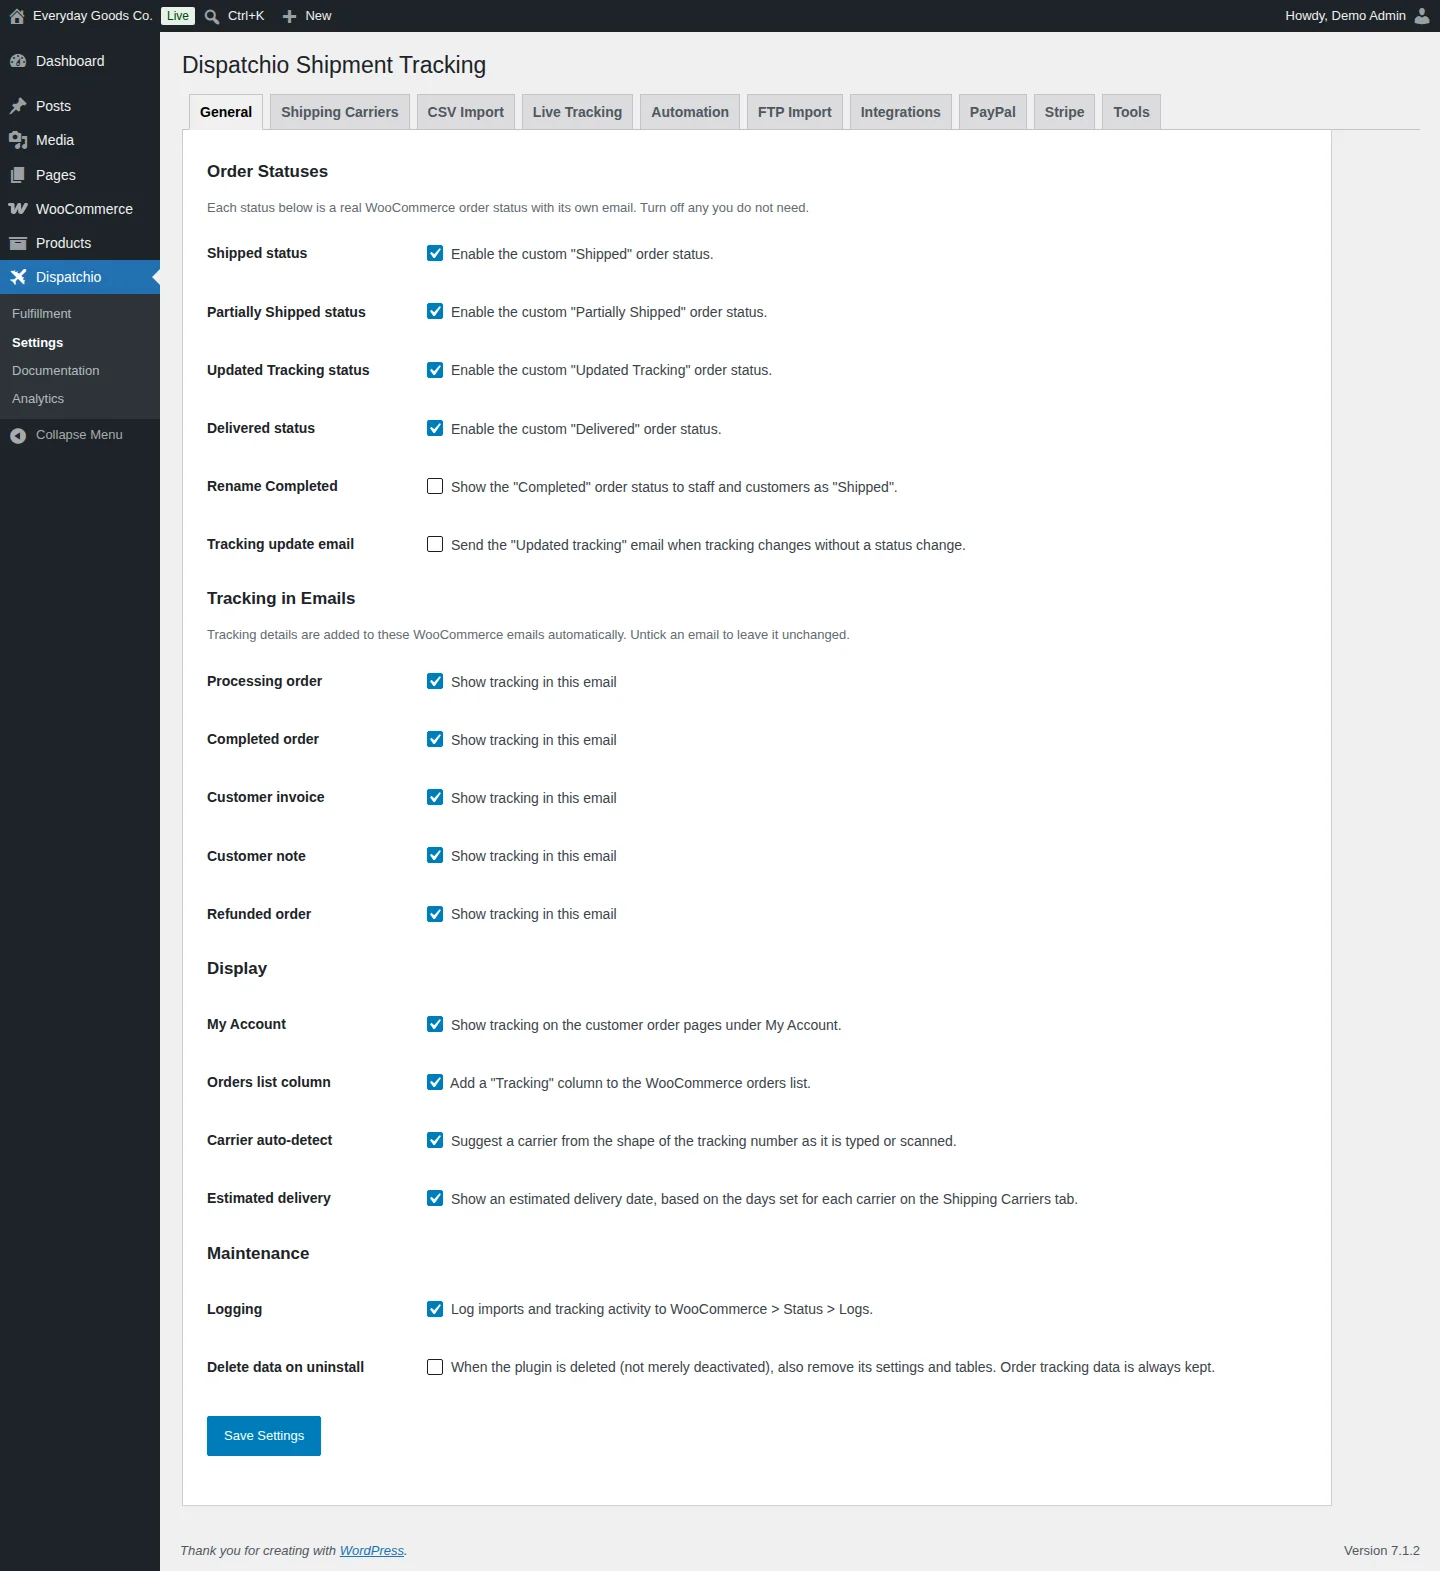
Dispatchio > Settings > General controls the order statuses, which WooCommerce emails show tracking, and where tracking is displayed.
- Order Statuses: each status is a real WooCommerce order status with its own email. Turn off any you do not need. Rename Completed shows the standard Completed status as "Shipped" without changing the underlying status. Tracking update email sends the Updated Tracking email when tracking changes on an order that is already shipped.
- Tracking in Emails: Dispatchio adds a tracking block to the ticked emails (Processing order, Completed order, Customer invoice, Customer note, Refunded order). Untick an email to leave it unchanged.
- Display: show tracking in My Account, add a Tracking column to the orders list, suggest a carrier from the tracking number format and show an estimated delivery date.
- Maintenance: log activity to WooCommerce > Status > Logs, and choose whether deleting the plugin removes its settings and tables. Order tracking data is always kept.
Click Save Settings when you are done.
#Shipping carriers
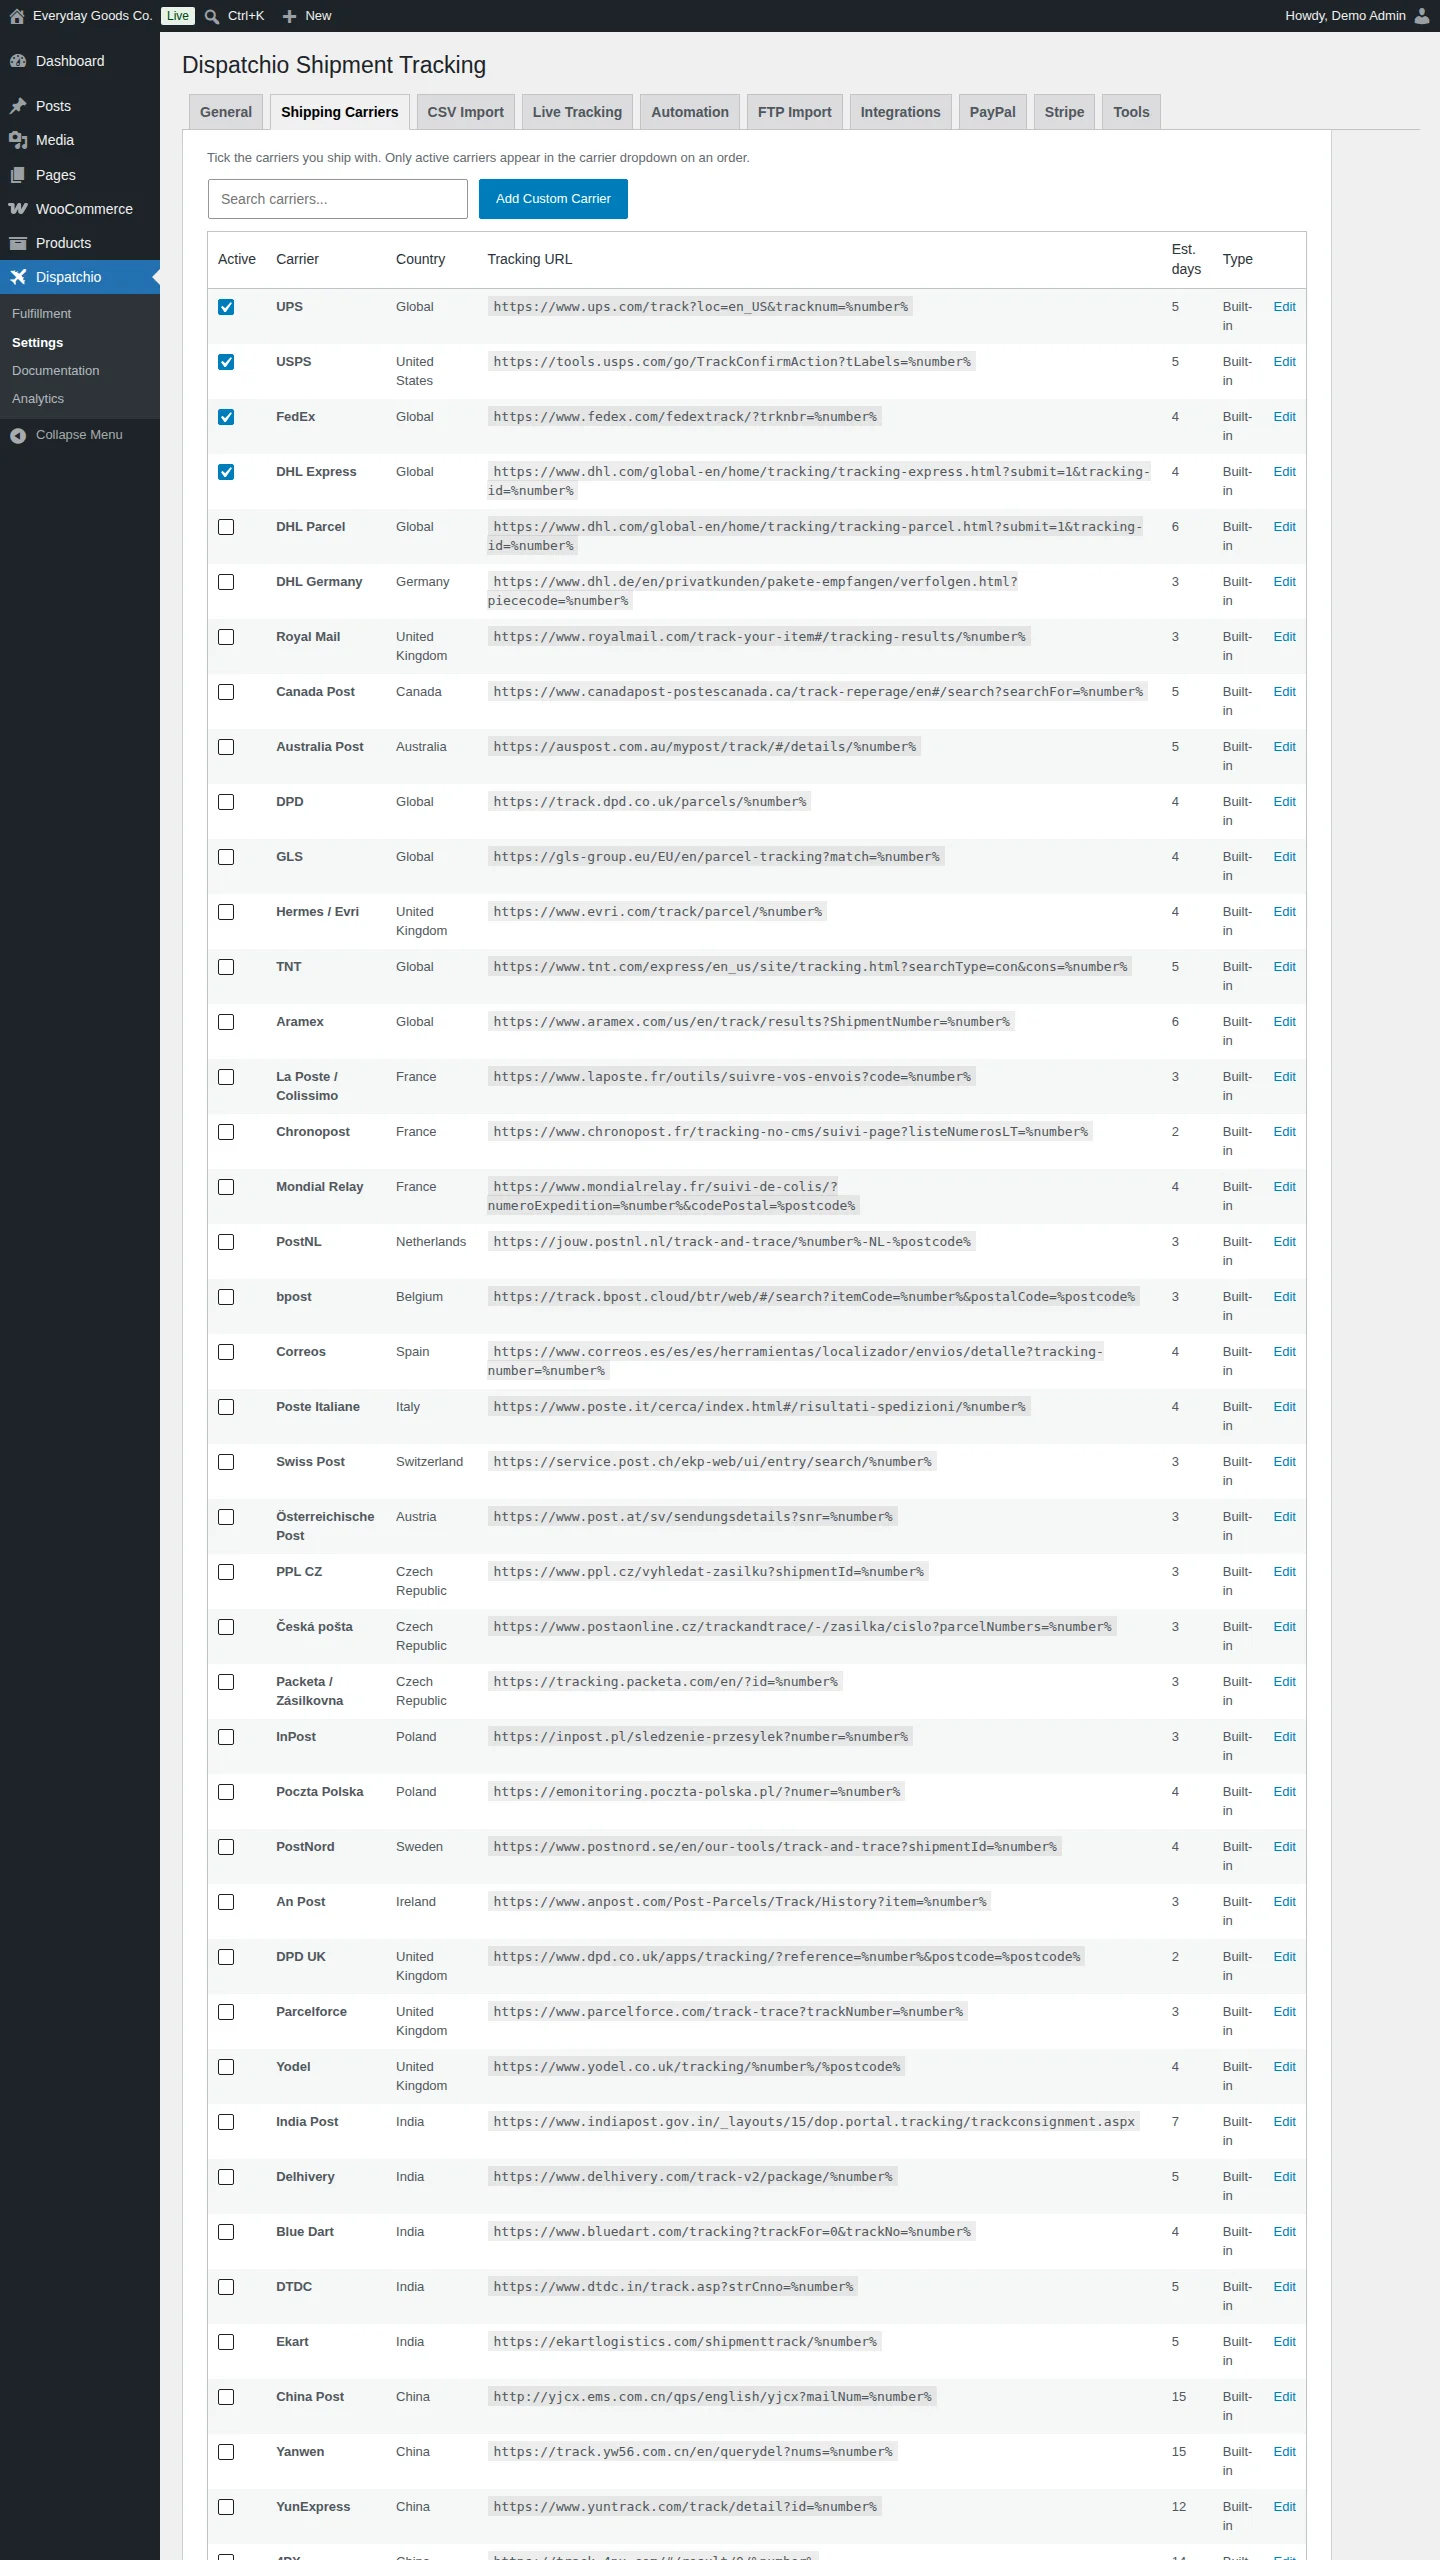
Dispatchio > Settings > Shipping Carriers lists the built-in carriers with their Country, Tracking URL, Est. days and Type.
- Tick Active for the carriers you ship with. Only active carriers appear in the carrier dropdown on an order. Keeping the list short speeds up fulfillment.
- Use Search carriers... to find a carrier quickly.
- Click Edit to change a carrier. You can rename it, change the tracking link pattern (
%number%for the tracking number, plus%postcode%or%phone%for carriers that need them), add API aliases (other spellings used in import files, comma separated), set the PayPal carrier code and set the estimated delivery days (0shows no estimate). - Click Add Custom Carrier to add a carrier that is not in the list.
#CSV import
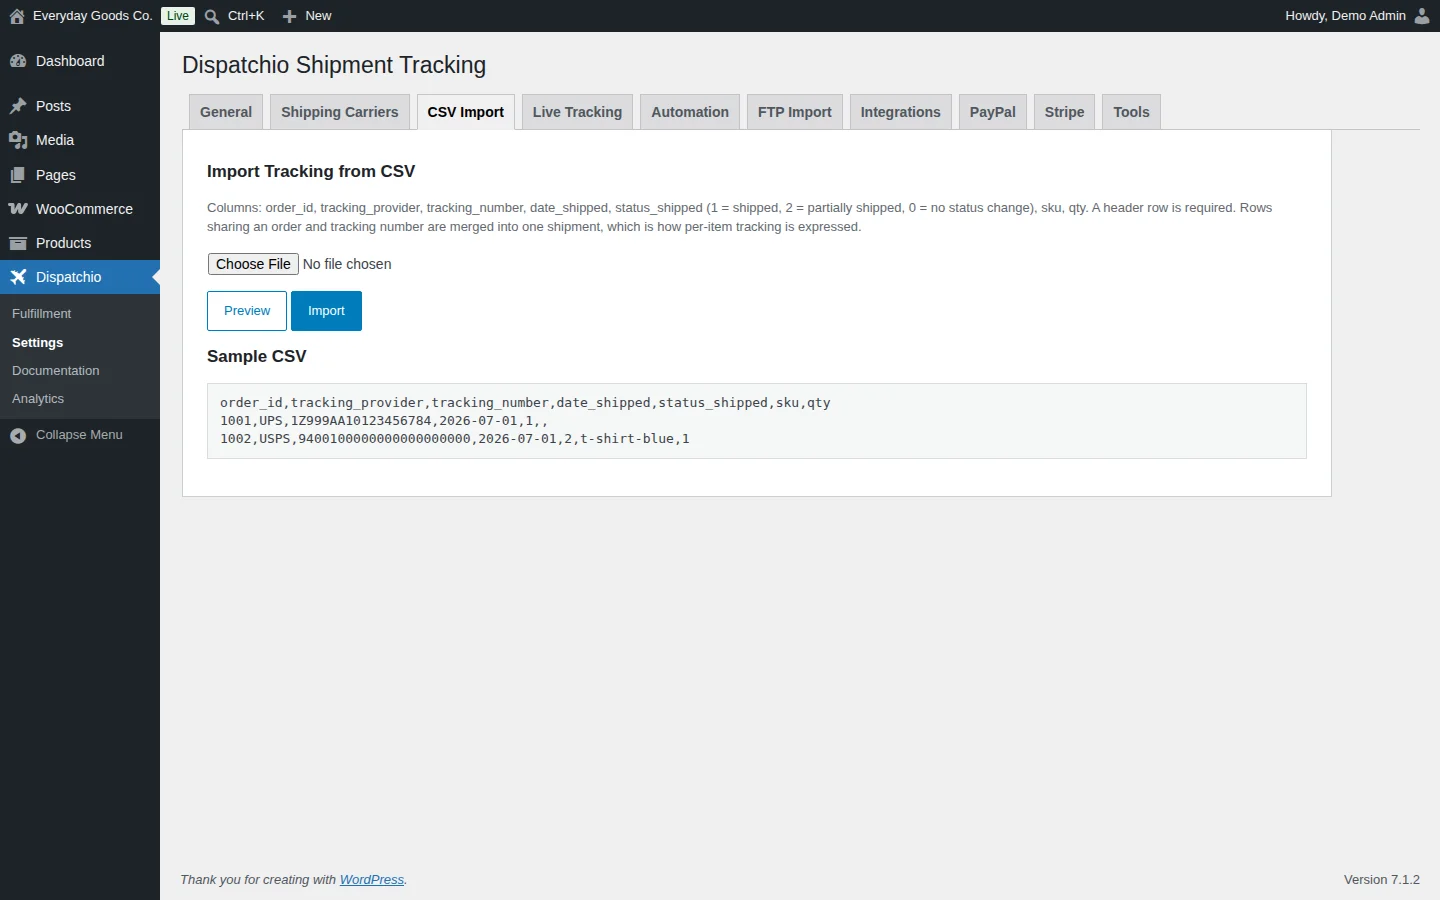
Dispatchio > Settings > CSV Import adds tracking to many orders at once.
- Prepare a CSV file with a header row and these columns:
order_id,tracking_provider,tracking_number,date_shipped,status_shipped,sku,qty. - For
status_shipped, use1for shipped,2for partially shipped or0for no status change. - Click Choose File and select your file.
- Click Preview to check the rows, then Import.
Rows that share an order and a tracking number are merged into one shipment. This is how you record per-item tracking with the sku and qty columns. The tab shows a sample CSV you can copy.
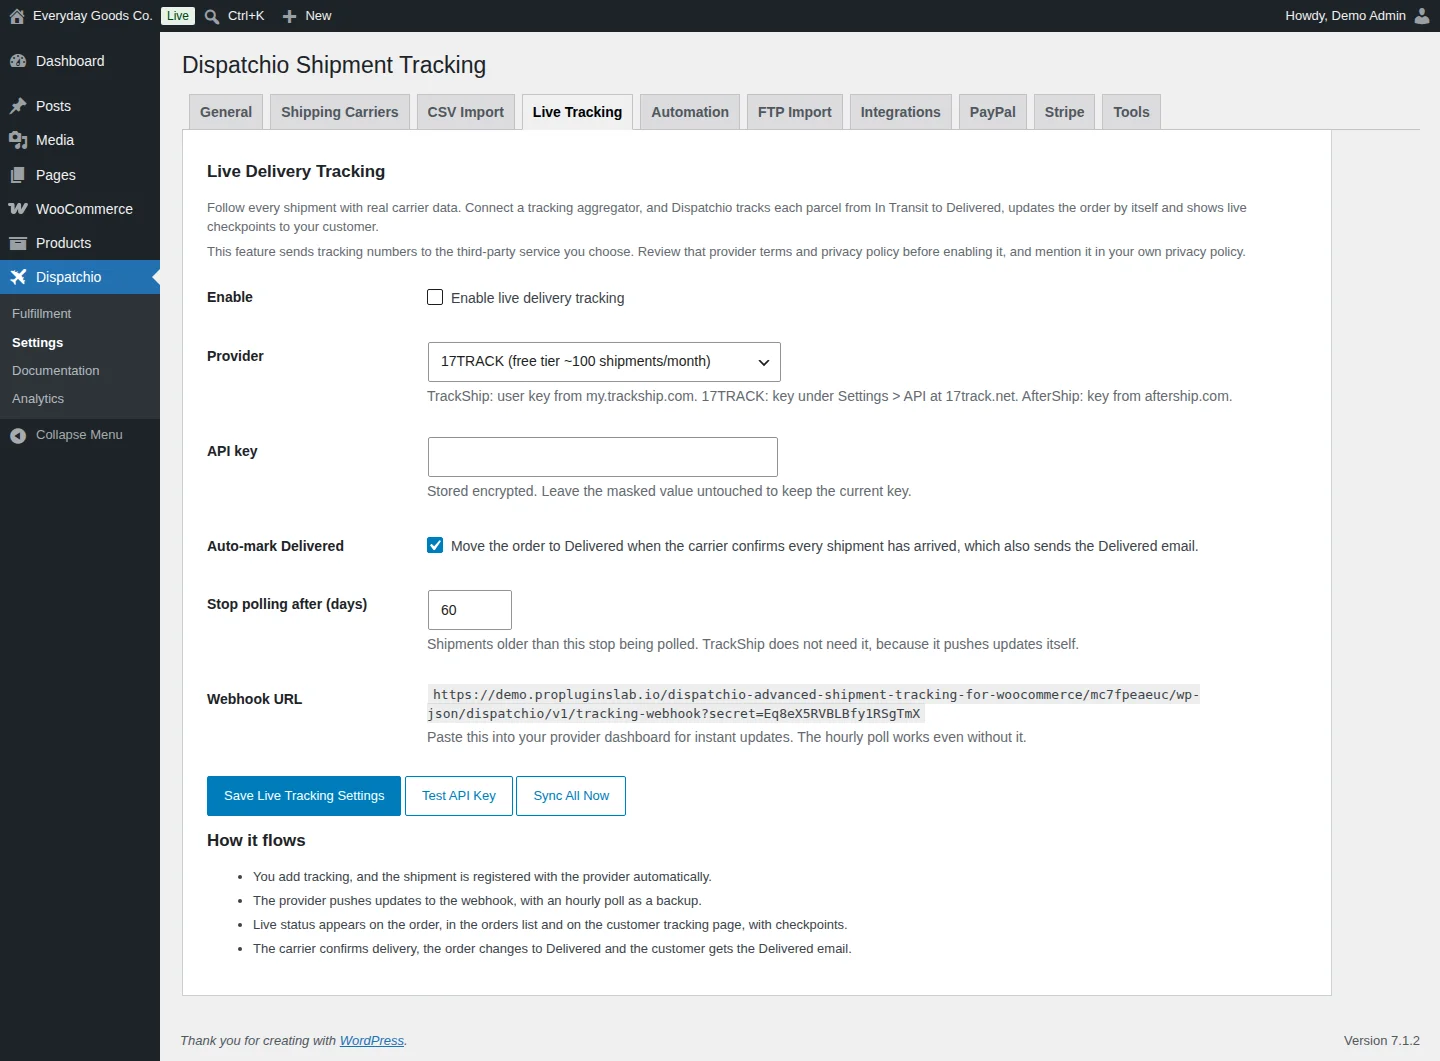
#Live delivery tracking
Dispatchio > Settings > Live Tracking connects a tracking service so Dispatchio follows each parcel with real carrier data.
- Tick Enable live delivery tracking.
- Choose a Provider: TrackShip, 17TRACK or AfterShip. You need an account with that provider, and they bill you directly.
- Paste your API key (TrackShip: user key from my.trackship.com; 17TRACK: key under Settings > API at 17track.net; AfterShip: key from aftership.com).
- Click Save Live Tracking Settings, then Test API Key.
- Copy the Webhook URL shown on the tab into your provider dashboard for instant updates. An hourly check runs even without it.
Once enabled, a shipment is registered with the provider as soon as you add tracking. Live status and checkpoints appear on the order, in the orders list, in My Account and on the tracking page. With Auto-mark Delivered on, the order moves to Delivered when the carrier confirms every shipment has arrived, which also sends the Delivered email. Use Sync All Now to refresh all shipments at once.
This feature sends tracking numbers to the service you choose. Review that provider's terms and privacy policy and mention it in your own privacy policy.
#Automation
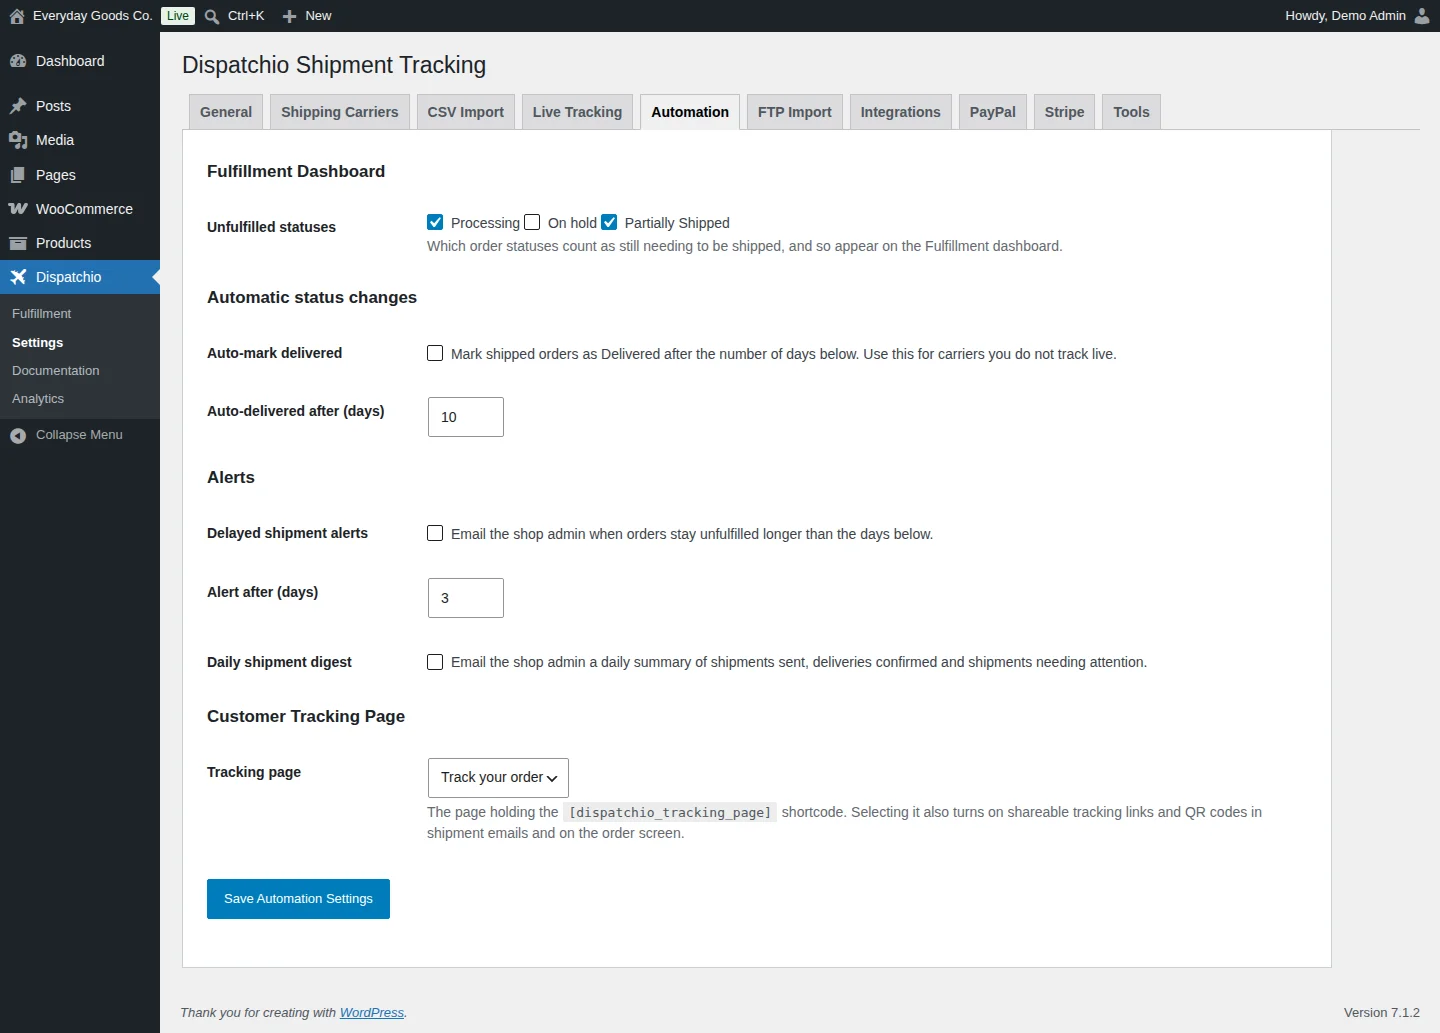
Dispatchio > Settings > Automation groups the rules that run on their own.
- Fulfillment Dashboard: choose which order statuses count as still needing to be shipped (Processing, On hold, Partially Shipped). Only those orders appear on the Fulfillment dashboard.
- Automatic status changes: mark shipped orders as Delivered after a set number of days. Use this for carriers you do not track live.
- Alerts: email the shop admin when orders stay unfulfilled too long, and send a daily digest of shipments sent, deliveries confirmed and shipments needing attention.
- Customer Tracking Page: select the page that holds the
[dispatchio_tracking_page]shortcode. Selecting it also turns on shareable tracking links and QR codes in shipment emails and on the order screen.
Click Save Automation Settings to apply your changes.
#Scheduled FTP import
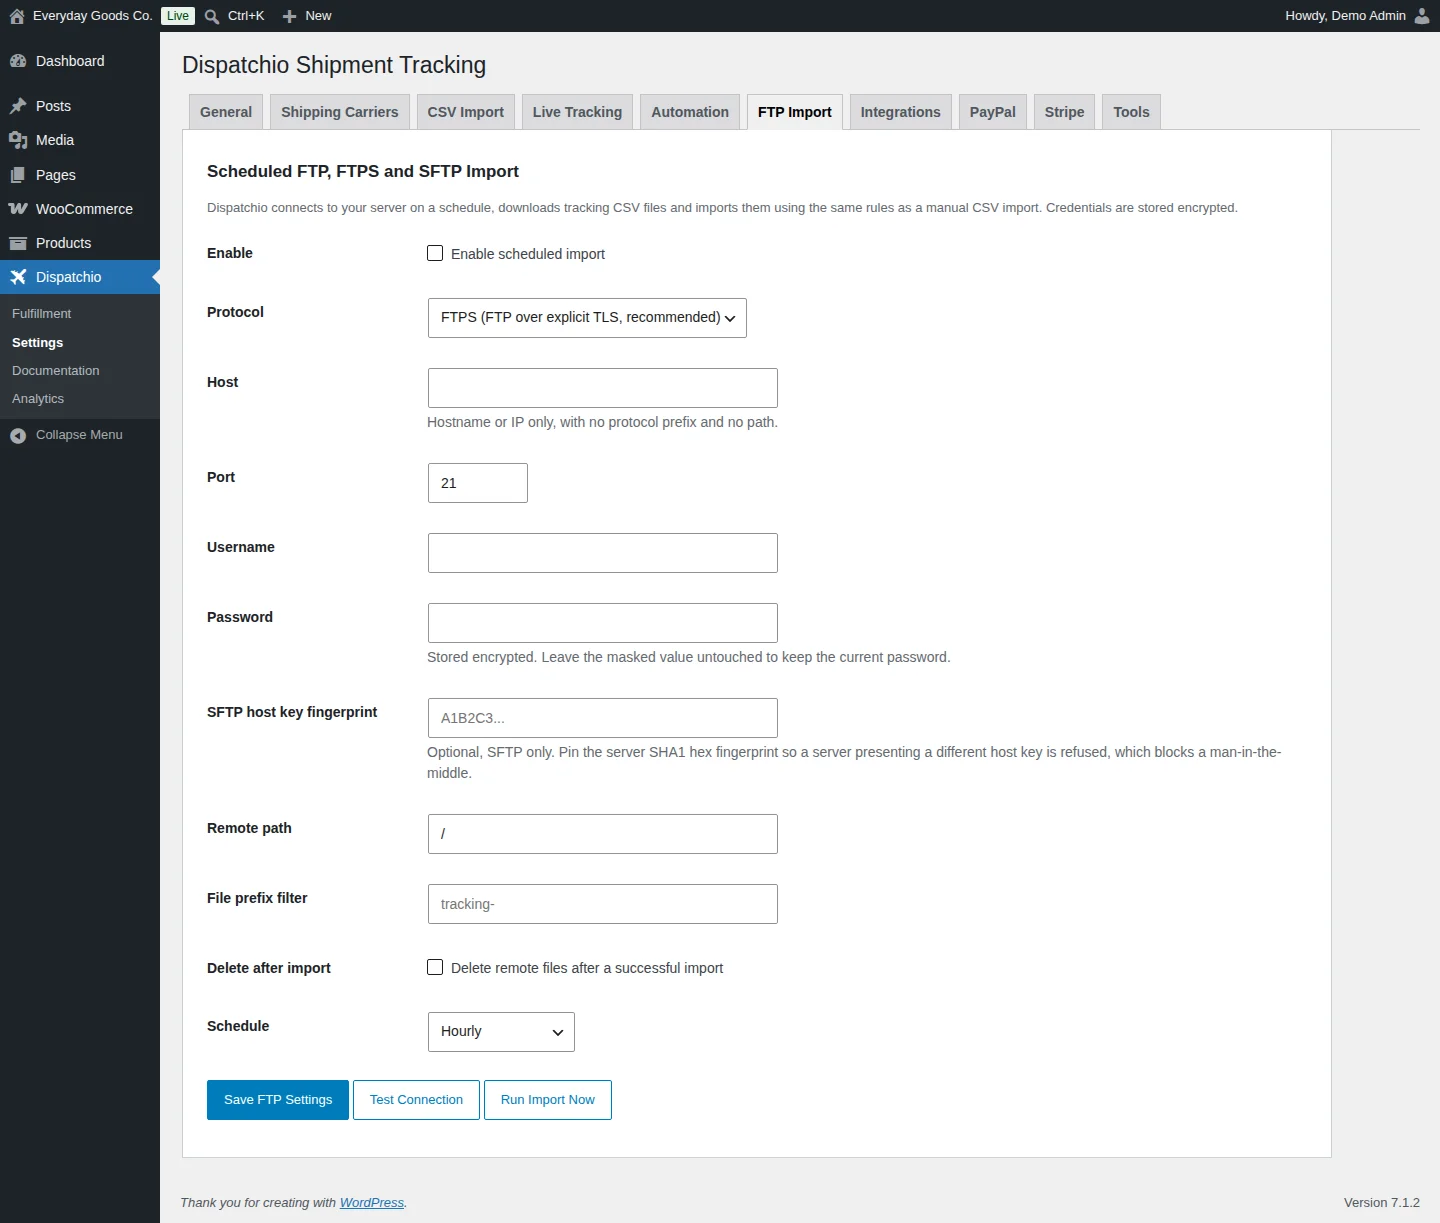
Dispatchio > Settings > FTP Import connects to your server on a schedule, downloads tracking CSV files and imports them with the same rules as a manual CSV import. Credentials are stored encrypted.
- Tick Enable scheduled import.
- Choose the Protocol: FTPS (recommended), SFTP or plain FTP (not recommended).
- Enter the Host (hostname or IP only, with no protocol prefix and no path), Port, Username and Password.
- For SFTP, you can pin the server's SHA1 SFTP host key fingerprint so a server with a different key is refused.
- Set the Remote path, an optional File prefix filter, and whether to delete remote files after a successful import.
- Pick a Schedule, from every 15 minutes to daily.
- Click Save FTP Settings, then Test Connection. Use Run Import Now to import immediately.
#Integrations
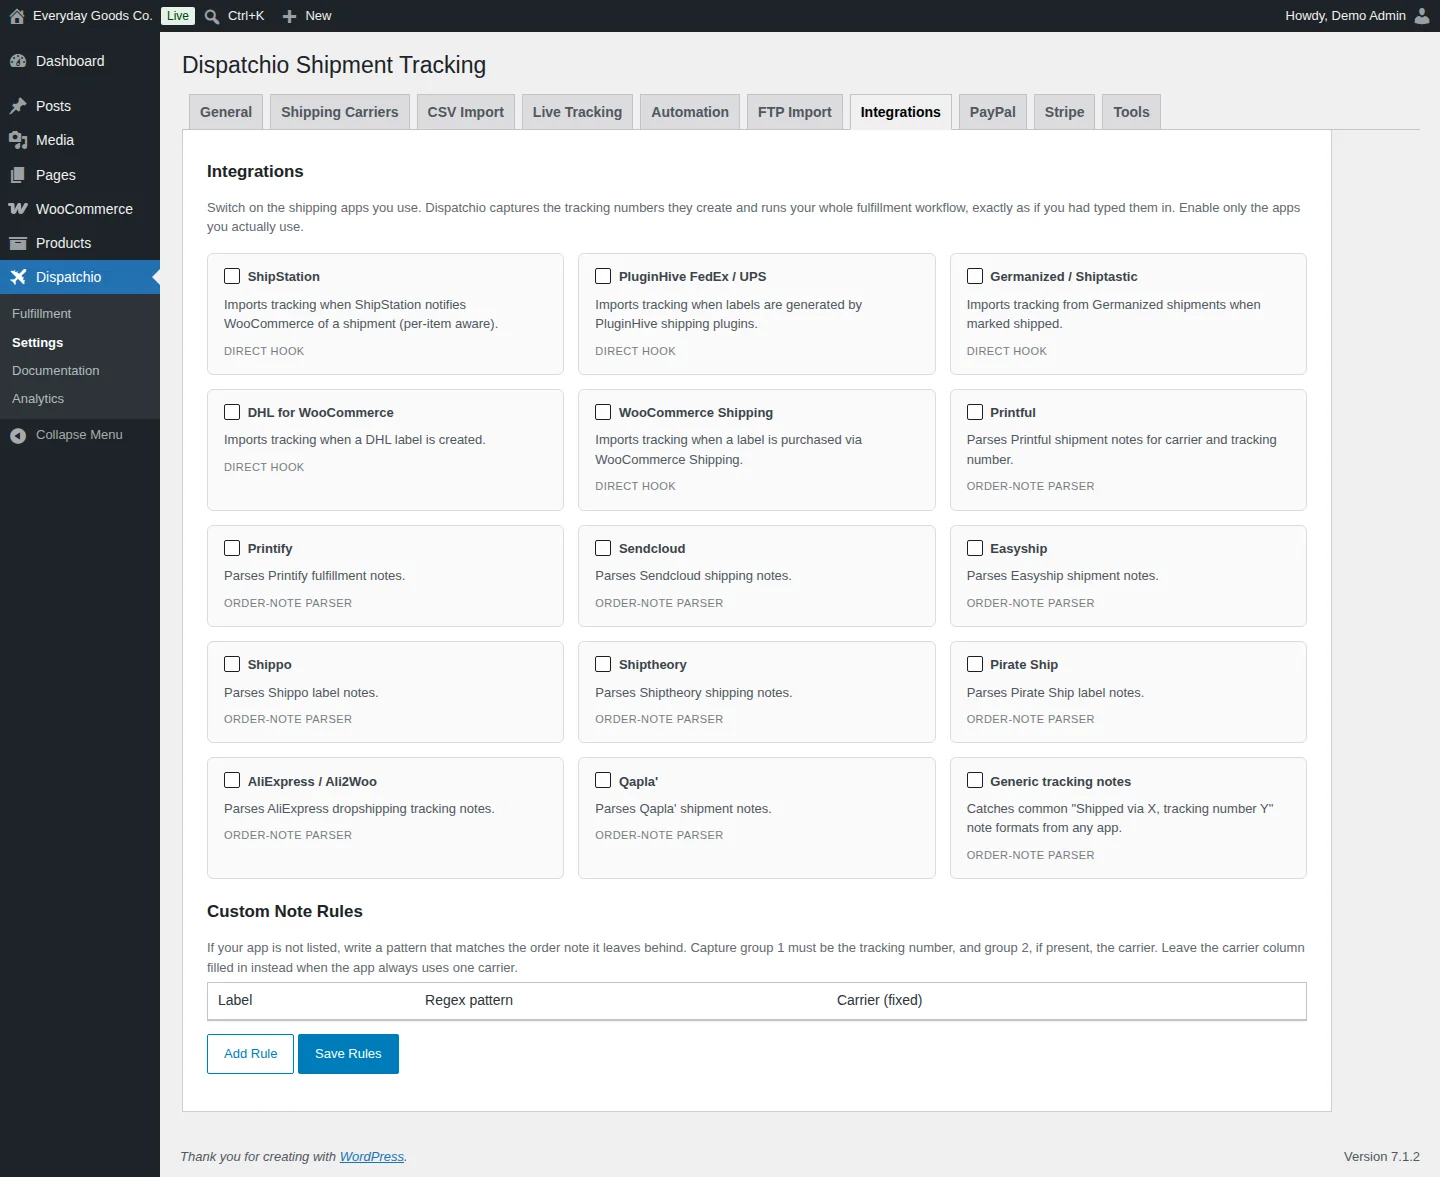
Dispatchio > Settings > Integrations captures tracking numbers created by other shipping apps and runs your normal fulfillment workflow, as if you had typed them in. Enable only the apps you actually use.
There are two kinds of integration:
- Direct hook: ShipStation, PluginHive FedEx / UPS, Germanized / Shiptastic, DHL for WooCommerce and WooCommerce Shipping. Tracking is imported when the app creates a label or marks a shipment.
- Order-note parser: Printful, Printify, Sendcloud, Easyship, Shippo, Shiptheory, Pirate Ship, AliExpress / Ali2Woo, Qapla' and Generic tracking notes, which catches common "Shipped via X, tracking number Y" notes from any app.
Custom Note Rules handle apps that are not listed. Click Add Rule, give it a Label and a Regex pattern that matches the order note the app leaves. Capture group 1 must be the tracking number, and group 2, if present, the carrier. Fill in Carrier (fixed) instead when the app always uses one carrier. Click Save Rules.
#PayPal and Stripe tracking sync
These tabs send tracking details to the payment provider when an order ships, which gives you proof of shipment in a dispute.
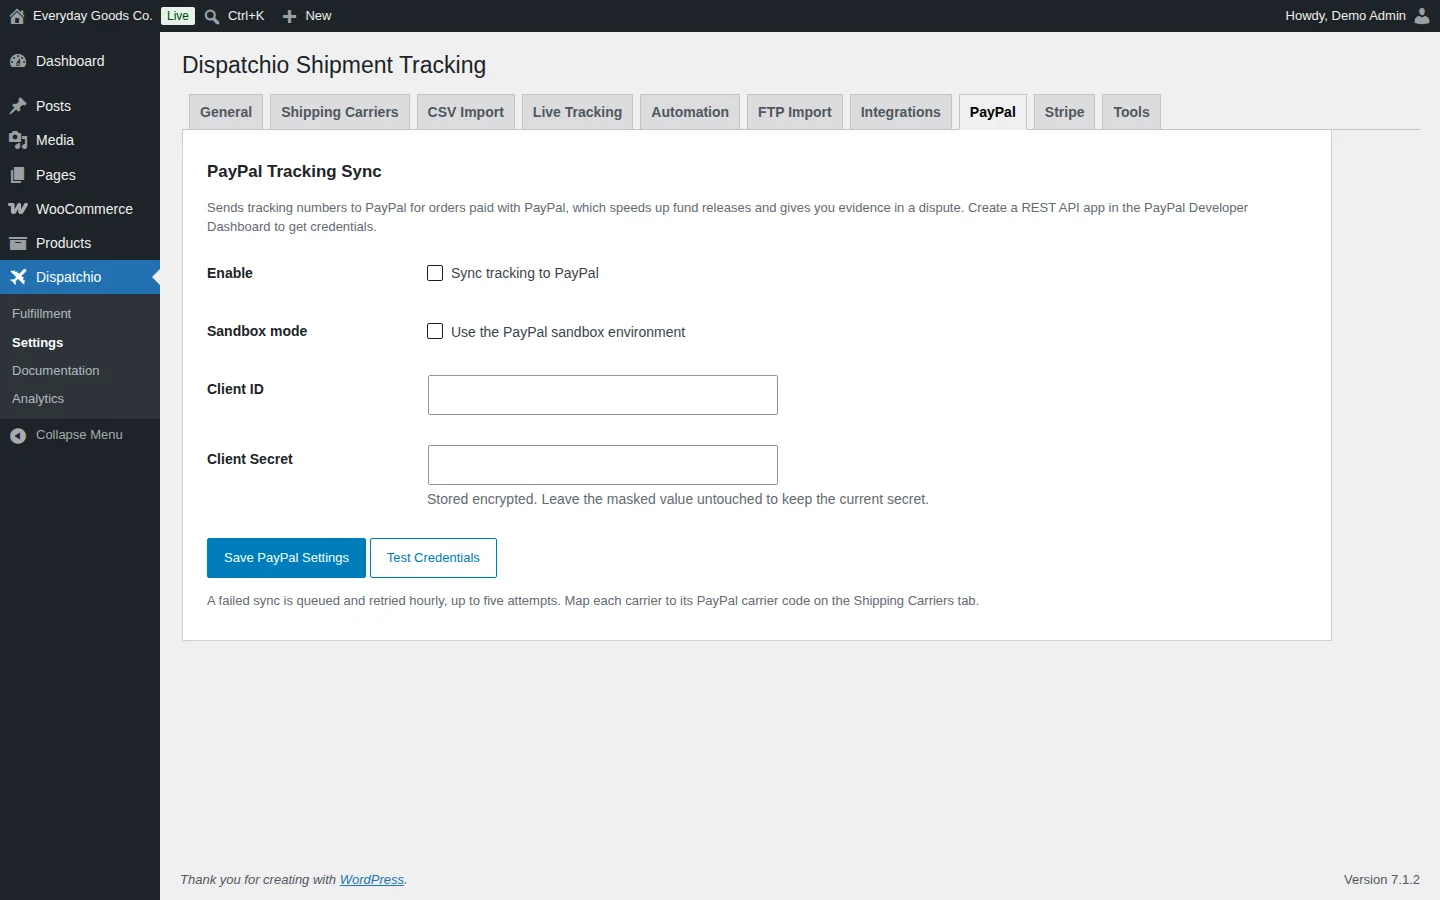
PayPal (Dispatchio > Settings > PayPal) sends tracking numbers for orders paid with PayPal, which also speeds up fund releases.
- Create a REST API app in the PayPal Developer Dashboard to get credentials.
- Tick Sync tracking to PayPal, and tick Use the PayPal sandbox environment if you are testing with sandbox credentials.
- Enter the Client ID and Client Secret, click Save PayPal Settings, then Test Credentials.
A failed sync is queued and retried hourly, up to five attempts. Map each carrier to its PayPal carrier code on the Shipping Carriers tab.
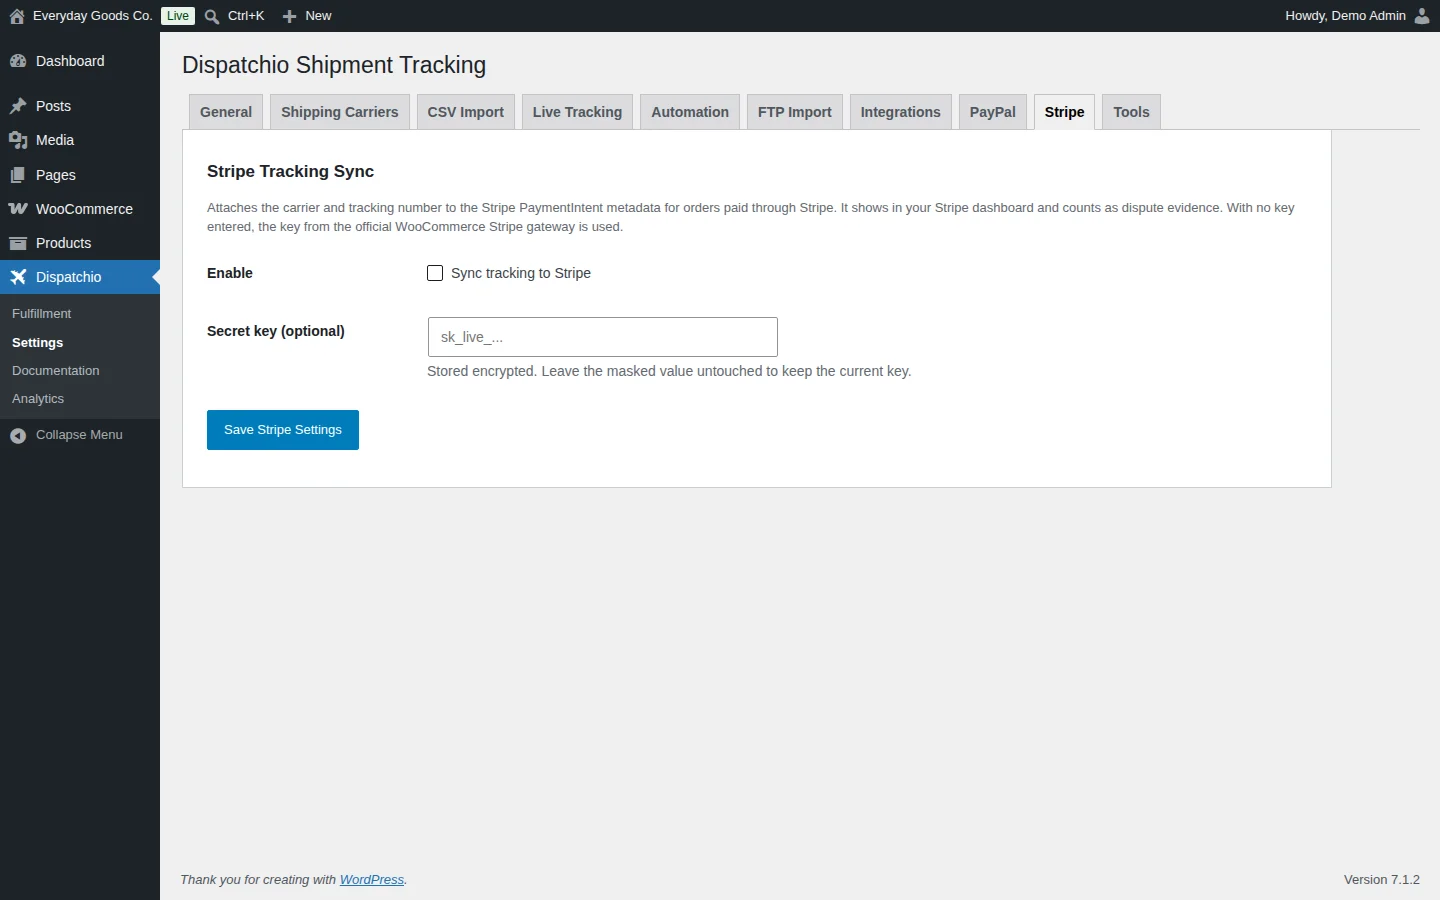
Stripe (Dispatchio > Settings > Stripe) attaches the carrier and tracking number to the Stripe PaymentIntent metadata for orders paid through Stripe. Tick Sync tracking to Stripe and click Save Stripe Settings. The Secret key (optional) field can stay empty: the key from the official WooCommerce Stripe gateway is used.
#Tools
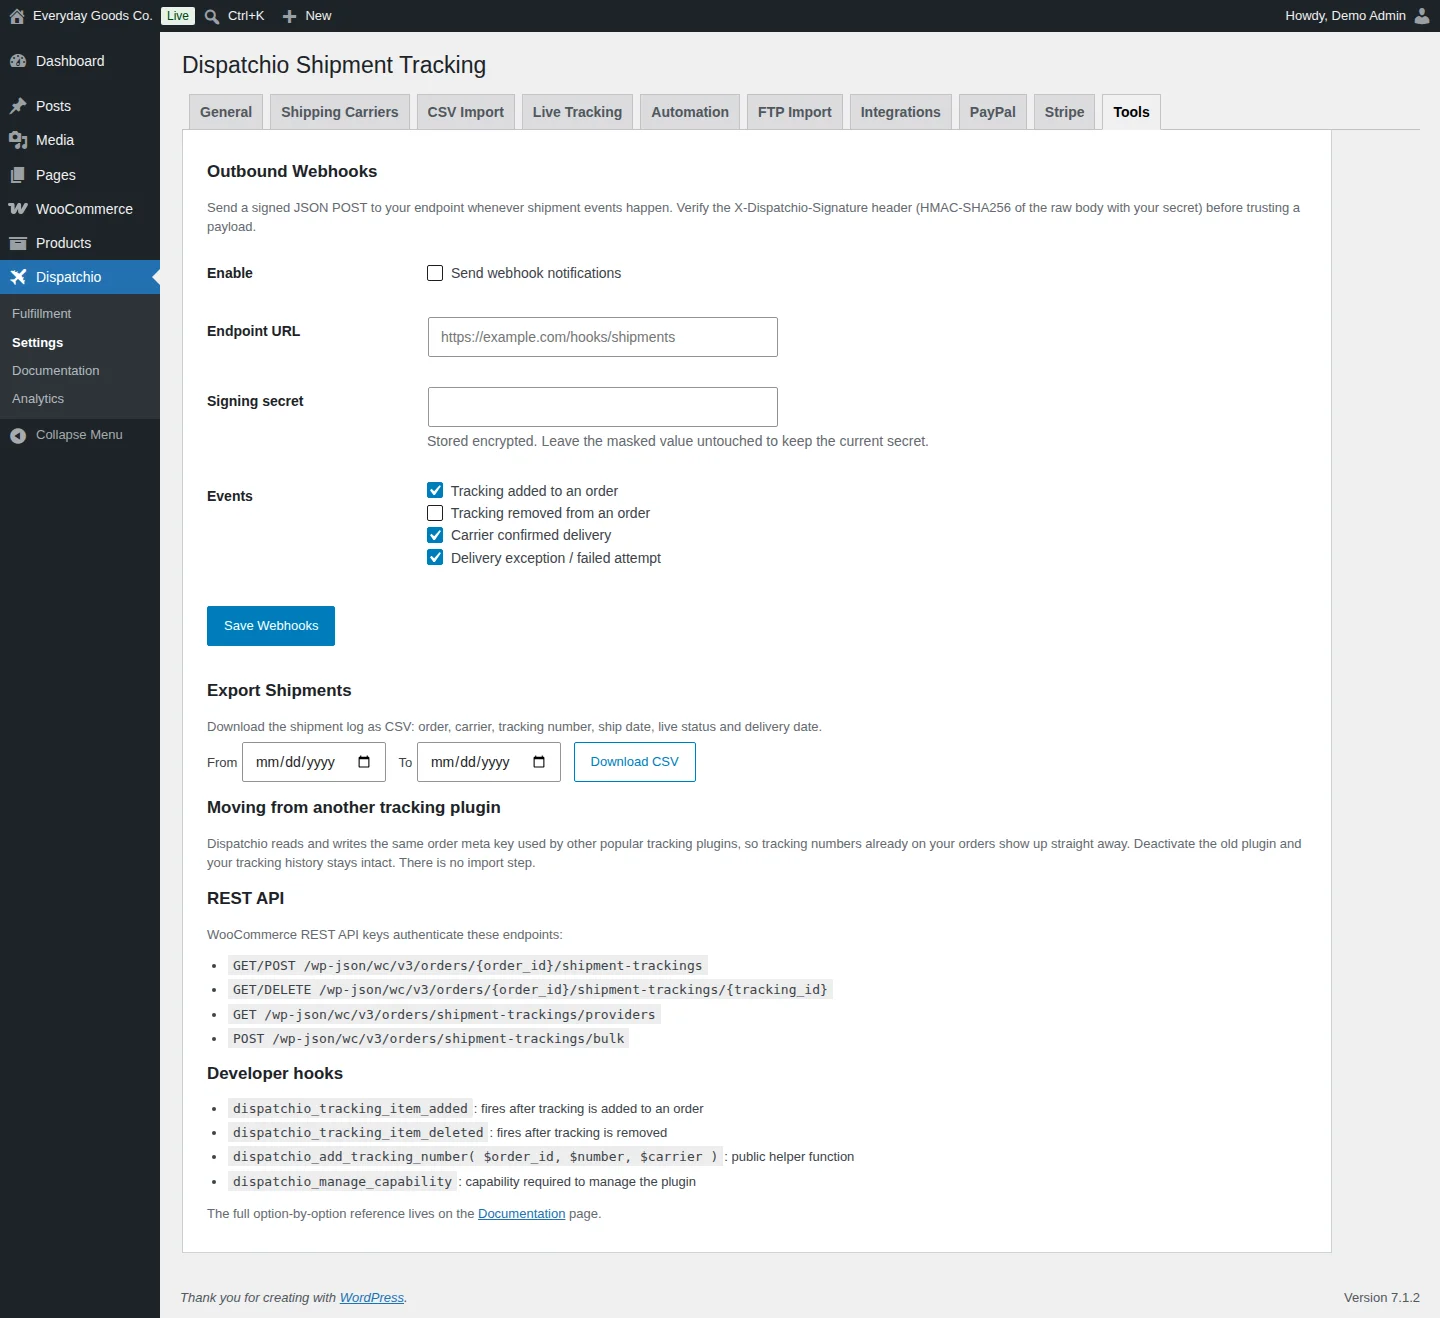
Dispatchio > Settings > Tools holds webhooks, exports and developer information.
Outbound Webhooks send a signed JSON POST to your endpoint when shipment events happen. Tick Send webhook notifications, enter the Endpoint URL and a Signing secret, choose the Events, and click Save Webhooks. Verify the X-Dispatchio-Signature header (HMAC-SHA256 of the raw body with your secret) before trusting a payload.
Export Shipments downloads the shipment log as CSV (order, carrier, tracking number, ship date, live status and delivery date). Pick the From and To dates and click Download CSV.
Moving from another tracking plugin: Dispatchio reads and writes the same order meta key used by other popular tracking plugins, so existing tracking numbers show up straight away. Deactivate the old plugin; there is no import step.
REST API endpoints, authenticated with WooCommerce REST API keys:
GET/POST /wp-json/wc/v3/orders/{order_id}/shipment-trackingsGET/DELETE /wp-json/wc/v3/orders/{order_id}/shipment-trackings/{tracking_id}GET /wp-json/wc/v3/orders/shipment-trackings/providersPOST /wp-json/wc/v3/orders/shipment-trackings/bulk
Developer hooks include dispatchio_tracking_item_added, dispatchio_tracking_item_deleted, the helper dispatchio_add_tracking_number( $order_id, $number, $carrier ) and the dispatchio_manage_capability filter.
#In-plugin documentation
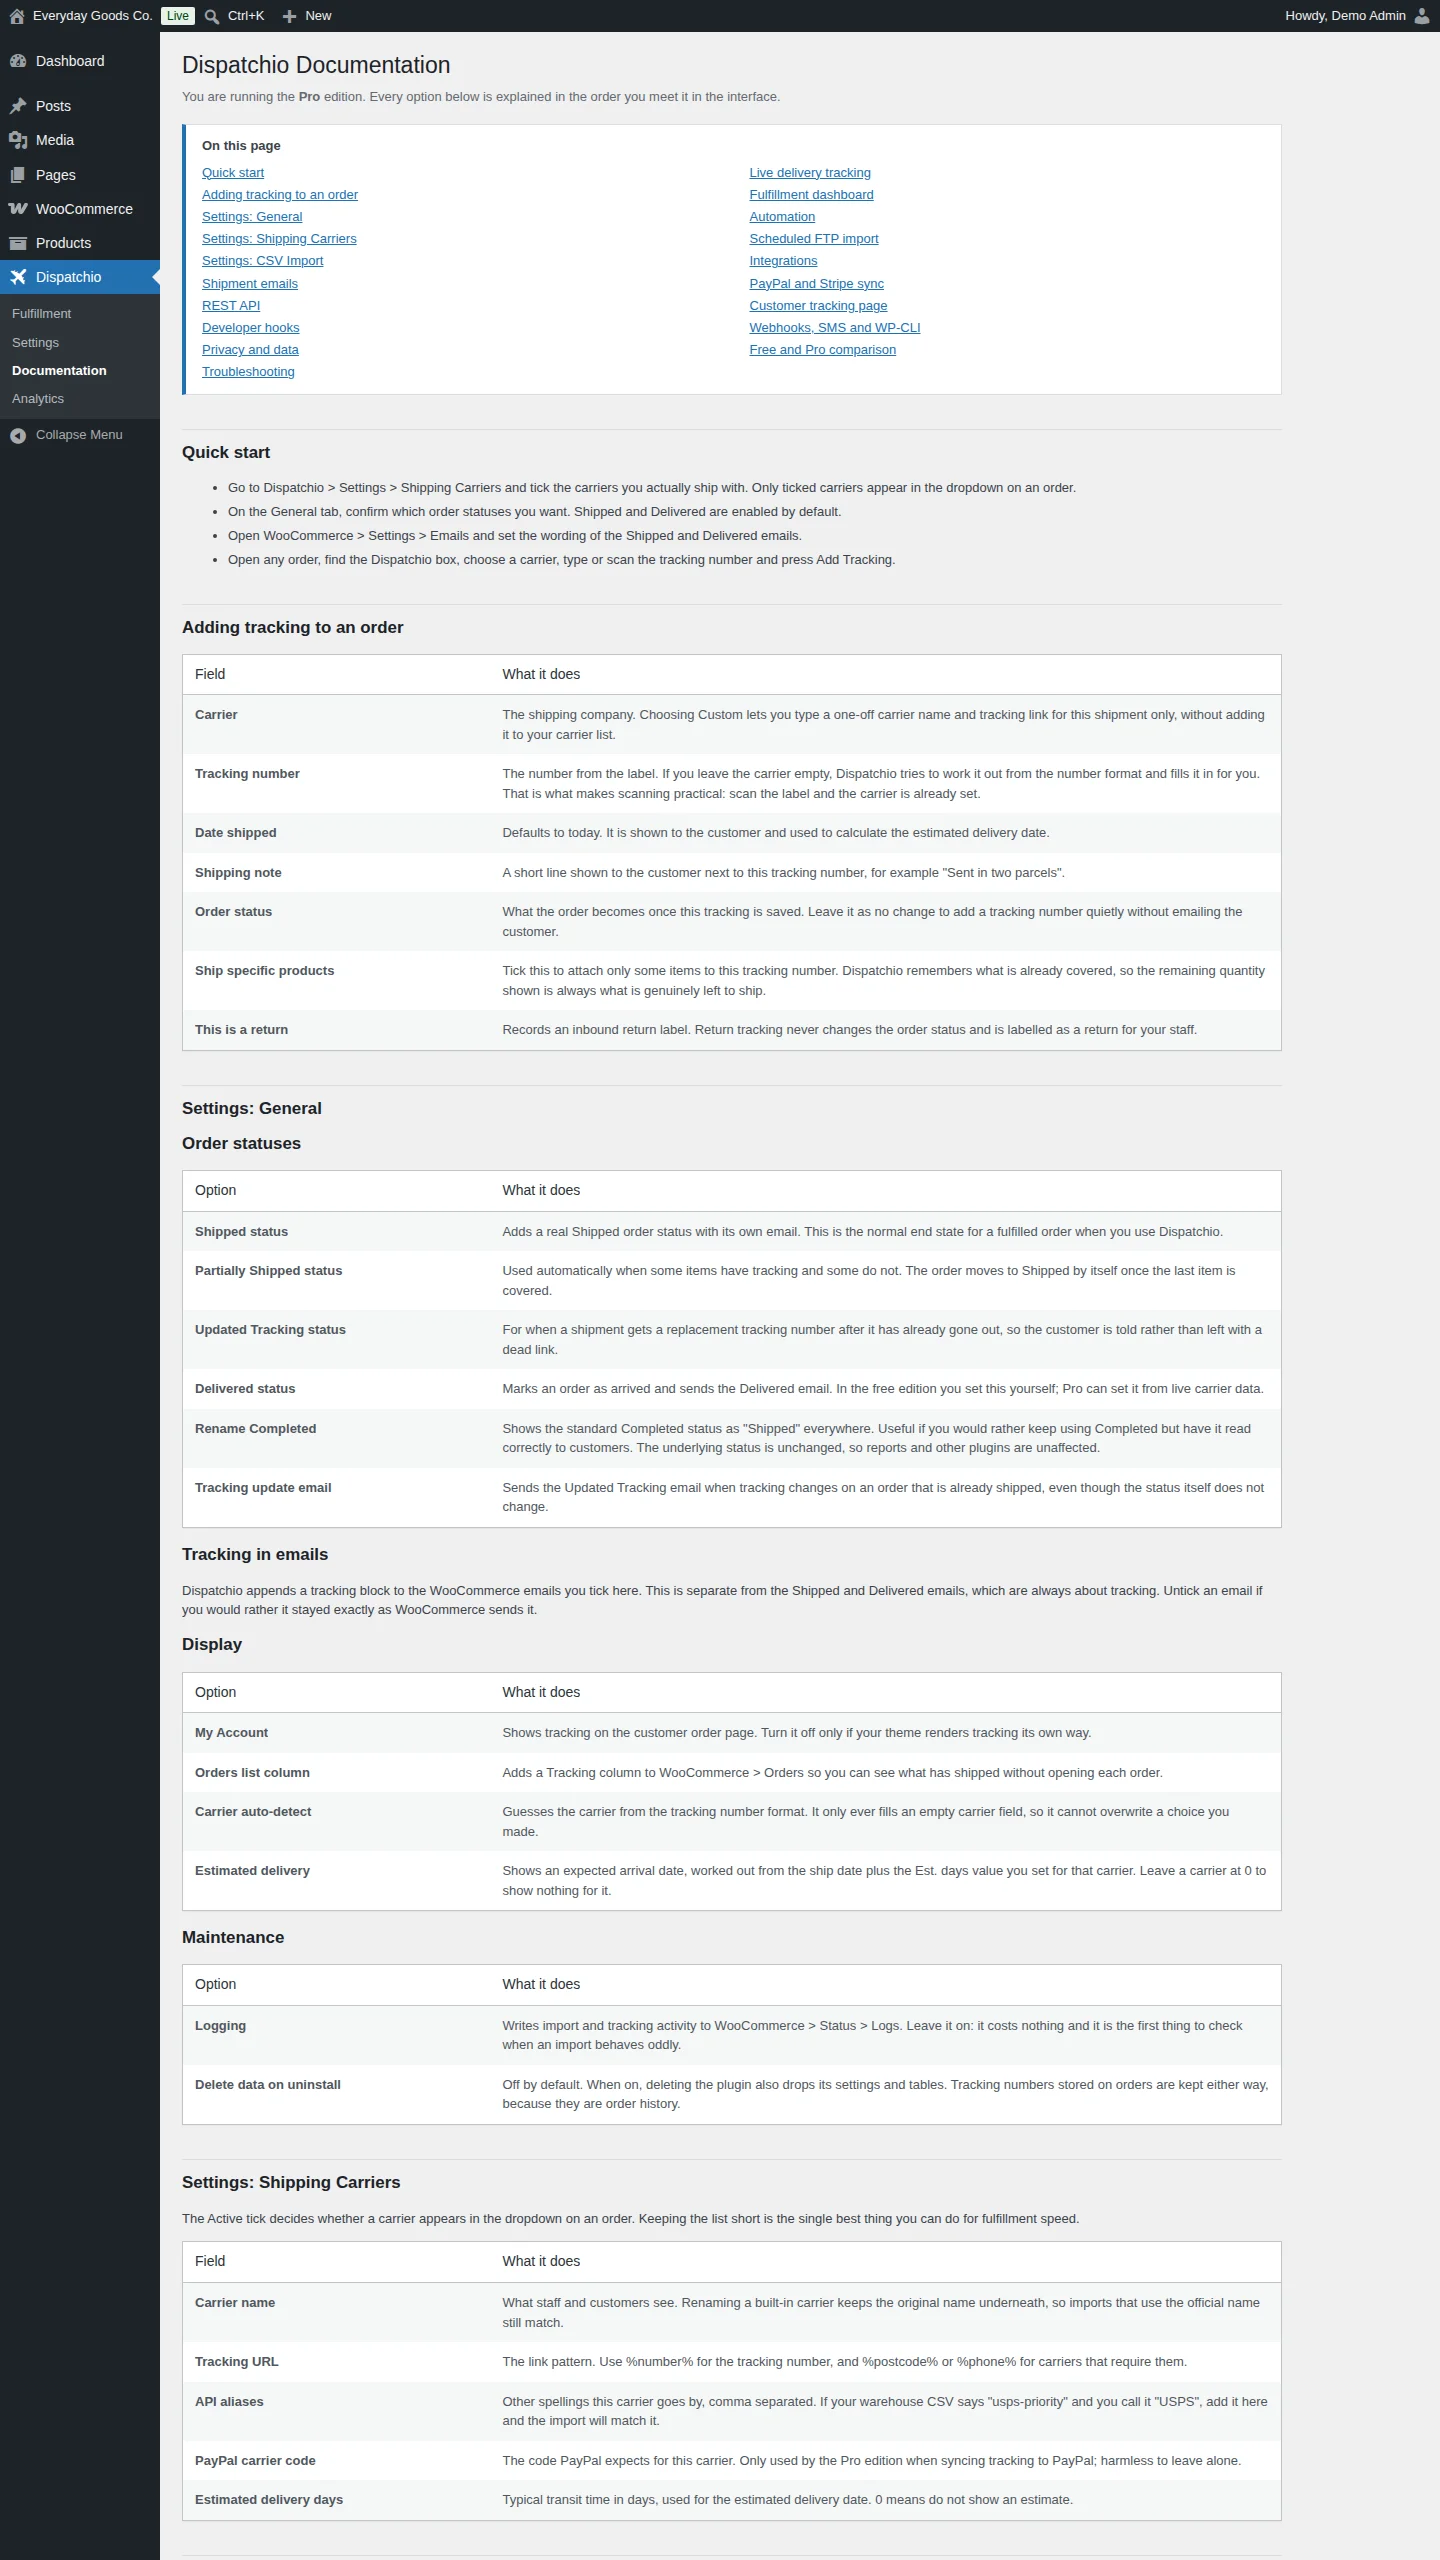
Dispatchio > Documentation explains every option in the order you meet it in the interface. It covers the quick start, adding tracking to an order, each settings tab, shipment emails, the REST API, developer hooks, privacy and data, troubleshooting, and the Pro features such as live tracking, the fulfillment dashboard, automation, FTP import, integrations, payment sync, the customer tracking page, webhooks, SMS and WhatsApp hooks and WP-CLI.
Use the On this page list at the top to jump to a topic.
#Shipment analytics
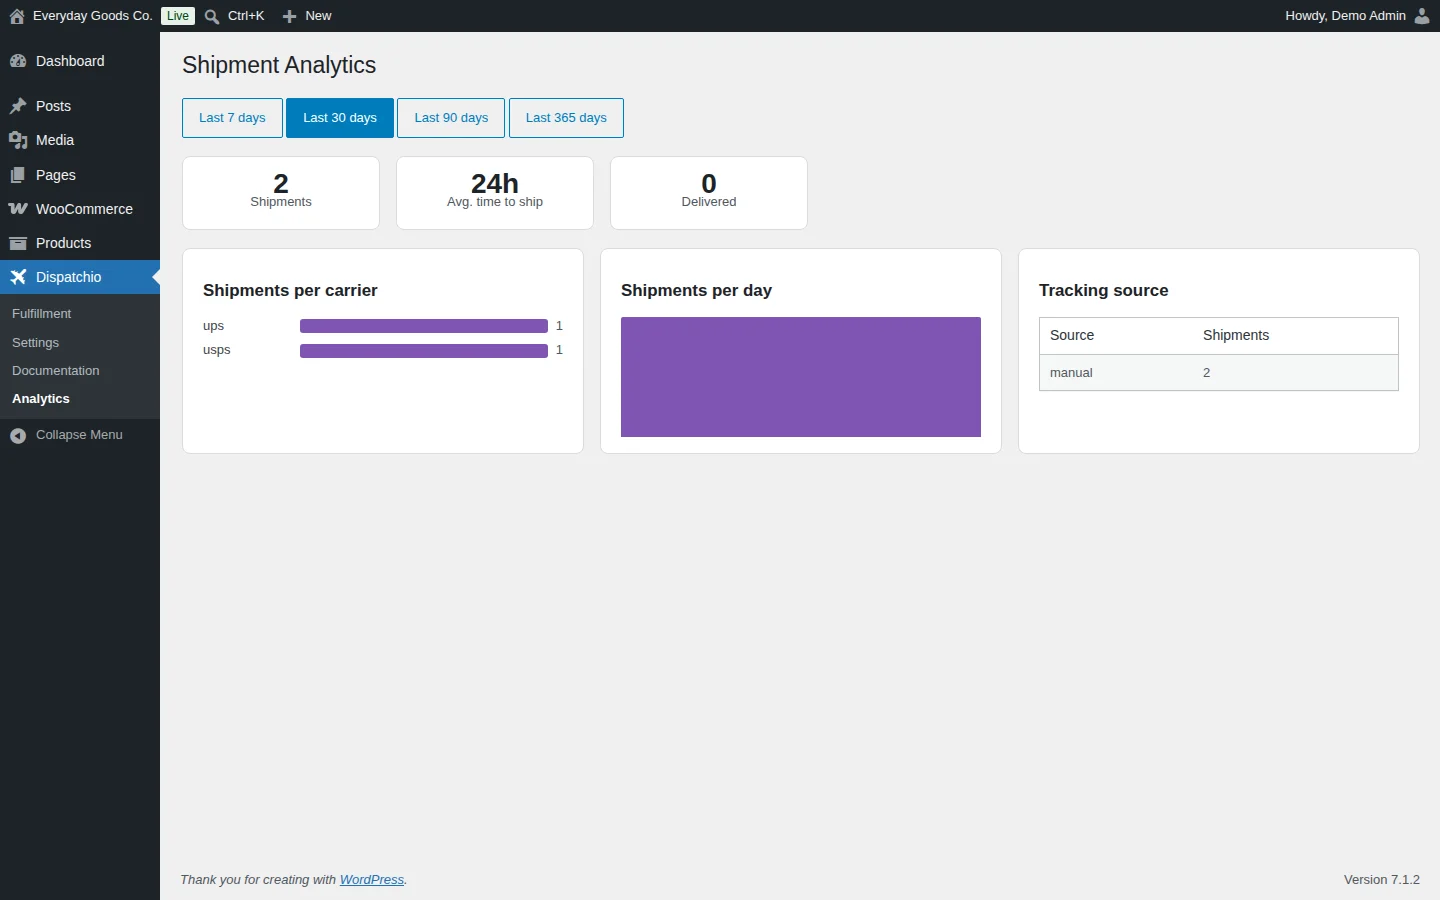
Dispatchio > Analytics summarizes your shipping activity. Choose a period with Last 7 days, Last 30 days, Last 90 days or Last 365 days.
The page shows:
- Totals for Shipments, Avg. time to ship and Delivered.
- Shipments per carrier, as a bar chart.
- Shipments per day, as a chart over the chosen period.
- Tracking source, a table showing how tracking was added (for example manually or by import).
For a date-ranged CSV of shipments, use Export Shipments on the Tools tab.
#Shipment emails
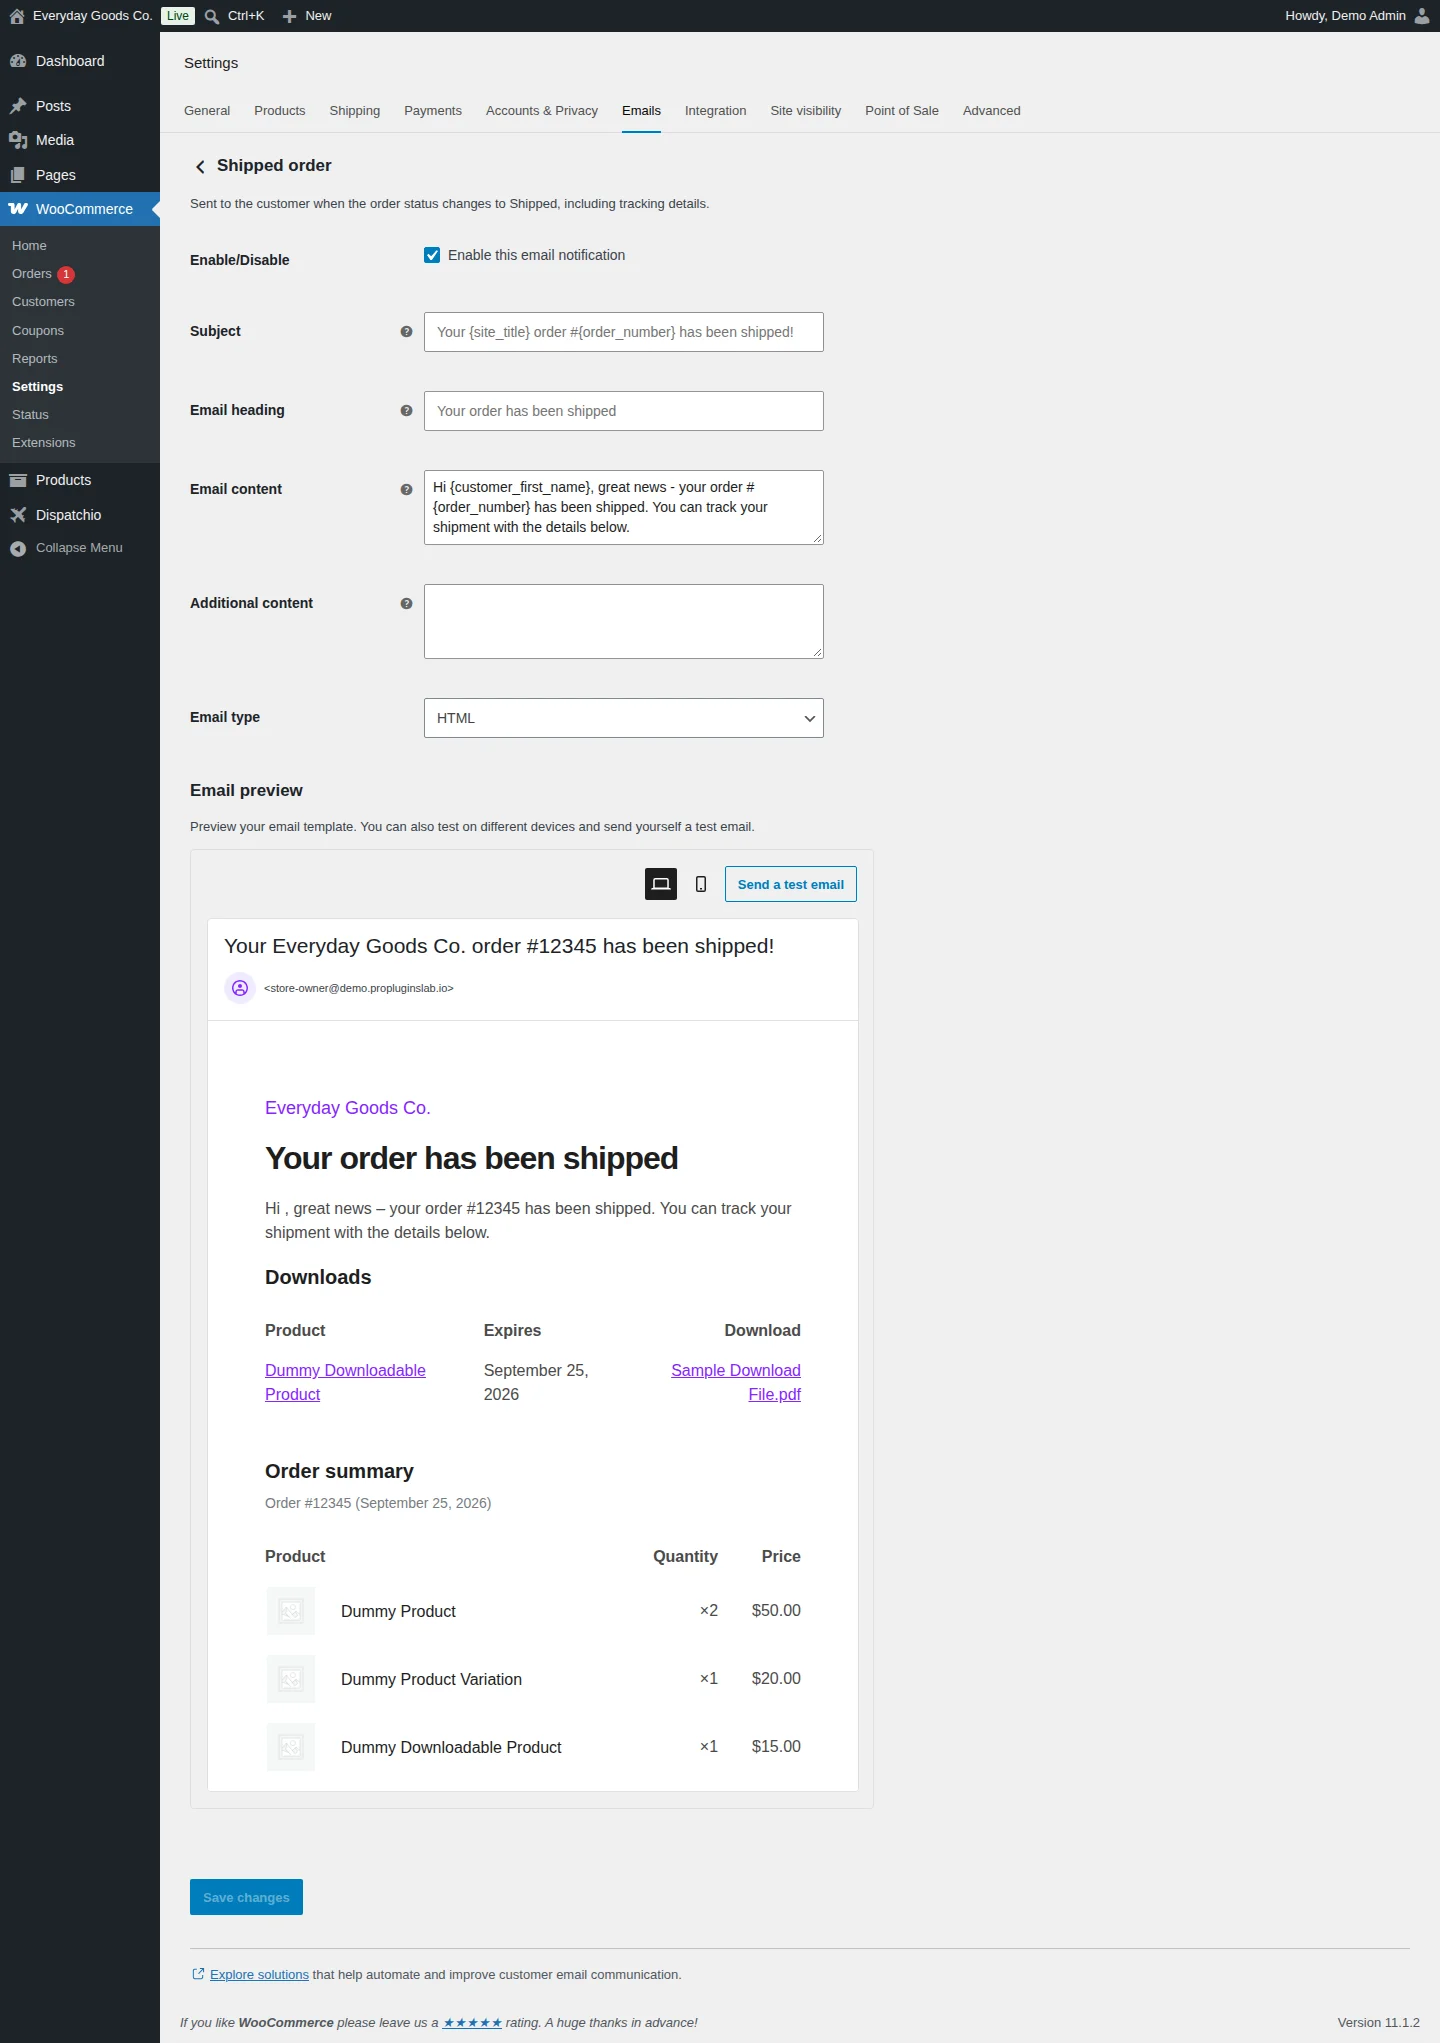
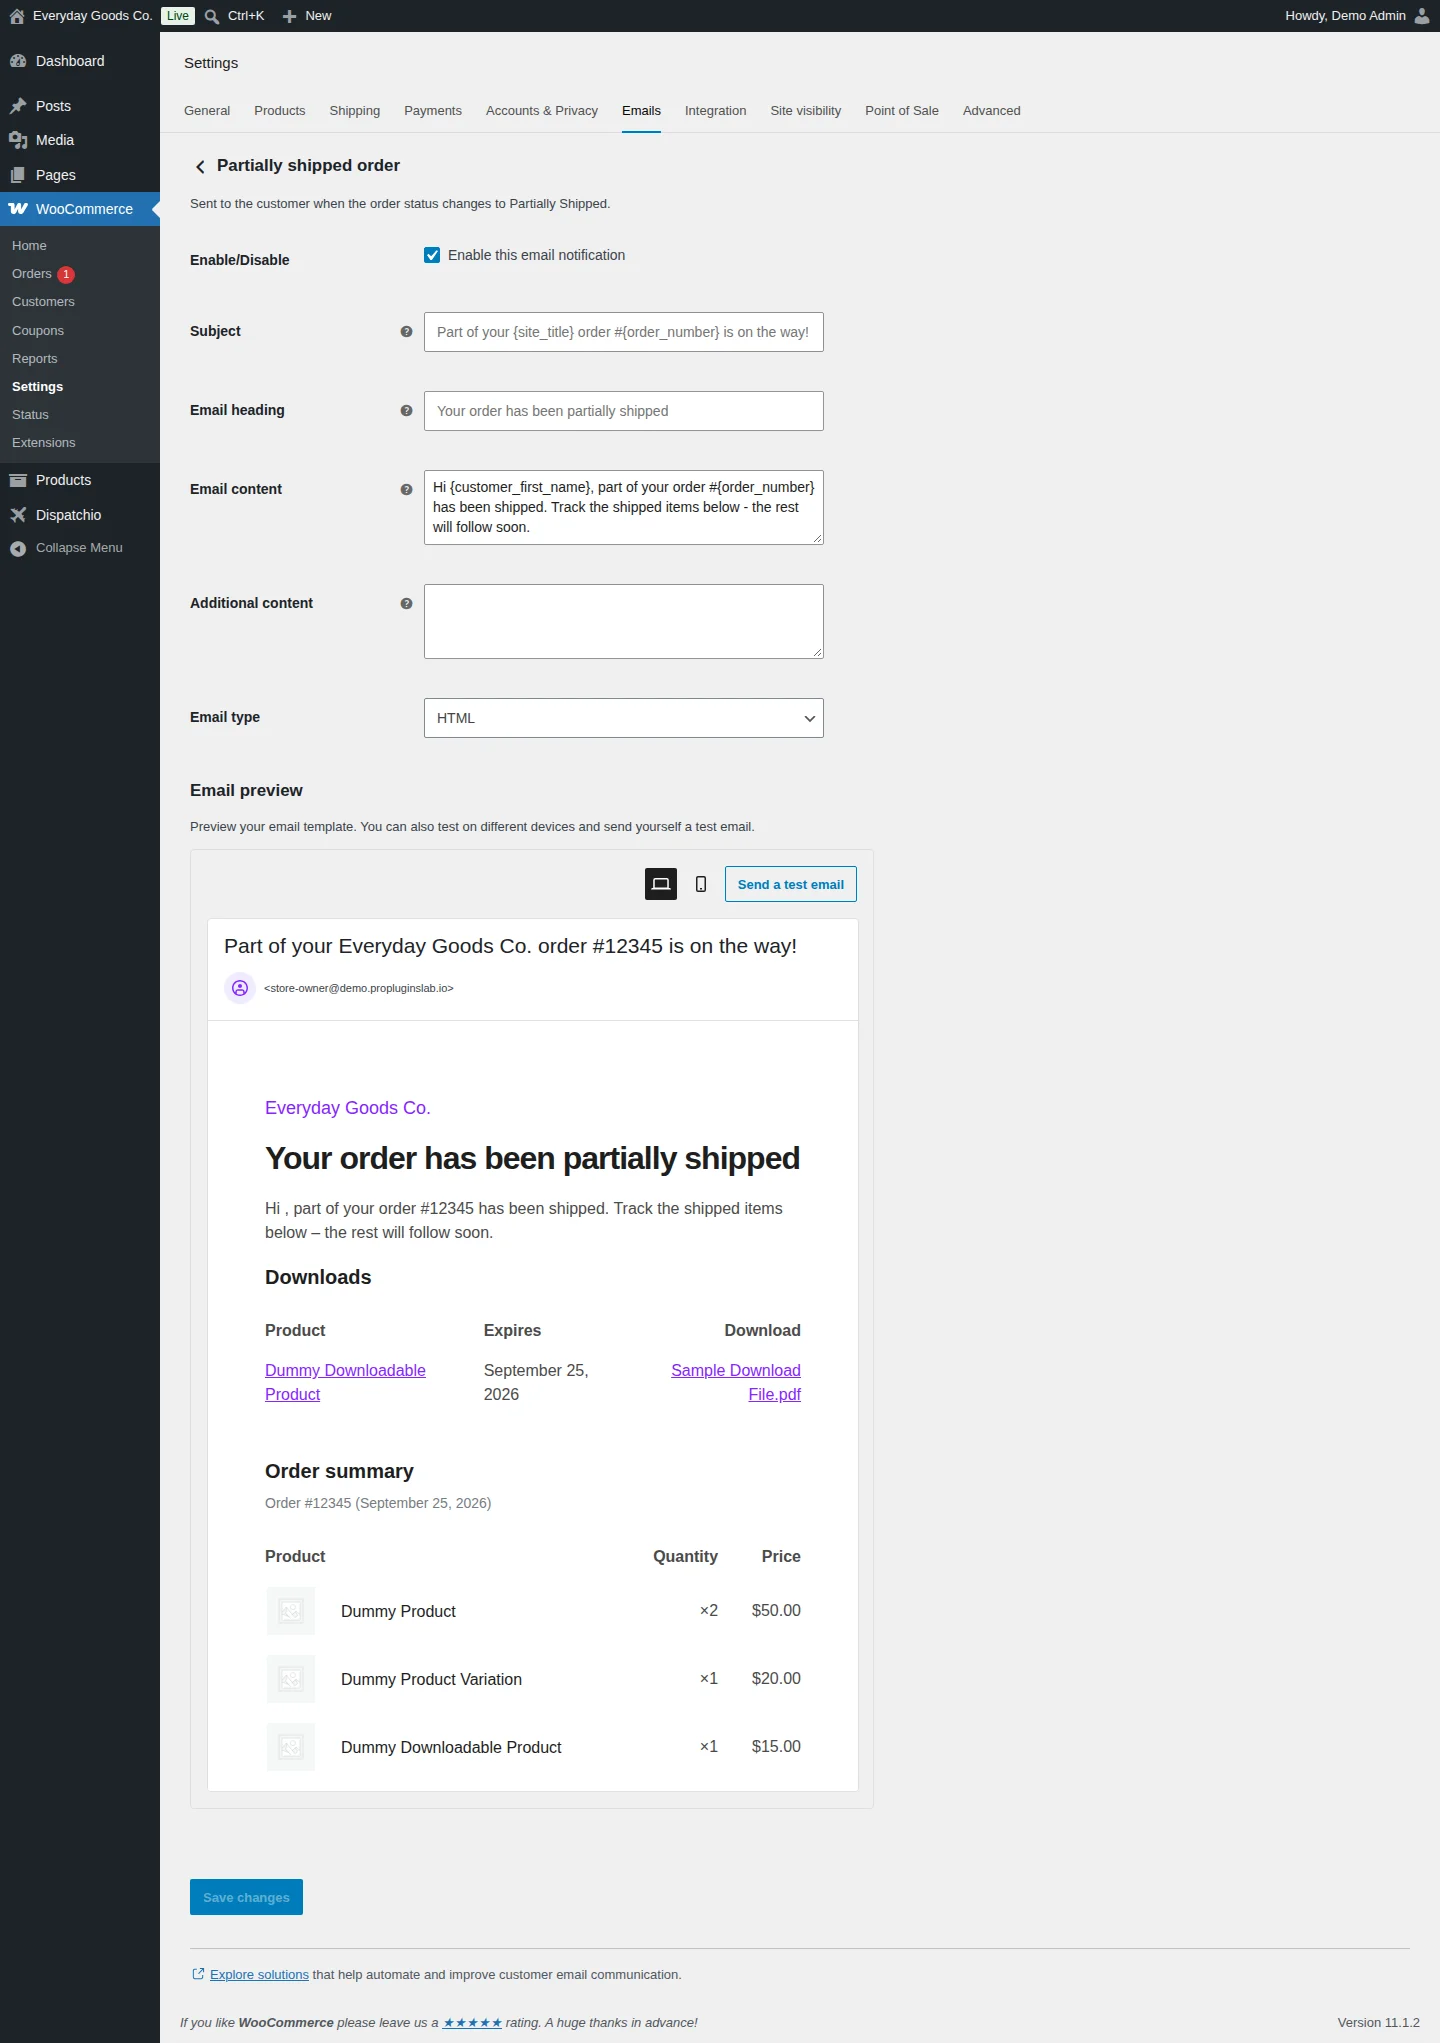
Dispatchio adds its own emails under WooCommerce > Settings > Emails, including Shipped order (sent when the order status changes to Shipped, with tracking details) and Partially shipped order (sent when the status changes to Partially Shipped). The Delivered and Updated Tracking statuses also have their own emails.
Each email has the usual WooCommerce fields: Enable/Disable, Subject, Email heading, Email content, Additional content and Email type. Besides the standard placeholders such as {site_title}, {order_number} and {customer_first_name}, every Dispatchio shipment email accepts {tracking_number}, {carrier_name} and {tracking_url} in the subject, heading, content and additional content.
Use the Email preview to check the result, and click Send a test email to see it in your inbox. Click Save changes when you are done.
Settings reference
Dispatchio > Settings > General
| Setting | Type | Default | What it does |
|---|---|---|---|
| Enable the custom "Shipped" order status. | checkbox | Enabled |
Shipped status: adds a real Shipped order status with its own email. This is the normal end state for a fulfilled order. |
| Enable the custom "Partially Shipped" order status. | checkbox | Enabled |
Partially Shipped status: used when some items have tracking and some do not. The order moves to Shipped once the last item is covered. |
| Enable the custom "Updated Tracking" order status. | checkbox | Enabled |
Updated Tracking status: for a shipment that gets a replacement tracking number after it has gone out, so the customer is told. |
| Enable the custom "Delivered" order status. | checkbox | Enabled |
Delivered status: marks an order as arrived and sends the Delivered email. Pro can set it from live carrier data. |
| Show the "Completed" order status to staff and customers as "Shipped". | checkbox | Disabled |
Rename Completed: shows Completed as "Shipped" everywhere. The underlying status is unchanged, so reports and other plugins are unaffected. |
| Send the "Updated tracking" email when tracking changes without a status change. | checkbox | Disabled |
Tracking update email: emails the customer when tracking changes on an order that is already shipped. |
| Show tracking in this email | checkbox | Enabled |
Processing order email: adds the tracking block to this WooCommerce email. |
| Show tracking in this email | checkbox | Enabled |
Completed order email: adds the tracking block to this WooCommerce email. |
| Show tracking in this email | checkbox | Enabled |
Customer invoice email: adds the tracking block to this WooCommerce email. |
| Show tracking in this email | checkbox | Enabled |
Customer note email: adds the tracking block to this WooCommerce email. |
| Show tracking in this email | checkbox | Enabled |
Refunded order email: adds the tracking block to this WooCommerce email. |
| Show tracking on the customer order pages under My Account. | checkbox | Enabled |
My Account: shows tracking on the customer order page. Turn it off only if your theme renders tracking its own way. |
| Add a "Tracking" column to the WooCommerce orders list. | checkbox | Enabled |
Orders list column: lets you see what has shipped without opening each order. |
| Suggest a carrier from the shape of the tracking number as it is typed or scanned. | checkbox | Enabled |
Carrier auto-detect: only fills an empty carrier field, so it never overwrites a choice you made. |
| Show an estimated delivery date, based on the days set for each carrier on the Shipping Carriers tab. | checkbox | Enabled |
Estimated delivery: ship date plus the carrier's Est. days value. A carrier set to 0 shows no estimate. |
| Log imports and tracking activity to WooCommerce > Status > Logs. | checkbox | Enabled |
Logging: the first thing to check when an import behaves oddly. |
| When the plugin is deleted (not merely deactivated), also remove its settings and tables. Order tracking data is always kept. | checkbox | Disabled |
Delete data on uninstall: tracking numbers stored on orders are kept either way. |
Dispatchio > Settings > Shipping Carriers
| Setting | Type | Default | What it does |
|---|---|---|---|
| Search carriers... | search | - | Filters the carrier table by name. |
| UPS | checkbox | - | The Active tick for a carrier (each carrier row has one). Only active carriers appear in the carrier dropdown on an order. |
Dispatchio > Settings > Live Tracking
| Setting | Type | Default | What it does |
|---|---|---|---|
| Enable live delivery tracking | checkbox | Disabled |
Turns on live tracking with the selected provider. |
| Provider | select | 17TRACK (free tier ~100 shipments/month) |
TrackShip (push updates, built for WooCommerce), 17TRACK or AfterShip. TrackShip: user key from my.trackship.com. 17TRACK: key under Settings > API at 17track.net. AfterShip: key from aftership.com. |
| API key | password | - | Stored encrypted. Leave the masked value untouched to keep the current key. |
| Move the order to Delivered when the carrier confirms every shipment has arrived, which also sends the Delivered email. | checkbox | Enabled |
Auto-mark Delivered. |
| Stop polling after (days) | number | 60 |
Shipments older than this stop being polled. TrackShip does not need it, because it pushes updates itself. |
Dispatchio > Settings > Automation
| Setting | Type | Default | What it does |
|---|---|---|---|
| Processing | checkbox | Enabled |
Unfulfilled statuses: Processing orders count as still needing to be shipped and appear on the Fulfillment dashboard. |
| On hold | checkbox | Disabled |
Unfulfilled statuses: include On hold orders on the Fulfillment dashboard. |
| Partially Shipped | checkbox | Enabled |
Unfulfilled statuses: include Partially Shipped orders on the Fulfillment dashboard. |
| Mark shipped orders as Delivered after the number of days below. Use this for carriers you do not track live. | checkbox | Disabled |
Auto-mark delivered. |
| Auto-delivered after (days) | number | 10 |
Days after shipping before an order is marked Delivered automatically. |
| Email the shop admin when orders stay unfulfilled longer than the days below. | checkbox | Disabled |
Delayed shipment alerts. |
| Alert after (days) | number | 3 |
Days an order can stay unfulfilled before the alert is sent. |
| Email the shop admin a daily summary of shipments sent, deliveries confirmed and shipments needing attention. | checkbox | Disabled |
Daily shipment digest. |
| Tracking page | select | - | The page holding the [dispatchio_tracking_page] shortcode. Selecting it also turns on shareable tracking links and QR codes in shipment emails and on the order screen. |
Dispatchio > Settings > FTP Import
| Setting | Type | Default | What it does |
|---|---|---|---|
| Enable scheduled import | checkbox | Disabled |
Turns on the scheduled import. |
| Protocol | select | FTPS (FTP over explicit TLS, recommended) |
FTPS (FTP over explicit TLS, recommended), SFTP (SSH) or FTP (unencrypted, not recommended). |
| Host | text | - | Hostname or IP only, with no protocol prefix and no path. |
| Port | number | 21 |
The server port. |
| Username | text | - | The login name for the server. |
| Password | password | - | Stored encrypted. Leave the masked value untouched to keep the current password. |
| SFTP host key fingerprint | text | - | Optional, SFTP only. Pin the server SHA1 hex fingerprint so a server presenting a different host key is refused, which blocks a man-in-the-middle. |
| Remote path | text | / |
The folder on the server that holds the tracking files. |
| File prefix filter | text | - | Only files whose names start with this text are imported, for example `tracking-`. |
| Delete remote files after a successful import | checkbox | Disabled |
Removes imported files from the server. |
| Schedule | select | Hourly |
Every 15 minutes, Every 30 minutes, Hourly, Twice daily or Daily. |
Dispatchio > Settings > Integrations
| Setting | Type | Default | What it does |
|---|---|---|---|
| ShipStation | checkbox | Disabled |
Direct hook. Imports tracking when ShipStation notifies WooCommerce of a shipment (per-item aware). |
| PluginHive FedEx / UPS | checkbox | Disabled |
Direct hook. Imports tracking when labels are generated by PluginHive shipping plugins. |
| Germanized / Shiptastic | checkbox | Disabled |
Direct hook. Imports tracking from Germanized shipments when marked shipped. |
| DHL for WooCommerce | checkbox | Disabled |
Direct hook. Imports tracking when a DHL label is created. |
| WooCommerce Shipping | checkbox | Disabled |
Direct hook. Imports tracking when a label is purchased via WooCommerce Shipping. |
| Printful | checkbox | Disabled |
Order-note parser. Parses Printful shipment notes for carrier and tracking number. |
| Printify | checkbox | Disabled |
Order-note parser. Parses Printify fulfillment notes. |
| Sendcloud | checkbox | Disabled |
Order-note parser. Parses Sendcloud shipping notes. |
| Easyship | checkbox | Disabled |
Order-note parser. Parses Easyship shipment notes. |
| Shippo | checkbox | Disabled |
Order-note parser. Parses Shippo label notes. |
| Shiptheory | checkbox | Disabled |
Order-note parser. Parses Shiptheory shipping notes. |
| Pirate Ship | checkbox | Disabled |
Order-note parser. Parses Pirate Ship label notes. |
| AliExpress / Ali2Woo | checkbox | Disabled |
Order-note parser. Parses AliExpress dropshipping tracking notes. |
| Qapla' | checkbox | Disabled |
Order-note parser. Parses Qapla' shipment notes. |
| Generic tracking notes | checkbox | Disabled |
Order-note parser. Catches common "Shipped via X, tracking number Y" note formats from any app. |
Dispatchio > Settings > PayPal
| Setting | Type | Default | What it does |
|---|---|---|---|
| Sync tracking to PayPal | checkbox | Disabled |
Sends tracking numbers to PayPal for orders paid with PayPal. |
| Use the PayPal sandbox environment | checkbox | Disabled |
Sandbox mode, for testing with PayPal sandbox credentials. |
| Client ID | text | - | From a REST API app in the PayPal Developer Dashboard. |
| Client Secret | password | - | Stored encrypted. Leave the masked value untouched to keep the current secret. |
Dispatchio > Settings > Stripe
| Setting | Type | Default | What it does |
|---|---|---|---|
| Sync tracking to Stripe | checkbox | Disabled |
Attaches the carrier and tracking number to the Stripe PaymentIntent metadata for orders paid through Stripe. |
| Secret key (optional) | password | - | Stored encrypted. Leave the masked value untouched to keep the current key. With no key entered, the key from the official WooCommerce Stripe gateway is used. |
Dispatchio > Settings > Tools
| Setting | Type | Default | What it does |
|---|---|---|---|
| Send webhook notifications | checkbox | Disabled |
Sends a signed JSON POST to your endpoint when the selected events happen. |
| Endpoint URL | url | - | The address that receives the webhook. |
| Signing secret | password | - | Stored encrypted. Used for the HMAC-SHA256 signature in the X-Dispatchio-Signature header. |
| Tracking added to an order | checkbox | Enabled |
Webhook event. |
| Tracking removed from an order | checkbox | Disabled |
Webhook event. |
| Carrier confirmed delivery | checkbox | Enabled |
Webhook event. |
| Delivery exception / failed attempt | checkbox | Enabled |
Webhook event. |
| From | date | - | Start date for the shipment CSV export. |
| To | date | - | End date for the shipment CSV export. |
WooCommerce > Settings > Emails > Shipped order
| Setting | Type | Default | What it does |
|---|---|---|---|
| Enable/Disable | checkbox | Enabled |
Enable this email notification. |
| Subject | text | - | Email subject. When empty, the placeholder shown is used: `Your {site_title} order #{order_number} has been shipped!` |
| Email heading | text | - | Main heading of the email. When empty, the placeholder shown is used: `Your order has been shipped` |
| Email content | textarea | Hi {customer_first_name}, great news - your order #{order_number} has been shipped. You can track your shipment with the details below. |
The introduction shown above the tracking details. Accepts {tracking_number}, {carrier_name} and {tracking_url}. |
| Additional content | textarea | - | Extra text shown below the main content. |
| Email type | select | HTML |
Plain text, HTML or Multipart. |
WooCommerce > Settings > Emails > Partially shipped order
| Setting | Type | Default | What it does |
|---|---|---|---|
| Enable/Disable | checkbox | Enabled |
Enable this email notification. |
| Subject | text | - | Email subject. When empty, the placeholder shown is used: `Part of your {site_title} order #{order_number} is on the way!` |
| Email heading | text | - | Main heading of the email. When empty, the placeholder shown is used: `Your order has been partially shipped` |
| Email content | textarea | Hi {customer_first_name}, part of your order #{order_number} has been shipped. Track the shipped items below - the rest will follow soon. |
The introduction shown above the tracking details. Accepts {tracking_number}, {carrier_name} and {tracking_url}. |
| Additional content | textarea | - | Extra text shown below the main content. |
| Email type | select | HTML |
Plain text, HTML or Multipart. |
Shortcodes
[dispatchio_tracking_page]
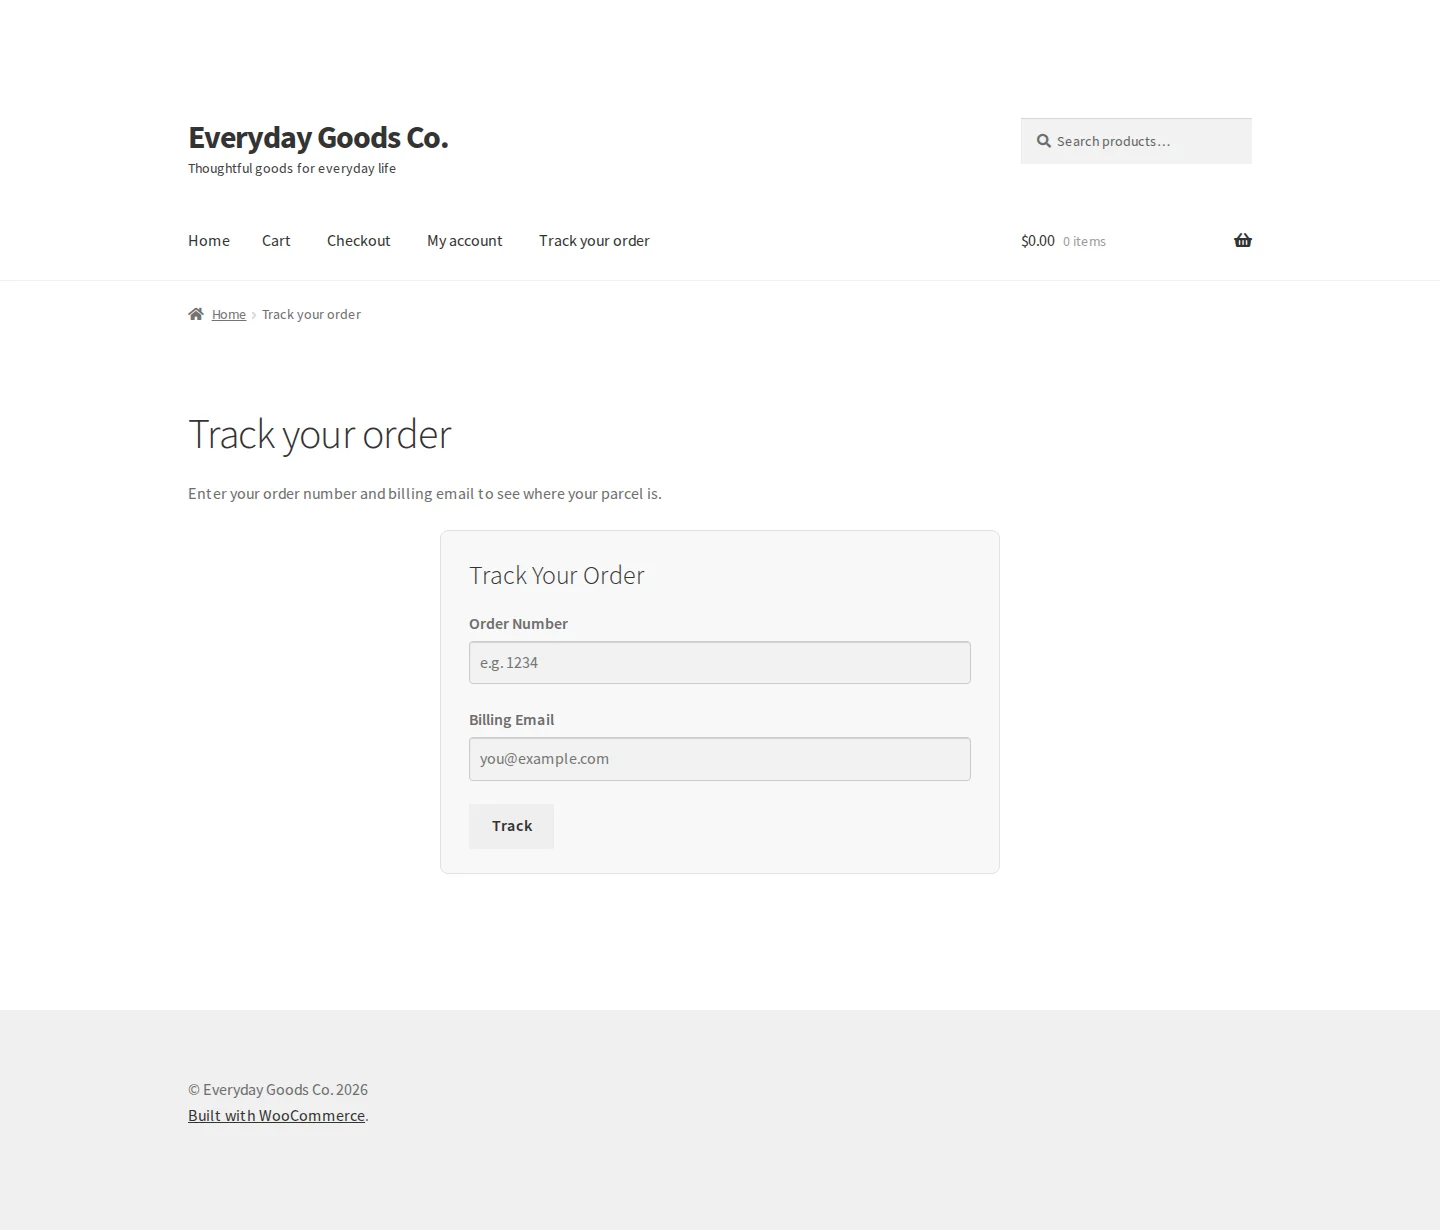
Shows the public order tracking form, where customers enter their order number and billing email to see their shipment and its timeline. Select the page that holds it under Dispatchio > Settings > Automation > Tracking page to turn on shareable tracking links and QR codes.
[dispatchio_tracking_page]On your site
Customers see tracking in several places:
- Tracking page: the page with
[dispatchio_tracking_page]shows a Track Your Order form. The customer enters the Order Number and Billing Email and clicks Track to see where the parcel is, with a shipment timeline. With live tracking enabled, the status and carrier checkpoints appear here too. - Emails: the Shipped, Partially Shipped, Updated Tracking and Delivered emails include tracking details, and so do the WooCommerce emails you tick on the General tab. When a tracking page is selected, shipment emails also include a shareable tracking link and a QR code.
- My Account: tracking appears on the customer order pages when My Account is enabled on the General tab, with live status when live tracking is on.
Frequently asked questions
Do I need the free edition of Dispatchio as well?
No. Dispatchio Pro is a standalone plugin that contains everything in the free edition. If the free edition is installed, activating Pro switches it off automatically, and your settings, carriers and tracking data carry over.
Can I add more than one tracking number to an order?
Yes. You can add several tracking numbers to an order and attach specific products to each one with Ship specific products. On the Fulfillment dashboard, click Split to send an order in several parcels. While some items are still untracked, the order uses the Partially Shipped status.
What if my carrier is not in the list?
Click Add Custom Carrier on the Shipping Carriers tab. For a one-off shipment, choose Custom as the carrier on the order and type the carrier name and tracking link for that shipment only.
Do I need an account with a tracking service for live tracking?
Yes. Live tracking uses TrackShip, 17TRACK or AfterShip. You need an account with the provider you choose, and they bill you directly. Without live tracking, you can still mark orders Delivered yourself or use Auto-mark delivered on the Automation tab.
I am moving from another tracking plugin. Do I need to import my tracking numbers?
No. Dispatchio reads and writes the same order meta key used by other popular tracking plugins, so tracking numbers already on your orders show up straight away. Deactivate the old plugin and your tracking history stays intact.
Will deleting the plugin remove tracking from my orders?
No. Order tracking data is always kept. Settings and tables are removed only if you tick Delete data on uninstall on the General tab before deleting the plugin.
Does Dispatchio send data to outside services?
Only for features you enable with your own credentials: live tracking (TrackShip, 17TRACK or AfterShip), PayPal sync and Stripe sync. When you select a tracking page, QR images in shipment emails are generated by goQR.me using the tracking link only. To avoid that service, return your own generator address from the dispatchio_qr_image_url filter, or leave the tracking page unset.
Can vendors on a marketplace add tracking?
Yes. Dispatchio Pro supports Dokan and WCFM, so vendors can add tracking from their own dashboards.
Troubleshooting
- The plugin does not activate or the Dispatchio menu is missing
Dispatchio requires WooCommerce 5.2 or later. Install and activate WooCommerce first, then activate Dispatchio Pro under Plugins.
- A carrier does not appear in the carrier dropdown on an order
Go to Dispatchio > Settings > Shipping Carriers, find the carrier with Search carriers... and tick its Active box. Only active carriers appear in the dropdown.
- An order is missing from the Fulfillment dashboard
The dashboard only shows orders in the statuses ticked under Dispatchio > Settings > Automation > Unfulfilled statuses. For example, tick On hold if you also want on-hold orders listed, then click Save Automation Settings.
- Live tracking statuses are not updating
On the Live Tracking tab, check that Enable live delivery tracking is ticked, the right Provider is selected and the API key is saved. Click Test API Key, then Sync All Now. Paste the Webhook URL into your provider dashboard for instant updates. Shipments older than Stop polling after (days) are no longer polled.
- The scheduled FTP import does not pick up files
Make sure Enable scheduled import is ticked and that Host contains only the hostname or IP, with no protocol prefix or path. Click Test Connection, check the Remote path and File prefix filter, then click Run Import Now. With Logging enabled on the General tab, details appear under WooCommerce > Status > Logs. Files use the same format as a manual CSV import, including the header row.
- Tracking is not reaching PayPal
On the PayPal tab, confirm Sync tracking to PayPal is ticked and click Test Credentials. Tick Use the PayPal sandbox environment only when you use sandbox credentials. Map each carrier to its PayPal carrier code on the Shipping Carriers tab. A failed sync is queued and retried hourly, up to five attempts.