

Overview
Dispatchio adds shipment tracking to your WooCommerce orders. When you add a tracking number to an order, Dispatchio can set the right order status, email the customer a tracking link and show the shipment on their order page under My Account.
The plugin adds four optional order statuses: Shipped, Partially Shipped, Updated Tracking and Delivered. Each one is a real WooCommerce order status with its own customer email. You can add as many tracking numbers to an order as you need, ship part of an order, add a short shipping note and mark a tracking number as a return. It comes with built-in carriers that already have tracking URLs, and you can add your own.
Dispatchio is for WooCommerce store owners and fulfillment staff who want a simple shipping routine. It also imports tracking from a CSV file and offers REST API endpoints. The free plugin makes no outbound network requests and needs no account with a tracking service.
Requirements
- WordPress 6.2 or later
- PHP 7.4 or later
- WooCommerce 5.2 or later (required plugin, installed and active)
- Works with WooCommerce High Performance Order Storage (HPOS) and with the classic order tables
Installation
Dispatchio is a free plugin on WordPress.org. It needs WooCommerce, so install and activate WooCommerce first.
Make sure WooCommerce is installed and active.
In your WordPress dashboard, go to Plugins > Add New.
Search for
Dispatchio Shipment Tracking for WooCommerce.Click Install Now on the Dispatchio plugin, then click Activate.
The setup wizard opens automatically. Pick your carriers and confirm the order statuses you want. After that, you can find everything under Dispatchio in the admin menu.
Quick start
- Finish the setup wizard
The setup wizard opens once, right after activation. Pick the carriers you ship with and confirm the order statuses you want to use.
- Choose your carriers
Go to Dispatchio > Settings and open the Shipping Carriers tab. Tick Active for each carrier you actually ship with. Only ticked carriers appear in the carrier dropdown on an order.
- Confirm your order statuses
On the General tab, check which of the Shipped, Partially Shipped, Updated Tracking and Delivered statuses you want. Click Save Settings.
- Set the wording of your shipment emails
Open WooCommerce > Settings > Emails and edit the Dispatchio emails, for example Shipped order. You can change the subject, heading and content.
- Add tracking to an order
Open any order and find the Dispatchio box. Choose a carrier, type or scan the tracking number and press Add Tracking. The customer gets the email for the status you picked and can see the shipment under My Account.
#Setup wizard
When you activate Dispatchio for the first time, a setup wizard opens automatically. It is shown once.
Use it to:
- pick the carriers you ship with
- confirm the order statuses you want
You can change these choices later on the General and Shipping Carriers tabs under Dispatchio > Settings.
#Adding tracking to an order
Open an order in WooCommerce and use the Dispatchio box on the order edit screen. You can add as many tracking numbers to one order as you need. Shipments you already added show above the form, with their tracking link and estimated delivery date.
| Field | What it does |
|---|---|
| Carrier | The shipping company. Choosing Custom lets you type a one-off carrier name and tracking link for this shipment only, without adding it to your carrier list. |
| Tracking number | The number from the label. If you leave the carrier empty, Dispatchio tries to work it out from the number format and fills it in. This makes barcode scanning quick. |
| Date shipped | Defaults to today. It is shown to the customer and used to calculate the estimated delivery date. |
| Shipping note | A short line the customer sees next to this tracking number, for example "Sent in two parcels". |
| Order status | What the order becomes once the tracking is saved. Leave it as no change to add a tracking number quietly, without emailing the customer. |
| Ship specific products | Tick this to attach only some items to this tracking number. Dispatchio remembers what is already covered, so the remaining quantity is what is left to ship. |
| This is a return | Records an inbound return label. Return tracking never changes the order status and is labelled as a return for your staff. |
Finding orders by tracking number
With Orders list column turned on, the WooCommerce orders list shows a Tracking column. To find an order from its tracking number:
- With High Performance Order Storage, choose Tracking number in the search dropdown next to the search box, then search.
- With the classic order tables, the normal order search already matches tracking numbers.
#General settings
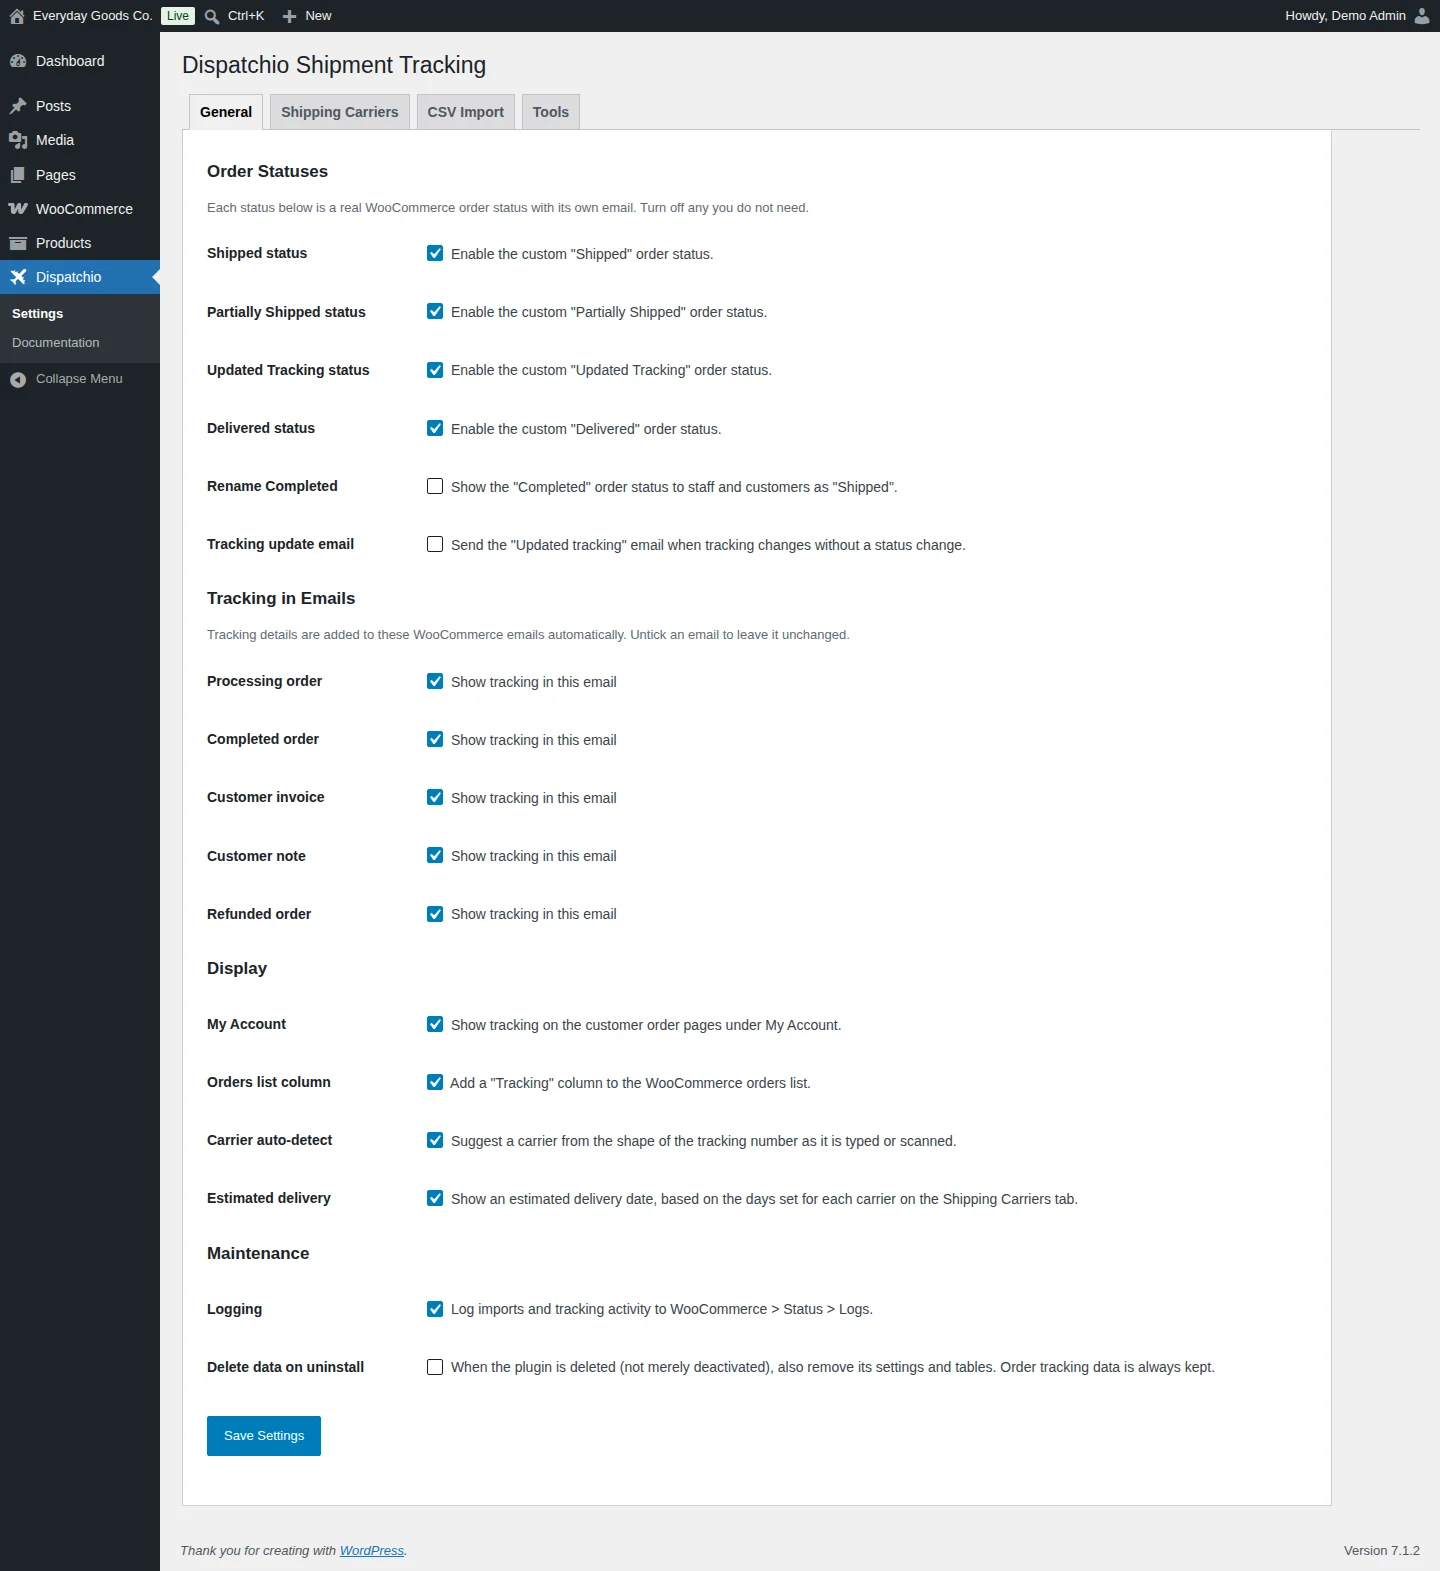
Go to Dispatchio > Settings and open the General tab. The same screen opens when you click Dispatchio in the admin menu. Click Save Settings when you are done.
Order Statuses
Each status is a real WooCommerce order status with its own email. Turn off any you do not need.
- Shipped status: the normal end state for a fulfilled order.
- Partially Shipped status: used automatically when some items have tracking and some do not. The order moves to Shipped by itself once the last item is covered.
- Updated Tracking status: for a shipment that gets a replacement tracking number after it has already gone out, so the customer is told about the new number.
- Delivered status: marks an order as arrived and sends the Delivered email. In the free plugin you set this status yourself.
- Rename Completed: shows the standard Completed status as "Shipped" to staff and customers. The underlying status does not change, so reports and other plugins are not affected.
- Tracking update email: sends the Updated Tracking email when tracking changes on an order that is already shipped, even if the status stays the same.
Tracking in Emails
Dispatchio adds a tracking block to the WooCommerce emails you tick here: Processing order, Completed order, Customer invoice, Customer note and Refunded order. Untick an email to leave it exactly as WooCommerce sends it. This is separate from Dispatchio's own shipment emails.
Display
- My Account: shows tracking on the customer order pages. Turn it off only if your theme shows tracking its own way.
- Orders list column: adds a Tracking column to the WooCommerce orders list.
- Carrier auto-detect: suggests a carrier from the tracking number format. It only fills an empty carrier field, so it never overwrites your choice.
- Estimated delivery: shows an expected arrival date, worked out from the ship date plus the Est. days value of the carrier.
Maintenance
- Logging: writes import and tracking activity to WooCommerce > Status > Logs. This is the first place to look when an import behaves oddly.
- Delete data on uninstall: when on, deleting the plugin also removes its settings and tables. Tracking numbers stored on orders are always kept.
#Shipping Carriers
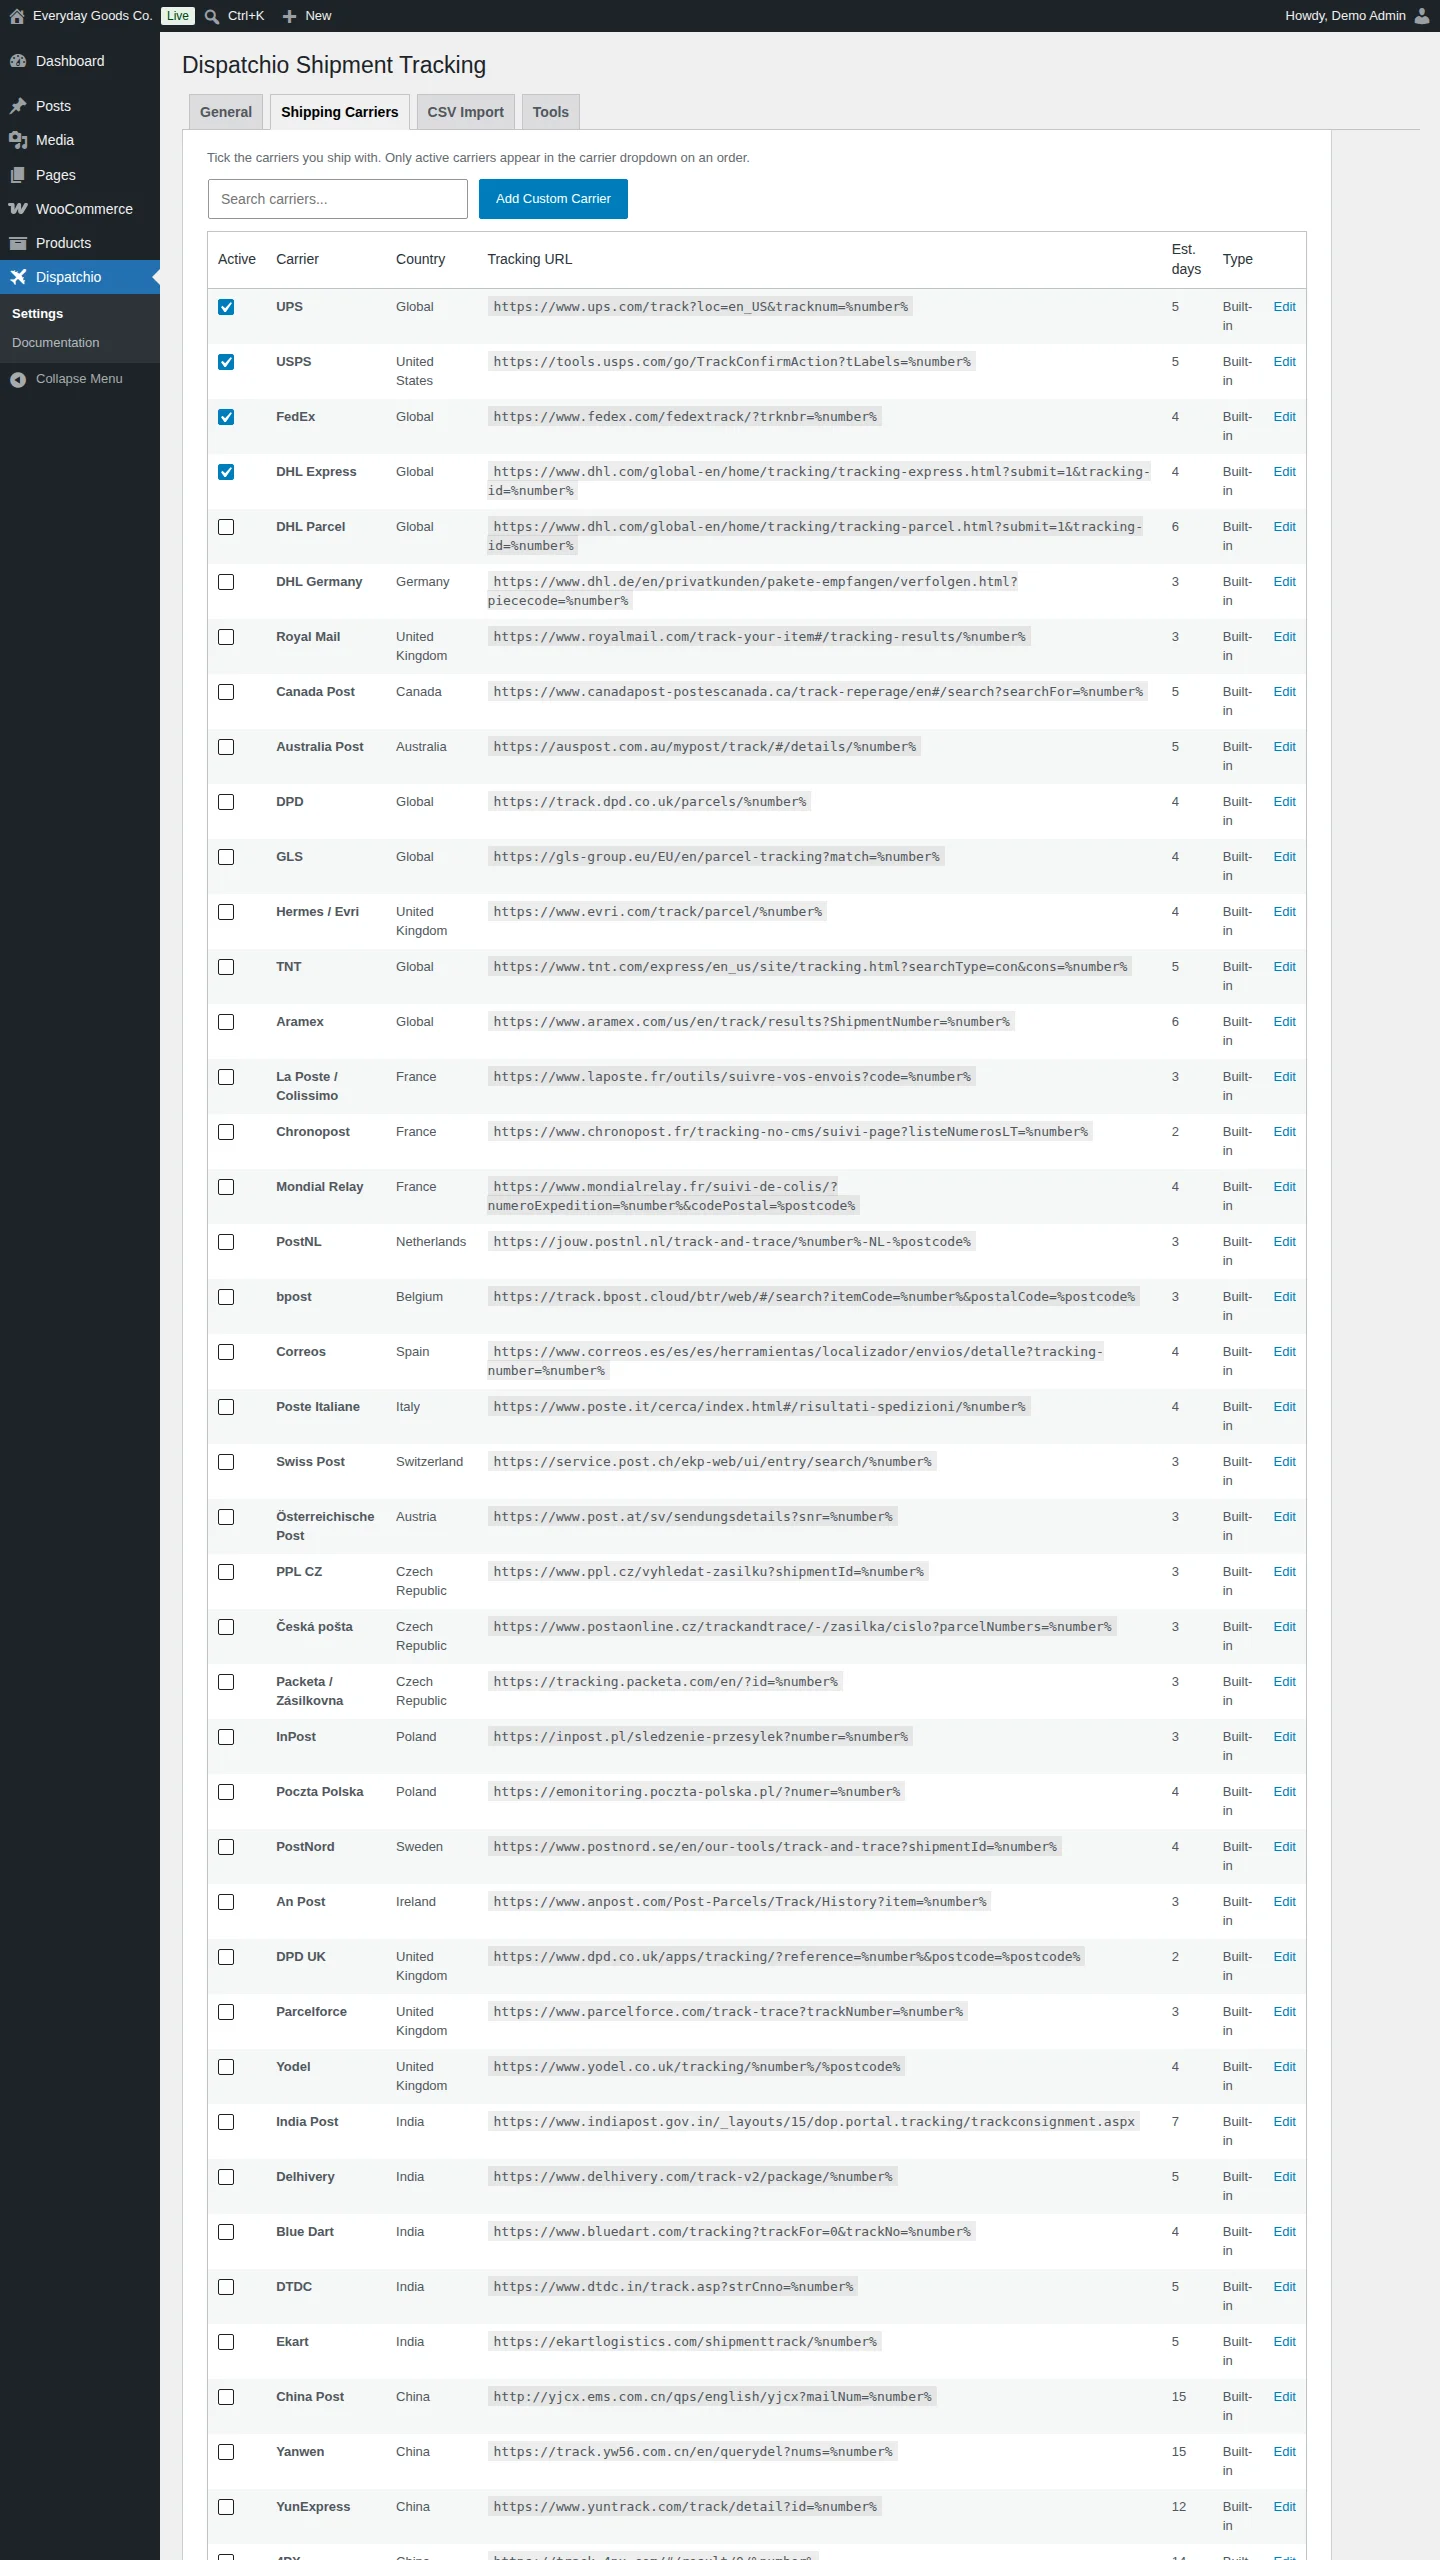
Go to Dispatchio > Settings > Shipping Carriers to choose the carriers you ship with. The table lists each carrier with its Carrier name, Country, Tracking URL, Est. days and Type (built-in or custom).
- Tick Active for the carriers you use. Only active carriers appear in the carrier dropdown on an order. If you untick a carrier, it does not appear anywhere. A short list makes fulfillment faster.
- Use Search carriers... to filter a long list.
- Click Edit on a row to change a carrier.
- Click Add Custom Carrier to add a carrier that is not in the list.
When you edit or add a carrier, you can set:
- Carrier name: what staff and customers see. If you rename a built-in carrier, it keeps its original name underneath, so imports that use the official name still match.
- Tracking URL: the link pattern. Use
%number%for the tracking number, and%postcode%or%phone%for carriers that need them. - API aliases: other spellings of this carrier, comma separated. For example, if your warehouse CSV says
usps-priorityand you call the carrier "USPS", add the alias here so the import matches. - PayPal carrier code: only used by Dispatchio Pro when it syncs tracking to PayPal. You can leave it alone.
- Estimated delivery days: typical transit time in days, used for the estimated delivery date.
0means no estimate is shown.
#CSV Import
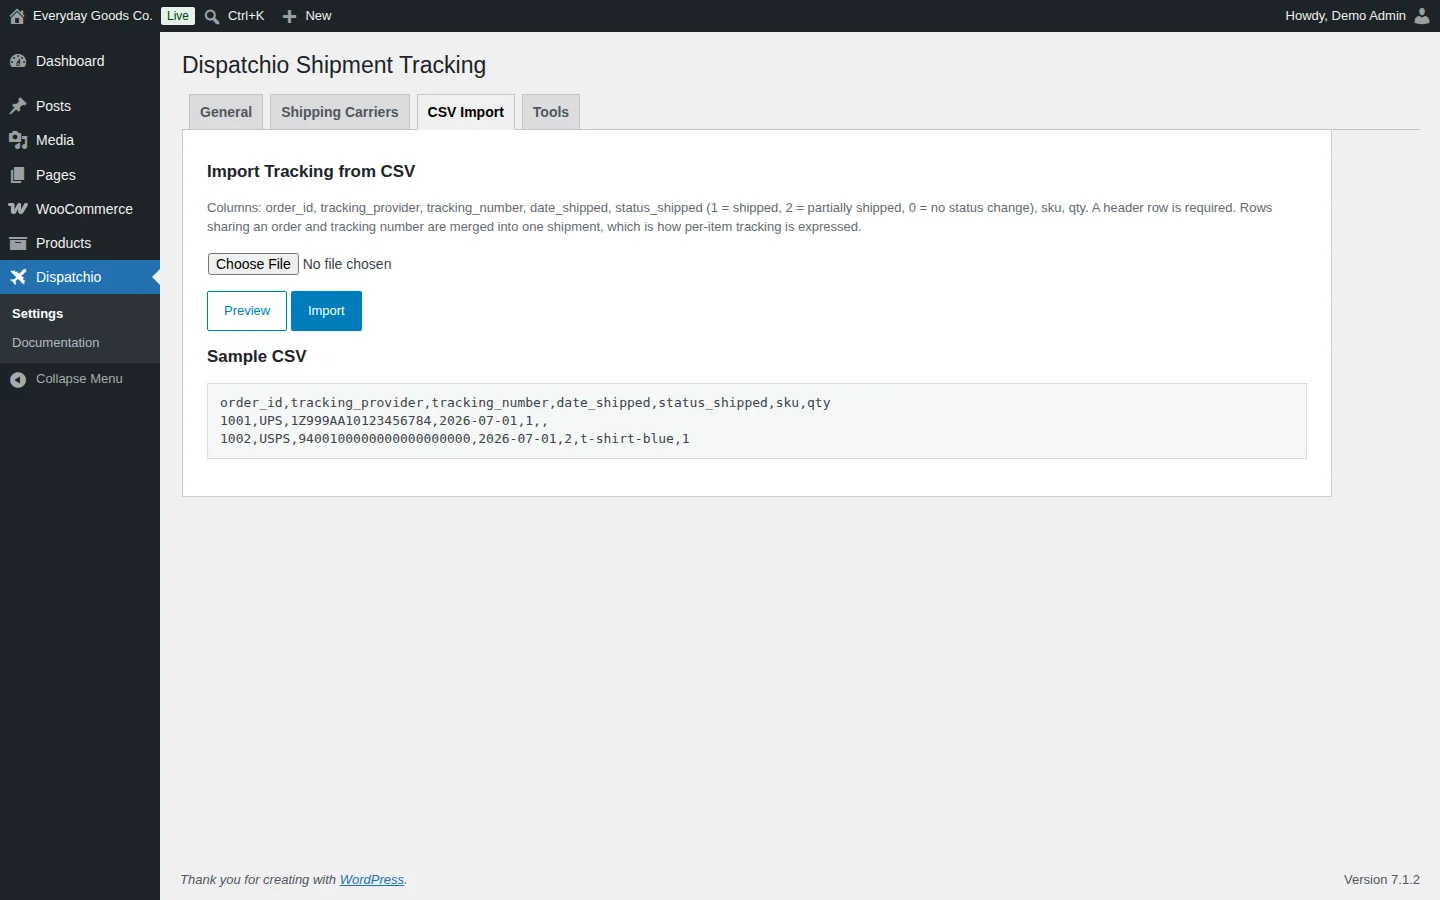
Go to Dispatchio > Settings > CSV Import to add tracking to many orders at once.
- Prepare a CSV file with a header row. The columns are
order_id,tracking_provider,tracking_number,date_shipped,status_shipped,skuandqty. - For
status_shipped, use1for shipped,2for partially shipped or0for no status change. - Click Choose File and select your file.
- Click Preview first. It shows the first rows exactly as Dispatchio read them, so you can catch a wrong delimiter or a shifted header before anything is written to your orders.
- When the preview looks right, click Import.
Rows that share an order and a tracking number are merged into one shipment. Use the sku and qty columns for per-item tracking. The import has duplicate protection. Uploaded files are size-capped, checked, stored in a folder that blocks direct web access and deleted once processed.
The tab shows a sample file you can copy:
order_id,tracking_provider,tracking_number,date_shipped,status_shipped,sku,qty
1001,UPS,1Z999AA10123456784,2026-07-01,1,,
1002,USPS,9400100000000000000000,2026-07-01,2,t-shirt-blue,1
#Tools
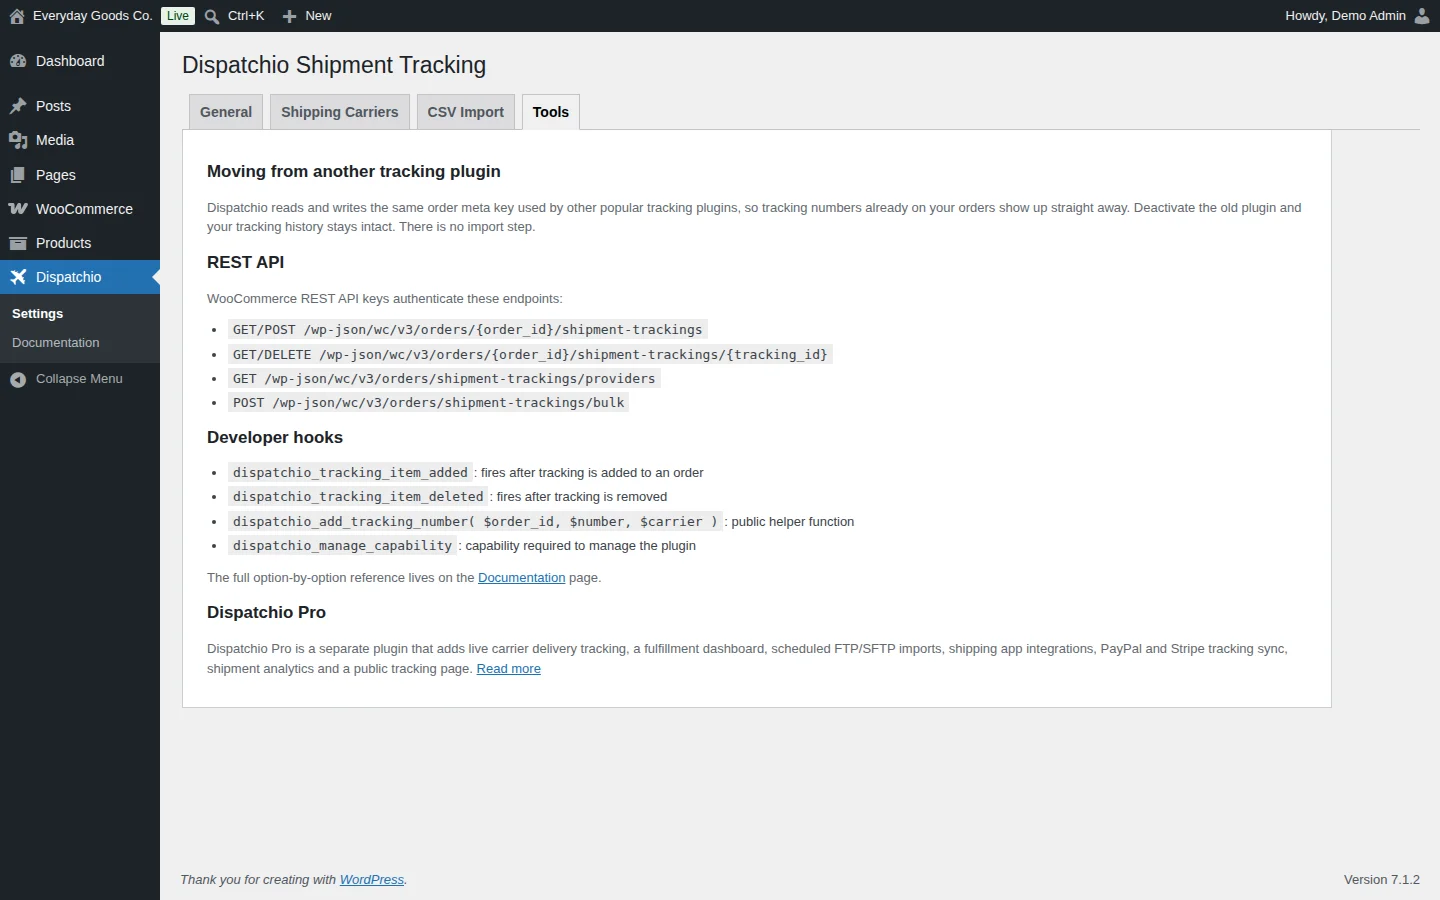
The Tools tab under Dispatchio > Settings covers moving from another plugin, the REST API and developer hooks.
Moving from another tracking plugin
Dispatchio reads and writes the same order meta key used by other popular tracking plugins. Tracking numbers already on your orders show up straight away. Deactivate the old plugin and your tracking history stays intact. There is no import step.
REST API
These endpoints are authenticated with standard WooCommerce REST API keys:
GET/POST /wp-json/wc/v3/orders/{order_id}/shipment-trackingsGET/DELETE /wp-json/wc/v3/orders/{order_id}/shipment-trackings/{tracking_id}GET /wp-json/wc/v3/orders/shipment-trackings/providersPOST /wp-json/wc/v3/orders/shipment-trackings/bulk
Developer hooks
dispatchio_tracking_item_added: fires after tracking is added to an orderdispatchio_tracking_item_deleted: fires after tracking is removeddispatchio_add_tracking_number( $order_id, $number, $carrier ): public helper functiondispatchio_manage_capability: capability required to manage the plugin
The full reference is on the Documentation page.
#Shipment emails
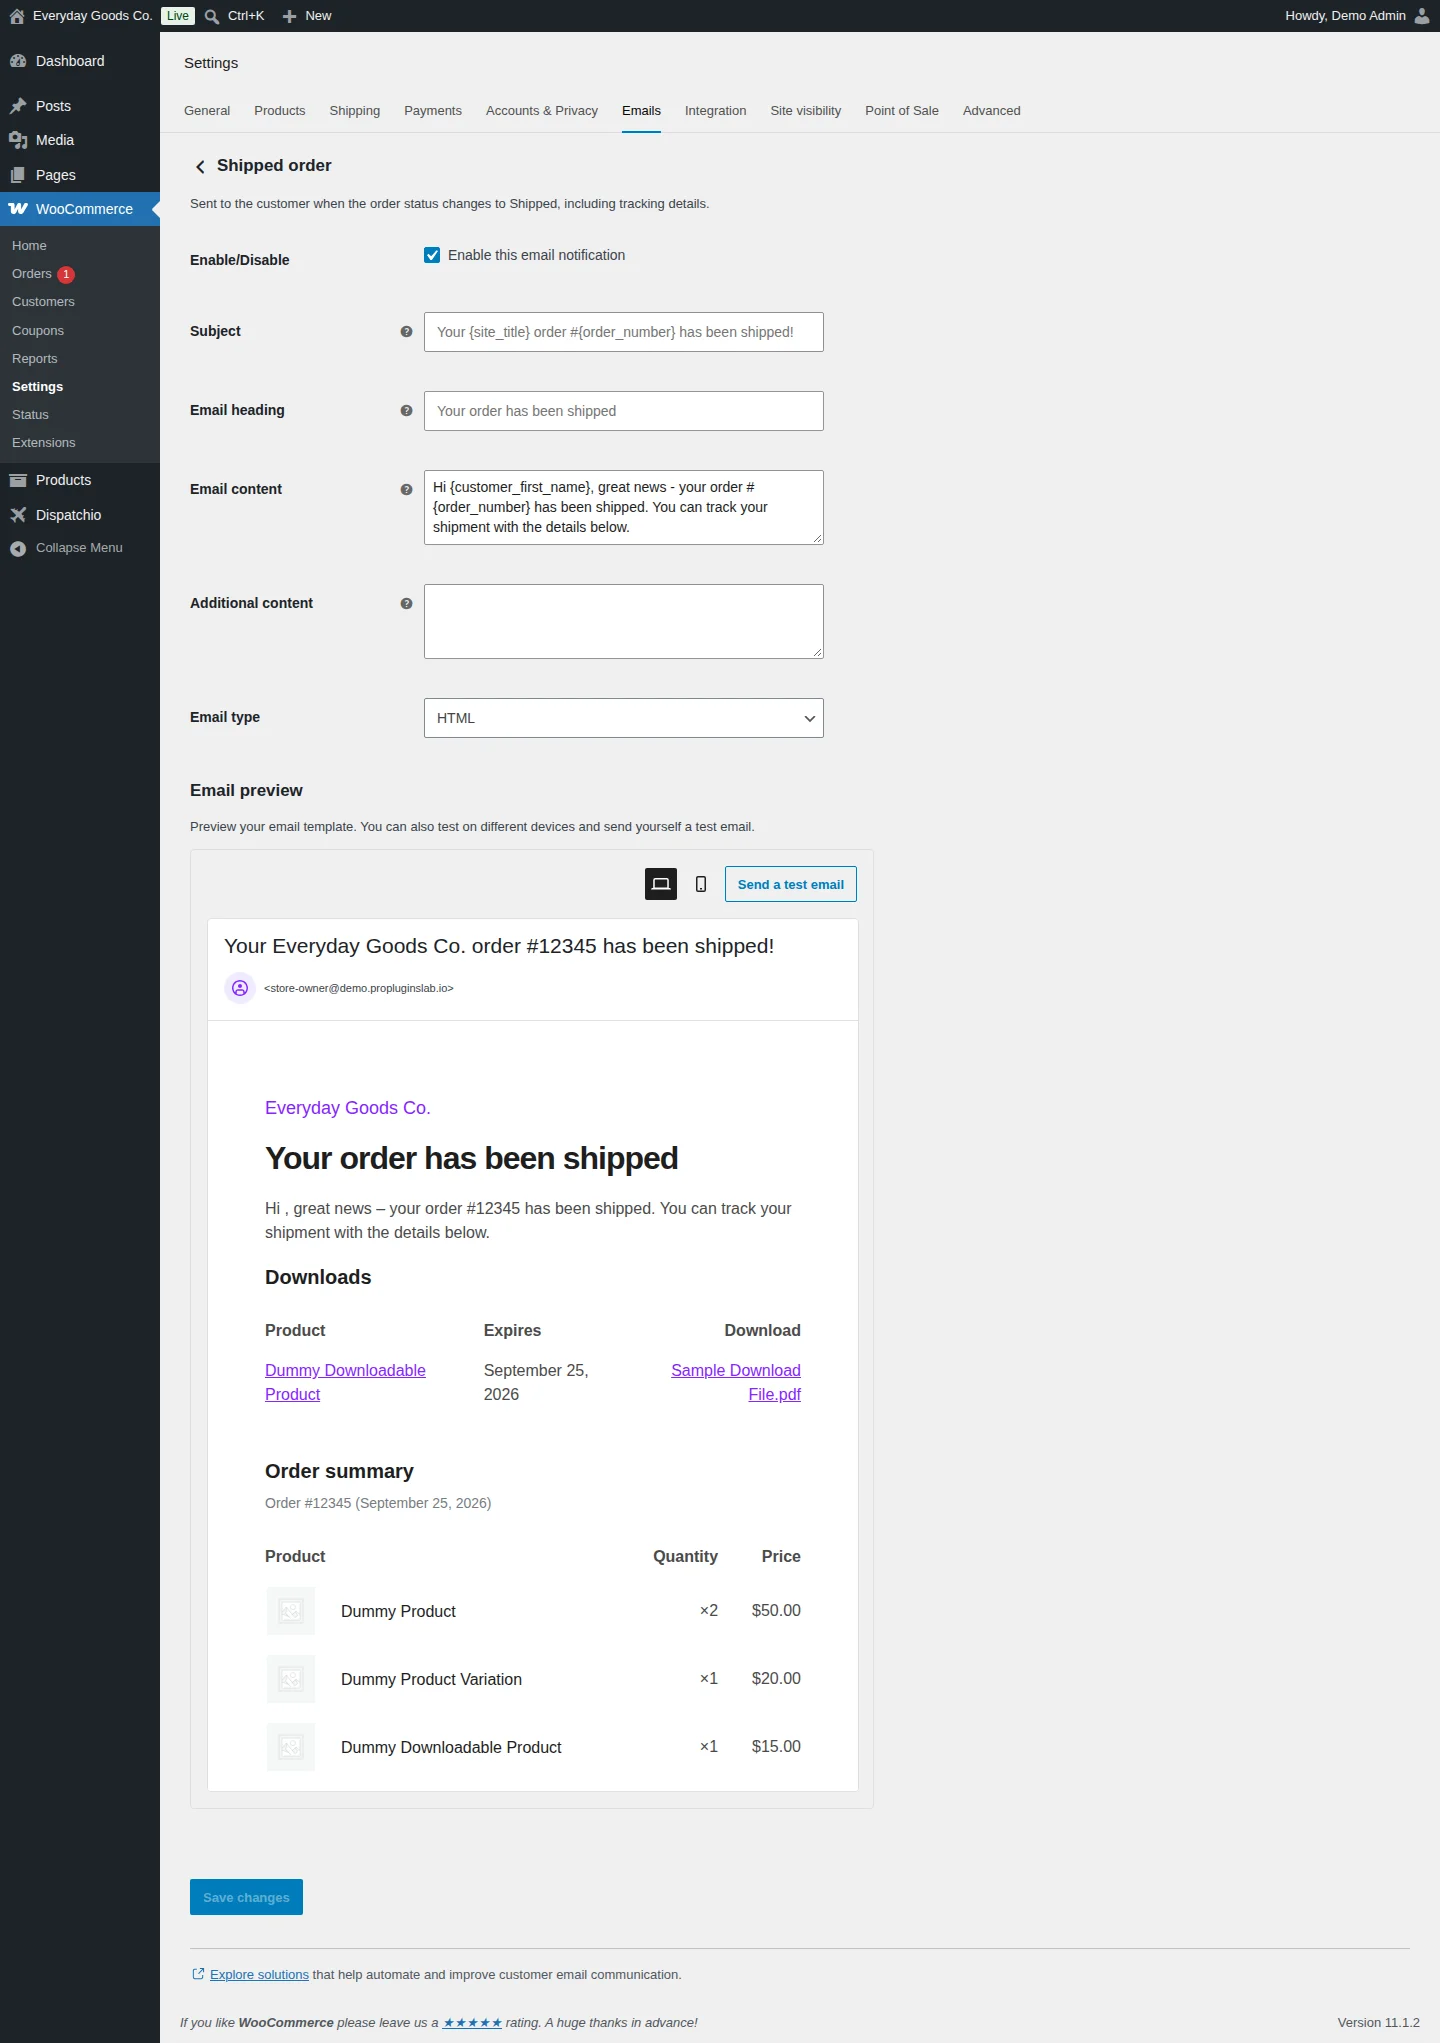
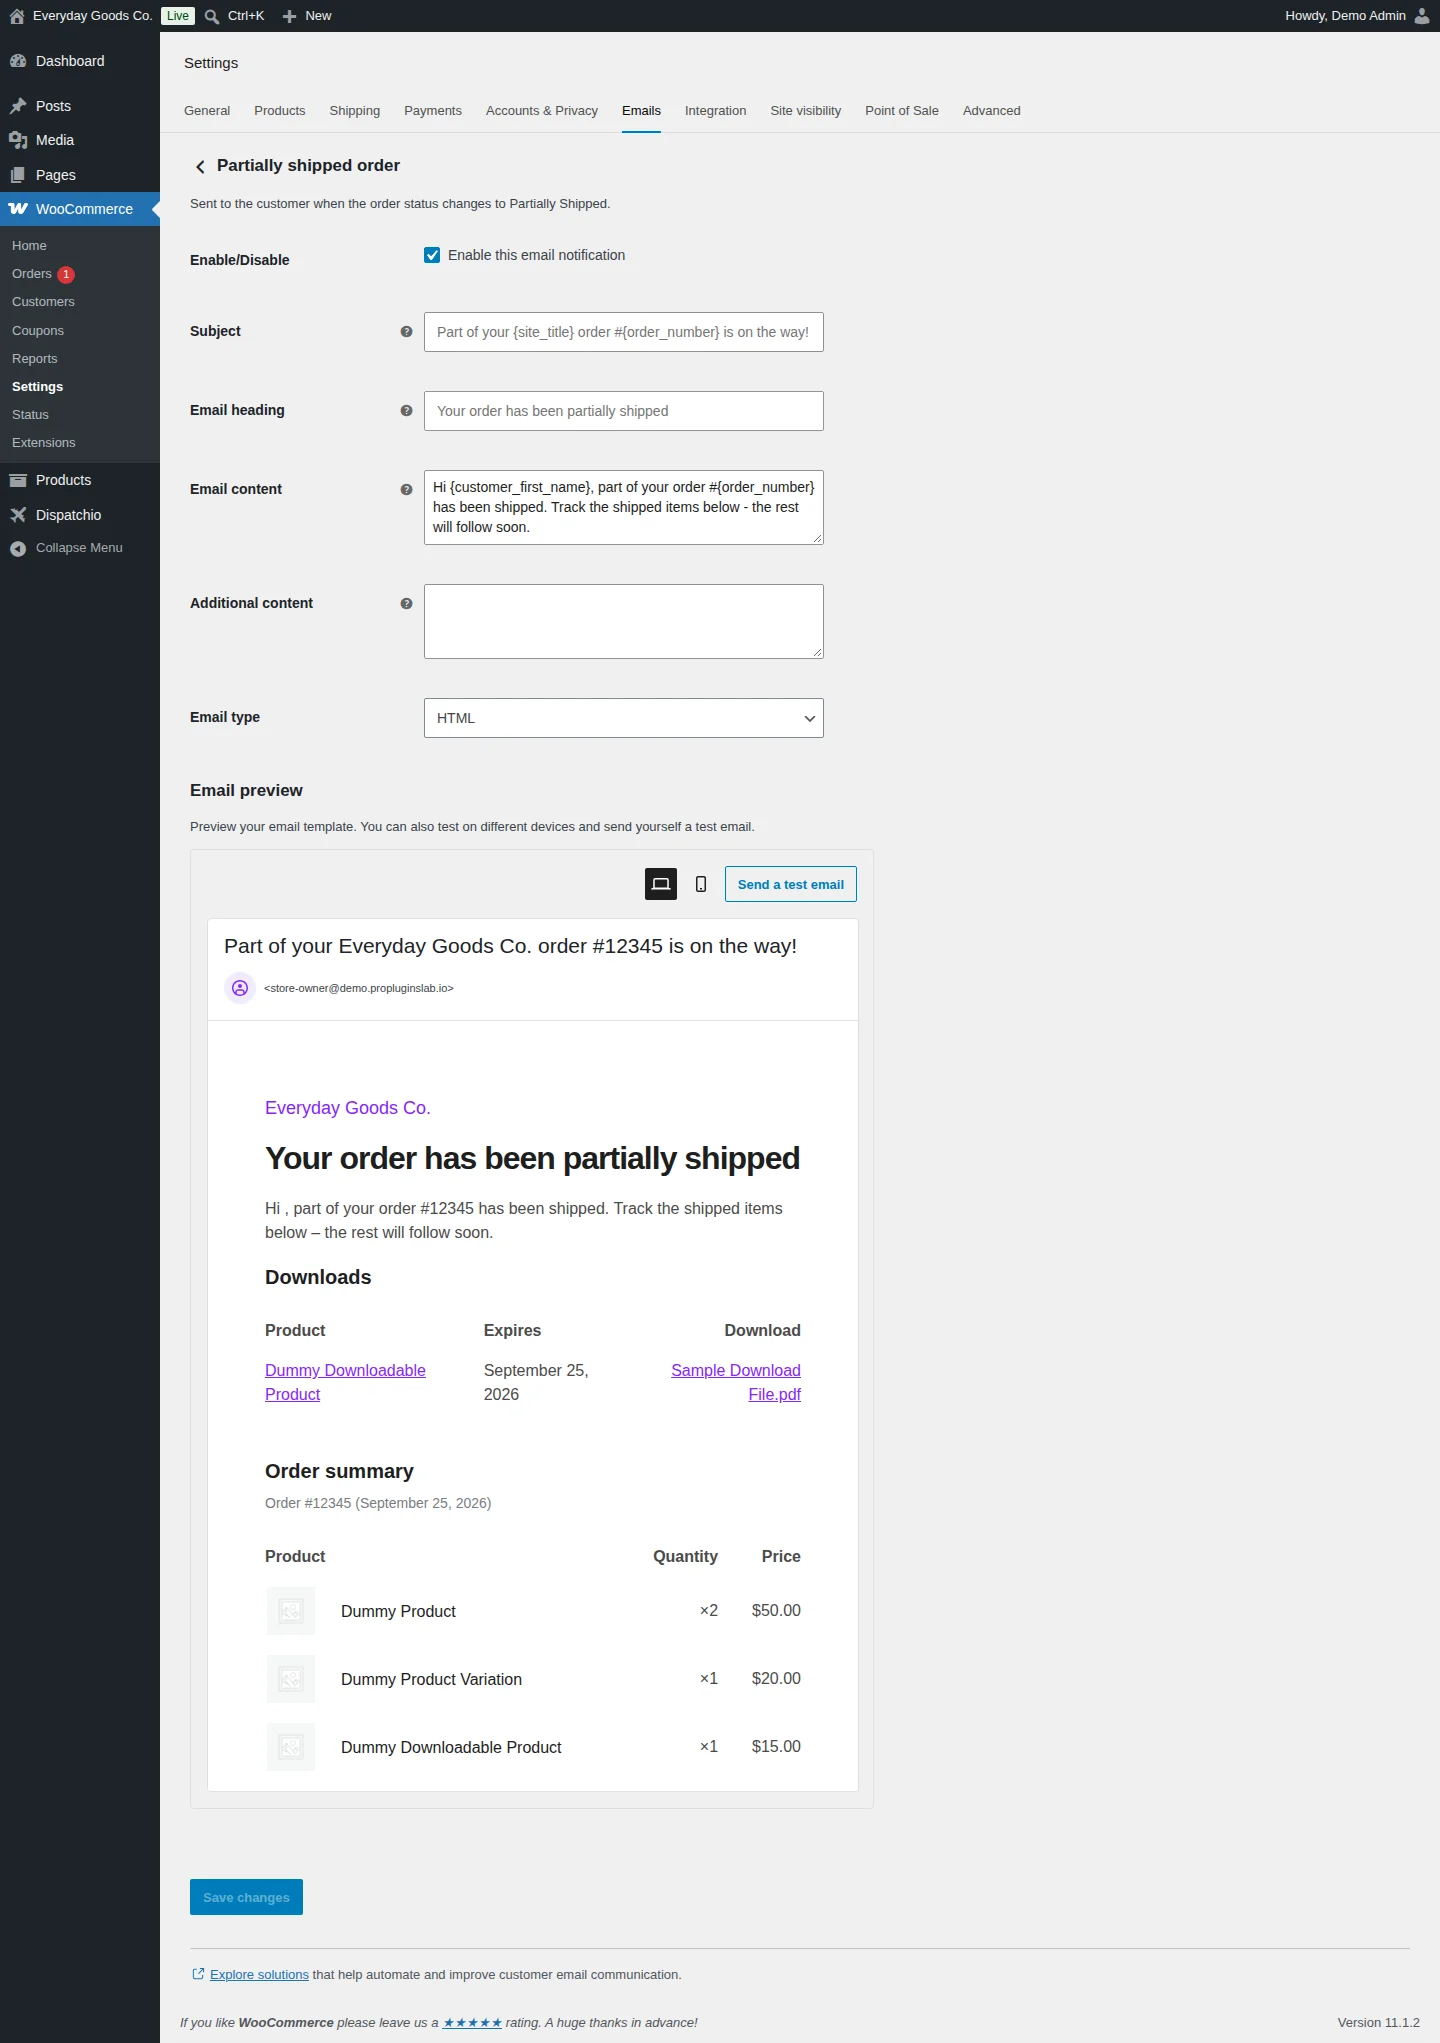
Each Dispatchio order status has its own customer email. You edit them under WooCommerce > Settings > Emails, like any other WooCommerce email. For example:
- Shipped order is sent when the order status changes to Shipped, including tracking details.
- Partially shipped order is sent when the order status changes to Partially Shipped.
For each email you can turn it on or off and set the Subject, Email heading, Email content, Additional content and Email type. The Email preview shows how the email looks, and Send a test email sends a copy to you.
You can use these placeholders in the subject, heading, email content and additional content:
{tracking_number},{carrier_name}and{tracking_url}, which use the most recent outbound shipment on the order{order_number}and{customer_first_name}
For example, a subject could be Your order #{order_number} is on its way with {carrier_name}.
#Documentation page
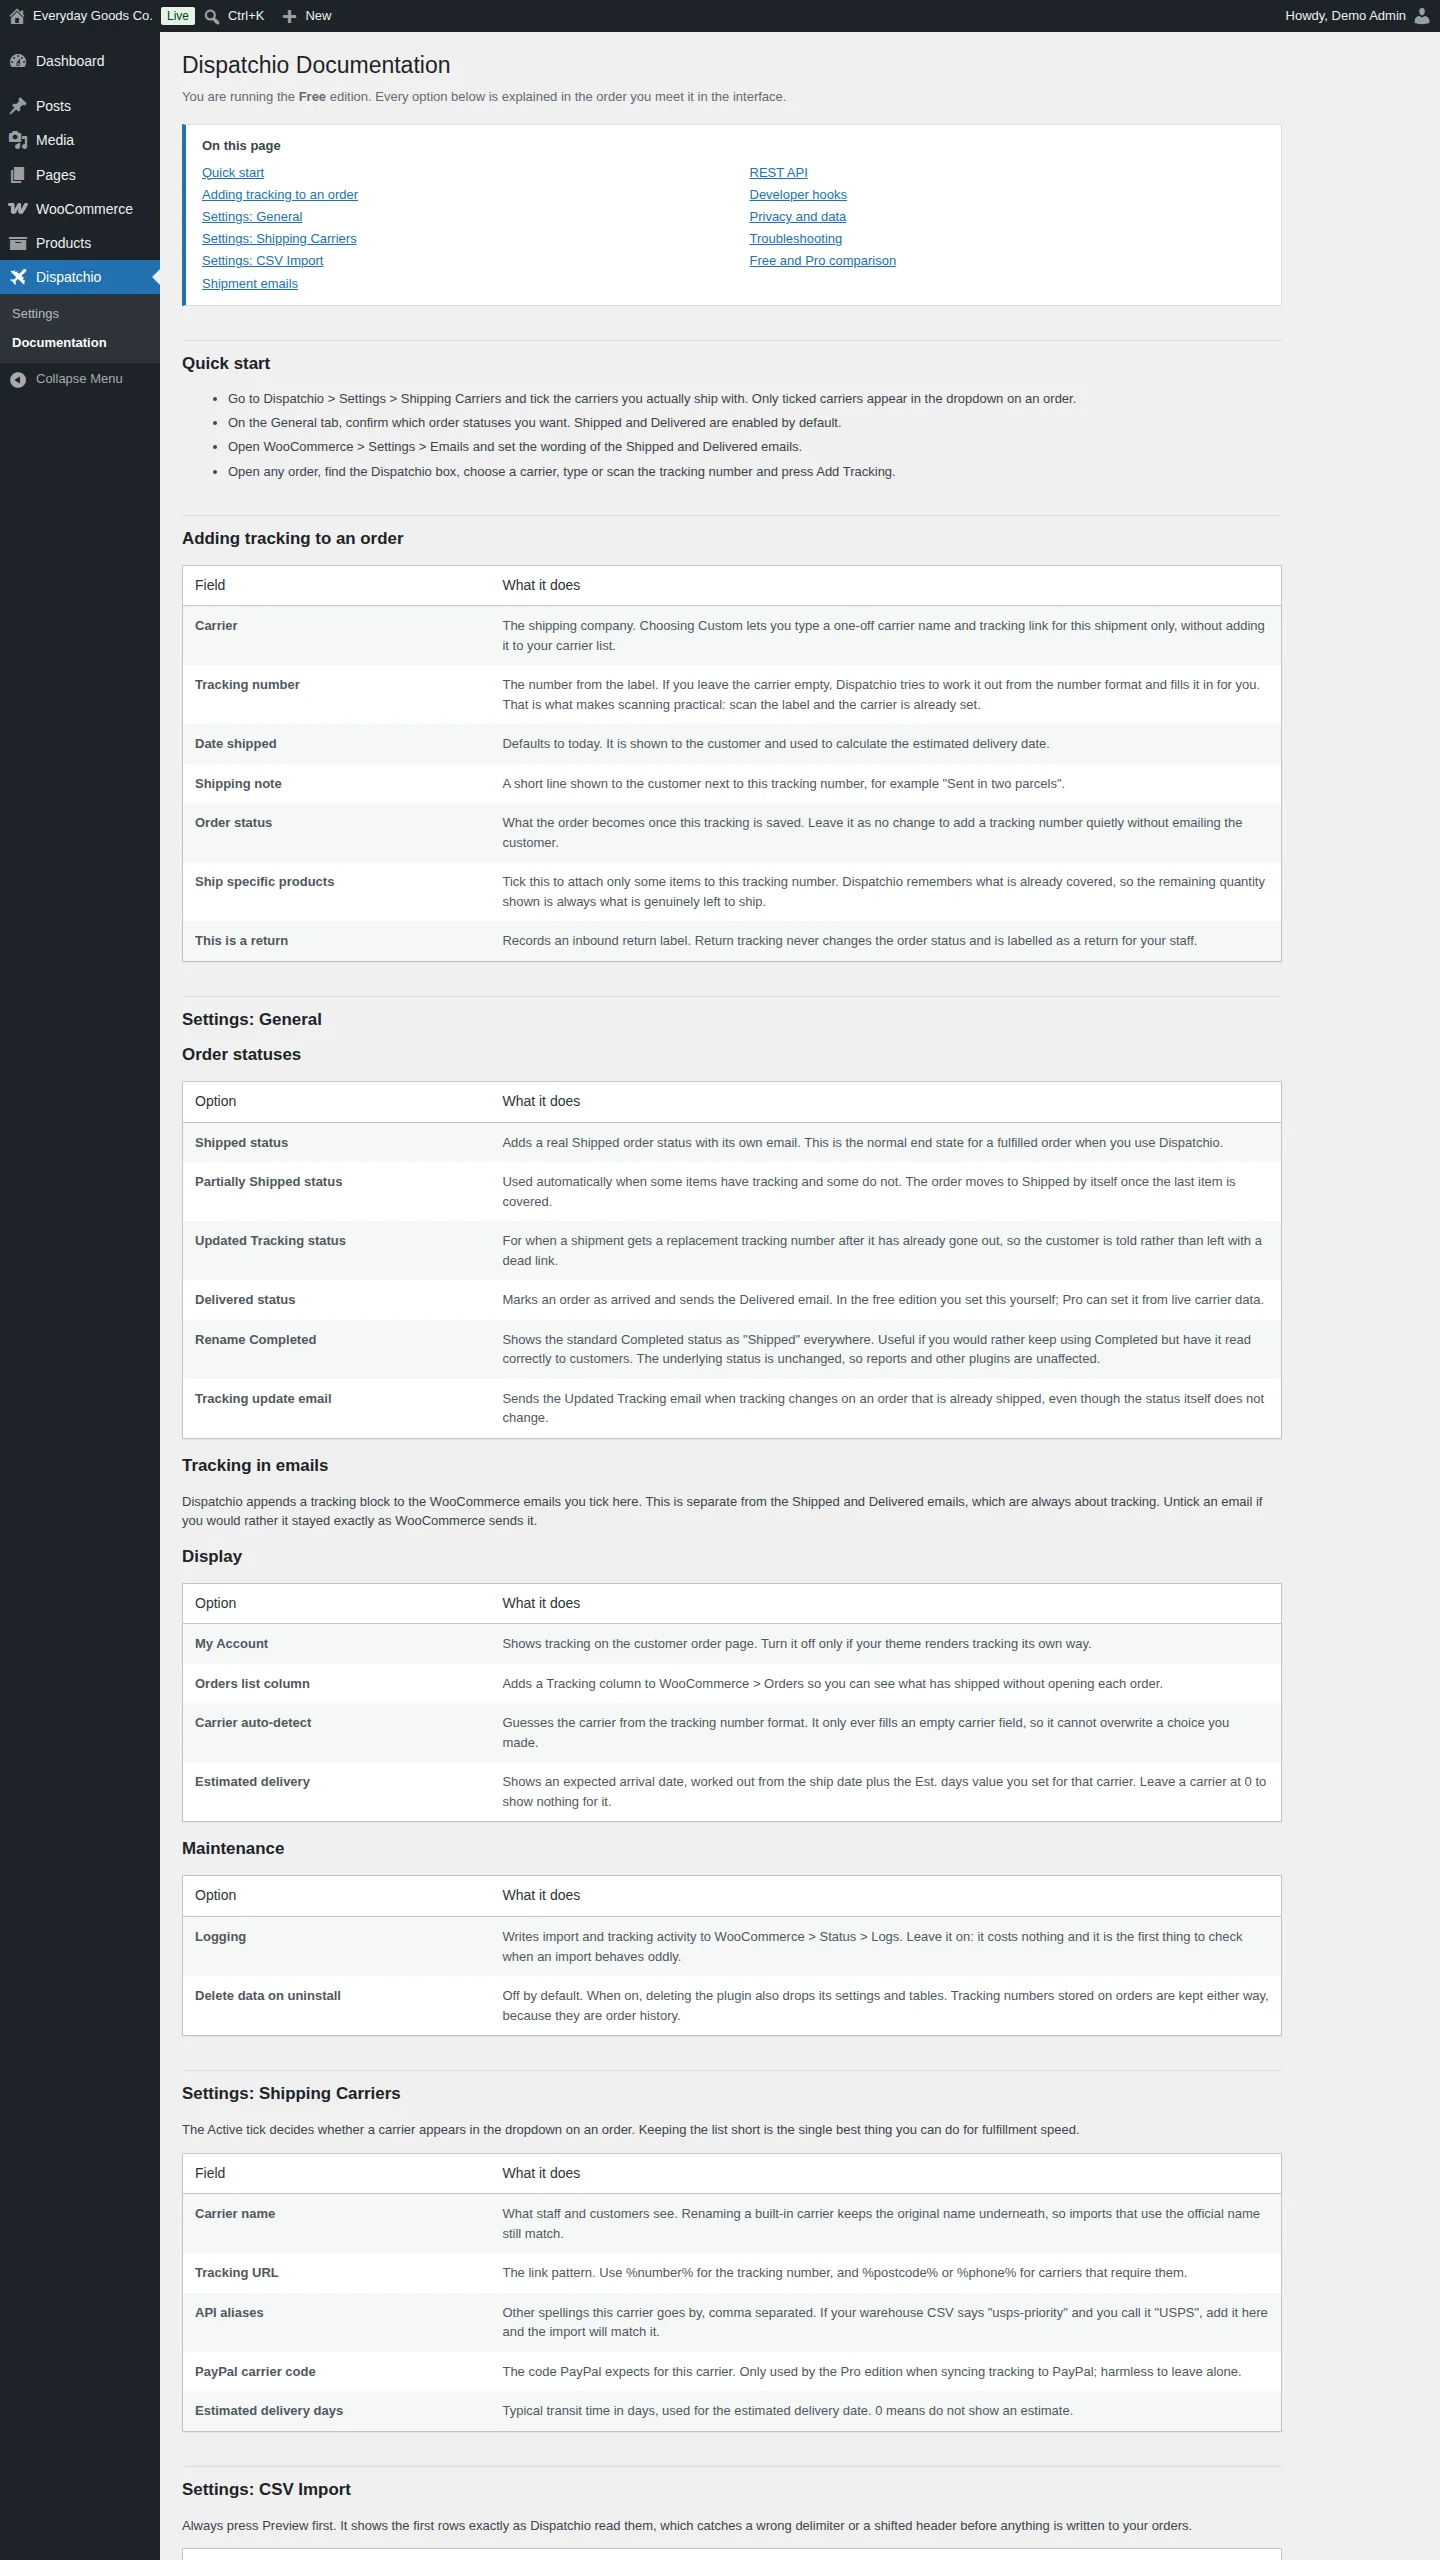
Dispatchio has a built-in help page under Dispatchio > Documentation. It explains every setting in the order you meet it in the plugin, plus the CSV format, shipment emails, the REST API, developer hooks, privacy and data, and troubleshooting. It also includes a side by side comparison of the free plugin and Dispatchio Pro.
Settings reference
Dispatchio > Settings > General
| Setting | Type | Default | What it does |
|---|---|---|---|
| Enable the custom "Shipped" order status. | checkbox | Enabled |
Shipped status: adds a real Shipped order status with its own email. |
| Enable the custom "Partially Shipped" order status. | checkbox | - | Partially Shipped status: used when some items have tracking and some do not. The order moves to Shipped once the last item is covered. |
| Enable the custom "Updated Tracking" order status. | checkbox | - | Updated Tracking status: for a shipment that gets a replacement tracking number after it has gone out. |
| Enable the custom "Delivered" order status. | checkbox | Enabled |
Delivered status: marks an order as arrived and sends the Delivered email. You set it yourself in the free plugin. |
| Show the "Completed" order status to staff and customers as "Shipped". | checkbox | Disabled |
Rename Completed: changes only the label. The underlying status stays Completed. |
| Send the "Updated tracking" email when tracking changes without a status change. | checkbox | Disabled |
Tracking update email: emails the customer when tracking changes on an order that is already shipped. |
| Show tracking in this email | checkbox | Enabled |
Processing order: adds the tracking block to the WooCommerce Processing order email. |
| Show tracking in this email | checkbox | Enabled |
Completed order: adds the tracking block to the WooCommerce Completed order email. |
| Show tracking in this email | checkbox | Enabled |
Customer invoice: adds the tracking block to the WooCommerce Customer invoice email. |
| Show tracking in this email | checkbox | Enabled |
Customer note: adds the tracking block to the WooCommerce Customer note email. |
| Show tracking in this email | checkbox | Enabled |
Refunded order: adds the tracking block to the WooCommerce Refunded order email. |
| Show tracking on the customer order pages under My Account. | checkbox | Enabled |
My Account: turn it off only if your theme shows tracking its own way. |
| Add a "Tracking" column to the WooCommerce orders list. | checkbox | Enabled |
Orders list column: see what has shipped without opening each order. |
| Suggest a carrier from the shape of the tracking number as it is typed or scanned. | checkbox | Enabled |
Carrier auto-detect: only fills an empty carrier field, so it never overwrites your choice. |
| Show an estimated delivery date, based on the days set for each carrier on the Shipping Carriers tab. | checkbox | Enabled |
Estimated delivery: ship date plus the carrier's Est. days. A carrier set to 0 shows no estimate. |
| Log imports and tracking activity to WooCommerce > Status > Logs. | checkbox | Enabled |
Logging: the first place to check when an import behaves oddly. |
| When the plugin is deleted (not merely deactivated), also remove its settings and tables. Order tracking data is always kept. | checkbox | Disabled |
Delete data on uninstall: tracking numbers stored on orders are kept either way. |
Dispatchio > Settings > Shipping Carriers
| Setting | Type | Default | What it does |
|---|---|---|---|
| Search carriers... | search | - | Filters the carrier table as you type. |
| UPS | checkbox | - | The Active tick for a carrier row. Only active carriers appear in the carrier dropdown on an order. Every carrier row has its own tick. |
WooCommerce > Settings > Emails > Shipped order
| Setting | Type | Default | What it does |
|---|---|---|---|
| Enable/Disable | checkbox | Enabled |
Turns the Shipped order email on or off. |
| Subject | text | - | The email subject. Accepts placeholders such as {order_number} and {tracking_number}. |
| Email heading | text | - | The main heading at the top of the email. |
| Email content | textarea | Hi {customer_first_name}, great news - your order #{order_number} has been shipped. You can track your shipment with the details below. |
The intro text shown above the tracking details. |
| Additional content | textarea | - | Extra text shown in the email. |
| Email type | select | HTML |
The email format: Plain text, HTML or Multipart. |
WooCommerce > Settings > Emails > Partially shipped order
| Setting | Type | Default | What it does |
|---|---|---|---|
| Enable/Disable | checkbox | Enabled |
Turns the Partially shipped order email on or off. |
| Subject | text | - | The email subject. Accepts placeholders such as {order_number} and {tracking_number}. |
| Email heading | text | - | The main heading at the top of the email. |
| Email content | textarea | Hi {customer_first_name}, part of your order #{order_number} has been shipped. Track the shipped items below - the rest will follow soon. |
The intro text shown above the tracking details. |
| Additional content | textarea | - | Extra text shown in the email. |
| Email type | select | HTML |
The email format: Plain text, HTML or Multipart. |
On your site
Dispatchio does not add anything to your shop or product pages. Customers see tracking in two places:
- My Account: when My Account is turned on in the General settings, the customer's order page shows the carrier, the tracking link, the ship date and your shipping note. An estimated delivery date is shown when Estimated delivery is on and the carrier has an Est. days value.
- Emails: the Dispatchio shipment emails, and the WooCommerce emails you tick under Tracking in Emails, include the tracking details.
The tracking link is an ordinary link to the carrier's tracking page. Nothing is sent to the carrier unless the customer clicks it.
Frequently asked questions
Does Dispatchio send SMS or WhatsApp notifications?
No. Dispatchio sends email only.
Will tracking numbers from my previous tracking plugin still work?
Yes. Dispatchio uses the same order meta key as other popular tracking plugins, so existing tracking numbers show up as soon as it is activated. Nothing needs to be imported.
Do I need an account with a tracking service?
No. Every feature in the free plugin works on your own site, with no external account and no outbound connections. Live carrier tracking uses a third-party service and is a Pro feature.
Can I find an order from its tracking number?
Yes. With High Performance Order Storage, choose Tracking number in the search dropdown next to the search box on the orders screen, then search. With the classic order tables, the normal order search already matches tracking numbers.
Can the shipment email subject include the tracking number?
Yes. Every Dispatchio shipment email accepts {tracking_number}, {carrier_name} and {tracking_url} in its subject, heading, email content and additional content, along with {order_number} and {customer_first_name}. They use the most recent outbound shipment on the order. Edit them under WooCommerce > Settings > Emails.
Does it work with High Performance Order Storage?
Yes. Dispatchio declares HPOS compatibility and works with both HPOS and the classic order tables.
Can I add a carrier that is not on the list?
Yes. On the Shipping Carriers tab, click Add Custom Carrier and give it a tracking URL that contains %number%. You can also use %postcode% and %phone%. For a one-off shipment, choose Custom as the carrier on the order instead.
Is my order tracking data removed if I delete the plugin?
No. Tracking numbers stored on orders are always kept. The plugin's settings and tables are removed only if you turn on Delete data on uninstall before you delete the plugin.
Troubleshooting
- The plugin will not activate, or the Dispatchio menu does not appear
Dispatchio requires WooCommerce 5.2 or later. Install and activate WooCommerce first, then activate Dispatchio again.
- A carrier is missing from the carrier dropdown on an order
Go to Dispatchio > Settings > Shipping Carriers and tick Active for that carrier. Only active carriers appear on the order screen. If the carrier is not in the list, use Add Custom Carrier.
- The customer did not get an email after I added tracking
Check these points:
- The Order status field in the Dispatchio box was not left as no change. That option adds tracking quietly, without emailing the customer.
- The status you chose is enabled on the General tab.
- The email is turned on with Enable/Disable under WooCommerce > Settings > Emails.
- For tracking changes on an order that is already shipped, Tracking update email must be ticked on the General tab.
- A CSV import did not update the orders I expected
Click Preview before Import and check that the columns were read correctly. A wrong delimiter or a shifted header shows up there. Make sure the file has a header row and uses the columns
order_id,tracking_provider,tracking_number,date_shipped,status_shipped,skuandqty. If the carrier name in your file is spelled differently, add it as an API aliases entry on the carrier. With Logging on, check WooCommerce > Status > Logs for details.- No estimated delivery date is shown
Turn on Estimated delivery on the General tab. Then check the carrier's Est. days value on the Shipping Carriers tab. A value of
0means no estimate is shown for that carrier.- Customers cannot see tracking on their order page
Make sure My Account is ticked in the Display section of the General tab and click Save Settings.
Upgrade
Upgrade to Dispatchio - Advanced Shipment Tracking for WooCommerce
Dispatchio Pro is a separate plugin that replaces this one. Every carrier, setting and tracking number you already have carries over when you switch. It adds:
- Live delivery status from 17TRACK or AfterShip
- Fulfillment dashboard with barcode scan to ship
- Order tracking page for your customers
- Sends tracking numbers to PayPal and Stripe
- Imports tracking from ShipStation, Printful and more
- Scheduled CSV tracking imports over FTP or SFTP