

Overview
Storefold Pro turns a WooCommerce shop into a multivendor marketplace. Sellers apply, you approve them, and they manage their own products and orders from a vendor dashboard on your site. Customers check out once. Each seller receives only their part of the order, and you keep a commission.
The Pro edition contains the complete free edition, so you do not need both. On top of it, Pro adds commission rules per product, per vendor and per product category, seller membership plans, Stripe Connect automatic payouts, an earning hold period, several sellers per product, categories open to vendors, custom questions on the application form, staff accounts, identity verification, per-vendor shipping, customer disputes, an activity log, signed JSON webhooks, CSV vendor import and an installable vendor dashboard with new order alerts.
Storefold is for store owners who want other sellers to sell through their WooCommerce store while keeping control over who sells, what they sell, how much commission you take and when sellers get paid.
Requirements
- WordPress 6.4 or later (tested up to 7.1)
- PHP 7.4 or later
- WooCommerce 8.5 or later, installed and active
- Pretty permalinks, so individual store pages at /store/store-name/ work
Installation
Storefold Pro needs WooCommerce, so install and activate WooCommerce first. Pro is a standalone plugin: it already contains the free edition. If the free edition is active when you activate Pro, the free edition is switched off automatically and all vendors, orders, commissions and settings carry over.
Make sure WooCommerce is installed and active.
Log in to your ProPluginsLab account, open My Account > Downloads and download the Storefold Pro zip file.
In WordPress, go to Plugins > Add New > Upload Plugin, choose the zip file and click Install Now.
Click Activate Plugin. If the free edition of Storefold was active, it is deactivated automatically and your data is kept.
Open Storefold > Setup wizard to answer the setup questions, or go straight to Storefold > Settings. Every option is explained under Storefold > Help and docs.
Quick start
- Run the setup wizard
Open Storefold > Setup wizard. It asks four questions: the kind of marketplace, your commission, how vendors get paid and how much you want to review. You can change every answer later under Storefold > Settings.
- Check the marketplace pages
Activation creates three pages: Vendor Dashboard, Become a Vendor and Stores. Add Become a Vendor and Stores to your site menu so people can find them. Under Storefold > Settings > Marketplace pages you can confirm which page is used for each role.
- Review your commission and payout settings
In Storefold > Settings, set How do you take your cut?, your percentage or fixed amount, and the payout methods under How vendors can get paid. The Live example line shows what you and the vendor get on a sample sale.
- Invite your first seller
Share the Become a Vendor page, or create a store yourself under Storefold > Vendors > Add a vendor. If you review applications manually, approve new sellers on the Vendors screen. Approved sellers log in and open the Vendor Dashboard page.
- Watch the overview
Open Storefold > Overview to see this month's sales, your commission, what vendors earned and a Needs your attention list. The Marketplace health check flags setup problems and tells you how to fix them.
#Marketplace overview
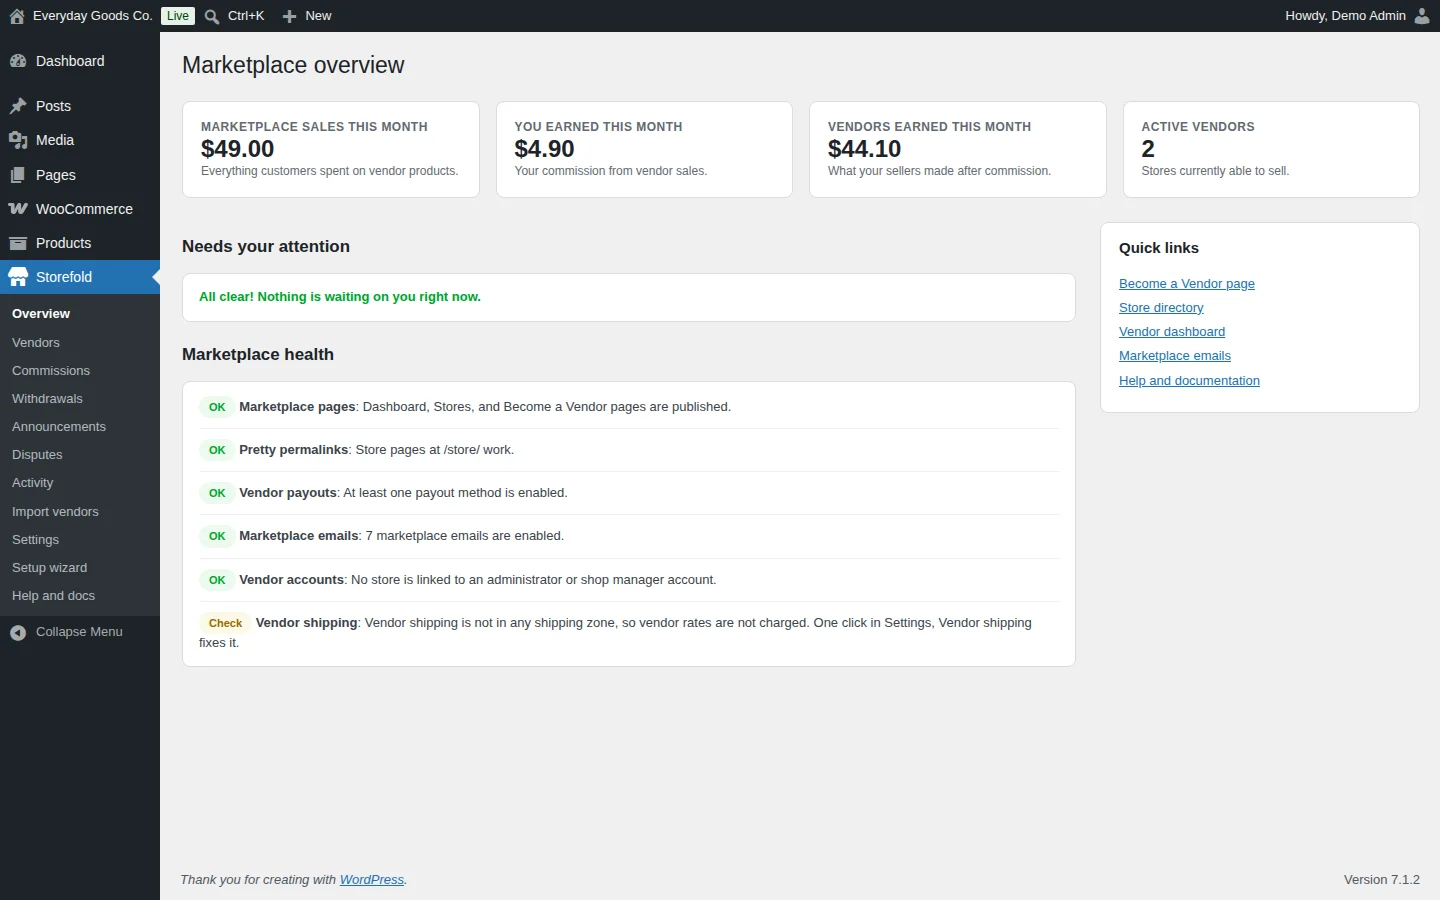
Storefold > Overview is the home screen of your marketplace.
At the top, four cards summarize the current month:
- Marketplace sales this month: everything customers spent on vendor products.
- You earned this month: your commission from vendor sales.
- Vendors earned this month: what your sellers made after commission.
- Active vendors: stores currently able to sell.
Needs your attention lists everything waiting on you, for example products waiting for review when you require product approval. When nothing is waiting, it says so.
Marketplace health runs a set of checks and marks each one OK or Check:
- Marketplace pages: the Dashboard, Stores and Become a Vendor pages are published.
- Pretty permalinks: store pages at /store/ work.
- Vendor payouts: at least one payout method is enabled.
- Marketplace emails: how many marketplace emails are enabled.
- Vendor accounts: no store is linked to an administrator or shop manager account.
- Vendor shipping: whether vendor shipping is added to your shipping zones.
Quick links takes you to the Become a Vendor page, the store directory, the vendor dashboard, the marketplace emails and the help pages.
#Vendors
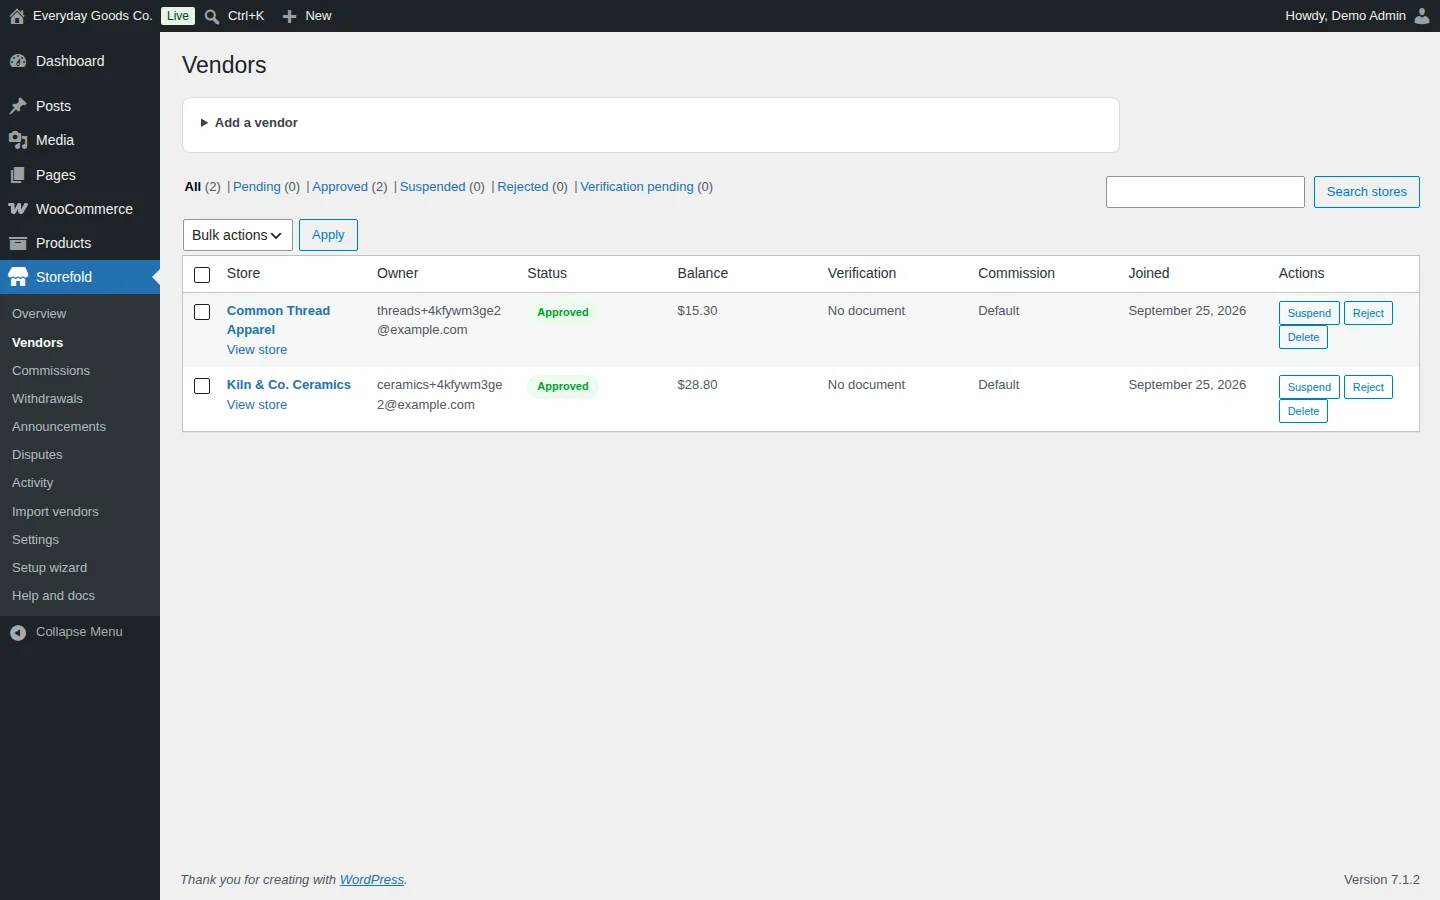
Storefold > Vendors lists every store with its Store, Owner, Status, Balance, Verification, Commission, Joined date and Actions.
Use the links above the table to filter by status: All, Pending, Approved, Suspended, Rejected and Verification pending. Use the search box and Search stores to find a store by name.
Vendor statuses:
- Pending: applied and waiting for you.
- Approved: can sell.
- Suspended: products can no longer be bought and the vendor dashboard shows a notice. Use it for temporary problems.
- Rejected: application declined.
Add a vendor
Open Add a vendor, enter a Store name and Owner email. If an account with that email exists, it becomes the owner. Otherwise a new account is created and emailed a link to set a password. Administrators and shop managers cannot be vendors, because every product their account creates would count as that store's. To test the vendor side, apply with a separate account.
Manage stores
- Use the Suspend, Reject and Delete buttons in the Actions column for one store, or tick several stores, choose a bulk action and click Apply.
- Click a store name to see its balance, lifetime earnings, application answers and full money ledger, and to rename the store. From there you can also adjust the balance with a reason, for example a bonus or a fee charged outside the store. The vendor sees the entry and reason in their earnings history.
- View store opens the public store page.
Deleting a vendor removes the store and the vendor role and cancels open withdrawal requests. The user account, their products and all commission and ledger history are kept, because they are financial records.
#Commissions
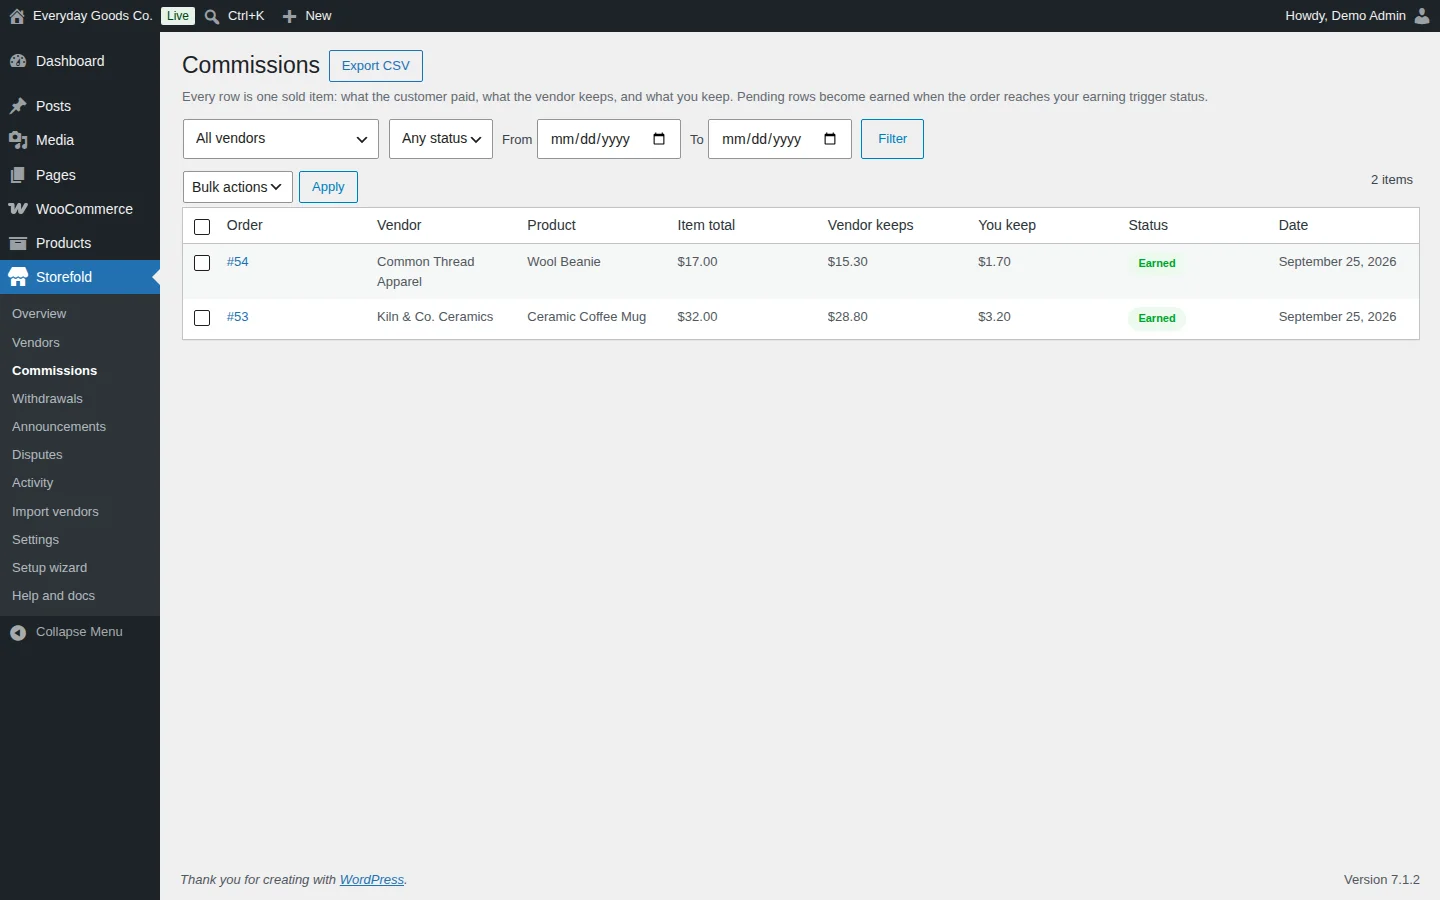
Storefold > Commissions shows one row per sold item: what the customer paid (Item total), what the vendor keeps (Vendor keeps) and what you keep (You keep), with the Order, Vendor, Product, Status and Date.
Commission is calculated per sold item, on the item total after coupons, when the order is placed. The rule used is saved with each commission row, so later changes to your settings never rewrite history.
Statuses:
- Pending: the order has not yet reached your earning trigger status.
- Earned: the vendor order reached the status you chose under Vendors earn their money when, and the vendor balance went up.
- Reversed: the amount was taken back, for example after a refund.
Filter the list by vendor, by status and by a From and To date, then click Filter. Click Export CSV to download the commissions.
#Withdrawals
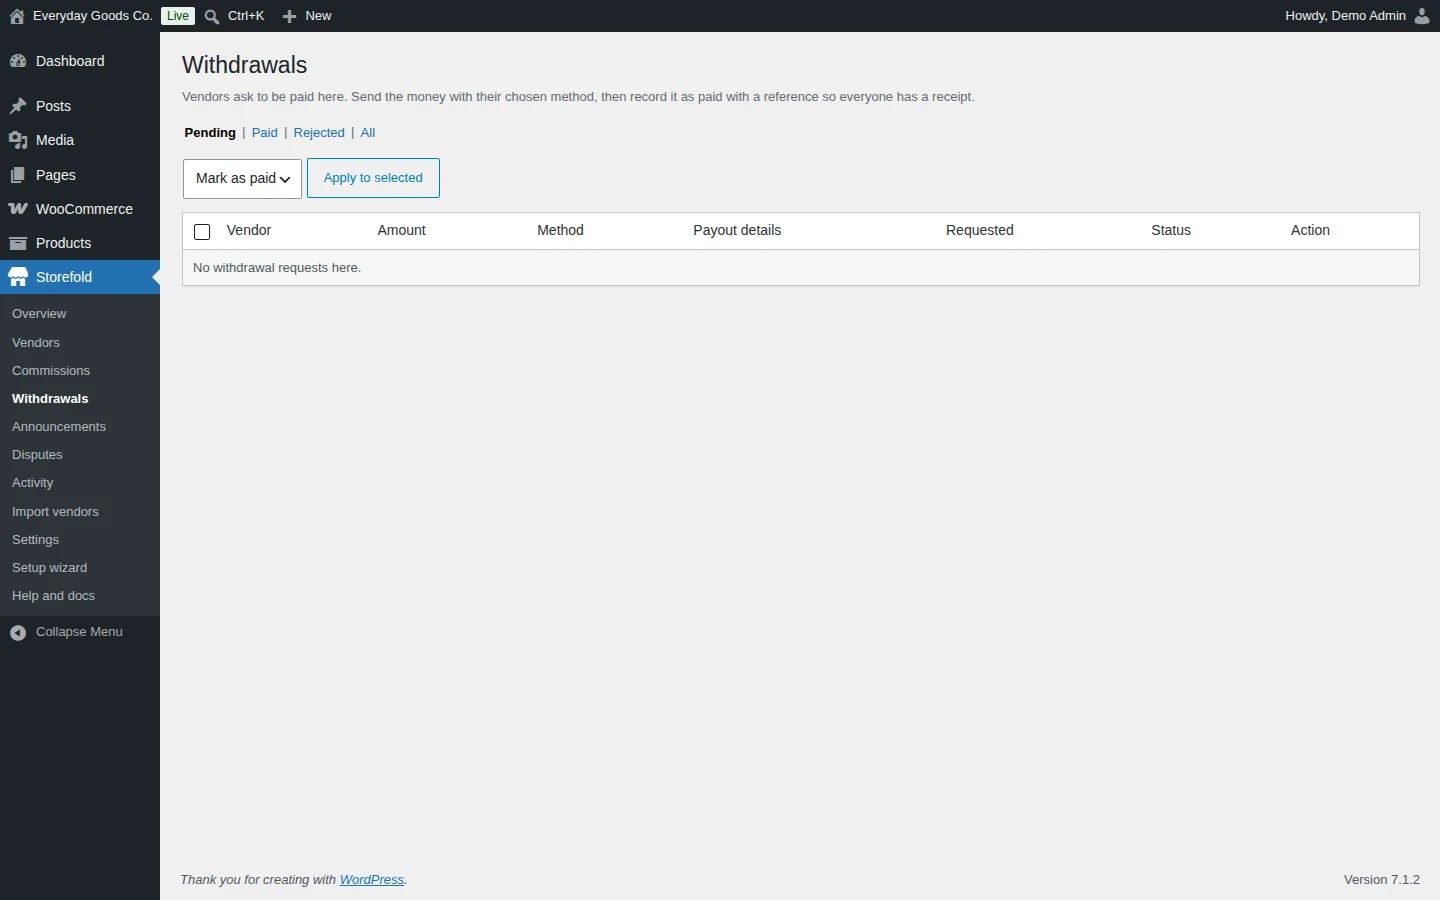
Vendors ask to be paid on Storefold > Withdrawals. Each request shows the Vendor, Amount, Method, Payout details, Requested date, Status and an Action.
To pay a request:
- Send the money with the method the vendor chose. For PayPal the vendor has entered their PayPal email. For bank transfer they have entered the account holder, bank name, account number and routing or IBAN.
- Record the request as paid with a reference, so everyone has a receipt.
To handle several requests at once, tick them, choose Mark as paid or Reject and click Apply to selected.
Use the Pending, Paid, Rejected and All links to switch between requests.
When Stripe payouts are enabled, Storefold creates a Stripe transfer for withdrawals you mark as paid. See Earning hold and Stripe payouts in the settings below.
#Announcements
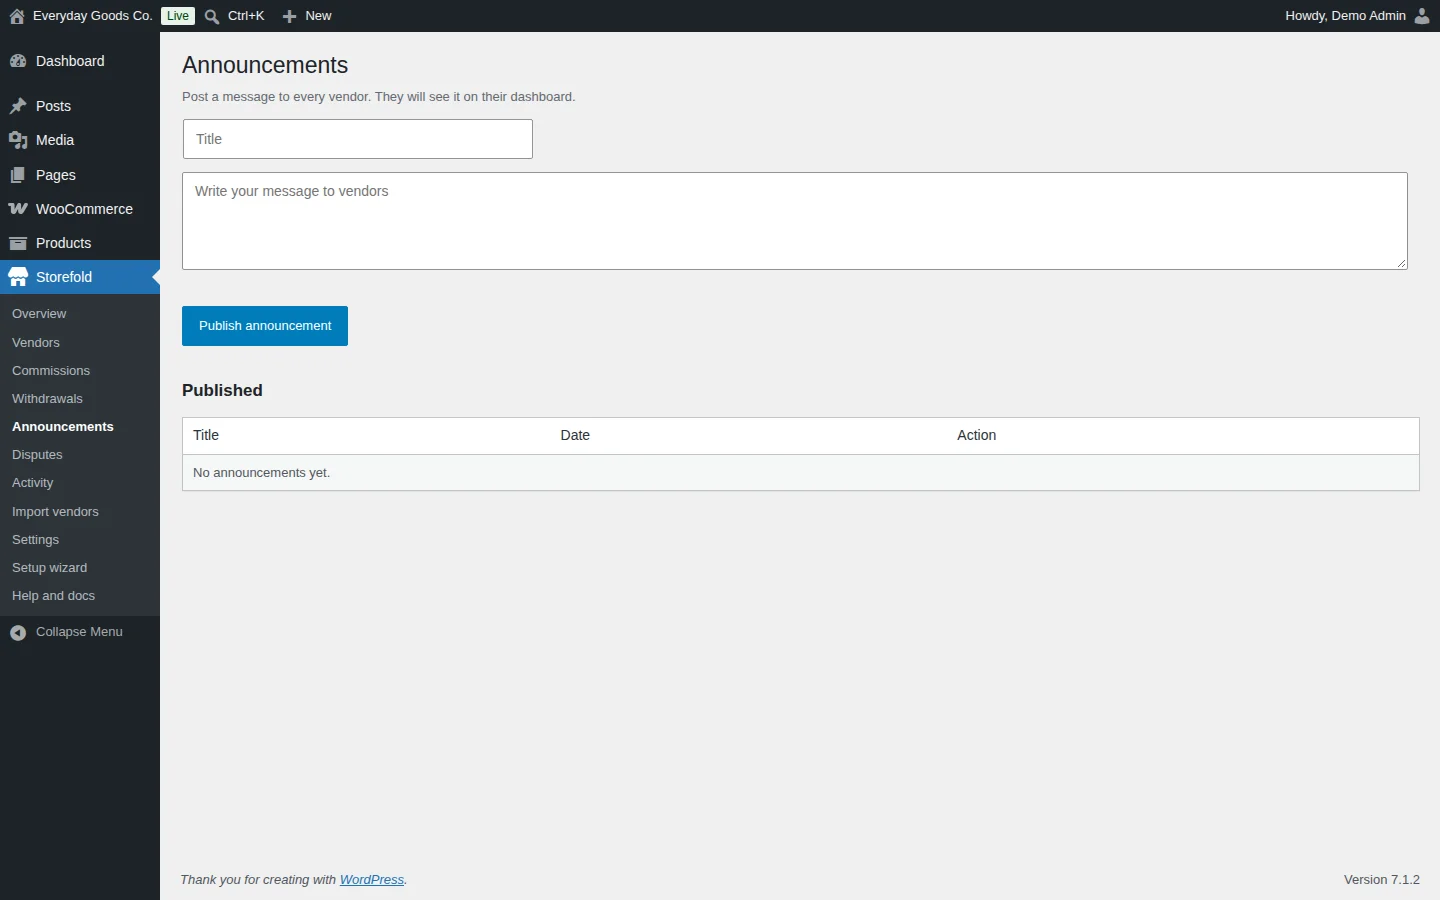
Storefold > Announcements lets you post a message to every vendor. Vendors see it on their dashboard.
- Enter a Title.
- Write your message in the Write your message to vendors box.
- Click Publish announcement.
Published announcements are listed under Published with their Title, Date and an Action.
#Disputes
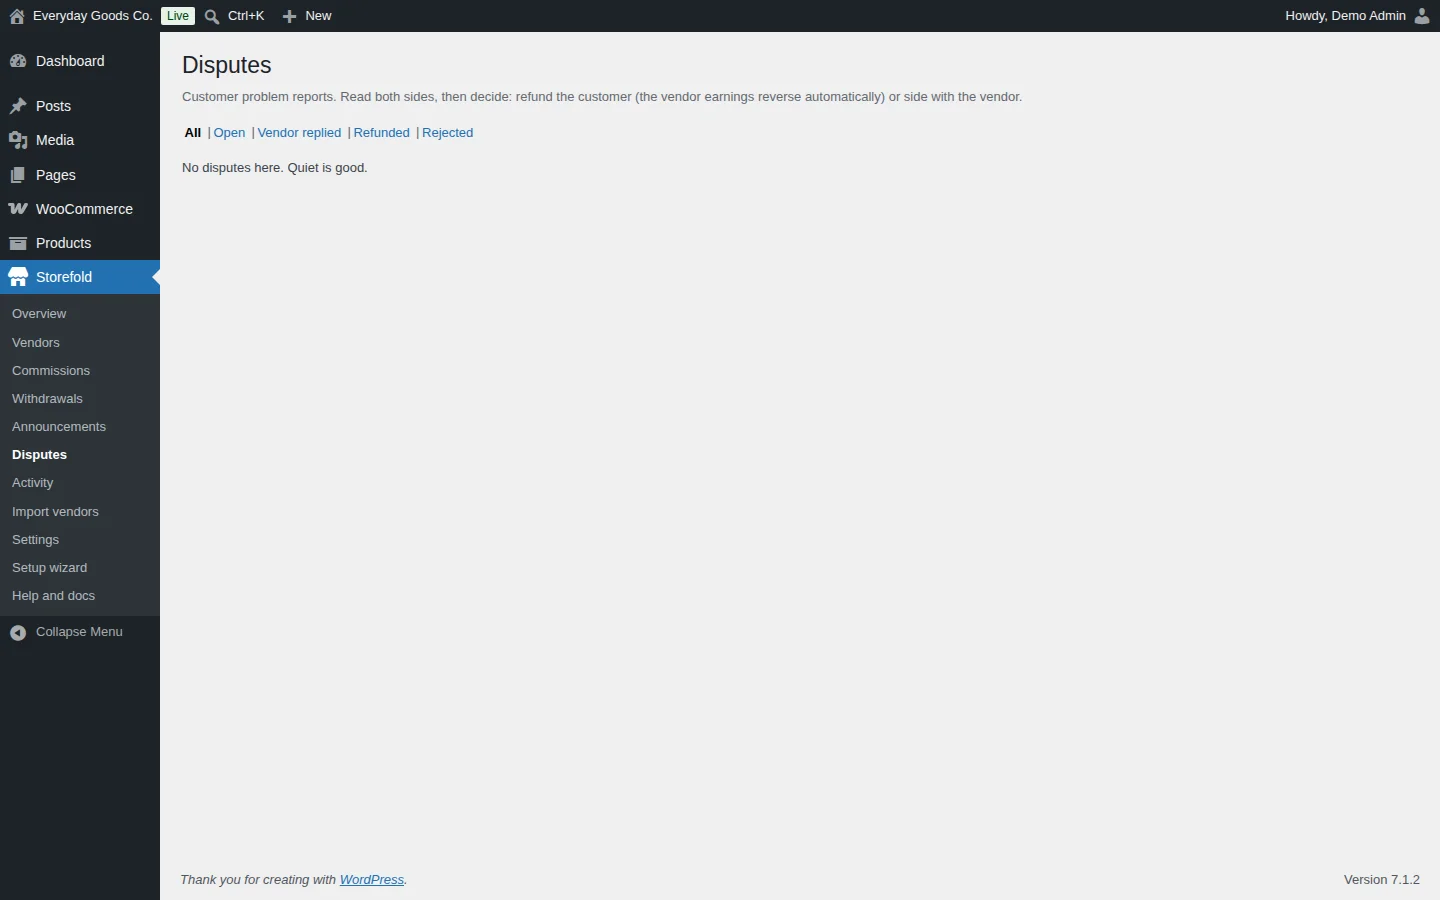
Storefold > Disputes collects problem reports from customers. Vendors can reply to each dispute.
Read both sides, then decide:
- Refund the customer. The vendor earnings for the refunded amount reverse automatically.
- Side with the vendor.
Use the All, Open, Vendor replied, Refunded and Rejected links to filter disputes.
#Activity
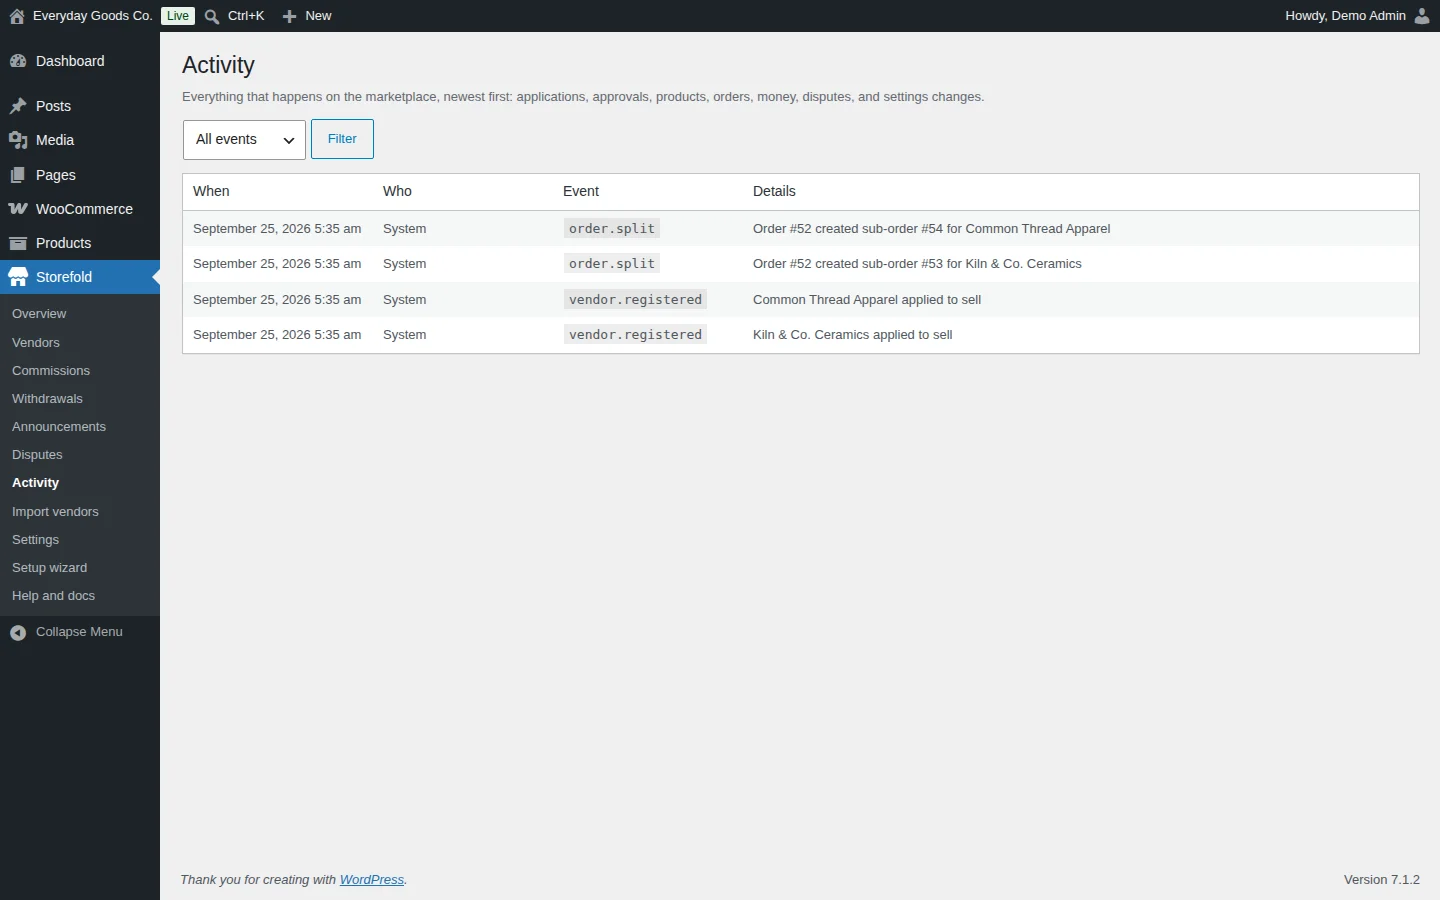
Storefold > Activity is a log of everything that happens on the marketplace, newest first: applications, approvals, products, orders, money, disputes and settings changes.
Each entry shows When, Who, the Event code (for example vendor.registered or order.split) and Details.
To narrow the list, pick a type in the event dropdown and click Filter. The types are Vendors, Products, Offers, Orders, Withdrawals, Commissions, Disputes, Verification, Plans, Slot packs, Staff, Stripe and Settings.
#Import vendors
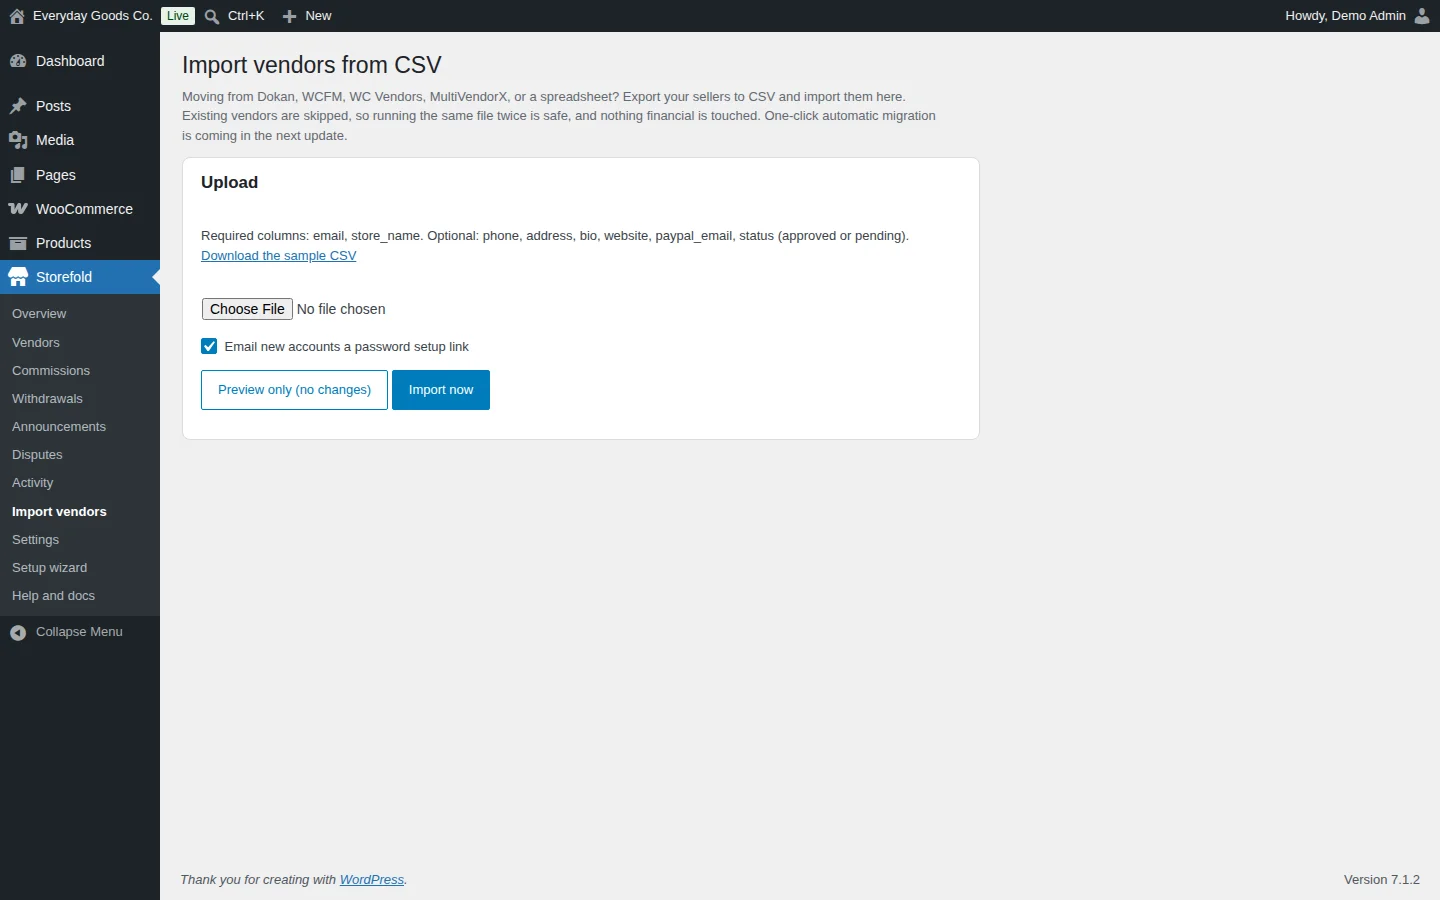
Storefold > Import vendors creates vendors from a CSV file. Use it when you move from Dokan, WCFM, WC Vendors, MultiVendorX or a spreadsheet: export your sellers to CSV and import them here.
The file needs these columns:
- Required:
email,store_name - Optional:
phone,address,bio,website,paypal_email,status(approvedorpending)
Click Download the sample CSV for a template.
To import:
- Click Choose File and select your CSV.
- Leave Email new accounts a password setup link ticked if new sellers should receive a link to set their password.
- Click Preview only (no changes) to check the result without changing anything.
- When the preview looks right, click Import now.
Existing vendors are skipped, so running the same file twice is safe. Nothing financial is touched.
#Marketplace settings
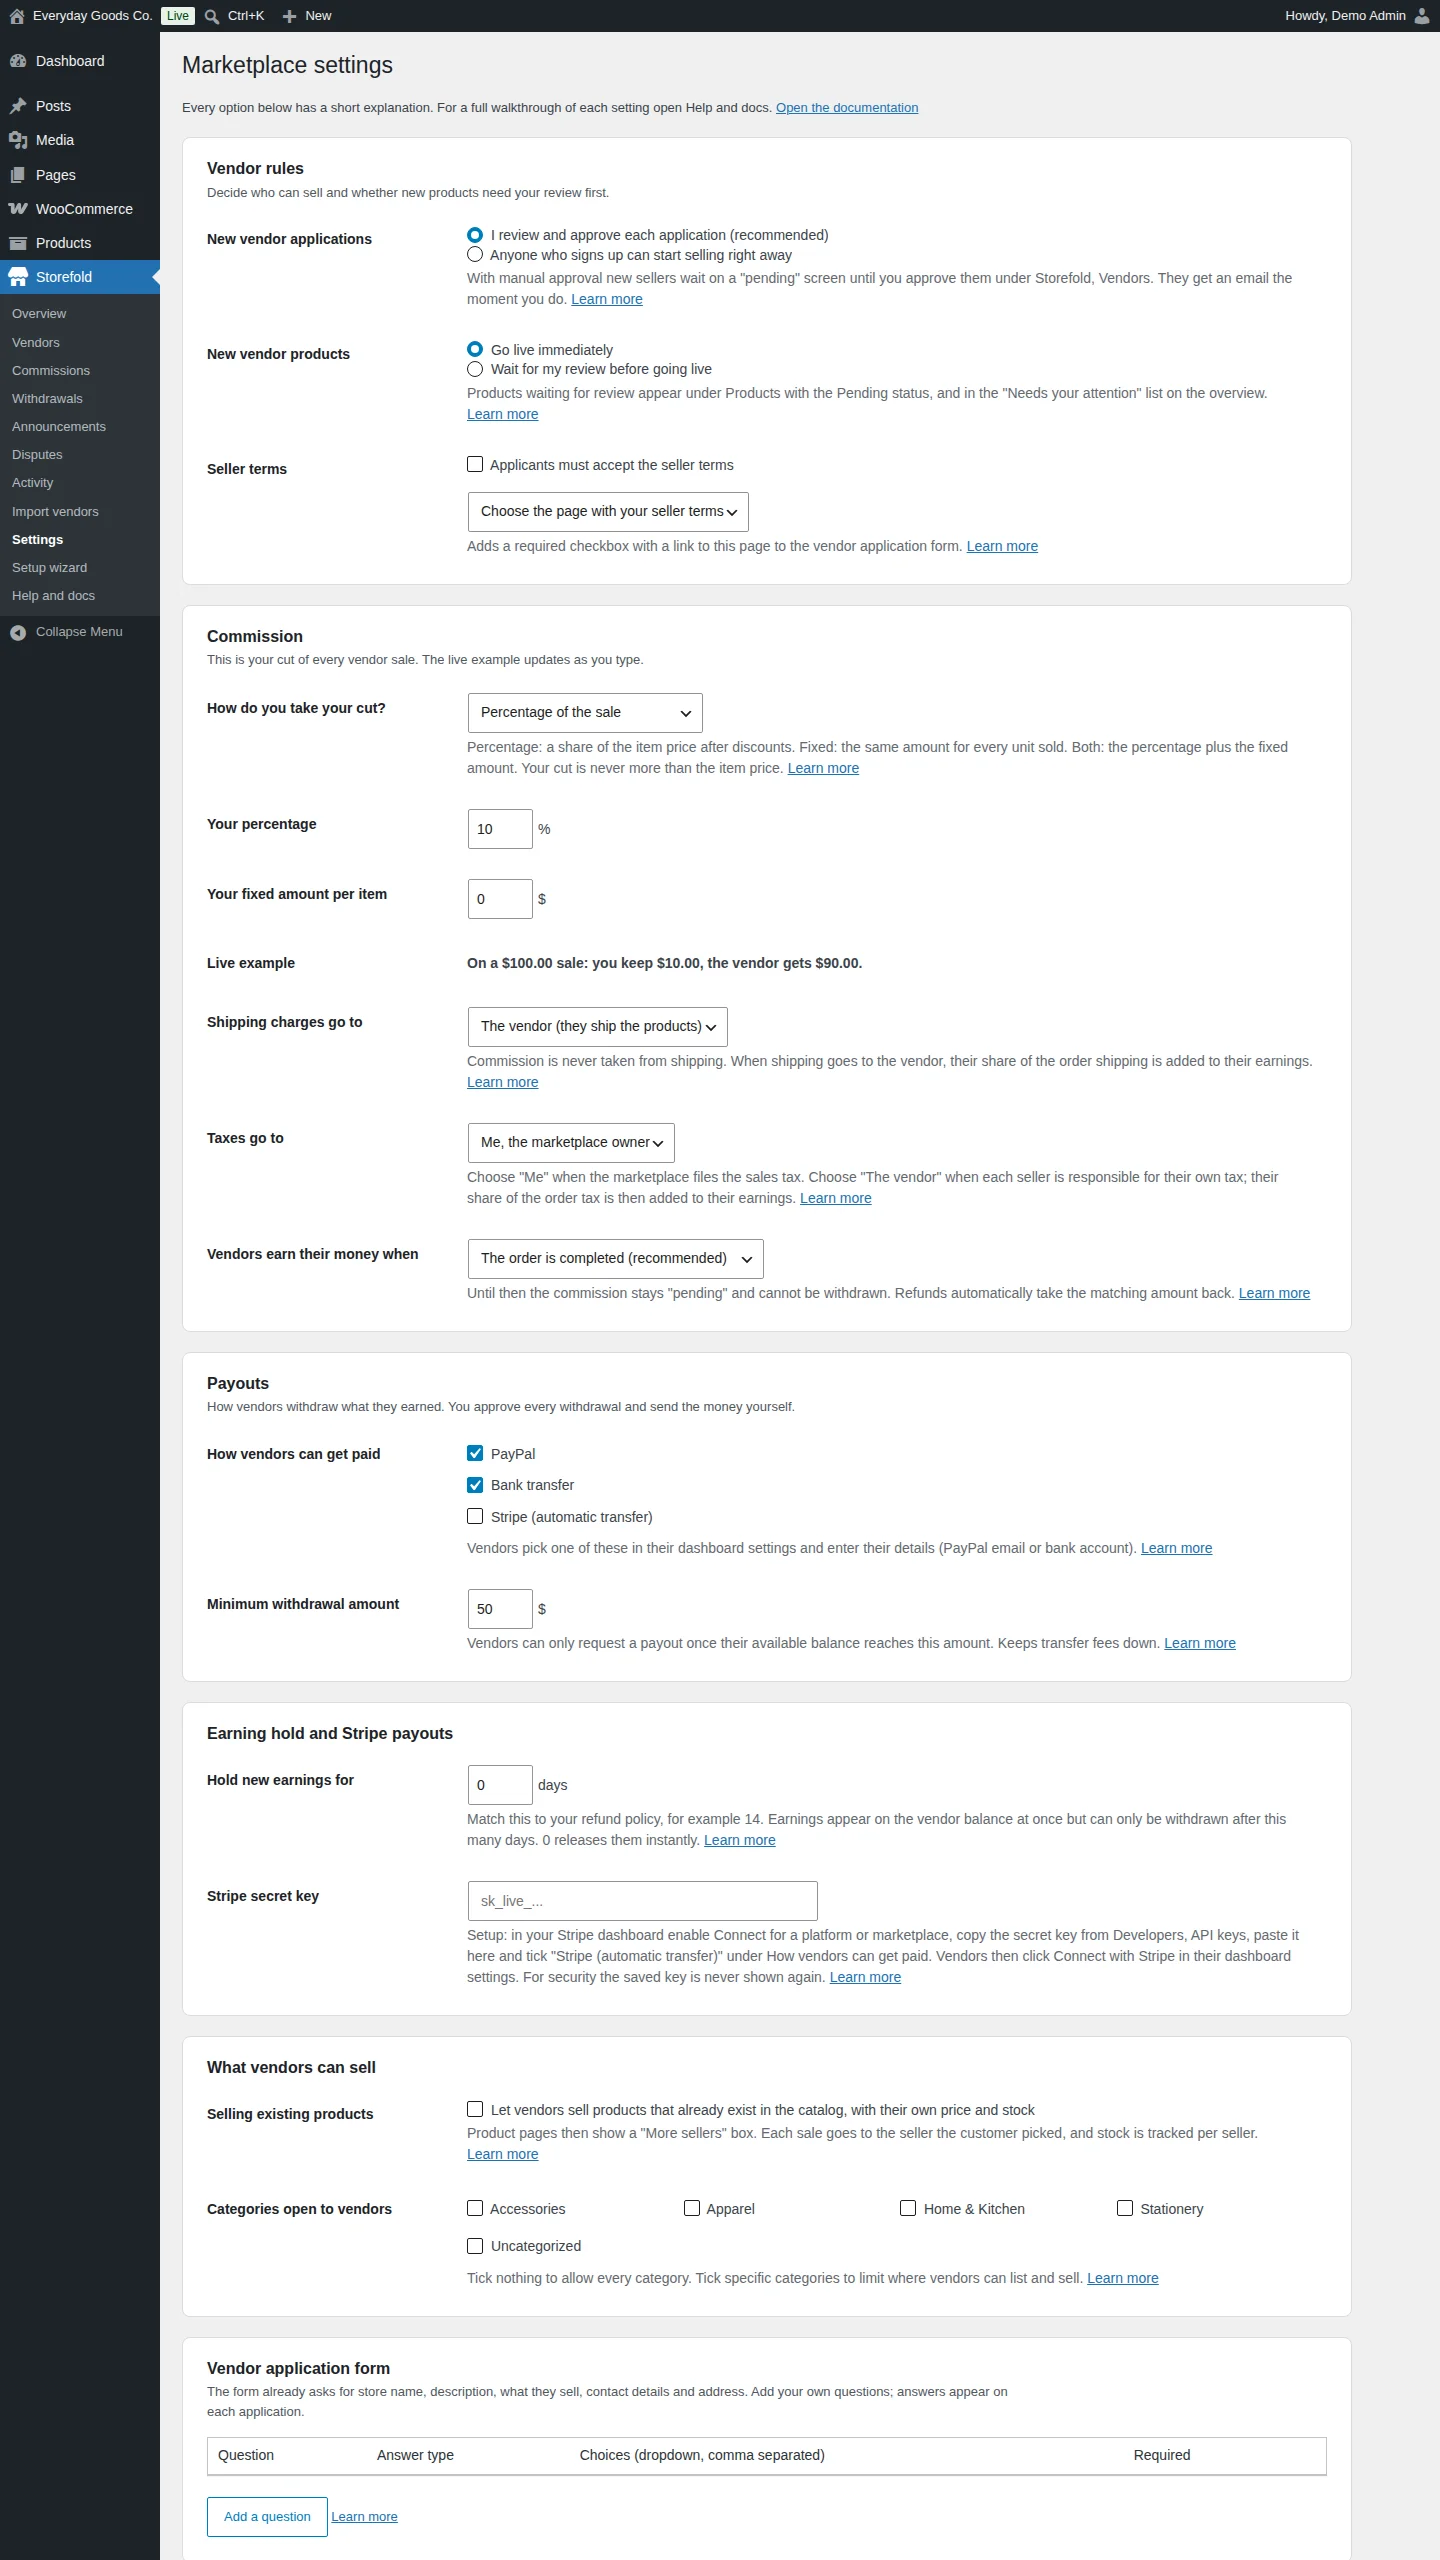
Storefold > Settings holds all marketplace options, grouped in boxes. Every option has a short explanation and a Learn more link to the matching entry in Help and docs. Click Save settings at the bottom when you are done. The full field list is in the settings reference below.
Vendor rules
Decide who can sell and whether new products need your review. With manual approval, applicants see an "application received" screen and wait until you approve them under Storefold > Vendors. With Wait for my review before going live, new vendor products are saved as Pending and you publish them from Products. Edits to already published products stay live. Tick Applicants must accept the seller terms and choose the page under Seller terms to add a required checkbox to the application form.
Commission
Choose a percentage, a fixed amount per item, or both. Your cut is never more than the item price. The Live example line updates as you type. You also decide who receives shipping charges and taxes, and when vendors earn their money. Commission is never taken from shipping or tax. When a cart has items from several vendors, shipping is split in proportion to each vendor's item total.
Pro also supports commission rules per product, per vendor and per product category.
Payouts
Under How vendors can get paid, tick PayPal, Bank transfer and, with Pro, Stripe (automatic transfer). Vendors pick one in their dashboard settings. Minimum withdrawal amount is the smallest payout a vendor can request.
Earning hold and Stripe payouts
Hold new earnings for keeps earnings on the vendor balance but blocks withdrawal for the number of days you set. Match it to your refund policy. For Stripe payouts, enable Connect for a platform or marketplace in your Stripe dashboard, copy the secret key from Developers > API keys, paste it into Stripe secret key and tick Stripe (automatic transfer). Vendors then click Connect with Stripe in their dashboard settings. For security, the saved key is never shown again.
What vendors can sell
Tick Let vendors sell products that already exist in the catalog, with their own price and stock to show a "More sellers" box on product pages. Under Categories open to vendors, tick specific product categories to limit where vendors can list and sell. Tick nothing to allow every category.
Vendor application form
The form already asks for store name, description, what they sell, contact details and address. Click Add a question to add your own, with a Question, Answer type, Choices (dropdown, comma separated) and Required flag. Answers appear on each application.
Seller plans
Click Add a plan to create membership plans with a Plan name, Price, Billing, Product limit (0 = unlimited), Existing-product limit (0 = unlimited), Your commission % and Only these categories. Plans can be free or paid, monthly or yearly, with pro-rated upgrades, renewal reminders with one-click renewal and a grace period. Under Extra product slots, set Slots per pack and Pack price to let vendors on a limited plan buy more product slots. Slots are a one-time purchase and stack on top of the plan limit. Set either field to 0 to turn this off.
Vendor shipping
Pro supports per-vendor shipping rates with an exact shipping split per vendor. Click Add vendor shipping to all zones so vendor rates are charged in your WooCommerce shipping zones.
Verification and vendor app
With Vendors must be verified before their products can be bought, vendors upload an ID or business licence under Settings in their dashboard. Documents are stored privately and only marketplace managers can open them. Verified stores always show a badge. The vendor app option lets vendors install the dashboard on their phone and get new order alerts while the dashboard is open.
Integrations
Enter a Webhook URL to send signed JSON events (vendor, order, withdrawal, dispute and plan details) to services such as Zapier, Make, n8n or your own system. Each request carries an X-Storefold-Signature header: the HMAC SHA-256 of the raw body with your secret. Tick Generate a new secret to replace the secret.
Storefront, Marketplace pages and Data
Control the "Sold by" labels and store reviews, choose the page used for each marketplace role, and decide whether marketplace data is deleted with the plugin.
#Setup wizard
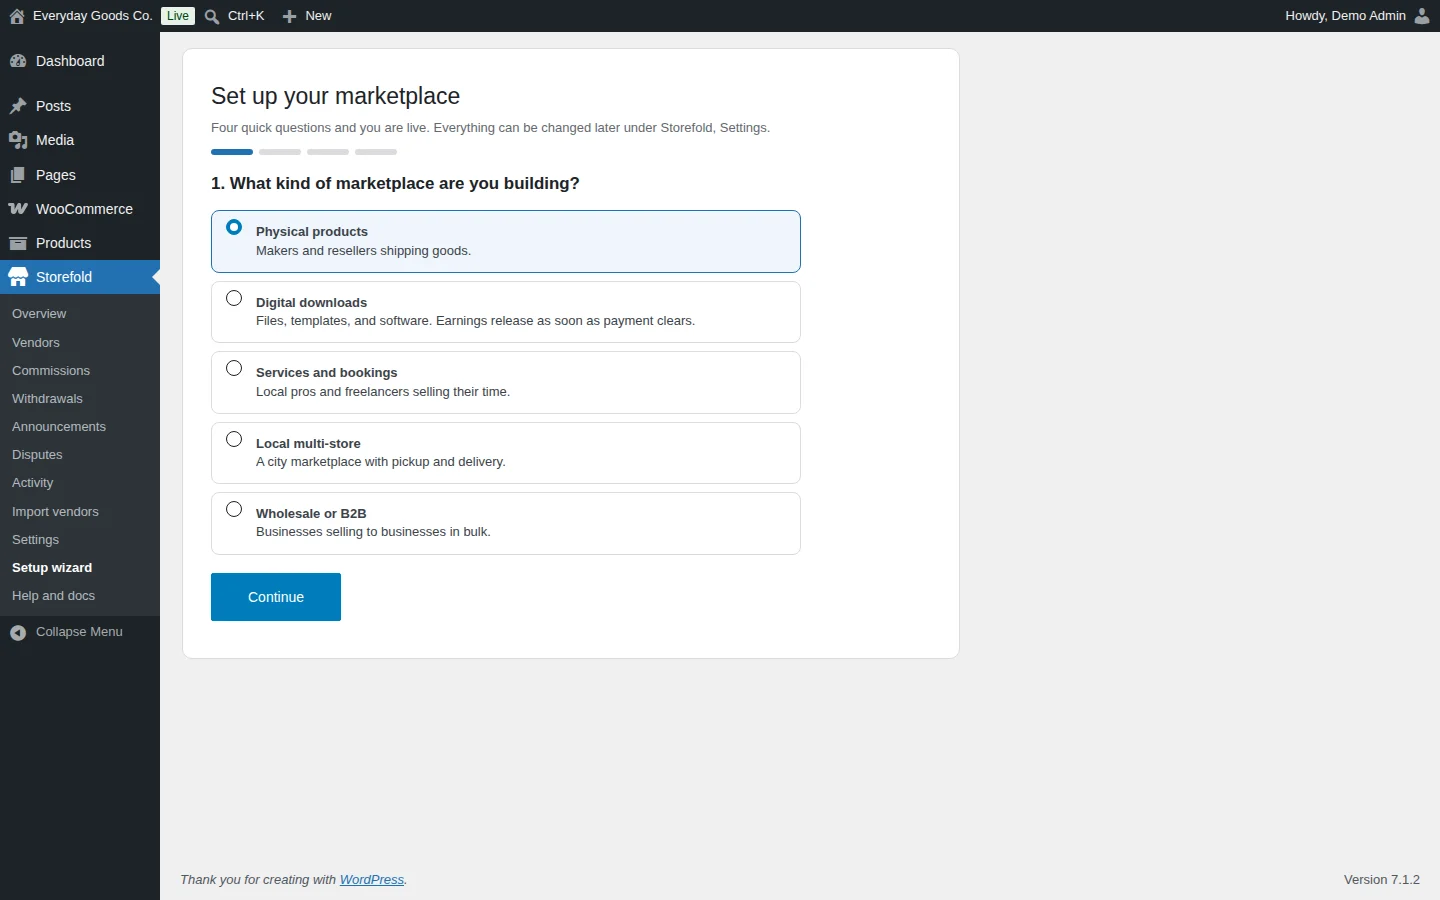
Storefold > Setup wizard asks four quick questions to get your marketplace running: the kind of marketplace, your commission, how vendors get paid and how much you want to review. Everything can be changed later under Storefold > Settings.
The first question is What kind of marketplace are you building?:
- Physical products: makers and resellers shipping goods.
- Digital downloads: files, templates and software. Earnings release as soon as payment clears.
- Services and bookings: local pros and freelancers selling their time.
- Local multi-store: a city marketplace with pickup and delivery.
- Wholesale or B2B: businesses selling to businesses in bulk.
Pick one and click Continue to move to the next question.
#Help and docs
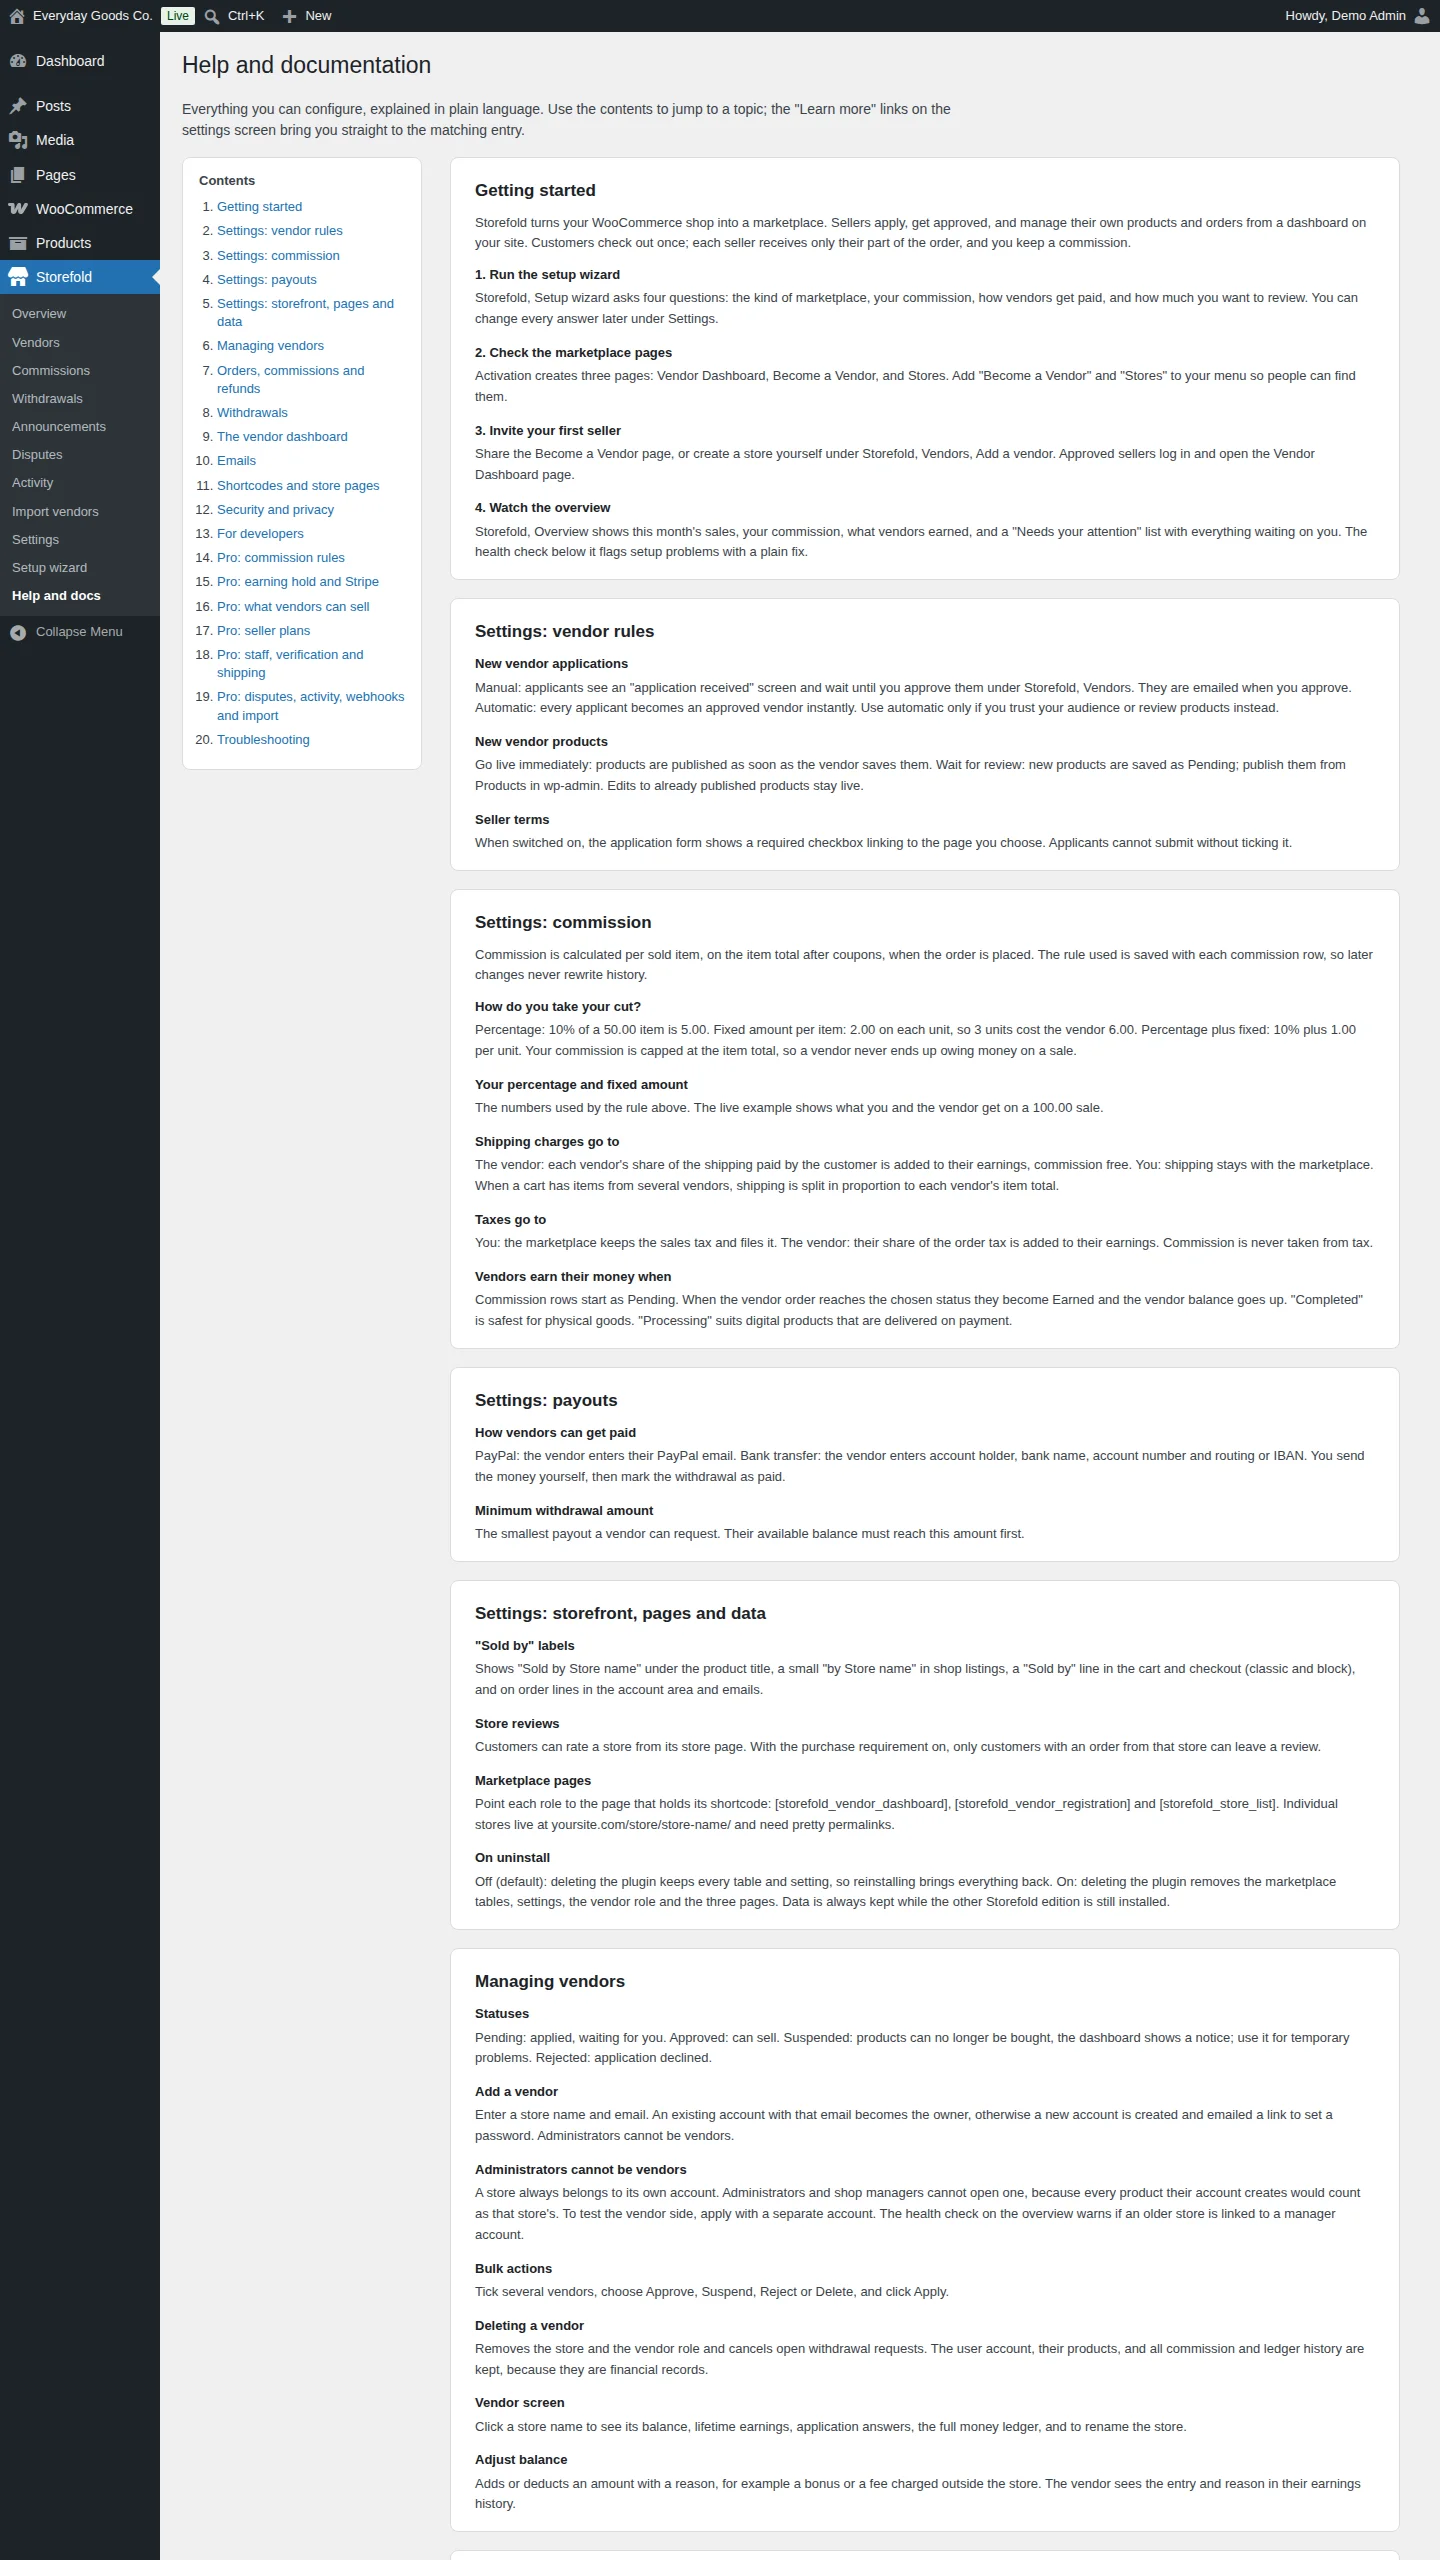
Storefold > Help and docs explains every option in plain language, right inside WordPress. Use the Contents list to jump to a topic. The Learn more links on the settings screen open the matching entry.
Topics include getting started, each settings group, managing vendors, orders, commissions and refunds, withdrawals, the vendor dashboard, emails, shortcodes and store pages, security and privacy, developer notes, each Pro feature and troubleshooting.
#Marketplace emails
Storefold adds its own emails to WooCommerce > Settings > Emails. Their names start with Marketplace:, for example:
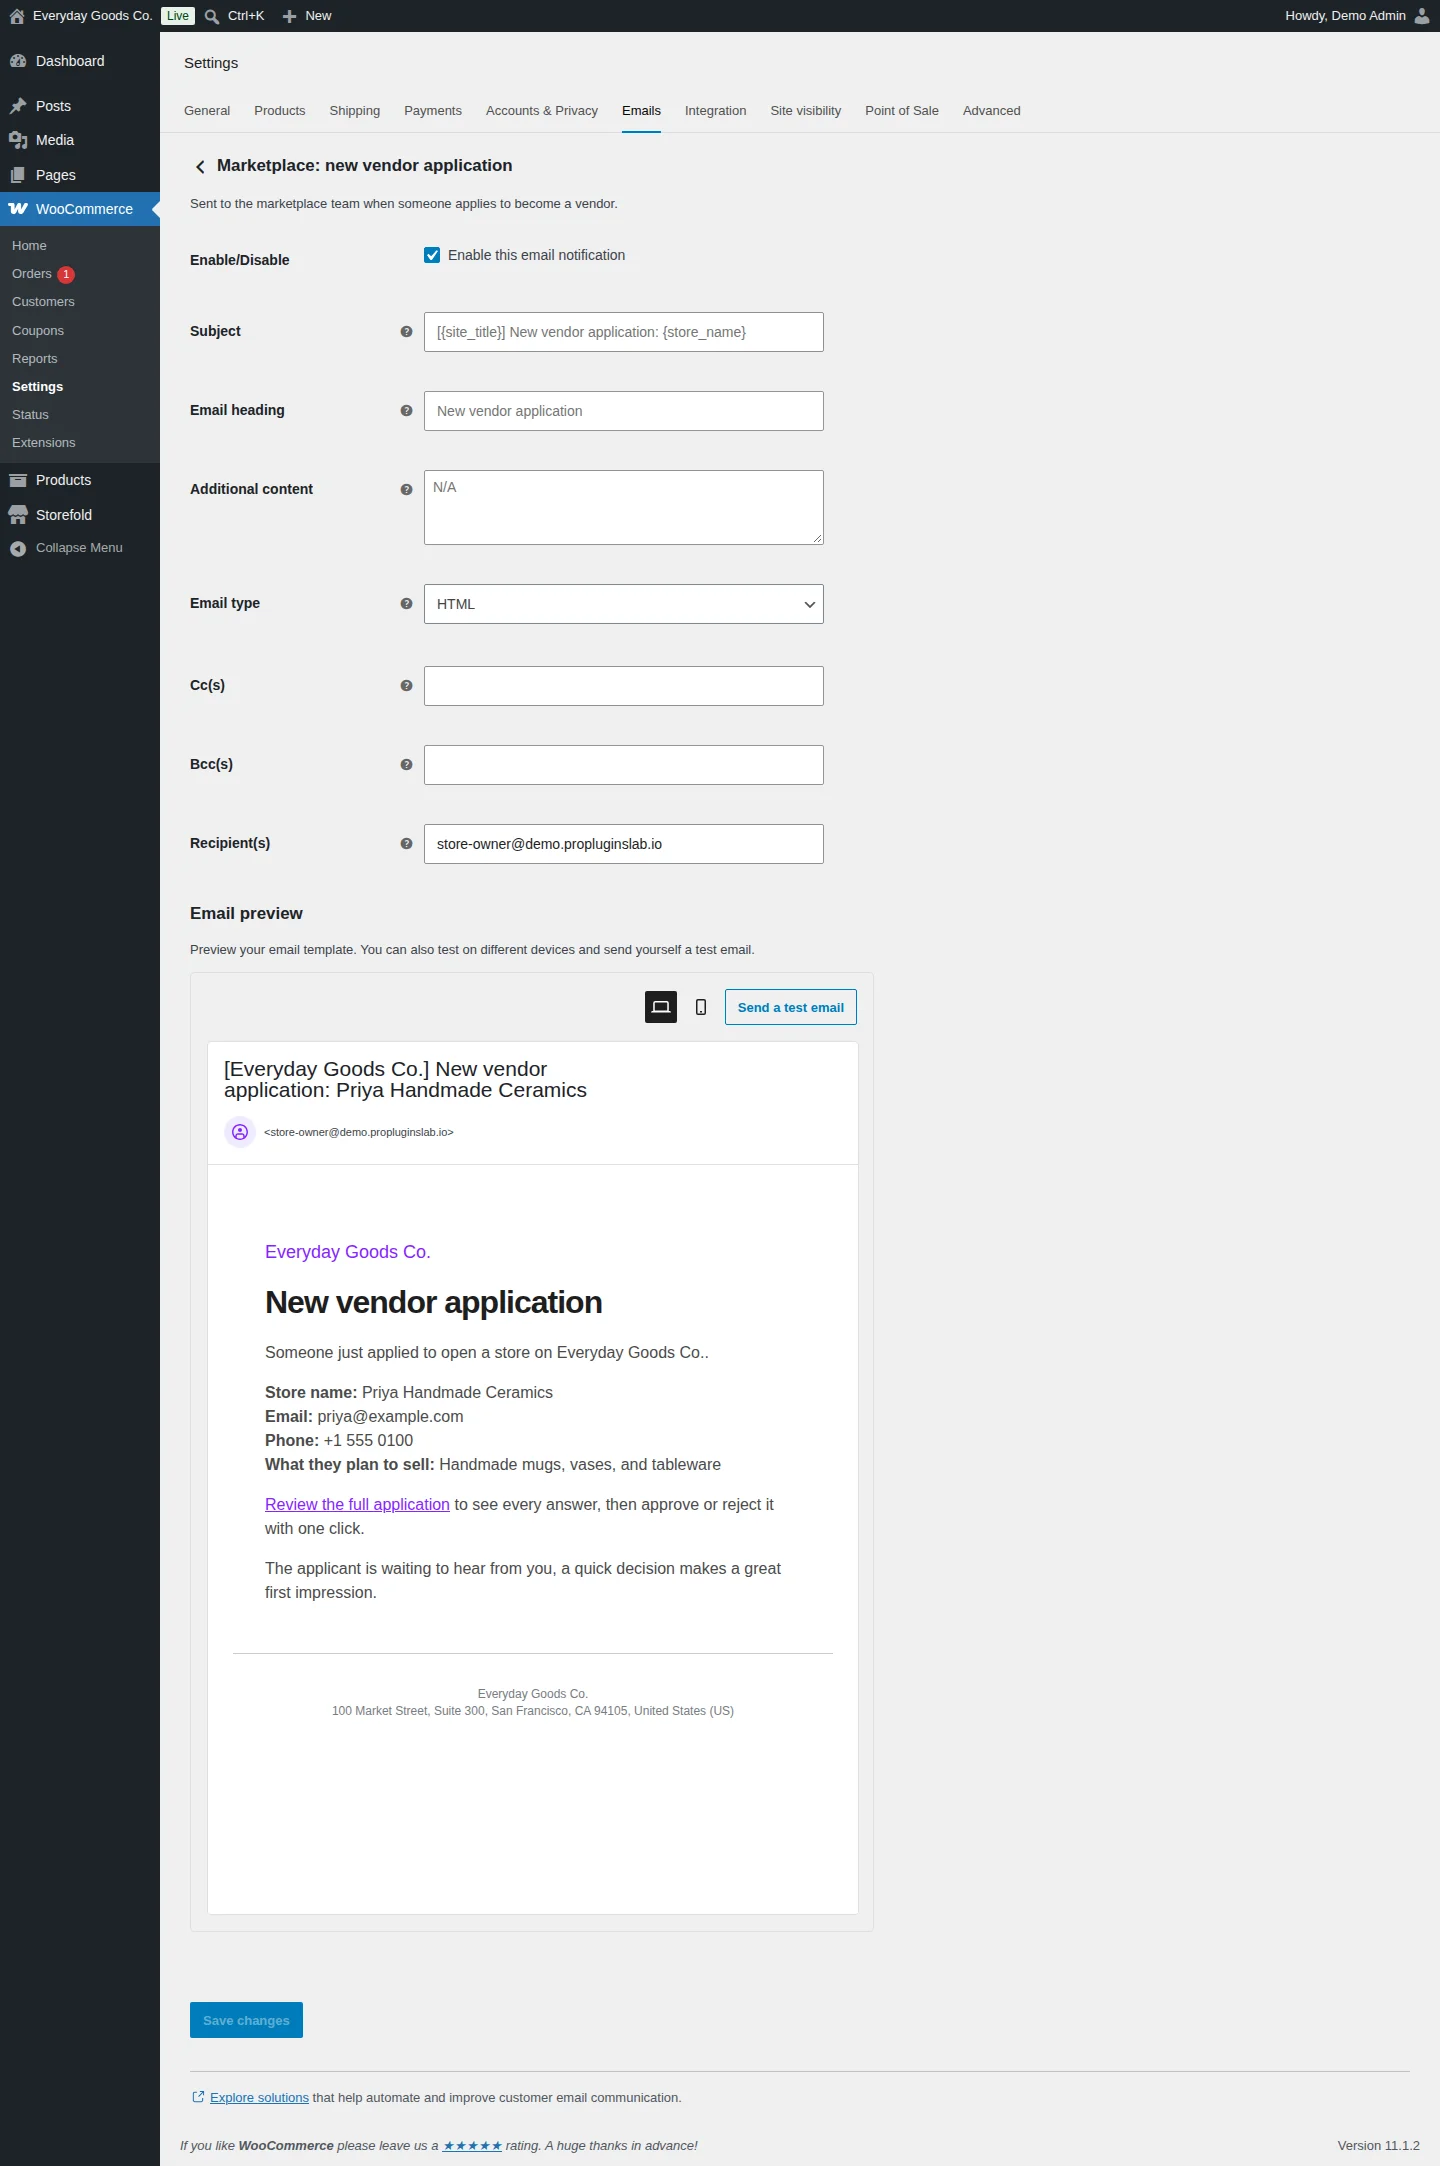
- Marketplace: new vendor application: sent to the marketplace team when someone applies to become a vendor. It lists the application details and links to the full application so you can approve or reject it.
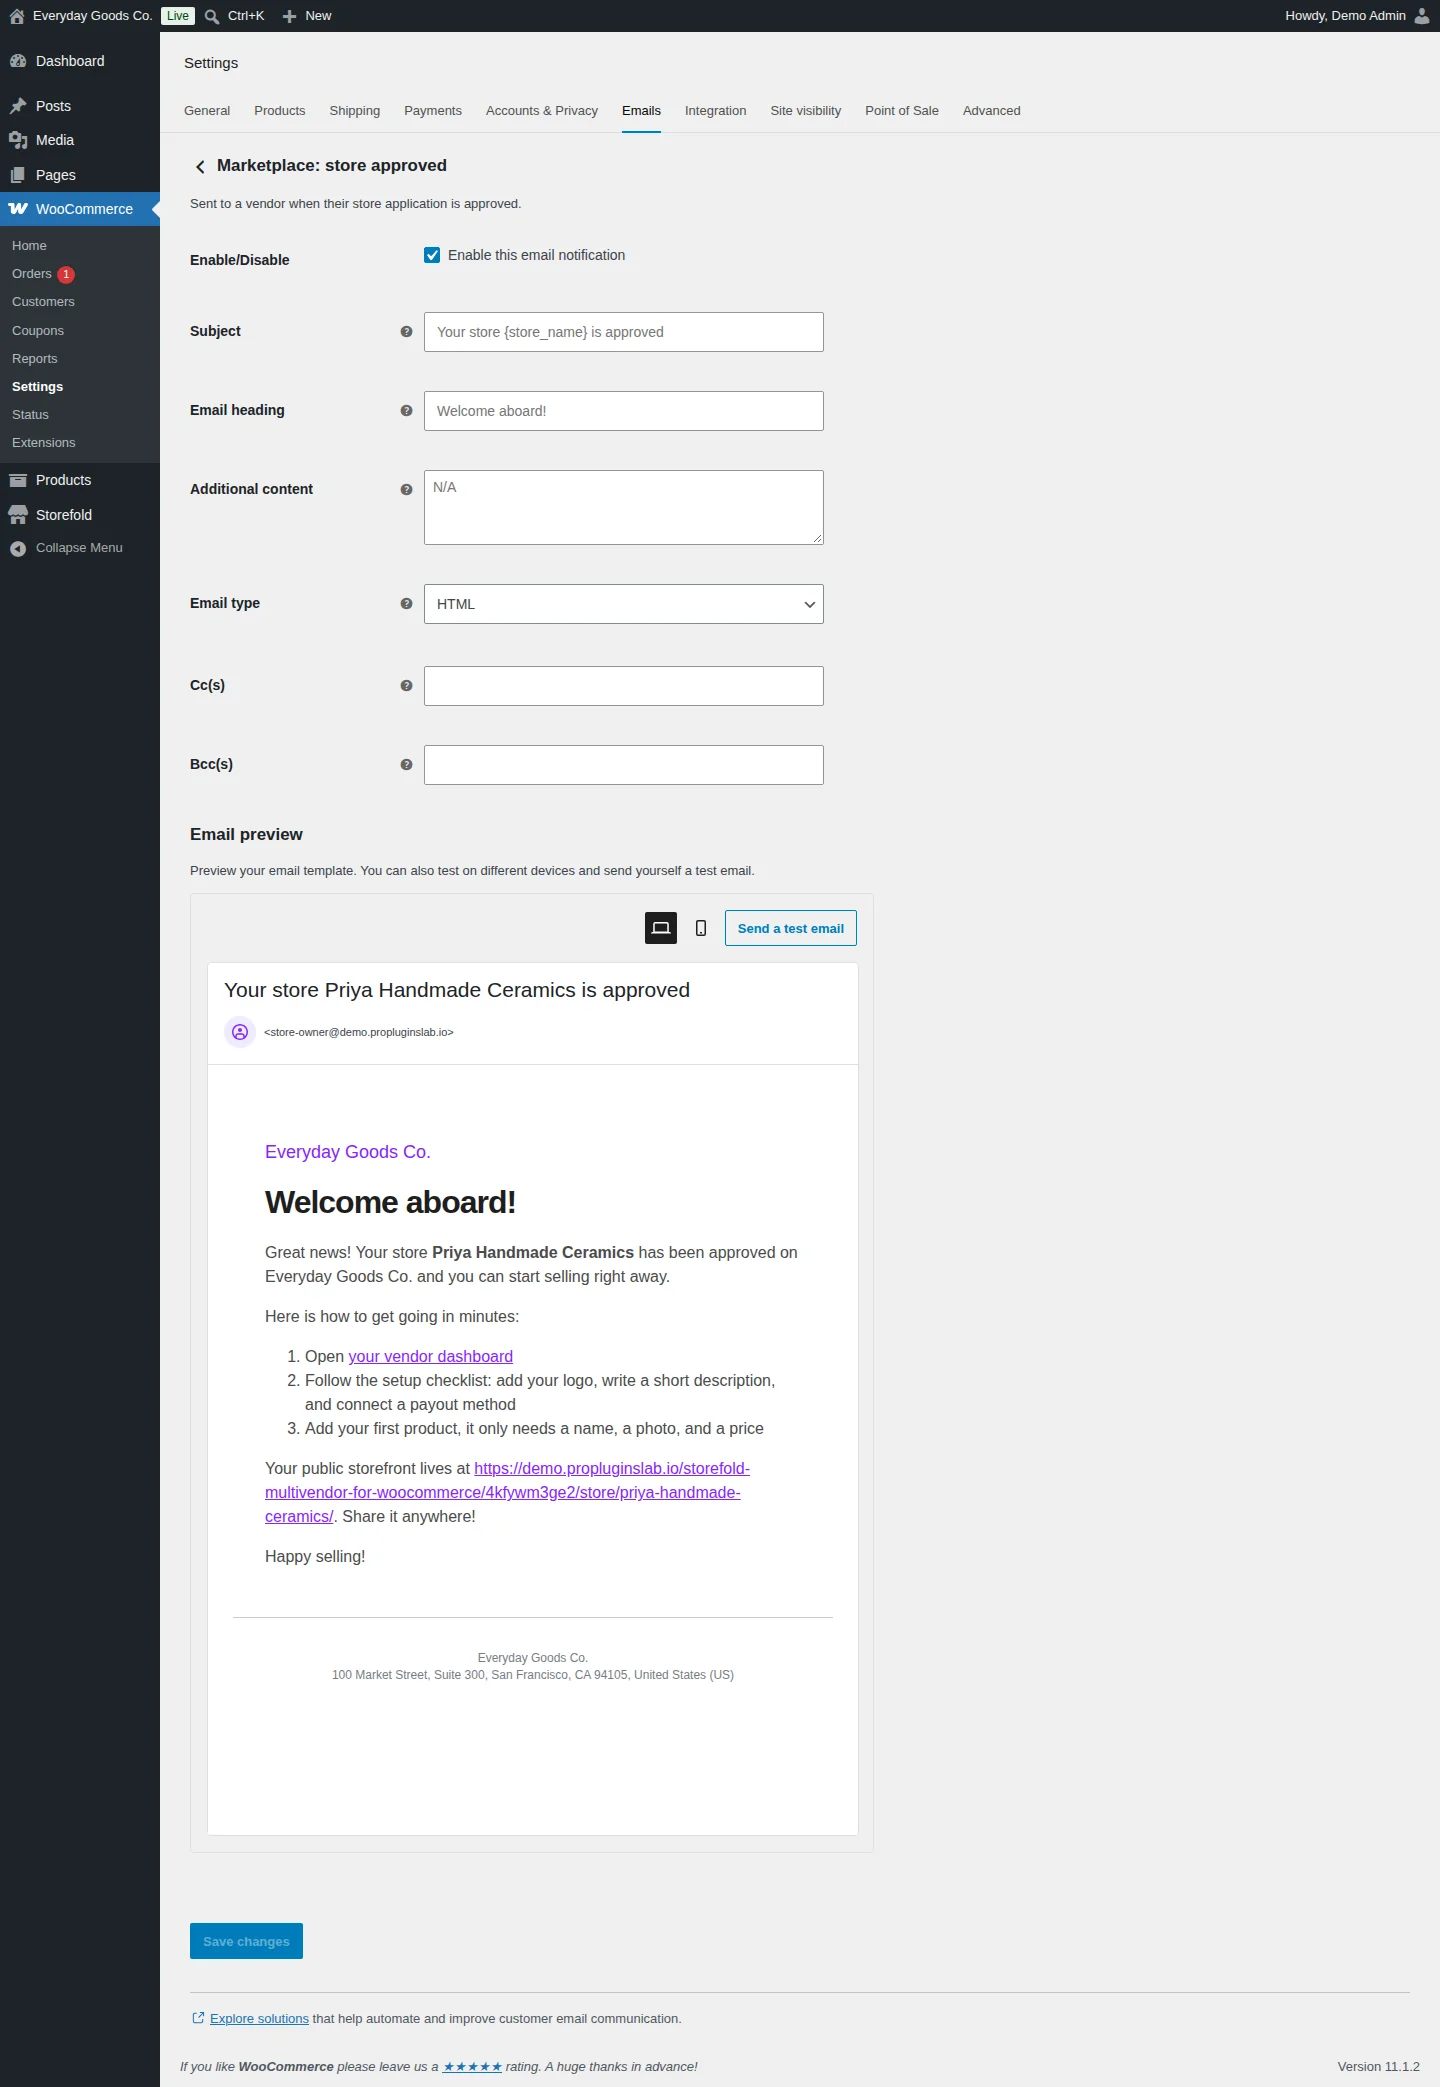
- Marketplace: store approved: sent to a vendor when their store application is approved. It links to the vendor dashboard and the public storefront.
Each email has the standard WooCommerce options: Enable/Disable, Subject, Email heading, Additional content, Email type, Cc(s) and Bcc(s). Emails sent to you also have Recipient(s). The subject and heading fields show the default text as a placeholder and accept placeholders such as {site_title} and {store_name}.
Use Email preview to check the email on desktop or mobile, and Send a test email to receive a copy. Click Save changes to keep your edits.
Settings reference
Storefold > Settings
| Setting | Type | Default | What it does |
|---|---|---|---|
| New vendor applications | radio | I review and approve each application (recommended) |
Options: `I review and approve each application (recommended)` or `Anyone who signs up can start selling right away`. With manual approval, new sellers wait on a pending screen until you approve them under Storefold > Vendors, and they get an email when you do. |
| New vendor products | radio | Go live immediately |
Options: `Go live immediately` or `Wait for my review before going live`. Products waiting for review appear under Products with the Pending status and in the Needs your attention list on the overview. |
| Applicants must accept the seller terms | checkbox | off |
Adds a required checkbox with a link to your seller terms page to the vendor application form. |
| Seller terms | select | - | The page with your seller terms, linked from the required checkbox on the application form. |
| How do you take your cut? | select | Percentage of the sale |
Options: `Percentage of the sale`, `Fixed amount per item` or `Percentage plus a fixed amount`. The percentage applies to the item price after discounts, the fixed amount applies to every unit sold. Your cut is never more than the item price. |
| Your percentage | number | 10 |
The percentage you keep from each sale. |
| Your fixed amount per item | number | 0 |
The fixed amount you keep for every unit sold. |
| Shipping charges go to | select | The vendor (they ship the products) |
Options: `The vendor (they ship the products)` or `Me, the marketplace owner`. Commission is never taken from shipping. When shipping goes to the vendor, their share of the order shipping is added to their earnings. |
| Taxes go to | select | Me, the marketplace owner |
Options: `Me, the marketplace owner` or `The vendor`. Choose Me when the marketplace files the sales tax. Choose The vendor when each seller is responsible for their own tax; their share of the order tax is then added to their earnings. |
| Vendors earn their money when | select | The order is completed (recommended) |
Options: `The order is completed (recommended)` or `Payment is received (order is processing)`. Until then the commission stays pending and cannot be withdrawn. Refunds automatically take the matching amount back. |
| PayPal | checkbox | on |
Lets vendors get paid by PayPal. The vendor enters their PayPal email in their dashboard settings. |
| Bank transfer | checkbox | on |
Lets vendors get paid by bank transfer. The vendor enters their bank account details in their dashboard settings. |
| Stripe (automatic transfer) | checkbox | off |
Pays vendors through Stripe Connect. Needs a Stripe secret key, and each vendor connects their Stripe account from their dashboard settings. |
| Minimum withdrawal amount | number | 50 |
Vendors can only request a payout once their available balance reaches this amount. Keeps transfer fees down. |
| Hold new earnings for | number | 0 |
Number of days. Earnings appear on the vendor balance at once but can only be withdrawn after this many days. 0 releases them instantly. Match it to your refund policy. |
| Stripe secret key | password | - | The secret key from Developers > API keys in your Stripe dashboard, with Connect enabled for a platform or marketplace. For security, the saved key is never shown again. |
| Let vendors sell products that already exist in the catalog, with their own price and stock | checkbox | off |
Product pages then show a "More sellers" box. Each sale goes to the seller the customer picked, and stock is tracked per seller. |
| Slots per pack | number | 0 |
Number of extra product slots in one pack. Set to 0 to turn slot packs off. |
| Pack price | number | 0 |
Price of one slot pack. Lets vendors on a limited plan buy more product slots without upgrading. Slots are a one-time purchase and stack on top of the plan limit. Set to 0 to turn slot packs off. |
| Vendors must be verified before their products can be bought | checkbox | off |
Vendors upload an ID or business licence under Settings in their dashboard. Documents are stored privately and only marketplace managers can open them. Verified stores always show a badge. |
| Let vendors install the dashboard on their phone and get new order alerts | checkbox | on |
Uses your site icon (Appearance > Customize > Site Identity). Alerts work while the dashboard is open, including as an installed app. |
| Webhook URL | url | - | Where marketplace events are sent. Leave empty to switch webhooks off. Addresses on your own network (localhost or private IPs) are refused. |
| Generate a new secret | checkbox | off |
Creates a new signing secret. Each request carries an `X-Storefold-Signature` header with the HMAC SHA-256 of the raw body, so you can check the request came from your site. |
| Show the store name on product pages, shop listings, cart, checkout and orders | checkbox | on |
Shoppers see who they buy from and can click through to the store page. |
| Only customers who bought from a store can review it | checkbox | off |
Stops reviews from people who never bought from the store. Recommended once you have real orders. |
| Vendor dashboard | select | Vendor Dashboard |
The page used as the vendor dashboard. It must contain the `[storefold_vendor_dashboard]` shortcode. |
| Become a vendor | select | Become a Vendor |
The page with the vendor application form. It must contain the `[storefold_vendor_registration]` shortcode. |
| Store directory | select | Stores |
The page that lists all stores. It must contain the `[storefold_store_list]` shortcode. |
| Delete all marketplace data when the plugin is deleted | checkbox | off |
When on, deleting the plugin removes the marketplace tables, settings, the vendor role and the three pages. Commissions and payouts are financial records, so leave this off unless you are sure. Data is always kept while another Storefold edition is installed. |
WooCommerce > Settings > Emails > Marketplace: new vendor application
| Setting | Type | Default | What it does |
|---|---|---|---|
| Enable/Disable | checkbox | on |
Sends this email to the marketplace team when someone applies to become a vendor. |
| Subject | text | - | Email subject. Leave empty to use the default shown as a placeholder: `[{site_title}] New vendor application: {store_name}`. |
| Email heading | text | - | Main heading inside the email. Leave empty to use the default shown as a placeholder. |
| Additional content | textarea | - | Extra text shown below the main email content. |
| Email type | select | HTML |
Options: `Plain text`, `HTML` or `Multipart`. |
| Cc(s) | text | - | Extra addresses that receive a copy. |
| Bcc(s) | text | - | Extra addresses that receive a blind copy. |
| Recipient(s) | text | - | Who receives new vendor applications. |
WooCommerce > Settings > Emails > Marketplace: store approved
| Setting | Type | Default | What it does |
|---|---|---|---|
| Enable/Disable | checkbox | on |
Sends this email to a vendor when their store application is approved. |
| Subject | text | - | Email subject. Leave empty to use the default shown as a placeholder: `Your store {store_name} is approved`. |
| Email heading | text | - | Main heading inside the email. Leave empty to use the default shown as a placeholder. |
| Additional content | textarea | - | Extra text shown below the main email content. |
| Email type | select | HTML |
Options: `Plain text`, `HTML` or `Multipart`. |
| Cc(s) | text | - | Extra addresses that receive a copy. |
| Bcc(s) | text | - | Extra addresses that receive a blind copy. |
Shortcodes
[storefold_vendor_dashboard]
Shows the frontend vendor dashboard where approved sellers manage their store. Select the page that holds it under Storefold > Settings > Marketplace pages > Vendor dashboard.
[storefold_vendor_dashboard][storefold_vendor_registration]
Shows the vendor application form. Select the page that holds it under Storefold > Settings > Marketplace pages > Become a vendor.
[storefold_vendor_registration][storefold_store_list]
Shows the store directory with a search box and a card for each store. Select the page that holds it under Storefold > Settings > Marketplace pages > Store directory.
[storefold_store_list]On your site
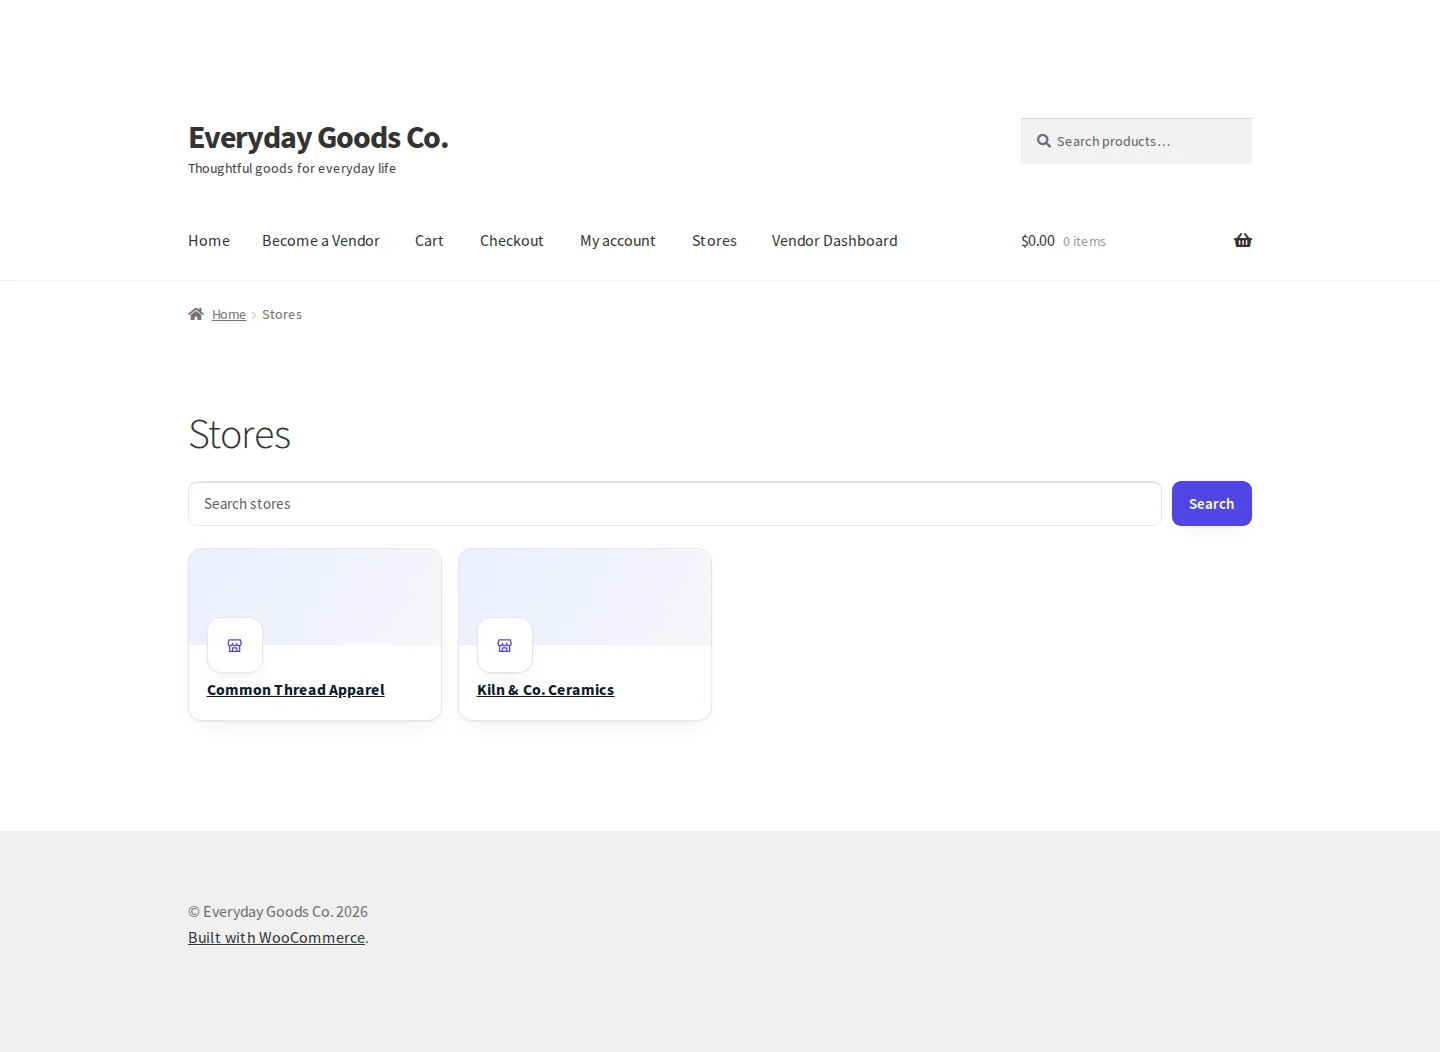
Storefold adds three pages to your site on activation: Vendor Dashboard, Become a Vendor and Stores.
- Stores lists every store as a card. Shoppers can type in Search stores and click Search to find a store, then click a store name to open its store page.
- Each store has its own page at
/store/store-name/. Customers can rate a store from its store page. If you turn on Only customers who bought from a store can review it, only customers with an order from that store can leave a review. - With Show the store name on product pages, shop listings, cart, checkout and orders turned on, shoppers see "Sold by" and the store name under the product title, a short "by" line in shop listings, a "Sold by" line in the cart and checkout, and the store on order lines in their account and in emails.
- When vendors can sell products that already exist in the catalog, product pages show a More sellers box so the customer can pick a seller.
- Verified stores show a badge.
- Become a Vendor shows the application form, and approved sellers use the Vendor Dashboard page to run their store.
Frequently asked questions
Do I need the free edition of Storefold as well?
No. Pro contains everything in the free edition. When you activate Pro while the free edition is active, the free edition is switched off automatically. You can delete it after activating Pro.
Will I lose data when I switch from the free edition to Pro?
No. Both editions share the same tables and settings, so every vendor, order, commission and setting carries over.
What happens to my marketplace data when I delete the plugin?
Nothing, unless you ticked Delete all marketplace data when the plugin is deleted under Storefold > Settings > Data. Data is also kept while another Storefold edition is still installed.
How is my commission calculated?
Per sold item, on the item total after coupons, when the order is placed. You choose a percentage, a fixed amount per item, or both under How do you take your cut?. Your cut is never more than the item price, and it is never taken from shipping or tax. The rule used is saved with each commission row, so later changes do not rewrite history.
When can vendors withdraw their earnings?
Commissions become Earned when the order reaches the status set in Vendors earn their money when. If you set Hold new earnings for, earnings can only be withdrawn after that many days. The available balance also has to reach the Minimum withdrawal amount.
Can I use my administrator account as a vendor?
No. Administrators and shop managers cannot open a store, because every product their account creates would count as that store's. To test the vendor side, apply with a separate account.
Can I move my sellers from another marketplace plugin?
Yes, with a CSV file. Export your sellers from Dokan, WCFM, WC Vendors, MultiVendorX or a spreadsheet and import them under Storefold > Import vendors. Existing vendors are skipped and nothing financial is touched.
Does Storefold send data to outside services?
Only when you use the matching feature. With Stripe payouts enabled, the plugin calls the Stripe API to verify your key, create connected accounts for vendors, create onboarding links, check account status and create transfers. With a webhook URL entered, marketplace events are sent to that URL. No other data leaves your site.
Troubleshooting
- Store pages at /store/store-name/ do not open
Individual store pages need pretty permalinks. Go to Settings > Permalinks in WordPress and choose any option other than Plain, then save. The Pretty permalinks check on Storefold > Overview shows OK when store pages work.
- Vendor shipping rates are not charged at checkout
Vendor shipping has to be added to your WooCommerce shipping zones. Open Storefold > Settings, go to Vendor shipping and click Add vendor shipping to all zones. The Vendor shipping check on the overview shows whether this is done.
- The vendor dashboard, application form or store list does not appear
Under Storefold > Settings > Marketplace pages, check that Vendor dashboard, Become a vendor and Store directory point to the right pages. Each page must contain its shortcode:
[storefold_vendor_dashboard],[storefold_vendor_registration]or[storefold_store_list].- A vendor cannot request a withdrawal
Check three things:
- The commissions are Earned, not Pending. They become earned when the order reaches the status set in Vendors earn their money when.
- The Hold new earnings for period has passed.
- The available balance has reached the Minimum withdrawal amount.
Also make sure at least one payout method is ticked under How vendors can get paid.
- Stripe payouts do not work
In your Stripe dashboard, enable Connect for a platform or marketplace. Copy the secret key from Developers > API keys, paste it into Stripe secret key under Storefold > Settings, and tick Stripe (automatic transfer) under How vendors can get paid. Each vendor then has to click Connect with Stripe in their dashboard settings.
- My webhook URL is refused
For safety, addresses on your own network (localhost or private IPs) are refused. Use a public URL, for example one from Zapier, Make, n8n or your own server.